User Manual
User Manual
User Manual

Create successful ePaper yourself
Turn your PDF publications into a flip-book with our unique Google optimized e-Paper software.
Instruction manual<br />
B230CH-A 60 cm 9 Function<br />
multifunction oven
ELECTRIC SINGLE<br />
OVENS<br />
USER AND INSTALLATION<br />
INSTRUCTIONS
For future reference please record the following<br />
information which can be found on the Rating Plate and<br />
the date of purchase which can be found in the invoice:<br />
Model Number …………………….<br />
Serial Number …………………….<br />
Date of Purchase …………………….<br />
Supplier …………………….
CONTENTS<br />
General Information pages 3-4<br />
Warning and Safety Instructions pages 5-8<br />
Instructions for Use pages 9-11<br />
Electrical Programmer/Temperature Display pages 12-15<br />
Cleaning the Appliance page 16<br />
Removing the oven Door page 17<br />
Instructions for Installation pages 18-23<br />
Replacing the oven light page 24<br />
Trouble shooting Guide pages 25-26<br />
Technical Data page 27<br />
Conditions of Guarantee page 28<br />
Contacting Baumatic page 29
GENERAL INFORMATION<br />
Please read this booklet thoroughly before you use this appliance.<br />
It is important that you understand all the control functions before<br />
commencing to cook with your Baumatic appliance.<br />
Please remember the advice and warnings shown on page 5 which<br />
is headed ‘IMPORTANT – Warning and Safety Instructions’.<br />
This appliance is designed for domestic household use and can be<br />
built into a standard kitchen cabinet or housing unit.<br />
NOTE: The adjacent furniture or the housing and all materials used<br />
in the installation must be able to withstand a minimum<br />
temperature rise of 85°C above ambient during periods of use.<br />
Certain types of vinyl or laminate kitchen furniture are particularly<br />
prone to heat damage or discolouration at temperatures below the<br />
above guidelines.<br />
Installing the appliance in contravention of this temperature limit<br />
or the placing of adjacent cabinet materials closer than 4mm to the<br />
appliance, will be at the liability of the owner.<br />
For use in Leisure Accommodation Vehicles, notice must be taken<br />
of the appropriate statement in the Installation Instructions.<br />
The use for any other purpose or in any other environment without<br />
the express agreement of Baumatic Ltd, would invalidate any<br />
warranty or liability claim.<br />
Your new appliance is guaranteed against electrical or mechanical<br />
defects subject to certain exclusions noted in Baumatic Conditions<br />
of Guarantee.<br />
The foregoing does not affect your statutory rights.<br />
3
4<br />
The Warranty applies to Great Britain and Northern Ireland only.<br />
In the event that you require any After Sales Service or advice,<br />
please contact the Baumatic Service Department on telephone<br />
number – 0118 933 6911.<br />
Before using this appliance ensure that any protective packaging or<br />
coatings have been removed. To aid the protection of the<br />
environment, please sort the packing materials into different types<br />
and dispose of them in accordance with the local waste disposal<br />
laws.<br />
Any further information on waste disposal can be obtained from<br />
your local Environmental Agency office.<br />
When first used, an odour may be emitted by any residual<br />
protective finish or moisture, which will cease after a short period<br />
of time.<br />
This Appliance has been Constructed and Distributed in<br />
compliance with the essential requirements of the following EEC<br />
DIRECTIVES and EUROPEAN NORMS:-<br />
CE Marking – 93/68 Low Voltage – 73/23 EMC – 89/336<br />
Safety Standards – EN 60 335-1, EN 60 335 – 2 – 6.<br />
As Baumatic have a policy of continued product improvement, the<br />
right is reserved to adjust and make any modifications deemed<br />
necessary without notification.
IMPORTANT NOTE –<br />
WARNING AND SAFETY INSTRUCTIONS<br />
Warning: this appliance must be earthed.<br />
This appliance complies with all current European safety<br />
legislation, however Baumatic do wish to emphasise that<br />
compliance does not remove the fact that the appliance surfaces<br />
will become hot during use and retain heat after operation.<br />
Baumatic advise that this appliance is not intended for use by young<br />
children or infirm persons unless they have been adequately supervised<br />
by a responsible person to ensure that they can use the appliance<br />
safely. Young children should be supervised to ensure they do not<br />
play with the appliance. If it is necessary for younger family<br />
members to be in the kitchen, please ensure that they are kept under<br />
close supervision at all times. During use, the appliance becomes hot.<br />
Care should be taken to avoid touching heating elements inside the oven.<br />
WARNING: accessible parts will become hot when in use.<br />
To avoid burns and scalds children should be kept away.<br />
Do not place heavy objects on or lean on the oven door when open<br />
as this can cause damage to the hinges.<br />
Do not leave heated oil or fat unattended as there is a risk of fire.<br />
Do not pour water directly into the inside of a hot oven:<br />
the enamel coating could be damaged.<br />
Do not place pans or baking trays on the bottom of oven cavities or<br />
line any part of the oven cavity with aluminium foil.<br />
Do not allow electrical fittings or cables to be in contact with hot<br />
areas of the appliance.<br />
Do not use the appliance for space heating or to dry clothes.<br />
Do not use a steam cleaner with this appliance.<br />
Do not install the appliance next to curtains or soft furnishings.<br />
Do not attempt to lift or move cooking appliances by pulling on any<br />
door or handle as this can cause damage.<br />
Always use oven gloves when moving food in or out of the oven cavity.<br />
Before any cleaning operation inside the oven, wait until it has cooled<br />
down.<br />
5
NOTE: This appliance must be correctly installed by a suitably<br />
qualified person, strictly in accordance with the manufacturer’s<br />
instructions.<br />
For electrical installations, NICEIC registration is recommended.<br />
Baumatic Ltd declines any responsibility for injury or damage<br />
to persons or property as a result of improper use or installation<br />
of this appliance.<br />
Please note that this appliance carries the CE mark for normal<br />
domestic use and is not suitable for the marine environment.<br />
Heat, steam and moisture will be created during use, take care<br />
to avoid injury and ensure that the room is adequately<br />
ventilated. If prolonged use occurs, additional ventilation may<br />
be required – please consult your Qualified Installer if you are<br />
in any doubt about the amount required.<br />
This appliance is marked according to the European directive<br />
2002/96/EC on Waste electrical and Electronic Equipment (WEEE).<br />
By ensuring this product is disposed of correctly, you will help<br />
prevent potential negative consequences for the environment and<br />
human health, which could otherwise be caused by inappropriate<br />
waste handling of this product.<br />
The symbol on the product, or on the documents<br />
accompanying the product, indicates that this appliance may not<br />
be treated as household waste. Instead it shall be handed over to<br />
the applicable collection point for the recycling of electrical and<br />
electronic equipment.<br />
Disposal must be carried out in accordance with local environmental<br />
regulations for waste disposal.<br />
For more detailed information about treatment, recovery and<br />
recycling of this product, please contact your local city office,<br />
your household waste disposal service or the shop where you<br />
purchased the product.<br />
6
INTRODUCTION<br />
Rating Plate<br />
The rating plate can be located on the right hand side inner frame<br />
of the oven and can be seen when the door is opened. It can also be<br />
found on the top of the oven housing unit.<br />
Do not remove the rating plate from the appliance, as this will<br />
invalidate the guarantee.<br />
Immediately fill in the guarantee card and return to Baumatic in<br />
order to register your new purchase.<br />
FIRST USE<br />
After you have installed your oven it is recommended to put the<br />
oven elements on for approximately 30 minutes at 200 degrees C.<br />
This is done in order to burn off any residue that has been left<br />
behind during manufacturer. Repeat this procedure using different<br />
elements such as the grill function and convectional cooking.<br />
Once this is completed wait until your oven has cooled down and<br />
use warm soapy water and a soft cloth to wipe the interior of your<br />
oven.<br />
HELPFUL HINTS<br />
STEAM<br />
The oven is vented to allow steam to escape. However, it is<br />
recommended to stand back from the appliance when opening the<br />
oven door in order to allow any build up of steam to escape.<br />
If steam comes into contact with cool surfaces on the outside of the<br />
oven, this may cause slight condensation. This is not a fault caused<br />
by the oven and is normal.<br />
7
8<br />
COOLING FAN<br />
The cooling fan comes on after a short period of time when the<br />
grill or any of the oven functions are selected and will remain on<br />
while the oven is in use.<br />
DO NOT turn the oven off at the power point until the cooling fan<br />
has switched off as this may cause damage to surrounding areas.<br />
INDICATOR NEON FOR OVEN AND TEMPERATURE<br />
The oven has a neon indicator on the left of the fascia that will emit<br />
a green light when on. There is also an orange indicator light for<br />
the temperature, which will glow until the oven reaches<br />
temperature. This will function On and Off periodically while<br />
cooking.<br />
COOKING TEMPERATURES<br />
Fan oven cooking generally requires lower temperatures than<br />
conventional cooking. As a guide reduce cooking temperatures by<br />
between 15 and 20 degrees C from conventional oven recipes.<br />
PREHEATING<br />
To get the best performance from your oven it is recommended to<br />
pre-heat the oven prior to use. This is especially important when<br />
baking items such as cakes, breads or Yorkshire Puddings. Without<br />
preheating you may need to add additional time to recipes.<br />
Preheating must always be used when cooking ready meals or<br />
frozen foods.
INSTRUCTIONS FOR USE<br />
These <strong>User</strong> Instructions should be retained for future reference and<br />
for use by a person who is perhaps unfamiliar with the appliance.<br />
The following models are covered by these instructions:<br />
AS8-A B209-A<br />
AS11-A<br />
B190-A<br />
B200-A<br />
B201-A<br />
B205-A<br />
USING THE OVEN<br />
B495-A<br />
B497-A<br />
B550-A<br />
B230CH-A<br />
The oven is controlled thermostatically between 50°C and or<br />
250°C depending on the temperature required.<br />
The mode of cooking desired is selected by using the multifunction<br />
control knob. The functions that can be selected are as follows:<br />
OVEN LIGHT<br />
The oven light remains on whilst the oven is in use.<br />
CONVECTION MODE<br />
This provides traditional cooking with heat from the<br />
top and bottom elements.<br />
TOP ELEMENT MODE (AS11-A, B230CH-A).<br />
This is for gentle cooking, browning or keeping<br />
cooked dishes warm.<br />
LOWER ELEMENT MODE (AS11-A, B230CH-A).<br />
This is for slow cooking or for warming up meals.<br />
9
10<br />
WARNING<br />
FAN OVEN MODE<br />
This provides even heating with the fan and allows<br />
different dishes to be cooked at the same time on<br />
different levels.<br />
FAN ASSIST MODE 1<br />
(all models except AS11-A, B230CH-A)<br />
This provides semi-convection heating with lower<br />
element for delicate dishes.<br />
FAN ASSIST MODE 2<br />
This provides convection heating with upper and<br />
lower elements for even cooking.<br />
GRILL MODE (all featured models except AS11-A)<br />
Select the required temperature by turning the<br />
thermostat regulator clockwise.<br />
FULL GRILL<br />
Same procedure as in previous position, but the grill<br />
element will give you a larger area for grilling.<br />
FAN ASSISTED MAXI GRILL MODE<br />
Using the large grill element and the fan for more<br />
even and crisper grilling of meat, fish or poultry.<br />
DEFROST MODE<br />
The fan runs without heat to reduce the defrost time<br />
for frozen food.<br />
• Ensure that the oven door is kept closed when using the GRILL<br />
and that food is not placed to close to the grill element.<br />
• Do not use aluminium foil to cover the grill pan or heat
• Do not wrap items in aluminium foil and place under the<br />
grill – the high reflectivity of the foil can damage the grill<br />
element.<br />
HELPFUL HINTS<br />
• Before cooking, check that any unused accessories are<br />
removed from the oven.<br />
• Preheat the oven at cooking temperature before use.<br />
• Place cooking trays in the centre of the oven and allow gaps<br />
when using more than one tray for air to circulate.<br />
• Try to open the door as little as possible to view food (the oven<br />
light remains on during cooking).<br />
• Be careful when opening the door to avoid contact with hot<br />
parts and steam.<br />
COOKING GUIDELINES<br />
Please refer to the information on food packaging for guidance on<br />
cooking temperatures and times.<br />
Once you become familiar with the performance of your appliance,<br />
temperatures and times can be varied to suit personal preferences.<br />
Make sure that frozen foods are thoroughly thawed before<br />
cooking, unless instructed otherwise.<br />
It is recommended that you avoid opening the oven door during the<br />
cooking process, should the need arise for the oven door to be opened<br />
then please ensure that you take care to avoid the heat from the oven<br />
when the drop down door is lowered.<br />
11
12<br />
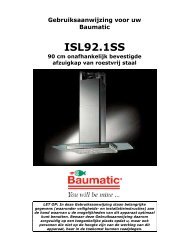
ELECTRONIC PROGRAMMER/ TEMPERATURE DISPLAY<br />
The electronic programmer is a<br />
device, which groups together the<br />
following functions:<br />
- 24 hours clock with illuminated<br />
display<br />
- Timer (up to 23 hours and 59 min.)<br />
- Program for automatic beginning<br />
and end of cooking<br />
- Program for semi-automatic<br />
cooking (either start or finish only)<br />
- Displaying the required<br />
temperature. When selecting a<br />
required temperature, the<br />
temperature is displayed in degrees<br />
C (example: 170’)<br />
Description of buttons<br />
“ TIMER ”<br />
“ COOKING TIME ”<br />
“ END OF COOKING TIME ”<br />
“ MANUAL POSITION ”<br />
“ ADVANCEMENT OF THE NUMBERS OF ALL<br />
PROGRAMS - CHECK THE INSERTED TEMPERATURE”<br />
“ TURNING BACK OF THE NUMBERS OF ALL<br />
PROGRAMS - CHECK THE INSERTED TEMPERATURE”<br />
Description of lighted symbols<br />
« AUTO » - (flashing) - Programmer in automatic position but not<br />
programmed.<br />
« AUTO » - (always lighted) - Programmer in automatic position with<br />
inserted program.
<strong>Manual</strong> cooking taking place<br />
+ A Automatic cooking taking place<br />
+ Timer in operation<br />
NOTE: After having selected the operation, a period of time will<br />
pass (about 3-4 seconds) before confirmation, during which the<br />
data may be modifies.<br />
Digital clock (THE CLOCK MUST BE SET BEFORE OVEN<br />
WILL OPERATE)<br />
Clock numbers show hours (0-24) and minutes. -------<br />
Upon immediate hooking up of the oven or after a blackout, three<br />
zeros will flash on the programmer panel.<br />
To set the hour it is necessary to first push and release the .<br />
button. Then using the “+” or “-” button set the correct time of<br />
the day.<br />
When the actual time is inserted, release the buttons in order to<br />
make function the clock.<br />
<strong>Manual</strong> cooking without using the programmer<br />
To use manually the oven, that is, without the auxiliary<br />
programmer, it is necessary to cancel the flashing «A» by<br />
pushing the button.<br />
If the «A» message is displayed in permanent mode, indicating<br />
that the oven is programmed, it is impossible to set the timer to<br />
manual function and therefore the oven cannot be switched on. In<br />
this case the program must be firstly cancelled by pressing ,<br />
then the manual function can be set. You can now select the<br />
required cooking function and temperature.<br />
Timer<br />
The timer can be used to measure a time period between 1 minute<br />
and 23 hours & 59 minutes.<br />
13
14<br />
1) Automatic cooking (start and end)<br />
Set temperature and cooking program required by using the<br />
thermostat and the selector knobs.<br />
Set the length of cooking time by pushing the button.<br />
Set the end of cooking time by pushing the button.<br />
After this setting the symbol «A» will light.<br />
An example: cooking lasts 45 minutes and is expected to stop at<br />
14.00. First select the required temperature and cooking function by<br />
using the appropriate control knob.<br />
Push and release the press the + button until you have set 0.45.<br />
Push and release the press the + button until you have set 14.00.<br />
After having finished the setting, the clock hour will appear on the<br />
panel and «A» symbol will light. This means the cooking program<br />
has been memorized.<br />
At 13.15 h. (14.00 h. minus 45 minutes) the oven turns on<br />
automatically.<br />
At 14.00 h. the oven turns off automatically, a buzzer goes on until<br />
it is stopped by pushing the button.<br />
The symbol «A» will flash.<br />
2) Semi-automatic cooking<br />
A. Set the length of cooking time<br />
B. Set the end of cooking time<br />
A) Set the length of cooking time by pushing the button.<br />
The oven will turn on immediately, the symbol «A» will light.<br />
When the set cooking time has elapsed, the oven will turn off, a<br />
buzzer will ring until it is stopped as above described.<br />
The symbol «A» will flash.<br />
B) Set the end of cooking time by pushing the button.<br />
The oven will turn on immediately, the symbol «A» will light.<br />
At the set time, the oven will turn off and a buzzer will ring until<br />
it is stopped as above described.<br />
The cooking program may be cancelled at any moment by<br />
pushing the , the oven can work manually.<br />
NOTE: 1) and 2) functions or 1)+ 2) functions are active only<br />
if a cooking function has been selected.
Timer = buzzer<br />
The timer program consists only of a buzzer, which may be set<br />
for a maximum period of 23 hours and 59 min.<br />
To set the timer, push the button and, at the same time, + or -<br />
until you read the desired time on the display.<br />
After the setting, the clock hour and the .symbol will appear.<br />
The countdown will start immediately and may be seen at any<br />
moment on the display by simply pressing the button.<br />
At the end of the set time, the symbol will turn off and the<br />
buzzer will ring until it is stopped by pressing the button.<br />
It is possible to change the sound (3 levels: low - medium - high):<br />
when it sounds, push “-” button.<br />
NOTE: At end of cooking time, the sound beeps every second for<br />
a maximum of 7 minutes. To cancel the beeps press and release<br />
the button.<br />
Cancelling an automatic cooking program<br />
An automatic cooking program can be cancelled whenever by<br />
pushing the button. Now the oven can work manually.<br />
It is advisable not to leave food in the oven for long periods of<br />
time before automatic cooking proceeds. Always ensure<br />
commercially prepared food is well within its use by date and that<br />
home prepared food is fresh and of good quality.<br />
When cooking is complete, do not leave food to stand in oven,<br />
but remove and cool it quickly if the food is not to be consumed<br />
immediately.<br />
(DO NOT PUT HOT FOOD IN THE REFRIGERATOR OR<br />
FREEZER).<br />
15
16<br />
CLEANING THE APPLIANCE<br />
ALWAYS ALLOW THE APPLIANCE TO COOL DOWN<br />
BEFORE CLEANING TO AVOID A BURN INJURY.<br />
Do not use caustic or abrasive agents, coarse wire wool or hard<br />
tools as these can damage the surface finishes.<br />
Normally, wiping with a soft cloth dampened with hot detergent is<br />
sufficient, but for stubborn marks the following is recommended:<br />
VITREOUS ENAMEL PARTS<br />
These parts can be cleaned using an oven cleaner. However contact<br />
with other parts such as catalytic liners, door seal and heating<br />
elements must be avoided as this may cause damage, also avoid<br />
chloride-based products such as bleach.<br />
INNER DOOR GLASS<br />
Do not use any abrasive medium that could cause damage.<br />
Remember that if the surface of the glass panel becomes scratched,<br />
this could lead to a dangerous failure.<br />
To facilitate cleaning, the door glass can be lifted out after<br />
removing the fixing screws.<br />
When refitting, make sure that the glass is correctly seated in the<br />
door recess and the correct way round.<br />
CLEANING THE OUTSIDE OF THE OVEN<br />
Do not use caustic or abrasive agents, course wire wool or hard<br />
tools as they can cause damage to the surface. Clean with warm<br />
soapy water only. If your oven is stainless steel can use a stainless<br />
steel polish.<br />
Scratches caused by use of cleaning agents not recommended by<br />
BAUMATIC LTD will invalidate the guarantee.<br />
When cleaning the oven, the shelves and side racks can be<br />
removed. Remove shelves by pulling forward. The side racks are held<br />
in position by 2 hooks at the top and a securing nut at the bottom.<br />
To remove first compress the lower wire and lift over the securing nut.<br />
Then lift upwards to disengage the top securing hooks.<br />
Care must be taken when cleaning between the door glasses and<br />
inside the inner frame as some of the edges maybe sharp due to<br />
the manufacturing process.
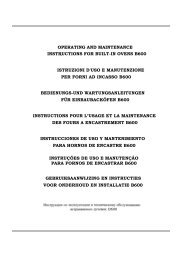
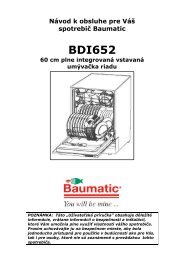
REMOVING THE OVEN DOOR<br />
To facilitate cleaning inside the oven, the door can be removed as<br />
follows:<br />
Hinges “A” are provided with two movable bolts “B”.<br />
When bolt “B” is raised, the hinge is released from its housing.<br />
Having done this, the door must be lifted upwards and removed,<br />
sliding it towards the outside; grip the sides of the door near the<br />
hinges when performing these operations.<br />
To refit the door, firstly slide the hinges into their slots and<br />
open the door fully.<br />
Remember to rotate the two movable bolts “B” used to hook<br />
the two hinges before closing the door. (Fig.1).<br />
WARNING<br />
• Take care not to dislodge<br />
the hinge lock system when<br />
removing the door as the<br />
hinge mechanism has a<br />
strong spring system!<br />
• Do not immerse the door in<br />
water at any time.<br />
Fig. 1<br />
17
18<br />
INSTRUCTIONS FOR INSTALLATION<br />
This appliance must be installed by a competent person, in<br />
accordance with the current version of the following UK<br />
Regulations and Safety Standards or their European Norm<br />
replacements:<br />
Building Regulations (issued by the Department of Environment)<br />
Building Standards (issued by the Scottish Development<br />
Department)<br />
IEE Wiring Regulations<br />
Electricity at Work Regulations<br />
PRE-COMMISSIONING THE APPLIANCE<br />
When unpacked, check that the following parts are included with<br />
the appliance:<br />
• Baumatic Instruction and Installation Book<br />
• Screws and plugs for fixing appliance into housing.<br />
• Grill pan, grill pan handle and grill pan trivet.<br />
• 2 x oven shelves<br />
• Baumatic Guarantee card<br />
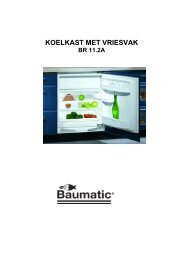
POSITIONING THE APPLIANCE (see Fig. 3 page 20)<br />
These appliances are classified as Class 1.<br />
INSTALLATION NOTES<br />
1. Ensure that the aperture for oven installation is the correct size<br />
as per Fig. 3 page 20.<br />
2. Ensure that the rear panel of the furniture housing has been<br />
removed.
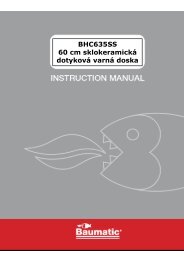
3. All ovens with which this instruction book is provided may be<br />
installed without the need for any additional ventilation<br />
cutouts.<br />
4. Ensure that the oven has been securely fixed into the housing.<br />
The fixing of the oven in the cabinet is made by 4 screws “A”<br />
that on the corner of the oven doorframe.<br />
screws<br />
Fig. 2: Fixing the oven on the cabinet<br />
19
20<br />
Fig. 3: Installation distances for 60cm wide single electric ovens<br />
(Shape of top casing may vary)<br />
A<br />
A<br />
A<br />
A
Fig. 4: Ventilation and cut-out requirements for installation of a<br />
Single electric oven into a standard kitchen unit.<br />
Fig. 5: Ventilation and cut-out requirements for installation of a<br />
Single electric oven into a tall housing unit.<br />
21
22<br />
ELECTRICAL CONNECTION<br />
Before connecting the appliance, make sure the supply voltage<br />
marked on the Rating Plate corresponds with the mains supply<br />
voltage.<br />
WARNING – THIS APPLIANCE MUST BE EARTHED<br />
This appliance should be wired into a 13A double pole switched<br />
fused spur outlet having 3mm contact separation and placed in an<br />
easily accessible position adjacent to the appliance.<br />
This appliance is supplied with and electrical mains lead already<br />
attached to the appliance.<br />
IMPORTANT<br />
The wires in the mains supply lead are coloured in accordance with<br />
the following code:<br />
Green and Yellow - Earth<br />
Blue - Neutral<br />
Brown - Live<br />
The wire coloured Green and Yellow must be connected to the<br />
terminal marked ‘E’ or with the earth symbol (⊥) or coloured green<br />
and yellow.<br />
The wire coloured Blue must be connected to the terminal marked<br />
‘load’ and ‘N’.<br />
The wire coloured Brown must be connected to the terminal<br />
marked ‘load’ and ‘L’.<br />
Care must be taken to ensure that the temperature of the mains<br />
supply lead does not exceed 50°C.
REPLACING THE MAINS LEAD<br />
In the event it is necessary to replace the mains supply lead,<br />
proceed as follows:<br />
1. Disconnect the appliance from the supply, undo the fixing screws<br />
and remove the back panel.<br />
2. Undo the clamp screws and terminal screws to release the<br />
existing lead.<br />
3. Assemble the replacement lead that must conform to the<br />
specification listed in the Technical Data, ensuring the correct<br />
colour code connection and that all screws are tightened correctly.<br />
MAINTENANCE<br />
Before carrying out any maintenance, disconnect the appliance<br />
from the electricity supply.<br />
During the guarantee period, in case of need all service<br />
interventions should be referred back to the Baumatic Ltd<br />
Service department. Please note that intervention or repair by<br />
any unauthorised personnel will invalidate such guarantee.<br />
23
24<br />
REPLACING THE OVEN LIGHT<br />
(Not covered by the appliance warranty)<br />
Disconnect the appliance from the<br />
electricity supply, remove the oven<br />
door (as described previously) as<br />
well as the oven shelves.<br />
Remove the protective glass lightcover<br />
by twisting anti-clockwise.<br />
Unscrew the old bulb and discard<br />
safely, replace with the type<br />
specified in the Technical Data and<br />
refit the cover.<br />
NOTE – The glass cover may be tight and may therefore<br />
require a tight grip to release.<br />
CARE AND REPLACEMENT OF CATALYTIC LINERS<br />
(Where fitted, the liners are not covered by the appliance<br />
warranty).<br />
To keep the ‘stay clean’ liners operating effectively, the oven<br />
should be heated to at least 200°C whenever heavy soiling has<br />
occurred, in order to avoid permanent soiling.<br />
If the liners are allowed to become black and shiny, they must be<br />
replaced by new items. Remove all internal accessories to facilitate<br />
replacement of the liners.<br />
Replacement liners may be purchased directly from the Baumatic<br />
Spares Department (details as per back cover). Please quote<br />
product-type references B600 and/or your appliance’s serial<br />
number when placing your order.
TROUBLE SHOOTING GUIDE<br />
Before calling a Baumatic Engineer please carry out the following<br />
checks, the solution may be listed below and will save you our<br />
customer valuable time.<br />
Should a Baumatic Engineer be called and finds that the fault and<br />
solution is list in this guide then you will be charged for the call<br />
whether or not the appliance is within the guarantee period.<br />
No power to the oven, grill and timer.<br />
Check that the appliance has been connected to the electrical<br />
mains supply correctly.<br />
Check that the mains fuses are in working order.<br />
Check that the operating instructions for the timer have been<br />
followed correctly.<br />
The grill function works but the main oven does not.<br />
Check that the correct cooking function has been selected.<br />
The grill and top oven element is not working or cuts out for<br />
long periods of time during use.<br />
Allow the oven to cool for approximately 2 hours. Once cool<br />
check appliance is now working correctly.<br />
The oven temperature is too high or low.<br />
Ensure that the correct temperatures are being selected. It<br />
may be necessary to adjust temperatures by approximately<br />
10° C to achieve the best cooking results.<br />
25
26<br />
Food is not cooking evenly.<br />
Check that the oven has been installed correctly and is level.<br />
Check that the correct temperatures and shelf positions are<br />
being used.<br />
The oven light fails.<br />
Refer to page 24 replacing the oven light bulb.
DIMENSIONS<br />
Height: 591mm<br />
Width: 597mm<br />
Depth: 525mm<br />
COOLING FAN<br />
TECHNICAL DATA<br />
A tangential cooling fan is fitted on the following models:<br />
AS8-A, AS11-A, B190-A, B200-A, B201-A, B205-A, B209-A,<br />
B230CH-A, B495-A, B497-A, B550-A<br />
ELECTRICAL DETAILS<br />
Rated Voltage: 230V a.c. 50Hz<br />
Supply Connection: 13A (double pole switched fused outlet with<br />
3mm contact gap)<br />
Max Rated Inputs:<br />
AS11-A, B230CH-A 2,38kW<br />
AS8-A, B190-A, B200-A, B201-A, B205-A, B209-A,<br />
B495-A, B497-A, B550-A<br />
2,98kW<br />
Mains supply lead: 3x 1.5mm 2 type H05 RR-F <br />
Oven Light Bulb: 25W/300°C Screw type pigmy<br />
27
Baumatic Ltd. Conditions of guarantee<br />
Dear Customer,<br />
Your new Baumatic appliance comes complete with a free 12 month guarantee covering both parts and<br />
labour costs resulting from defective materials or workmanship.<br />
Baumatic also gives you the opportunity to automatically extend the guarantee period for a further 12<br />
months at no extra cost, giving an initial guarantee period of 24 months. The extended guarantee period<br />
applies to England, Scotland, Wales and Northern Ireland only.<br />
To qualify for your full 24 months guarantee you must register your appliance within 28 days of purchase<br />
to be covered under this guarantee. This can be done online via: www.baumatic.co.uk or through returning<br />
the guarantee card which can be found in each new Baumatic appliance.<br />
* In addition, your appliance is covered by a 5 year parts warranty. Baumatic Ltd will provide free of<br />
charge the parts required to repair the appliance, only if they are fitted by a Baumatic engineer, for any<br />
defect that arises due to faulty materials or workmanship within a period of 5 years from the original<br />
purchase date.<br />
* An additional 1 to 3 year insurance scheme for labour is available should you wish to extend the<br />
warranty period.<br />
Should any person other than an authorised representative of Baumatic Ltd interfere with the appliance, the<br />
policy is negated and Baumatic Ltd will be under no further liability.<br />
The guarantee covers the appliance for normal domestic use only, unless otherwise stated.<br />
Any claims made under the terms of the guarantee must be supported by the original invoice/bill of sale<br />
issued at the time of purchase.<br />
This guarantee is transferable only with the written consent of Baumatic Ltd.<br />
If the appliance fails and is considered either not repairable or uneconomical to repair between 12 months<br />
(2 years if registered) and five years, a free of charge replacement will not be offered.<br />
The guarantee for any replacement will only be for the remainder of the guarantee on the original product<br />
purchased.<br />
The guarantee does not cover:<br />
- Sinks and taps<br />
- Failure to comply with the manufacturers instructions for use.<br />
- The replacement of cosmetic components of accessories<br />
- Accidental damage or wilful abuse.<br />
- Subsequent loss or damage owing to the failure of the appliance or electrical supply<br />
- Incorrect installation<br />
- Losses caused by Acts of God, civil war, failure to obtain spare parts, strikes or lockouts<br />
- Filters, fuses, light bulbs, external hoses, damage to bodywork, paintwork, plastic items, covers,<br />
baskets, trays, shelves, burner bases, burner caps, decals, corrosion, rubber seals.<br />
In the course of the work carried out it may be necessary to remove the appliance from it operating<br />
position. Whilst all reasonable care will be taken, Baumatic Ltd cannot accept responsibility for damage<br />
sustained to any property whatsoever in this process.<br />
This guarantee is in addition to and does not diminish your statutory or legal rights.<br />
Contacting Baumatic Ltd<br />
Sales Service Spares Technical/Advice<br />
TEL: 0118 933 6900 TEL: 0118 933 6911 TEL: 0118 933 6922 0118 933 6933<br />
FAX: 0118 931 0035 FAX: 0118 986 9124 FAX: 0118 933 6942 0118 933 6942<br />
For ROI (Republic of Ireland), please contact one of the numbers below:<br />
TEL: 01 – 6266798 FAX: 01 - 6266634<br />
Thanks you for buying Baumatic.<br />
* Applies to UK, Scotland, Wales & Northern Ireland only (Republic of Ireland has 1 year labour & 1 year parts warranty only)
Headquarters<br />
Baumatic Ltd.<br />
Baumatic Buildings,<br />
6 Bennet Road,<br />
Reading,<br />
Berkshire<br />
RG2 0QX, United Kingdom<br />
Sales Telephone<br />
+44 118 933 6900<br />
Sales Fax<br />
+44 118 931 0035<br />
Service Telephone<br />
+44 118 933 6911<br />
Service Fax<br />
+44 118 986 9124<br />
Spares Telephone<br />
+44 118 933 6922<br />
Technical / Advice Telephone<br />
+44 118 933 6933<br />
E-mail:<br />
sales@baumatic.co.uk<br />
technical@baumatic.co.uk<br />
Http (Internet site):<br />
www.baumatic.com
Environmental note<br />
o The packaging materials that Baumatic uses are environmentally<br />
friendly and can be recycled.<br />
o Please discard all packaging material with due regard for the<br />
environment.
® Baumatic<br />
www.baumatic.com