CD-ROM Drive Unit - Ibm
CD-ROM Drive Unit - Ibm
CD-ROM Drive Unit - Ibm

Create successful ePaper yourself
Turn your PDF publications into a flip-book with our unique Google optimized e-Paper software.
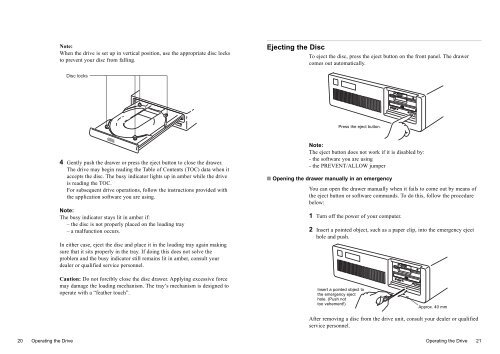
20 Operating the <strong>Drive</strong><br />
Note:<br />
When the drive is set up in vertical position, use the appropriate disc locks<br />
to prevent your disc from falling.<br />
Disc locks<br />
4 Gently push the drawer or press the eject button to close the drawer.<br />
The drive may begin reading the Table of Contents (TOC) data when it<br />
accepts the disc. The busy indicator lights up in amber while the drive<br />
is reading the TOC.<br />
For subsequent drive operations, follow the instructions provided with<br />
the application software you are using.<br />
Note:<br />
The busy indicator stays lit in amber if:<br />
– the disc is not properly placed on the loading tray<br />
– a malfunction occurs.<br />
In either case, eject the disc and place it in the loading tray again making<br />
sure that it sits properly in the tray. If doing this does not solve the<br />
problem and the busy indicator still remains lit in amber, consult your<br />
dealer or qualified service personnel.<br />
Caution: Do not forcibly close the disc drawer. Applying excessive force<br />
may damage the loading mechanism. The tray’s mechanism is designed to<br />
operate with a “feather touch”.<br />
Ejecting the Disc<br />
To eject the disc, press the eject button on the front panel. The drawer<br />
comes out automatically.<br />
Press the eject button.<br />
Note:<br />
The eject button does not work if it is disabled by:<br />
- the software you are using<br />
- the PREVENT/ALLOW jumper<br />
■ Opening the drawer manually in an emergency<br />
You can open the drawer manually when it fails to come out by means of<br />
the eject button or software commands. To do this, follow the procedure<br />
below:<br />
1 Turn off the power of your computer.<br />
2 Insert a pointed object, such as a paper clip, into the emergency eject<br />
hole and push.<br />
Insert a pointed object to<br />
the emergency eject<br />
hole. (Push not<br />
too vehement!)<br />
Approx. 40 mm<br />
After removing a disc from the drive unit, consult your dealer or qualified<br />
service personnel.<br />
Operating the <strong>Drive</strong> 21