Installation Instructions / Warranty - Hansgrohe
Installation Instructions / Warranty - Hansgrohe
Installation Instructions / Warranty - Hansgrohe

Create successful ePaper yourself
Turn your PDF publications into a flip-book with our unique Google optimized e-Paper software.
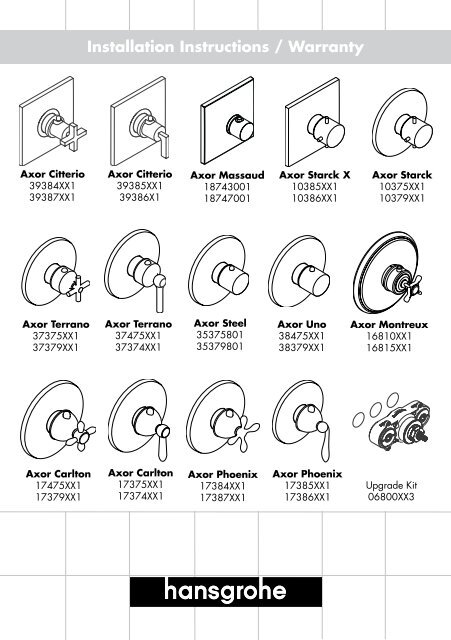
Axor Citterio<br />
39384XX1<br />
39387XX1<br />
Axor Terrano<br />
37375XX1<br />
37379XX1<br />
Axor Carlton<br />
17475XX1<br />
17379XX1<br />
<strong>Installation</strong> <strong>Instructions</strong> / <strong>Warranty</strong><br />
Axor Citterio<br />
39385XX1<br />
39386X1<br />
Axor Terrano<br />
37475XX1<br />
37374XX1<br />
Axor Carlton<br />
17375XX1<br />
17374XX1<br />
Axor Massaud<br />
18743001<br />
18747001<br />
Axor Steel<br />
35375801<br />
35379801<br />
Axor Phoenix<br />
17384XX1<br />
17387XX1<br />
Axor Starck X<br />
10385XX1<br />
10386XX1<br />
Axor Uno<br />
38475XX1<br />
38379XX1<br />
Axor Phoenix<br />
17385XX1<br />
17386XX1<br />
Axor Starck<br />
10375XX1<br />
10379XX1<br />
Axor Montreux<br />
16810XX1<br />
16815XX1<br />
Upgrade Kit<br />
06800XX3
Ecostat / EcoMax Trim Kits<br />
Axor Starck<br />
10375XX1 Ecostat<br />
10379XX1 EcoMax<br />
Axor Starck X<br />
10385XX1 Ecostat<br />
10386XX1 EcoMax<br />
Axor Citterio - Cross Handle<br />
39384XX1 Ecostat<br />
39387XX1 EcoMax<br />
Axor Citterio - Lever Handle<br />
39385XX1 Ecostat<br />
39386XX1 EcoMax<br />
Axor Massaud<br />
18743001 Ecostat<br />
18747001 EcoMax<br />
Axor Steel<br />
35375801 Ecostat<br />
35379801 EcoMax<br />
Axor Uno<br />
38475XX1 EcoStat<br />
38379XX1 EcoMax<br />
<strong>Installation</strong> Considerations<br />
Axor Montreux<br />
16810XX1 Ecostat<br />
16815XX1 EcoMax<br />
Axor Terrano - Cross Handle<br />
37375XX1 Ecostat<br />
37379XX1 EcoMax<br />
Axor Terrano - Lever Handle<br />
37475XX1 Ecostat<br />
37374XX1 EcoMax<br />
Axor Carlton - Cross Handle<br />
17475XX1 Ecostat<br />
17379XX1 EcoMax<br />
Axor Carlton - Lever Handle<br />
17375XX1 Ecostat<br />
17374XX1 EcoMax<br />
Axor Phoenix - Cross Handle<br />
17384XX1 Ecostat<br />
17387XX1 EcoMax<br />
Axor Phoenix - Lever Handle<br />
17385XX1 Ecostat<br />
17386XX1 EcoMax<br />
EcoMax Upgrade Kit<br />
06800XX3<br />
• For best results, <strong>Hansgrohe</strong> recommends that this trim kit be installed by a licensed,<br />
professional plumber.<br />
• Prior to the installation of this trim kit, rough valve 15373181 or 15374181 must be<br />
installed. The finished wall must be complete.<br />
• The water must be turned off at the main before beginning installation.<br />
• The Ecostat TM and Ecomax TM thermoelements incorporate isolation stops and check valves.<br />
These trim kits are compatible with the new style<br />
rough, manufactured after 10/ 003. Note the<br />
more rectangular opening.<br />
ok! no!<br />
5 7/8”<br />
These trim kit are not compatible with the<br />
older-style rough, manufactured before<br />
10/ 003. The opening is too wide to be<br />
covered by the escutcheon.<br />
6 3/4”
10375XX1<br />
10379XX1<br />
39385XX1<br />
39386XX1<br />
35375801<br />
35379801<br />
10385XX1<br />
10386XX1<br />
18743001<br />
18747001<br />
38475801<br />
38379801<br />
39384XX1<br />
39387XX1<br />
37475XX1<br />
37374XX1<br />
16810XX1<br />
16815XX1<br />
3
4<br />
37375XX1<br />
37379XX1<br />
17384XX1<br />
17387XX1<br />
17475XX1<br />
17379XX1<br />
17385XX1<br />
17386XX1<br />
17375XX1<br />
17374XX1
<strong>Installation</strong><br />
Remove the flush insert and the o-rings. Do not<br />
discard the hex-head screws.<br />
Cut the installation box so that it is nearly flush<br />
with the finished wall. Seal around the installation<br />
box with waterproof bathroom sealant.<br />
Install the new o-rings included with the<br />
thermoelement. Install the thermoelement, using<br />
the saved hex-head screws. Turn on the water and<br />
check for leaks.<br />
Install the trim carrier plate with the enclosed<br />
carrier screws.<br />
5
Install the trim sleeve with the indexing mark at the<br />
1 :00 position.<br />
Push the escutcheon firmly over the carrier plate - the<br />
sealing ring around the carrier plate will hold it in<br />
place. Install the handle adapter with the screw.<br />
Install and justify the handle.<br />
Massaud only:<br />
Install the two pieces of the sleeve -- the safety set<br />
and the cover. Orient the safety set as shown in the<br />
illustration.<br />
Install the escutcheon.<br />
Install the handle adapter and screw. Install and<br />
justify the handle.<br />
Justify the handle<br />
Tools required: small slot-head screwdriver, thermometer<br />
Loosen, but do not remove, the set screw on the handle.<br />
Turn the water on to one of the functions. Place the thermometer in the water stream. Turn the<br />
handle until the water is 100 o F. Turn the water off, without moving the thermostatic mixer handle.<br />
Remove the thermostatic mixer handle. Replace it so that the safety stop override button is at the<br />
1 :00 position. Tighten the set screw.<br />
Reverse the Thermoelement<br />
If the Ecostat TM or EcoMax TM outputs both hot and cold water, but the water does not mix, the<br />
supply lines may have been crossed, or the rough valve or thermoelement may have been installed<br />
upside down. This is easily remedied .<br />
Turn the water off to the valve – do not use the stops on the thermoelement.<br />
Remove, reverse, and reinstall the entire thermoelement.<br />
6<br />
indexing<br />
mark
User <strong>Instructions</strong><br />
Turn the handle clockwise to make the water cooler, counter-clockwise to make it warmer.<br />
The handle will stop at the 100 o safety stop. To obtain water hotter than 100 o , push the safety<br />
stop override button and continue turning the handle counter-clockwise.<br />
stops<br />
Using the isolation stops<br />
Turn off the water using the isolation stops on the Ecostat or EcoMax<br />
instead of turning off the water to the whole house when making minor<br />
repairs to the shower.<br />
Use an 8 mm allen wrench to turn the isolation valve clockwise to close<br />
the stop. Be sure to close both the hot and cold stops before removing<br />
the cartridge, etc. Turn a volume control valve on to depressurize the system<br />
and to confirm that the water is off.<br />
The water must be turned off at the main before the entire thermoelement can be removed.<br />
EcoMax TM Upgrade Kit 06800XX3<br />
<strong>Installation</strong> Considerations<br />
The EcoMax TM upgrade kit contains an EcoMax TM function block, trim sleeve, and screws. It is<br />
used to upgrade an existing Ecostat TM installation.<br />
Install the EcoMax TM Upgrade Kit<br />
Turn the water off to the valve before proceeding.<br />
Do not use the stops on the thermoelement.<br />
Remove the trim. Set it aside in a safe place.<br />
Remove the Ecostat TM thermoelement and the o-rings.<br />
Install the EcoMax TM thermoelement and o-rings Use<br />
the screws provided with the EcoMax TM upgrade kit.<br />
Turn on the water to the valve and check for leaks.<br />
Replace the trim as shown in the previous instructions<br />
EXCEPT use the included EcoMax TM trim sleeve.<br />
Justify the handle.<br />
7
Set the High Temperature Limit Stop (optional)<br />
IMPORTANT: Many municipalities have codes limiting the maximum discharge temperature of a<br />
shower valve to 110 o F or less. Please know and follow all applicable local codes when setting<br />
the high temperature limit stop.<br />
Tools Required:<br />
Thermometer<br />
3 mm Allen wrench (included with trim kit)<br />
Turn the hot and cold supplies to the valve on.<br />
Turn the water on using the handle.<br />
Use the 3 mm Allen wrench to loosen the set screw on the bottom of the handle. Remove the<br />
handle.<br />
Remove the clip and stop ring from the thermostatic cartridge stem. Put them in a safe place.<br />
Turn the thermostatic mixer stem with your fingers, clockwise to make the water cooler, counterclockwise<br />
to make the water warmer. Turn the stem until the water coming out is the desired<br />
maximum high temperature – 110 o in most areas.<br />
Reinstall the stop ring so that it is against the stop. Reinstall the clip.<br />
Justify and reinstall the handle.<br />
8
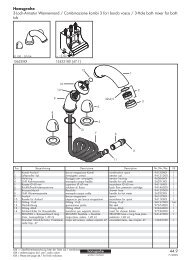
Replacement Parts<br />
7<br />
b<br />
6<br />
5<br />
c<br />
8<br />
4a<br />
9<br />
1i<br />
1h<br />
4b<br />
10<br />
1k<br />
1m<br />
1j<br />
11<br />
3<br />
a<br />
1<br />
d<br />
14<br />
1c<br />
1f<br />
1g<br />
e<br />
1b<br />
1a<br />
13<br />
1e<br />
1n<br />
1d<br />
9
1a Citterio cross handle 39994XX1<br />
1b Citterio lever handle 39391XX1<br />
1c Starck handle 10391XX1<br />
1d Steel handle 35391801<br />
1e Terrano handle, lever 37391XX1<br />
1f Terrano handle, cross 37994XX1<br />
1g Uno handle 38391XX1<br />
1h Carlton handle, cross 17994XX1<br />
1i Carlton handle, lever 17391XX1<br />
1j Phoenix handle, cross 96631XX1<br />
1k Phoenix handle, lever 96791XX1<br />
1m Montreux handle 16594XX1<br />
1n Massaud handle 18097000<br />
a Escutcheon, Citterio 96749XX0<br />
b Escutcheon, round 9645 XX0<br />
c Escutcheon, Montreux 98648XX0<br />
d Escutcheon, square 97449XX0<br />
e Escutcheon, Massaud 98678000<br />
3 Ecostat TM sleeve 9503 XX0<br />
EcoMax TM sleeve 96635XX0<br />
4a Ecostat TM cartridge 94 8 000<br />
4b EcoMax TM cartridge 96633000<br />
10<br />
5 check valve 95033000<br />
6 isolation stop 95036000<br />
7 seals 96364000<br />
8 seals 95037000<br />
9 seals 96636000<br />
10 carrier plate 96447000<br />
11 carrier plate screw 96454001<br />
1 handle adapter 97108000<br />
13 Massaud handle adapter 98701001<br />
14 Massaud sleeve 98734001<br />
XX = color<br />
00 = chrome<br />
09 = chrome/gold<br />
4 = platinum<br />
80 = steel<br />
81 = satinox<br />
8 = brushed nickel<br />
83 = polished nickel<br />
93 = polished brass
Cleaning Recommendation for <strong>Hansgrohe</strong> Products<br />
Modern faucetry and shower products utilize a combination of materials to comply with the needs of the market with regard to<br />
design and functionality.<br />
To avoid damage, it is necessary to use some caution when cleaning. Damage caused by improper treatment is not covered<br />
under the <strong>Hansgrohe</strong> warranty.<br />
Cleaning Materials for Faucets and Showers<br />
• To remove lime scale, use only products made specifically for that purpose. Always follow the manufacturer’s instructions<br />
when using.<br />
• Do not use cleaners that contain hydrochloric, formic, acetic, or phosphoric acids, as these will cause considerable damage<br />
to finishes and to plastic components.<br />
• Never mix cleaning materials.<br />
• Never use cleaners containing abrasives. Do not use abrasive cleaning cloths, pads, or sponges.<br />
Cleaning Procedures<br />
• Clean your faucets and shower products as and when required. Regular cleaning will prevent scale buildup and water<br />
spotting.<br />
• Follow the label instructions. Do not allow any cleaner to remain on the product for longer than necessary.<br />
• When using spray cleaners, spray first onto a sponge or cloth – do not spray directly onto the product.<br />
• After cleaning, rinse thoroughly with clear water to remove any cleaner residue.<br />
Important<br />
• Soap and shampoo residue can also cause damage to the product. Rinse well with clean water after use.<br />
• If the surface is already damaged, harsh cleaning materials will cause further damage.<br />
Limited Lifetime Consumer <strong>Warranty</strong><br />
This product has been manufactured and tested to the highest quality standards by <strong>Hansgrohe</strong>, Inc. (“<strong>Hansgrohe</strong>”). This warranty is limited to <strong>Hansgrohe</strong><br />
products which are purchased by a consumer in the United States after March 1, 1996, and installed in either the United States or Canada.<br />
WHO IS COVERED BY THE WARRANTY<br />
This warranty extends to the original consumer purchaser only. This warranty is non-transferable.<br />
WHAT IS COVERED BY THE WARRANTY<br />
This warranty covers only your <strong>Hansgrohe</strong> manufactured product. <strong>Hansgrohe</strong> warrants this product against defects in material or workmanship as<br />
follows: <strong>Hansgrohe</strong> will repair at no charge for parts only or, at its option, replace any product or part of the product that proves defective because of<br />
improper workmanship and/or material, under normal installation, use, service and maintenance. If <strong>Hansgrohe</strong> is unable to provide a replacement<br />
and repair is not practical or cannot be timely made, <strong>Hansgrohe</strong> may elect to refund the purchase price in exchange for the return of the product.<br />
LENGTH OF WARRANTY<br />
Replacement or repaired parts of products will be covered for the term of this warranty as stated in the following two sentences. If you are a consumer<br />
who purchased the product for use primarily for personal, family, or household purposes, this warranty extends for as long as you own the product<br />
and the home in which the product is originally installed. If you purchased the product for use primarily for any other purpose, including, without<br />
limitation, a commercial purpose, this warranty extends only (i) for 1 year, with respect to <strong>Hansgrohe</strong> and Commercial products, and (ii) for 5 years,<br />
with respect to AXOR products.<br />
THIS WARRANTY DOES NOT COVER, AND HANSGROHE WILL NOT PAY FOR:<br />
A. Conditions, malfunctions or damage not resulting from defects in material or workmanship.<br />
B. Conditions, malfunctions or damage resulting from (1) normal wear and tear, improper installation, improper maintenance, misuse, abuse,<br />
negligence, accident or alteration, or ( ) the use of abrasive or caustic cleaning agents or “no-rinse” cleaning products, or the use of the product<br />
in any manner contrary to the product instructions. (3) Conditions in the home such as excessive water pressure or corrosion.<br />
C. Labor or other expenses for the disconnection, deinstallation, or return of the product for warranty service, or for installation or reinstallation of<br />
the product (including but not limited to proper packaging and shipping costs), or for installation or reinstallation of the product.<br />
11
D. Accessories, connected materials and products, or related products not manufactured by <strong>Hansgrohe</strong>.<br />
TO OBTAIN WARRANTY PARTS OR INFORMATION<br />
Contact your <strong>Hansgrohe</strong> retailer, or contact Technical Service at:<br />
<strong>Hansgrohe</strong> Inc.<br />
149 Bluegrass Lakes Parkway<br />
Alpharetta GA 30004<br />
Toll-free (800) 334-0455.<br />
In requesting warranty service, you will need to provide<br />
1. The sales receipt or other evidence of the date and place of purchase.<br />
. A description of the problem.<br />
3. Delivery of the product or the defective part, postage prepaid and carefully packed and insured, to <strong>Hansgrohe</strong> Inc. 149 Bluegrass Lakes<br />
Parkway, Alpharetta, Georgia 30004, Attention: Technical Service, if required by <strong>Hansgrohe</strong>.<br />
When warranty service is completed, any repaired or replacement product or part will be returned to you postage prepaid.<br />
EXCLUSIONS AND LIMITATIONS<br />
REPAIR OR REPLACEMENT (OR, IN LIMITED CIRCUMSTANCES, REFUND OF THE PURCHASE PRICE) AS PROVIDED UNDER THIS WARRANTY IS<br />
THE EXCLUSIVE REMEDY OF THE PURCHASER. HANSGROHE NEITHER ASSUMES NOR AUTHORIZES ANY PERSON TO CREATE FOR IT ANY<br />
OBLIGATION OR LIABILITY IN CONNECTION WITH THIS PRODUCT.<br />
HANSGROHE SHALL NOT BE LIABLE TO PURCHASER OR ANY PERSON FOR ANY INCIDENTAL, SPECIAL, OR CONSEQUENTIAL DAMAGES,<br />
ARISING OUT OF BREACH OF THIS WARRANTY OR ANY IMPLIED WARRANTY (INCLUDING MERCHANTABILITY).<br />
Some States do not allow the exclusion or limitation of incidental or consequential damages, so the above limitation or exclusion may not apply to<br />
you. This warranty gives you specific legal rights, and you may have other rights which vary from State to State. You may be required by law to give<br />
us a reasonable opportunity to correct or cure any failure to comply before you can bring any action in court against us under the Magnuson-Moss<br />
<strong>Warranty</strong> Act.<br />
PRODUCT INSTRUCTIONS AND QUESTIONS<br />
Upon purchase or prior to installation, please carefully inspect your <strong>Hansgrohe</strong> product for any damage or visible defect. Prior to installing, always<br />
carefully study the enclosed instructions on the proper installation and the care and maintenance of the product. If you have questions at any time about<br />
the use, installation, or performance of your <strong>Hansgrohe</strong> product, or this warranty, please call or write to us or call us toll-free at 800 334 0455.<br />
<strong>Hansgrohe</strong>, Inc. • 1490 Bluegrass Lakes Parkway • Alpharetta, GA 30004<br />
Tel. 770 360-9880 • Fax 770 360 9887<br />
www.hansgrohe-USA.com<br />
US - <strong>Installation</strong> <strong>Instructions</strong> • Part No.90500004 • Revised 05/ 007