FONIX® FA-10 Hearing Evaluator™ - Frye Electronics
FONIX® FA-10 Hearing Evaluator™ - Frye Electronics
FONIX® FA-10 Hearing Evaluator™ - Frye Electronics
You also want an ePaper? Increase the reach of your titles
YUMPU automatically turns print PDFs into web optimized ePapers that Google loves.
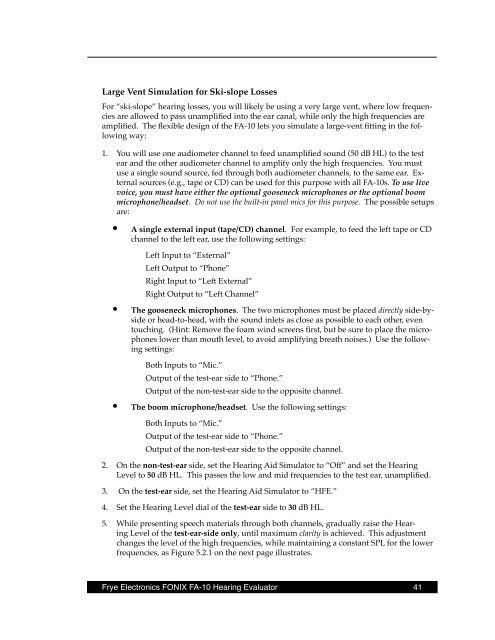
Large Vent Simulation for Ski-slope Losses<br />
For “ski-slope” hearing losses, you will likely be using a very large vent, where low frequencies<br />
are allowed to pass unamplified into the ear canal, while only the high frequencies are<br />
amplified. The flexible design of the <strong>FA</strong>-<strong>10</strong> lets you simulate a large-vent fitting in the following<br />
way:<br />
1. You will use one audiometer channel to feed unamplified sound (50 dB HL) to the test<br />
ear and the other audiometer channel to amplify only the high frequencies. You must<br />
use a single sound source, fed through both audiometer channels, to the same ear. External<br />
sources (e.g., tape or CD) can be used for this purpose with all <strong>FA</strong>-<strong>10</strong>s. To use live<br />
voice, you must have either the optional gooseneck microphones or the optional boom<br />
microphone/headset. Do not use the built-in panel mics for this purpose. The possible setups<br />
are:<br />
• A single external input (tape/CD) channel. For example, to feed the left tape or CD<br />
channel to the left ear, use the following settings:<br />
Left Input to “External”<br />
Left Output to “Phone”<br />
Right Input to “Left External”<br />
Right Output to “Left Channel”<br />
• The gooseneck microphones. The two microphones must be placed directly side-byside<br />
or head-to-head, with the sound inlets as close as possible to each other, even<br />
touching. (Hint: Remove the foam wind screens first, but be sure to place the microphones<br />
lower than mouth level, to avoid amplifying breath noises.) Use the following<br />
settings:<br />
Both Inputs to “Mic.”<br />
Output of the test-ear side to “Phone.”<br />
Output of the non-test-ear side to the opposite channel.<br />
• The boom microphone/headset. Use the following settings:<br />
Both Inputs to “Mic.”<br />
Output of the test-ear side to “Phone.”<br />
Output of the non-test-ear side to the opposite channel.<br />
2. On the non-test-ear side, set the <strong>Hearing</strong> Aid Simulator to “Off” and set the <strong>Hearing</strong><br />
Level to 50 dB HL. This passes the low and mid frequencies to the test ear, unamplified.<br />
3. On the test-ear side, set the <strong>Hearing</strong> Aid Simulator to “HFE.”<br />
4. Set the <strong>Hearing</strong> Level dial of the test-ear side to 30 dB HL.<br />
5. While presenting speech materials through both channels, gradually raise the <strong>Hearing</strong><br />
Level of the test-ear-side only, until maximum clarity is achieved. This adjustment<br />
changes the level of the high frequencies, while maintaining a constant SPL for the lower<br />
frequencies, as Figure 5.2.1 on the next page illustrates.<br />
<strong>Frye</strong> <strong>Electronics</strong> FONIX <strong>FA</strong>-<strong>10</strong> <strong>Hearing</strong> Evaluator 41


