Installing The Java JDK and JCreator
Installing The Java JDK and JCreator
Installing The Java JDK and JCreator

Create successful ePaper yourself
Turn your PDF publications into a flip-book with our unique Google optimized e-Paper software.
<strong>Installing</strong> <strong>The</strong> <strong>Java</strong> <strong>JDK</strong> <strong>and</strong> <strong>JCreator</strong><br />
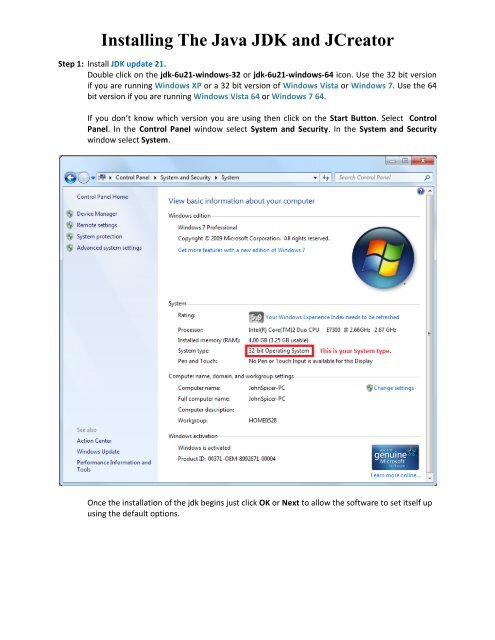
Step 1: Install <strong>JDK</strong> update 21.<br />
Double click on the jdk-6u21-windows-32 or jdk-6u21-windows-64 icon. Use the 32 bit version<br />
if you are running Windows XP or a 32 bit version of Windows Vista or Windows 7. Use the 64<br />
bit version if you are running Windows Vista 64 or Windows 7 64.<br />
If you don’t know which version you are using then click on the Start Button. Select Control<br />
Panel. In the Control Panel window select System <strong>and</strong> Security. In the System <strong>and</strong> Security<br />
window select System.<br />
Once the installation of the jdk begins just click OK or Next to allow the software to set itself up<br />
using the default options.
Step 2: Install the <strong>JDK</strong> help files.<br />
This could take an hour or more depending on your system. Double click on<br />
A window will open that has one folder in it.<br />
Click on Start <strong>and</strong> My Computer. An instance of My Computer will open. Click on the C: drive<br />
<strong>and</strong> then on Program Files. Locate the <strong>Java</strong> folder. Click on the <strong>Java</strong> folder then click on the<br />
jdk1.6.0.21 folder. Now drag the docs folder from the first folder <strong>and</strong> drop it into the<br />
jdk1.6.0.21 folder. It will take quite a while for the computer to copy all the files. Be patient.<br />
2
Step 3: Install <strong>JCreator</strong>.<br />
If you are using Windows Vista or Windows 7 you need to start the install program as an<br />
administrator. Right click on the jcrea450-setupLE icon <strong>and</strong> select Run as administrator. If you<br />
are using Windows XP just double click on the jcrea450-setupLE icon. Use all the default<br />
settings. <strong>JCreator</strong> will locate the jdk <strong>and</strong> the jdk help files.<br />
Step 4: Configuring <strong>JCreator</strong>.<br />
Start <strong>JCreator</strong>. From the menu bar select Configure <strong>and</strong> then Options…. In the Options dialog<br />
window select <strong>JDK</strong> Tools on the left <strong>and</strong> Run Application in the Select Tool Type drop down list<br />
box on the left. Click on in the list box. Click on the Edit… button.<br />
Remove the check mark from Capture output. Click on OK.<br />
3