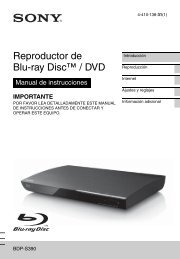
Additional Information for Using Sony Wall-Mount Bracket (SU-WL100)
Additional Information for Using Sony Wall-Mount Bracket (SU-WL100)
Additional Information for Using Sony Wall-Mount Bracket (SU-WL100)

You also want an ePaper? Increase the reach of your titles
YUMPU automatically turns print PDFs into web optimized ePapers that Google loves.
<strong>Additional</strong> <strong>In<strong>for</strong>mation</strong> <strong>for</strong><br />
<strong>Using</strong> <strong>Sony</strong> <strong>Wall</strong>-<strong>Mount</strong> <strong>Bracket</strong> (<strong>SU</strong>-<strong>WL100</strong>)<br />
Compatible TV models <strong>for</strong> this <strong>Wall</strong>-<strong>Mount</strong> <strong>Bracket</strong> in<strong>for</strong>mation:<br />
KDL-26L5000<br />
KDL-22L5000<br />
For product protection and safety reasons, <strong>Sony</strong> strongly recommends that you use the<br />
<strong>Wall</strong>-<strong>Mount</strong> <strong>Bracket</strong> model designed <strong>for</strong> your TV and that the wall-mounting of your TV<br />
is per<strong>for</strong>med by <strong>Sony</strong> dealers or licensed contractors.<br />
To Customers<br />
Please provide your licensed contractor with this installation supplement as well as the instructions<br />
(supplied with the <strong>SU</strong>-WL 00 <strong>Wall</strong>-<strong>Mount</strong> <strong>Bracket</strong>). Read these documents carefully <strong>for</strong> safety and proper<br />
installation.<br />
To <strong>Sony</strong> Dealers and Contractors<br />
Provide full attention to safety during the installation, periodic maintenance and examination of this<br />
product.<br />
Sufficient expertise is required in installing this product, especially to determine the strength<br />
of the wall <strong>for</strong> withstanding the TV’s weight. Be sure to entrust the attachment of this product<br />
to the wall to <strong>Sony</strong> dealers or licensed contractors and pay adequate attention to safety during<br />
the installation. <strong>Sony</strong> is not liable <strong>for</strong> any damage or injury caused by mishandling or improper<br />
installation.<br />
For proper installation, follow your wall-mount bracket instructions and the directions below.<br />
<strong>Additional</strong> <strong>In<strong>for</strong>mation</strong> <strong>for</strong> <strong>Using</strong> <strong>Sony</strong> <strong>Wall</strong>-<strong>Mount</strong> <strong>Bracket</strong> (<strong>SU</strong>-<strong>WL100</strong>)<br />
− −<br />
A-DAE- 00-12( )
Step 1: Checking the parts required <strong>for</strong> the installation<br />
Open the <strong>Wall</strong>-<strong>Mount</strong> <strong>Bracket</strong> package and check the contents <strong>for</strong> all required parts along with the<br />
Instructions.<br />
Step 2: Adjusting the position of the holders of the Base Plate<br />
Follow the same procedure as <strong>for</strong> a 0 inch TV.<br />
Refer to the Instructions <strong>for</strong> <strong>SU</strong>-<strong>WL100</strong>.<br />
Step 3: Deciding on the installation location<br />
Decide where you want to install your TV. Refer to the TV installation dimensions table.<br />
Refer to the Instructions <strong>for</strong> <strong>SU</strong>-<strong>WL100</strong>.<br />
Dimension Table<br />
Screen center point<br />
<strong>Additional</strong> <strong>In<strong>for</strong>mation</strong> <strong>for</strong> <strong>Using</strong> <strong>Sony</strong> <strong>Wall</strong>-<strong>Mount</strong> <strong>Bracket</strong> (<strong>SU</strong>-<strong>WL100</strong>)<br />
− −<br />
Unit: inches (mm)<br />
Model Name Display Screen center Length <strong>for</strong> each mounting angle<br />
dimensions dimensions Angle (0°) Angle (20°)<br />
<br />
KDL-26L5000<br />
KDL-22L5000<br />
26 3 /4<br />
(679)<br />
22<br />
(558)<br />
17 1 /4<br />
(435)<br />
14 5 /8<br />
(370)<br />
3 7 /8<br />
(98)<br />
5 1 /4<br />
(133)<br />
12 5 /8<br />
(318)<br />
13<br />
(330)<br />
6 1 /8<br />
(154)<br />
5 5 /8<br />
(140)<br />
Figures in the above table may differ slightly depending on the installation.<br />
10 1 /4<br />
(258)<br />
8 5 /8<br />
(219)<br />
16 3 /8<br />
(411)<br />
13 7 /8<br />
(350)<br />
12 3 /4<br />
(323)<br />
13<br />
(329)<br />
CAUTION<br />
The wall that the TV will be installed on should be capable of supporting a weight of at least four times that of the TV.<br />
Refer to your TV’s operating instructions <strong>for</strong> its weight.<br />
Step 4: Installing the Base Plate on the wall<br />
Refer to the Instructions <strong>for</strong> <strong>SU</strong>-<strong>WL100</strong>.
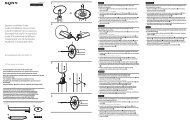
Step 5: Preparing the TV <strong>for</strong> wall mount installation<br />
Follow the steps below to prepare <strong>for</strong> installing the TV.<br />
1 Disconnect all the cables from the TV.<br />
2 Align the holes on the left <strong>Mount</strong>ing Hook with the corresponding holes on the<br />
rear of the TV.<br />
Secure them to the TV using two screws (supplied with <strong>SU</strong>-WL 00).<br />
When using an electric screwdriver to tighten the screws, the torque must be approximately<br />
.5 N·m ( 5 kgf·cm). Do not lift the <strong>Mount</strong>ing Hook be<strong>for</strong>e the screws (two screws each <strong>for</strong><br />
left/right) are secured.<br />
<strong>Additional</strong> <strong>In<strong>for</strong>mation</strong> <strong>for</strong> <strong>Using</strong> <strong>Sony</strong> <strong>Wall</strong>-<strong>Mount</strong> <strong>Bracket</strong> (<strong>SU</strong>-<strong>WL100</strong>)<br />
− −<br />
Screw<br />
(+PSW 4 × 12)<br />
<strong>Mount</strong>ing Hook<br />
Hook locations diagram<br />
KDL- 6L5000: Install the TV onto the location “a” of the Base Plate.<br />
KDL- L5000: Install the TV onto the location “b” of the Base Plate.<br />
a<br />
b
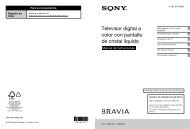
3 Adjust the angle of the <strong>Mount</strong>ing Hook.<br />
<strong>Mount</strong>ing Hook<br />
4 Align the holes on the right <strong>Mount</strong>ing Hook with the corresponding holes on<br />
the rear of the TV.<br />
Secure them to the TV using two screws (supplied with <strong>SU</strong>-WL 00).<br />
Screw<br />
(+PSW 4 × 12)<br />
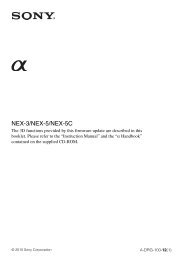
Step 6: Installing the TV on the Base Plate<br />
Refer to the Instructions <strong>for</strong> <strong>SU</strong>-<strong>WL100</strong>.<br />
<strong>Additional</strong> <strong>In<strong>for</strong>mation</strong> <strong>for</strong> <strong>Using</strong> <strong>Sony</strong> <strong>Wall</strong>-<strong>Mount</strong> <strong>Bracket</strong> (<strong>SU</strong>-<strong>WL100</strong>)<br />
− −<br />
Arm<br />
<strong>Mount</strong>ing Hook<br />
1 Connect the AC power cord and cables to the corresponding inputs on the rear<br />
of the TV.<br />
For details on the cable connection, refer to the Operating Instructions <strong>for</strong> your TV.<br />
2 Install the TV onto the Base Plate.