Cs120 - Niles Audio
Cs120 - Niles Audio
Cs120 - Niles Audio

You also want an ePaper? Increase the reach of your titles
YUMPU automatically turns print PDFs into web optimized ePapers that Google loves.
IntroduCtIon<br />
The cs120 is a ceiling mounted IR sensor designed<br />
for use with the <strong>Niles</strong> infrared extender systems.<br />
Installed in a remote room location, the cs120<br />
receives the IR commands transmitted from your<br />
existing hand-held remotes in that room. The<br />
commands are carried via a category 5 cable to<br />
your A/V equipment in another room, and instantly<br />
“repeated”.<br />
The cs120 is compatible with all current <strong>Niles</strong><br />
infrared systems. It may be used along with, or as<br />
an alternative to, the <strong>Niles</strong> Ts120, Ms120, Ms220,<br />
ws120R and MVc100IR sensors or the IntelliPad ® .<br />
The cs120 is just one part of the three building<br />
blocks necessary to complete a <strong>Niles</strong> IR repeating<br />
system<br />
• IR Main System Unit—Models MSU140, MSU250,<br />
MSU480 and MSU440Z<br />
• IR Sensors/Keypads—Models WS120R, TS120,<br />
Ms120, Ms220, cs120 and the IntelliPad<br />
• IR Flashers—Models MF1, MF2, MF1VF,<br />
Mf2Vf and the IRB1<br />
An IR sensor expansion hub, Model IRh610, is<br />
available to provide additional sensor inputs to<br />
your system.<br />
Features & beneFIts<br />
The cs120 offers a number of improvements over<br />
other miniature IR sensors.<br />
• Wideband High-Fidelity Design enables operation<br />
with virtually any brand of equipment<br />
• Patent Pending Universal Noise Suppression enables<br />
operation in virtually any environment: near<br />
plasma and LCD displays, compact fluorescent<br />
lights, and indirect sunlight<br />
• Excellent IR receiving range — 20’ to 35’ of<br />
remote control range (depending upon the<br />
strength of your handheld remote)<br />
• Factory tested for pickup range and angle<br />
• Small size of only 1/2” diameter by 2-7/8”<br />
long—fits almost anywhere<br />
• 10’ of connecting wire included<br />
• Printed circuit board design uses surface mount<br />
technology, assuring high reliability<br />
• Ideal for both home and commercial installations<br />
• Each CS120 includes a transparent cover<br />
• Two year parts and labor limited warranty<br />
InstallatIon ConsIderatIons<br />
IMPORTANT: RefeR INsTAllATION TO A PROfessIONAl<br />
cusTOM INsTAlleR If yOu ARe uNfAMIl-<br />
IAR wITh ANy Of The fOllOwINg PROceduRes.<br />
TOOLS REQUIRED<br />
• 1/8” Standard Slotted Screwdriver<br />
• 1/4” Standard Slotted Screwdriver<br />
• Wire Stripper<br />
Type of Cable<br />
The cs120 connects to the <strong>Niles</strong> Infrared main systems<br />
unit or IRh610 sensor expansion hub with an<br />
individual home run of cAT-5 cable. when running<br />
wires inside walls, most states and municipalities<br />
in the u.s. specify that you must use a special type<br />
of wire. usually, the requirement is that the wire<br />
has a specific “cl” fire rating, such as “cl-2” or<br />
“cl-3”. consult your <strong>Niles</strong> dealer, building contractor,<br />
or local building and inspection department if<br />
unsure about which type of wire is best for your<br />
application.<br />
CS120 Mounting Location<br />
The cs120 is designed to be ceiling mounted in<br />
a direct line of sight location within the operating<br />
range of the remote control.<br />
Receiving Range and Pickup Angle<br />
The receiving range of the cs120 will vary according<br />
to the IR output strength of the remote control<br />
being used. Remote strength varies among brands<br />
depending on the number and size of batteries<br />
used, and how many IR emitters the remote has.<br />
for example, remotes that operate on two small<br />
AAA batteries and have only one IR emitter are<br />
generally not as strong as remotes that use the<br />
larger AA size batteries and have two emitters.<br />
Tests with various manufacturers’ remote controls<br />
have shown that the operating range can vary from<br />
a minimum of 20’ to a maximum of about 35’.<br />
Infrared signals travel essentially line-of-sight. They<br />
will not pass through or around solid objects. do not<br />
rely on an IR signal being able to “bounce” off a wall<br />
or object to the cs120. The IR pickup angle of the<br />
cs120 is 30° off-axis (horizontal and vertical) at 25’.<br />
Avoiding Interference<br />
cs120 is designed to work in most applications<br />
including with lcd and plasma displays and in<br />
areas where cfl lighting and indirect sunlight are<br />
present. you should avoid locating the cs120 near<br />
potential sources of electrical or optical noise, such<br />
as light dimmers or low-voltage lights.<br />
Avoiding Optical Feedback<br />
If installing the cs120 in the same room as an IR<br />
flasher, it is possible for the flasher’s IR output to<br />
be picked-up by the cs120. This effect, known<br />
as an optical feedback loop, can cause erratic<br />
operation. Optical feedback is similar to acoustical<br />
feedback: the howling or whistling sound heard in<br />
a P.A. system when the microphone is too close to<br />
the speaker.<br />
To avoid optical feedback:<br />
1. Re-position the flasher(s) and/or the sensor<br />
2. Use <strong>Niles</strong> an MF1 or MF2 Microflasher and cover<br />
them with the supplied IR blockers<br />
Using the CS120 with the <strong>Niles</strong> MultiZone<br />
keypads with an IR connection<br />
The CS120 is fully compatible with <strong>Niles</strong> MultiZone<br />
keypads with an IR connection, follow the wiring<br />
instructions in Figure 5. for specific information<br />
see your <strong>Niles</strong> MultiZone keypad manual.<br />
1 2 3 4<br />
5 6<br />
7 8<br />
InstallatIon<br />
If you are installing the cs120 into an existing<br />
ceiling, take time to consider any possible obstructions<br />
which may be hidden, such as wood or metal<br />
studs, electrical, telephone or other types of wiring,<br />
plumbing, Ac or heating conduits, etc.<br />
1. Determine a mounting location for the CS120<br />
2. Drill a 11/16" hole where the CS120 will be<br />
mounted<br />
3. Run the CS120’s IR cable. Label the cable for<br />
future reference ( Figure 2). The CS120 is supplied<br />
with 10’ of pre-stripped IR cable. The IR cable<br />
may be shortened or lengthened as needed.<br />
If you want to make the CS120’s cable shorter,<br />
use a pair of wire cutters to cut the cable to the<br />
desired length. The IR cable may be lengthened<br />
by splicing it to a recommended IR cable (See<br />
Installation Considerations—Type of Cable). You<br />
may splice the CS120 cable to another cable by<br />
soldering or crimping the connections.<br />
4. Fasten sensor to ceiling with supplied screws<br />
( Figure 3)<br />
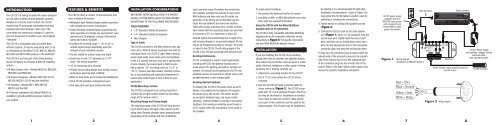
5. Connect the CS120 cable to the main system<br />
unit ( Figure 1). Strip 1/4” of insulation from the<br />
end of each wire. Tightly twist the end of each<br />
wire until there are no frayed ends. Insert each<br />
wire into the appropriate hole on the removable<br />
connector plug, and snap the locking tab down.<br />
To help you, the connector plug is keyed. Insert the<br />
smooth side of the connector plug into the smooth<br />
side of the socket. don’t force the scalloped side<br />
of the connector plug into the smooth side of the<br />
socket. Refer to the main system main system unit<br />
manual for specific installation instrutions.<br />
12V dc power supply<br />
(supplied with the<br />
Msu250 main system<br />
unit) plugged into an<br />
unswitched Ac outlet<br />
powers the system<br />
Figure 1 wiring diagram<br />
(installed in an Msu250 system)<br />
<strong>Niles</strong> IR flasher<br />
Msu250<br />
stereo receiver<br />
Power, IR data, status signal and ground<br />
via cAT-5 wire<br />
Figure 2 wiring legend<br />
12V dc Power supply<br />
(not supplied) plugged into the<br />
switched outlet.<br />
<strong>Niles</strong> stock# fg01035<br />
cs120 IR sensor