REMOTE SURVEILLANCE CAMERA - One Call
REMOTE SURVEILLANCE CAMERA - One Call
REMOTE SURVEILLANCE CAMERA - One Call

Create successful ePaper yourself
Turn your PDF publications into a flip-book with our unique Google optimized e-Paper software.
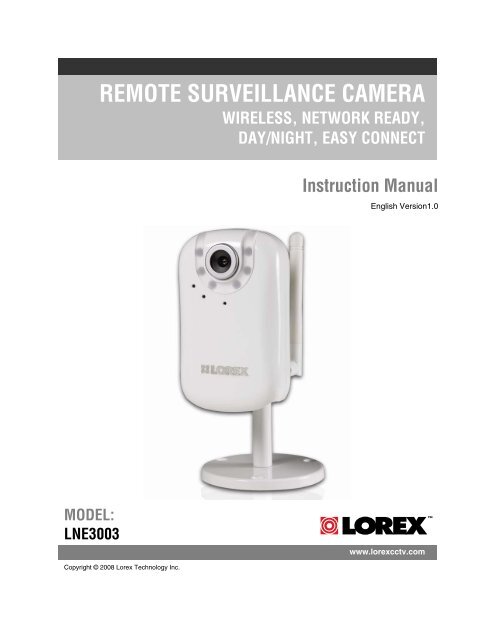
MODEL:<br />
LNE3003<br />
<strong>REMOTE</strong> <strong>SURVEILLANCE</strong> <strong>CAMERA</strong><br />
WIRELESS, NETWORK READY,<br />
DAY/NIGHT, EASY CONNECT<br />
Copyright © 2008 Lorex Technology Inc.<br />
Instruction Manual<br />
English Version1.0<br />
www.lorexcctv.com
Important Safeguards<br />
2<br />
Thank you for purchasing the LNE3003 Remote Surveillance Camera. Lorex is committed to providing<br />
our customers with a high quality, reliable security product.<br />
To learn more about the Wireless Easy Connect Network Camera, and to learn about our complete<br />
range of accessory products, including manuals, software updates, and firmware, please visit our<br />
website at:<br />
http://www.lorexcctv.com<br />
CAUTION<br />
RISK OF ELECTRIC SHOCK<br />
DO NOT OPEN<br />
CAUTION: TO REDUCE THE RICK OF ELECTRIC SHOCK<br />
DO NOT REMOVE COVER (OR BACK).<br />
NO USER SERVICABLE PARTS INSIDE.<br />
REFER SERVICING TO QUALIFIED SERVICE PERSONNEL.<br />
The lightning flash with arrowhead symbol, within an<br />
equilateral triangle, is intended to alert the user to the<br />
presence of uninsulated “dangerous voltage” within the<br />
products ‘ enclosure that may be of sufficient magnitude<br />
to constitute a risk of electric shock<br />
The exclamation point within an equilateral triangle is<br />
intended to alert the user to the presence of important<br />
operating and maintenance (servicing) instructions in the<br />
literature accompanying the appliance.<br />
WARNING: TO PREVENT FIRE OR SHOCK HAZARD, DO NOT<br />
EXPOSE THIS UNIT TO RAIN OR MOISTURE.<br />
CAUTION: TO PREVENT ELECTRIC SHOCK, MATCH WIDE BLADE<br />
OF THE PLUG TO THE WIDE SLOT AND FULLY INSERT.<br />
*iPhone, iPod touch, Yoics, and MSN are registered trademarks of their respective companies, registered in the United<br />
States and other countries.<br />
iPhone and iPod touch are not included in this package.
Important Safeguards<br />
LNE3003 Surveillance Camera<br />
In addition to the careful attention devoted to quality standards in the manufacture process of your video<br />
product, safety is a major factor in the design of every instrument. However, safety is your responsibility<br />
too. This sheet lists important information that will help to assure your enjoyment and proper use of the<br />
video product and accessory equipment. Please read them carefully before operating and using your<br />
video product.<br />
Installation<br />
1. Read and Follow Instructions - All the safety<br />
and operating instructions should be read<br />
before the video product is operated. Follow all<br />
operating instructions.<br />
2. Retain Instructions - The safety and operating<br />
instructions should be retained for future<br />
reference.<br />
3. Heed Warnings - Comply with all warnings on<br />
the video product and in the operating<br />
4.<br />
instructions.<br />
Polarization - Do not defeat the safety purpose<br />
of the polarized or grounding-type plug.<br />
o A polarized plug has two blades with<br />
one wider than the other.<br />
o A grounding type plug has two<br />
blades and a third grounding prong.<br />
o The wide blade or the third prong is<br />
provided for your safety.<br />
o If the provided plug does not fit into<br />
your outlet, consult an electrician for<br />
replacement of the obsolete outlet<br />
5. Power Sources - This video product should be<br />
operated only from the type of power source<br />
indicated on the marking label. If you are not<br />
sure of the type of power supply to your<br />
location, consult your video dealer or local<br />
power company. For video products intended to<br />
operate from battery power, or other sources,<br />
refer to the operating instructions.<br />
6. Overloading - Do not overload wall outlets of<br />
extension cords as this can result in the risk of<br />
fire or electric shock. Overloaded AC outlets,<br />
extension cords, frayed power cords, damaged<br />
or cracked wire insulation, and broken plugs are<br />
dangerous. They may result in a shock or fire<br />
hazard. Periodically examine the cord, and if its<br />
appearance indicates damage or deteriorated<br />
insulation, have it replaced by your service<br />
technician.<br />
7. Power-Cord Protection - Power supply cords<br />
should be routed so that they are not likely to be<br />
walked on or pinched by items placed upon or<br />
against them, paying particular attention to<br />
cords at plugs, convenience receptacles, and<br />
the point where they exit from the video product.<br />
8. Ventilation - Slots and openings in the case<br />
are provided for ventilation to ensure reliable<br />
operation of the video product and to protect<br />
it from overheating. These openings must not<br />
be blocked or covered. The openings should<br />
never be blocked by placing the video<br />
equipment on a bed, sofa, rug, or other<br />
similar surface. This video product should<br />
never be placed near or over a radiator or<br />
heat register. This video product should not<br />
be placed in a built-in installation such as a<br />
bookcase or rack unless proper ventilation is<br />
provided or the video product manufacturer’s<br />
instructions have been followed.<br />
9. Attachments - Do not use attachments<br />
unless recommended by the video product<br />
manufacturer as they may cause a hazard.<br />
10. Water and Moisture - Do not use this video<br />
product near water. For example, near a bath<br />
tub, wash bowl, kitchen sink or laundry tub, in<br />
a wet basement, near a swimming pool and<br />
the like.<br />
Caution: Maintain electrical safety. Power line<br />
operated equipment or accessories<br />
connected to this unit should bear the UL<br />
listing mark of CSA certification mark on the<br />
accessory itself and should not be modified<br />
so as to defeat the safety features. This will<br />
help avoid any potential hazard from electrical<br />
shock or fire. If in doubt, contact qualified<br />
service personnel.<br />
11. Accessories - Do not place this video<br />
equipment on an unstable cart, stand, tripod,<br />
or table.<br />
The video equipment may fall,<br />
causing serious damage to the<br />
video product. Use this video<br />
product only with a cart, stand,<br />
tripod, bracket, or table<br />
recommended by the<br />
manufacturer or sold with the<br />
video product.<br />
Any mounting of the product should follow<br />
the manufacturer’s instructions and use a<br />
mounting accessory recommended by the<br />
manufacturer.<br />
3
4<br />
Service<br />
13. Servicing - Do not attempt to service this<br />
video equipment yourself as opening or<br />
removing covers may expose you to<br />
dangerous voltage or other hazards. Refer all<br />
servicing to qualified service personnel.<br />
14. Conditions Requiring Service - Unplug this<br />
video product from the wall outlet and refer<br />
servicing to qualified service personnel under<br />
the following conditions.<br />
A. When the power supply cord or plug is<br />
damaged.<br />
B. If liquid has been spilled or objects have<br />
fallen into the video product.<br />
C. If the video product has been exposed to<br />
rain or water.<br />
D. If the video product does not operate<br />
normally by following the operating<br />
instructions. Adjust only those controls<br />
that are covered by the operating<br />
instructions. Improper adjustment of<br />
other controls may result in damage and<br />
will often require extensive work by a<br />
qualified technician to restore the video<br />
product to its normal operation.<br />
E. If the video product has been dropped or<br />
the cabinet has been damaged.<br />
F. When the video product exhibits a<br />
distinct change in performance. This<br />
indicates a need for service.<br />
15. Replacement Parts - When replacement<br />
parts are required, have the service<br />
technician verify that the replacements used<br />
have the same safety characteristics as the<br />
original parts. Use of replacements specified<br />
by the video product manufacturer can<br />
prevent fire, electric shock or other hazards.<br />
16. Safety Check - Upon completion of any<br />
service or repairs to this video product, ask<br />
the service technician to perform safety<br />
checks recommended by the manufacturer to<br />
determine that the video product is in safe<br />
operating condition.<br />
17. Wall or Ceiling Mounting - The cameras<br />
provided with this system should be mounted<br />
to a wall or ceiling only as instructed in this<br />
guide, using the provided mounting brackets.<br />
18. Heat - The product should be situated away<br />
from heat sources such as radiators, heat<br />
registers, stoves, or other products (including<br />
amplifiers) that produce heat.<br />
Use<br />
19. Cleaning - Unplug the video product from the<br />
wall outlet before cleaning. Do not use liquid<br />
cleaners or aerosol cleaners. Use a damp<br />
cloth for cleaning.<br />
20. Product and Cart Combination - Video and<br />
cart combination should be moved with care.<br />
Quick stops, excessive force, and uneven<br />
surfaces may cause the video product and<br />
car combination to overturn<br />
21. Object and Liquid Entry - Never push<br />
objects for any kind into this video product<br />
through openings as they may touch<br />
dangerous voltage points or “short-out” parts<br />
that could result in a fire or electric shock.<br />
Never spill liquid of any kind on the video<br />
product<br />
22. Lightning - For added protection for this<br />
video product during a lightning storm, unplug<br />
it from the wall outlet. This will prevent<br />
damage to the video product due to lightning<br />
and power line surges. The manufacturer’s<br />
instructions and use a mounting accessory<br />
recommended by the manufacturer.
General Precautions<br />
LNE3003 Surveillance Camera<br />
1. All warnings and instructions of this manual should be followed.<br />
2. Remove the plug from the outlet before cleaning. Do not use liquid aerosol detergents. Use a water<br />
dampened cloth for cleaning.<br />
3. Do not use this unit in humid or wet places.<br />
4. Keep enough space around the unit for ventilation. Slots and openings in the storage cabinet should<br />
not be blocked.<br />
5. During lightning storms disconnect the power supply, antenna, and cables to protect the unit from<br />
electrical surge.<br />
FCC CLASS B NOTICE<br />
Note:<br />
This equipment has been tested and found to comply with the limits for a Class B digital device,<br />
pursuant to Part 15 of the FCC Rules. These limits are designed to provide reasonable protection<br />
against harmful interference in a residential installation. This equipment generates, uses, and can<br />
radiate radio frequency energy and, if not in-stalled and used in accordance with the instruction, may<br />
cause harmful interference to radio communications.<br />
However, there is no guarantee that interference will not occur in a particular installation. If this<br />
equipment does cause harmful interference to radio or television reception (which can be determined<br />
by turning the equipment on and off), the user is encouraged to try to correct the interference by one<br />
or more of the following measures:<br />
o Reorient or relocate the receiving antenna<br />
o Increase the separation between the equipment and receiver<br />
o Connect the equipment into an outlet on a circuit different from that to which the receiver<br />
is connected<br />
o Consult the dealer or an experienced radio or television technician for assistance<br />
This equipment has been certified and found to comply with the limits regulated by FCC, EMC, and<br />
LVD. Therefore, it is designated to provide reasonable protection against interference and will not<br />
cause interference with other appliance usage.<br />
However, it is imperative that the user follows the guidelines in this manual to avoid improper usage<br />
which may result in damage to the unit, electrical shock and fire hazard injury<br />
In order to improve the feature functions and quality of this product, the specifications are subject to<br />
change without notice from time to time.<br />
LOREX TECHNOLOGY INC.<br />
www.lorexcctv.com<br />
5
LNE3003 Features<br />
LNE3003 Features<br />
Lorex’s new Wireless Easy Connect Network Camera (LNE3003) allows you to remotely<br />
monitor your home or business through a secure, password protected connection that requires<br />
no networking knowledge. Simply connect the camera to a router, run the installation CD and<br />
you are on your way to see, hear and protect what matters.<br />
The LNE3003 features high-resolution viewing, 10x digital zoom and two-way audio. MPEG4<br />
compression provides an efficient video stream, allowing users to monitor real-time surveillance<br />
from any computer with an Internet connection or by using the Apple iPhone (mobile 3G).<br />
The LNE3003 is PC and Mac compatible, supporting Internet Explorer, Firefox, Opera, Safari,<br />
and Google Chrome browsers. It also provides superior low-light performance with night-vision<br />
LEDs. Motion events trigger e-mail notifications with JPEG image attachment allowing users to<br />
see what happened. The included software gives users the ability to view, record, and playback<br />
video.<br />
It really is that easy!<br />
6<br />
• No Networking Knowledge Required, GUARANTEED!<br />
o Plug in Camera, Run Discovery CD (DigiConsole included)<br />
o Connect<br />
• No DDNS/Router Configuration Required<br />
• Wired / Wireless IEEE 802.11b/g (up to 250ft in open space) connectivity for flexible<br />
installation<br />
• Remote Easy Connect (Yoics and MSN), no networking knowledge required<br />
• 10x Digital Zoom<br />
• Superior low-light performance with night-vision LEDs<br />
• Supports VGA (640x480) resolution, 30 frames per second (real time)<br />
• Browser support, Internet Explorer, Firefox, Opera, Safari for viewing on PC or Mac<br />
• Supports MPEG4, MJPEG, 3GPP<br />
• MPEG4 enhanced compression for efficient video streaming<br />
• Motion event triggers e-mail notification with JPEG image attachment<br />
• 3GPP mobile support (e.g. iPhone/compatible)<br />
• Two-way audio via integrated microphone and external speakers.(not included)<br />
• 6 channel surveillance application for real time viewing and recording<br />
• Lorex DDNS included for guaranteed connection<br />
• Secure web management User/Password protection<br />
• Windows Vista Compatible
Table of Contents<br />
LNE3003 Surveillance Camera<br />
Getting Started ..............................................................................................................................................8<br />
System Requirements...................................................................................................................................9<br />
Additional Requirements ...........................................................................................................................9<br />
About Yoics ...................................................................................................................................................9<br />
Camera Connections ..................................................................................................................................10<br />
Basic Setup .................................................................................................................................................11<br />
Network Connections ..............................................................................................................................12<br />
Positioning the camera................................................................................................................................13<br />
Installation Warnings ...............................................................................................................................13<br />
Camera Stand Installation .......................................................................................................................13<br />
Night Vision..........................................................................................................................................13<br />
Using the Camera .......................................................................................................................................14<br />
Installing DigiConsole..............................................................................................................................14<br />
Setting up local viewing...........................................................................................................................16<br />
Setting up Remote Viewing.........................................................................................................................16<br />
Setting up Remote Viewing.........................................................................................................................17<br />
Registering with Yoics..........................................................................................................................17<br />
Registering your camera......................................................................................................................18<br />
Remote Viewing using a Web browser ...................................................................................................18<br />
Remote Viewing using a Web browser ...................................................................................................19<br />
Setting up Wireless Connectivity ................................................................................................................20<br />
Remote Viewing from iPhone or iPod touch........................................................................................22<br />
Additional Information .................................................................................................................................23<br />
Appendix 1: Camera Specifications ............................................................................................................24<br />
7
Getting Started<br />
Getting Started<br />
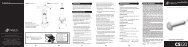
The system comes with the following components:<br />
8<br />
1 X NETWORK<br />
<strong>CAMERA</strong><br />
1 X MOUNTING<br />
STAND (3 PIECES)<br />
1 X POWER ADAPTOR 1 X WIRELESS<br />
ANTENNA<br />
1 X ETHERNET<br />
CABLE<br />
1 X QUICK START GUIDE<br />
1 X SOFTWARE/MANUALS CD<br />
CHECK YOUR PACKAGE TO CONFIRM THAT YOU HAVE RECEIVED THE COMPLETE<br />
<strong>CAMERA</strong> SYSTEM, INCLUDING ALL COMPONENTS SHOWN ABOVE.
System Requirements<br />
LNE3003 Surveillance Camera<br />
For setup and viewing, the LNE3003 Remote Surveillance Camera requires the following:<br />
• PC running Windows Vista / XP<br />
• Internet connection<br />
• Web browser: Internet Explorer 7 or later (with Active X), Mozilla Firefox, Opera (up to<br />
version 9.2), Safari, Google Chrome<br />
Additional Requirements<br />
To view your camera from a remote computer (remote viewing using Yoics), you may need to<br />
install the following:<br />
• QuickTime 7 or later: The QuickTime plug-in is required to view streaming video from your<br />
camera using Yoics. Download QuickTime at www.apple.com/quicktime/download<br />
• Quicktime is also required for use with Web browsers other than Internet Explorer, i.e.<br />
Firefox, Opera, Safari, and Chrome.<br />
About Yoics<br />
Yoics is secure, instant networking made easy. The LNE3003 Remote Surveillance Camera<br />
is enabled for easy-connect Yoics remote access, letting you connect to your camera<br />
anywhere, anytime. Visit www.yoics.com for more information.<br />
9
Camera Connections<br />
Camera Connections<br />
10<br />
1<br />
3<br />
4<br />
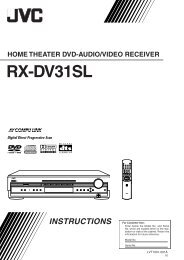
1. Power port – Connect AC adaptor to this port and then connect AC adaptor to<br />
electrical outlet.<br />
2. LAN port – Local Area Network port. Connect one end of the included network cable<br />
to this port, and then connect the other end of the network cable to a network router,<br />
switch, or active wall port.<br />
3. Reset – Using a paper-clip, hold for 10 seconds to reset the camera to its default<br />
configuration.<br />
4. Speaker port – Connect speakers for listen-in audio.<br />
5. Wireless antenna – The antenna can be positioned at 90˚ and 180˚ and rotate 360˚.<br />
2<br />
5
Basic Setup<br />
Make the following connections prior to starting the camera for the first time.<br />
1. Assemble the pedestal<br />
i. Attach the stand to the base.<br />
ii. Attach the mounting bracket to the<br />
stand.<br />
2. Assemble the camera<br />
i. Attach the camera to the completed<br />
pedestal. Use the thumb screws to<br />
secure the camera firmly.<br />
ii. Attach the wireless antenna to the<br />
back of the camera.<br />
iii. Optional: You can permanently<br />
mount the stand to a wall or flat<br />
surface.<br />
3. Connect the camera<br />
i. Connect the included network cable<br />
to the LAN port on the bottom of the<br />
camera.<br />
ii. Connect the other end of the network<br />
cable to the router, switch, or active<br />
wall port of your local network.<br />
iii. Plug the power adapter into the<br />
power port on the bottom of the<br />
camera. Plug the other end to an<br />
electrical outlet.<br />
Note: Make sure the LED is lit on the<br />
front of the camera. If not, check that all<br />
cables are properly connected.<br />
LNE3003 Surveillance Camera<br />
Figure 1.0 Assemble the pedestal<br />
Figure 1.1 Assemble the camera<br />
Figure 1.2 Attach the antenna<br />
Figure 1.3 Connect cables<br />
11
Basic Setup<br />
Network Connections<br />
12<br />
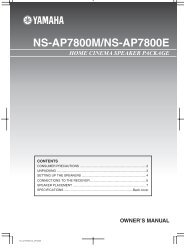
Figure 1.4 Network connectivity diagram<br />
Network<br />
Cable<br />
WAN 1 2 3 4 UP PWR<br />
WAN 1 2 3 4 UP PWR<br />
COMPUTER<br />
(Not Included)<br />
ROUTER / SWITCH / ACTIVE WALL PORT<br />
(Not Included)
Positioning the camera<br />
Before you install the camera, carefully plan where and how it will be positioned.<br />
Installation Warnings<br />
Positioning the camera<br />
• Select a location for the camera that provides a clear view of the area you want to<br />
monitor, which is free from dust, and is not in line-of-sight to a strong light source or<br />
direct sunlight.<br />
• Route the cables so that they are not close to power or telephone lines, transformers,<br />
microwave ovens or other electrical equipment.<br />
• Select a location for the camera that has an ambient temperature between 32°F~113°F<br />
(0°C~45°C); Humidity 20-80% relative humidity (non-condensing)<br />
• If you plan to install the camera in a location that has conditions not recommended in<br />
this manual, consult with a professional installer and consider use of a separate camera<br />
cover or housing<br />
• Before starting permanent installation, have another person hold the camera for you<br />
while you verify its performance by observing the image on a monitor.<br />
Camera Stand Installation<br />
1. Attach the pedestal to the ceiling, wall or other surface by<br />
the base using the provided screws.<br />
2. Attach the camera to the pedestal. Adjust the angle of the<br />
camera, and tighten the thumbscrew to set the position<br />
Note: The mounting bracket must be attached to a<br />
structural device such as a wall stud or ceiling rafter<br />
using the supplied screws.<br />
Night Vision<br />
This camera includes LEDs, which provide the camera with the ability to view images in low light<br />
conditions. It is important to use the provided power adaptor when using the camera for prolonged<br />
periods in low light conditions.<br />
13
Using the Camera<br />
Using the Camera<br />
With the camera setup and connected, you can now set up local viewing, remote viewing, and<br />
wireless connectivity. Before starting the installation, please ensure your computer is connected<br />
to the same local network as the camera and has access to the Internet.<br />
It is recommended to install the camera when your computer is wired to the local network. If you<br />
are using the wireless connection on your computer, please connect your computer to your<br />
wireless router using an Ethernet cable (not included).<br />
14<br />
Note: The following refers to a Windows Vista installation. Security windows may differ<br />
in Windows XP.<br />
Opening DigiConsole<br />
Note: Prior to using DigiConsole, visit www.lorexcctv.com and check for software and<br />
firmware updates. Please refer to the DigiConsole & DigiViewer Software Manual for<br />
more information on upgrading firmware.<br />
To open DigiConsole:<br />
1. Insert the include DigiConsole software CD into your CD/DVD-ROM drive. DigiConsole<br />
automatically launches.<br />
Figure 2.0 DigiConsole main window<br />
2. If a security pop-up window appears, click Unblock and Continue to allow DigiConsole<br />
access to the Internet.<br />
Note: If AutoPlay fails to start, go to Computer (My Computer for Windows XP users)<br />
and double-click the CD-drive to run the application. Follow step 2.<br />
Note: You do not need to install DigiConsole to view live video from the camera.<br />
However, if you wish to record and playback video, you must install DigiConsole to your<br />
computer. Please refer to the DigiConsole & DigiViewer Software Manual for more<br />
information on installing DigiConsole.
Figure 2.1 Find your camera from the list of devices<br />
Using the Camera<br />
3. Click Find to discover Lorex cameras on your network.<br />
4. Double-click the selected camera to launch DigiViewer in your default browser.<br />
Finding Your Camera as an UPnP Device (optional)<br />
You can also discover the camera as an UPnP (Universal Plug and Play) device by opening<br />
Network in Vista (My Network Places for Windows XP users).<br />
To discover your UPnP device:<br />
1. Turn on Network discovery and file sharing to find your camera as an UPnP device.<br />
2. Double-click the selected camera icon to launch DigiViewer in your default browser.<br />
A.<br />
B. C.<br />
Figure 2.2 Optional UPnP discovery of your camera<br />
15
Setting up Yoics Remote Viewing<br />
Setting up local viewing<br />
With your camera now detected by DigiConsole, you can begin to view live images from your<br />
camera on your local network. When using Internet Explorer, you need to install Active X in<br />
order for DigiViewer to run properly; other supported browsers will require Quicktime.<br />
To setup local viewing:<br />
1. With DigiViewer open in your default browser, enter admin in the username text field<br />
and admin in the password text field. Your browser prompts you to Install Active X<br />
Control.<br />
2. Click the warning bar (it turns from yellow to blue) and select Install Active X Control.<br />
3. Click Unblock or Continue in any subsequent security windows (this is only required for<br />
initial setup).<br />
4. Click Install to start the installation. DigiViewer resets and live video streams in your<br />
browser.<br />
Figure 3.0 Select Install Active X control from the warning bar<br />
Figure 3.1 Windows Security/Firewall<br />
16<br />
Figure 3.2 Installing Active X<br />
ATTENTION: For security<br />
reasons, you should change<br />
the default username and<br />
password (admin) for the<br />
camera. Please refer to the<br />
DigiConsole & DigiViewer<br />
Software Manual for more<br />
information on changing your<br />
username and password.
Setting up Yoics Remote Viewing<br />
Setting up Yoics Remote Viewing<br />
By default, the LNE3003 IP Camera is enabled for Yoics easy-connect remote access.<br />
Yoics remote viewing allows you to easily connect to your camera without needing to<br />
configure your network gateway device. Sign-up with Yoics to view your camera from a<br />
remote location anywhere, anytime.<br />
Note: Apple Quicktime is required for Yoics Remote Viewing. Download at<br />
www.apple.com/quicktime/download<br />
Registering with Yoics<br />
Sign-up for a free Yoics account to access your camera remotely.<br />
To register with Yoics:<br />
1. From DigiViewer, click Settings and then click Remote Access.<br />
2. Under Yoics Instant Networking, click Register with Yoics. The Lorex Remote Viewing<br />
page opens ( www.lorex.yoics.com ).<br />
Figure 4.0 DigiViewer Settings – register with Yoics<br />
Figure 4.0 Lorex Remote Viewing – powered by Yoics<br />
17
Setting up Yoics Remote Viewing<br />
18<br />
3. Enter your personal information in the required fields (marked with *) and click Register.<br />
You will be sent an email confirming your registration; use the email address and password you<br />
entered when registering to login to lorex.yoics.com<br />
Registering your camera<br />
Once you have created an account with Yoics, you must register your camera in order to<br />
enable Yoics remote viewing.<br />
To register you camera:<br />
1. In your browser go to lorex.yoics.com and login using your username and password<br />
(from the confirmation email). Click Yes in the subsequent security window.<br />
2. From the Lorex pop-up window click Complete Registration. The Register New<br />
Devices page opens.<br />
Figure 4.1 Complete registration<br />
3. You will be asked to register your camera twice: Video Stream (for using a web browser),<br />
and Camera Viewer (when viewing from an iPhone or iPod touch). Enter a name for<br />
the camera in the Yoics Device Name text field and click Register Now.<br />
Figure 4.2 Register your camera for high bandwidth and low bandwidth<br />
TIP!<br />
If your camera<br />
does not appear in<br />
the under “My<br />
Stuff,” press F5 on<br />
your keyboard to<br />
refresh the page.<br />
ATTENTION: If you want to<br />
use Yoics Remote Viewing<br />
and port forwarding, you must<br />
first register your camera with<br />
Yoics. For more information<br />
on port forwarding and DDNS<br />
setup, please refer to the<br />
DigiConsole & DigiViewer<br />
Software Manual.
Remote Viewing using a Web browser<br />
Setting up Yoics Remote Viewing<br />
To access your device remotely from a web browser:<br />
1. In your browser, go to http://lorex.yoics.com and log in using your username and<br />
password. Click Yes in the security pop-up window.<br />
2. Under My Stuff, click the camera you want to view.<br />
3. Enter you username and password (by default, admin) to login to your camera.<br />
Figure 5.0 Remote viewing in your Web browser<br />
ATTENTION: You will be able<br />
to view live video for 5~10<br />
minutes then the connection<br />
will drop. To refresh the<br />
connection, click the camera<br />
icon again.<br />
Note: You may need to install Quicktime for the Yoics site. If you have not installed the<br />
QuickTime plug-in, your browser will prompt you to do so now<br />
(www.apple.com/quicktime/download).<br />
Note: If you have an external (WAN) static IP address or you have registered with the<br />
free LOREX DDNS service, you can configure your router to port-forward the incoming<br />
Internet connections to the camera. Use the static IP address or your customized lorexddns.net<br />
URL in the address field of your browser to access your camera. Yoics registration is not required<br />
when using this option. Please refer to the DigiConsole & DigiViewer Software Manual<br />
for more information on DDNS setup and port forwarding.<br />
19
Setting up Wireless Connectivity<br />
Setting up Wireless Connectivity<br />
With initial setup of the camera complete, you can configure settings in DigiViewer to employ a<br />
wireless network connection.<br />
To setup wireless connectivity:<br />
1. From DigiViewer, click Settings, and then click Wireless. DigiViewer automatically scans<br />
for any wireless networks.<br />
2. If not already enabled, select Enabled from the Wireless Mode drop-down menu.<br />
Figure 6.0 Enable a wireless connection<br />
20<br />
3. From the list of available networks, select the wireless network for the device. If<br />
protection/encryption is enabled on the wireless router, you must enter the network<br />
password.<br />
Figure 6.1 Select your wireless network (enter password if necessary)<br />
4. Click Connect. Allow DigiViewer a few moments to apply your new connection settings.<br />
.
Figure 6.2 Your device may need to reconnect with new wireless settings<br />
Note: Changing wireless settings may require devices to reconnect.<br />
Setting up Wireless Connectivity<br />
5. Close the browser window.<br />
6. Return to DigiConsole. From the Find menu, right-click on your camera and select<br />
Refresh the list of devices (If DigiConsole was closed earlier, run the software again<br />
and click Find).<br />
7. Disconnect the network cable from the camera.<br />
8. Double-click the camera to launch DigiViewer in your default browser.<br />
21
Remote Viewing from iPhone or iPod touch<br />
Remote Viewing from iPhone or iPod touch<br />
To access your device remotely from iPhone or iPod touch:<br />
1. Using Safari, go to www.yoics.com and login using your Yoics username and password.<br />
2. Click the name of the device you want to view.<br />
3. Enter your username and password (by default, admin) to login to the camera.<br />
A. B.<br />
C. D.<br />
Figure 7.0 Remote viewing using iPhone or iPod touch<br />
22<br />
TIP!<br />
With the latest version<br />
of iPhone and iPod<br />
touch, you can<br />
bookmark the Yoics<br />
website for quick<br />
access. You can also<br />
create a shortcut on the<br />
Applications screen for<br />
even faster access.
Additional Information<br />
Additional Information<br />
For details on camera maintenance and firmware updates, please refer to the DigiConsole &<br />
DigiViewer Software Manual included on the CD bundled with this package.<br />
Focusing the camera<br />
You can manually adjust the focus of the LNE3003 Remote Surveillance Camera.<br />
Note: Make sure the camera is powered on and connected to a network before<br />
attempting to adjust the focus.<br />
To adjust the focus:<br />
1. Open DigiViewer in your default browser.<br />
Note: You can open DigiViewer from DigiConsole or directly in your browser using your<br />
camera’s IP address.<br />
2. Using DigiViewer as a monitor, turn the silver ring at the lens of the camera back and<br />
forth until image is sharp.<br />
Figure 8.0 Turn the ring back and forth to adjust the focus<br />
23
Appendix 1: Camera Specifications<br />
Appendix 1: Camera Specifications<br />
24
Appendix 1: Camera Specifications (cont’d.)<br />
Appendix 1: Camera Specifications (cont’d.)<br />
25
Appendix 1: Camera Specifications (cont’d.)<br />
Lorex Technology Inc.<br />
26<br />
It’s all on the Web!<br />
Product Information<br />
User Manuals<br />
Quick Start Guides<br />
VISIT<br />
www.lorexcctv.com<br />
Specification Sheets<br />
Software Upgrades<br />
Firmware Upgrades<br />
www.lorexcctv.com