REMOTE SURVEILLANCE CAMERA - One Call
REMOTE SURVEILLANCE CAMERA - One Call
REMOTE SURVEILLANCE CAMERA - One Call

You also want an ePaper? Increase the reach of your titles
YUMPU automatically turns print PDFs into web optimized ePapers that Google loves.
Setting up Yoics Remote Viewing<br />
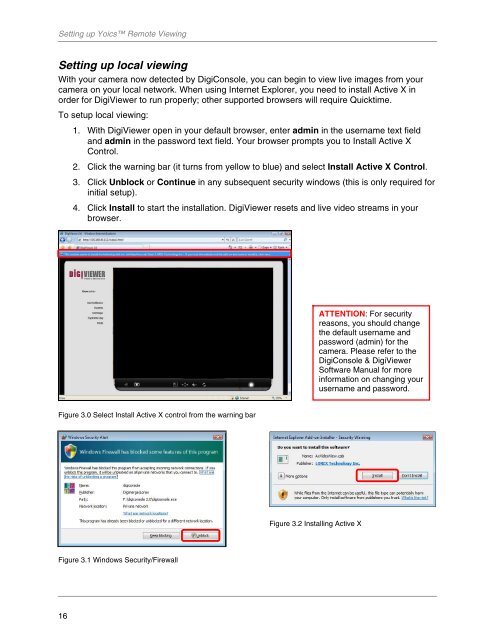
Setting up local viewing<br />
With your camera now detected by DigiConsole, you can begin to view live images from your<br />
camera on your local network. When using Internet Explorer, you need to install Active X in<br />
order for DigiViewer to run properly; other supported browsers will require Quicktime.<br />
To setup local viewing:<br />
1. With DigiViewer open in your default browser, enter admin in the username text field<br />
and admin in the password text field. Your browser prompts you to Install Active X<br />
Control.<br />
2. Click the warning bar (it turns from yellow to blue) and select Install Active X Control.<br />
3. Click Unblock or Continue in any subsequent security windows (this is only required for<br />
initial setup).<br />
4. Click Install to start the installation. DigiViewer resets and live video streams in your<br />
browser.<br />
Figure 3.0 Select Install Active X control from the warning bar<br />
Figure 3.1 Windows Security/Firewall<br />
16<br />
Figure 3.2 Installing Active X<br />
ATTENTION: For security<br />
reasons, you should change<br />
the default username and<br />
password (admin) for the<br />
camera. Please refer to the<br />
DigiConsole & DigiViewer<br />
Software Manual for more<br />
information on changing your<br />
username and password.