LCD Fundamentals Using PIC16C92X Microcontrollers - Microchip
LCD Fundamentals Using PIC16C92X Microcontrollers - Microchip
LCD Fundamentals Using PIC16C92X Microcontrollers - Microchip

You also want an ePaper? Increase the reach of your titles
YUMPU automatically turns print PDFs into web optimized ePapers that Google loves.
Author: Rodger Richey<br />
<strong>Microchip</strong> Technology Inc.<br />
INTRODUCTION<br />
This Application Note provides a basic introduction to<br />
the features and uses of Liquid Crystal Displays (<strong>LCD</strong>).<br />
At the end of this Application Note, you should be able<br />
to answer the following questions:<br />
• What are the basic components in an <strong>LCD</strong> panel?<br />
• How does an <strong>LCD</strong> work?<br />
• What are the different types of <strong>LCD</strong> panels?<br />
• How are <strong>LCD</strong> panels driven?<br />
WHAT ARE THE BASIC<br />
COMPONENTS IN AN <strong>LCD</strong> PANEL?<br />
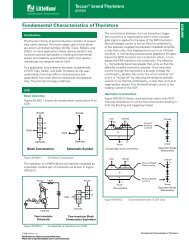
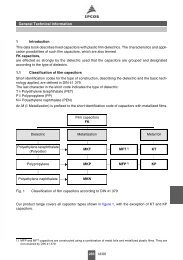
An <strong>LCD</strong> panel, or more commonly known as a piece of<br />
“glass”, is constructed of many layers. Figure 1 shows<br />
all the layers that are typically present in <strong>LCD</strong> panels.<br />
The first layer is called the front polarizer.<br />
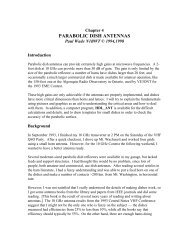
FIGURE 1: BASIC <strong>LCD</strong> COMPONENTS<br />
Front<br />
Polarizer<br />
Backplane<br />
Electrode<br />
Perimeter<br />
Seal<br />
Conductive<br />
Connection<br />
Segment<br />
Electrodes<br />
Glass<br />
Rear<br />
Polarizer<br />
LC Fluid<br />
Glass<br />
Terminal<br />
Pins<br />
AN658<br />
<strong>LCD</strong> <strong>Fundamentals</strong> <strong>Using</strong> <strong>PIC16C92X</strong> <strong>Microcontrollers</strong><br />
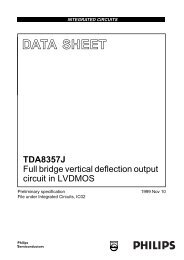
Polarization is a process or state in which rays of light<br />
exhibit different properties in different directions, especially<br />
the state in which all the vibration takes place in<br />
one plane. Essentially, a polarizer passes light only in<br />
one plane. As shown in Figure 2, if light is polarized in<br />
one plane, by passing through a polarizer, it cannot<br />
pass through a second polarizer if its plane is 90°<br />
out of<br />
phase to the first.<br />
FIGURE 2: POLARIZERS OUT OF PHASE<br />
The front polarizer is applied to the outside surface of<br />
the top piece of glass.<br />
The top piece of glass also provides<br />
structural support for the <strong>LCD</strong> panel.<br />
On the bottom of the top glass, a transparent coating of<br />
Indium-Tin Oxide (ITO) is applied to the glass. ITO is<br />
conductive and forms the backplane or common electrodes<br />
of the <strong>LCD</strong> panel. The patterns of the backplane<br />
and segment ITO forms the numbers, letters, symbols,<br />
icons, etc.<br />
After the ITO has been applied to the glass, a thin polyimide<br />
coating is applied to the ITO. The polyimide is<br />
“rubbed” in a single direction that matches the polarization<br />
plane of the front polarizer. The action of “rubbing”<br />
the polyimide causes the Liquid Crystal (LC) molecules<br />
in the outermost plane to align themselves in the same<br />
direction.<br />
© 1997 <strong>Microchip</strong> Technology Inc. DS00658A-page 1
AN658<br />
The next layer is a reservoir of LC. The LC fluid has<br />
many planes of molecules.<br />
The next layer is the polyimide coating on the bottom<br />
glass followed by the ITO segment electrodes.<br />
The<br />
bottom glass also supplies structural integrity for the<br />
<strong>LCD</strong> panel as well as mounting surface for the electrode<br />
connections. Applied to the external surface of<br />
the bottom glass is the rear polarizer. Depending on the<br />
type of viewing mode employed by the <strong>LCD</strong> panel, the<br />
axis of polarization is the same or 90°<br />
apart from the<br />
front polarizer.<br />
LC molecules are long and cylindrical. On any plane<br />
within the LC fluid, the molecules align themselves<br />
such that the major axis of each molecule is parallel to<br />
all others, as shown in Figure 3. The outermost planes<br />
of LC molecules will align themselves on the same axis<br />
that the polyimide is “rubbed”. The direction of “rubbing”<br />
of the polyimide on the bottom glass is 90°<br />
apart<br />
from that of the polyimide on the top glass. This orientation<br />
creates the twist in the LC fluid.<br />
FIGURE 3: LC MOLECULES IN<br />
ALIGNMENT<br />
DS00658A-page 2<br />
A consequence of this alignment is that each intermediate<br />
plane of LC molecules will have a slightly different<br />
orientation from the plane above or below as seen in<br />
Figure 4.<br />
FIGURE 4: LC MOLECULES PLANE<br />
ORIENTATION<br />
The twisting of the planes causes the polarization of the<br />
light to twist as it passes through the LC fluid. The twisting<br />
of the LC planes is critical to the operation of the<br />
<strong>LCD</strong> panel as will be shown in the next section.<br />
Now that the mystery of what the <strong>LCD</strong> panel is made<br />
of has been uncovered, how does an <strong>LCD</strong> work?<br />
© 1997 <strong>Microchip</strong> Technology Inc.
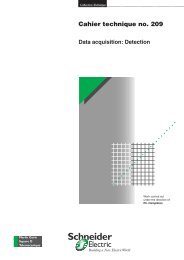
HOW DOES AN <strong>LCD</strong> WORK?<br />
As explained before, the twist created in the LC fluid is<br />
the basis of how the panel operates. Figure 5 shows<br />
how an <strong>LCD</strong> panel creates a pixel that is OFF. For this<br />
example the LC fluid is not energized, i.e. there is<br />
0 VRMS<br />
potential between the backplane and segment<br />
electrodes. The following is a step-by-step description<br />
of the path light takes through the <strong>LCD</strong> panel.<br />
1. Light enters the panel through the rear polarizer.<br />
At this point the light becomes polarized to the<br />
vertical plane.<br />
2. The polarized light passes unobstructed through<br />
the transparent backplane electrode.<br />
3. As the polarized light passes through the LC<br />
fluid it gets twisted into the horizontal plane.<br />
4. The polarized light passes unobstructed through<br />
the transparent segment electrode.<br />
5. Since the light is now polarized in the horizontal<br />
plane, it passes unobstructed through the front<br />
polarizer which has a horizontal polarization.<br />
6. The observer does not detect that the pixel is on<br />
because the light has not been obstructed.<br />
FIGURE 5: PATH OF LIGHT FOR OFF PIXEL (POSITIVE IMAGE)<br />
Light<br />
Backplane<br />
Electrode<br />
FIGURE 6: PATH OF LIGHT FOR ON PIXEL<br />
Light<br />
LIQUID CRYSTAL<br />
AN658<br />
If a potential is applied across the backplane and segment<br />
electrodes, the LC fluid becomes energized. The<br />
LC molecule planes will now align themselves such<br />
that they are parallel to the electrical field generated by<br />
the potential difference. This removes the twisting effect<br />
of the LC fluid. Figure 6 shows a pixel that is ON or,<br />
more specifically energized. The following is a<br />
step-by-step description of the path that the light takes<br />
through this <strong>LCD</strong> panel.<br />
1. Light enters the panel through the rear polarizer.<br />
At this point the light becomes polarized to the<br />
vertical plane.<br />
2. The polarized light passes unobstructed through<br />
the transparent backplane electrode.<br />
3. As the polarized light passes through the LC<br />
fluid it does not twist and remains in the vertical<br />
plane.<br />
4. The polarized light passes unobstructed through<br />
the transparent segment electrode.<br />
5. Since the light is still polarized in the vertical<br />
plane, it is obstructed by the front polarizer<br />
which has a horizontal polarization.<br />
6. The observer detects that the pixel is on<br />
because the light has been obstructed and creates<br />
a dark image on the panel.<br />
Segment<br />
Electrode<br />
Rear<br />
Polarizer<br />
OFF<br />
Front<br />
Polarizer<br />
(Vertical) (Horizontal)<br />
Rear<br />
Polarizer<br />
(Vertical)<br />
Backplane<br />
Electrode<br />
LIQUID CRYSTAL<br />
Segment<br />
Electrode<br />
ON Front<br />
Polarizer<br />
(Horizontal)<br />
Polarized<br />
LIght<br />
© 1997 <strong>Microchip</strong> Technology Inc. DS00658A-page 3
AN658<br />
<strong>LCD</strong> IMAGES<br />
<strong>LCD</strong>s have the capability to produce both positive and<br />
negative images. A positive image is defined to be a<br />
dark image on a light background. In a positive image<br />
display, the front and rear polarizers are perpendicular<br />
to each other. Unenergized pixels and the background<br />
area transmit the light and energized pixels obstruct the<br />
light creating dark images on the light background. A<br />
negative image is a light image on a dark background.<br />
In this type of display, the front and rear polarizers are<br />
aligned to each other. Unenergized pixels and the background<br />
inhibit light from passing through the display.<br />
Energized pixels allow the light to pass creating a light<br />
image on a dark background.<br />
There are essentially three types of viewing modes for<br />
a <strong>LCD</strong>: reflective, transmissive, and transflective. Typically<br />
Reflective displays use only positive images.<br />
The front and rear polarizers are perpendicular to each<br />
other. The <strong>LCD</strong> panel will have an additional layer<br />
added to the bottom of the display, a reflector. Figure 7<br />
shows the diagrams for pixels that are ON and OFF for<br />
reflective displays. Here again, the path that light takes<br />
is described in a step-by-step fashion for a pixel that is<br />
OFF in a positive image display.<br />
FIGURE 7: REFLECTIVE <strong>LCD</strong> PATH OF LIGHT<br />
DS00658A-page 4<br />
Light Source<br />
Light Source<br />
Backplane<br />
Electrode<br />
LIQUID CRYSTAL<br />
1. Light enters the panel through the front polarizer.<br />
At this point the light becomes polarized to the<br />
vertical plane.<br />
2. The polarized light passes unobstructed through<br />
the transparent backplane electrode.<br />
3. As the polarized light passes through the LC<br />
fluid it gets twisted into the horizontal plane.<br />
4. The polarized light passes unobstructed through<br />
the transparent segment electrode.<br />
5. Since the light is now polarized in the horizontal<br />
plane, it passes unobstructed through the rear<br />
polarizer which has a horizontal polarization.<br />
6. The reflector behind the rear polarizer reflects<br />
the incoming light back on the same path.<br />
7. The observer does not detect that the pixel is<br />
ON because the light was reflected back.<br />
A pixel that is ON follows the same basic steps except<br />
that the light never reaches the reflector and therefore<br />
does not return to the observer. Reflective displays lend<br />
themselves to battery powered applications because<br />
the images are created using ambient light sources.<br />
These displays are very bright under proper lighting<br />
conditions, with excellent contrast, and have a wide<br />
viewing angle.<br />
Segment<br />
Electrode<br />
Front<br />
Polarizer<br />
OFF<br />
Rear<br />
Polarizer<br />
(Vertical) (Horizontal)<br />
Front<br />
Polarizer<br />
(Vertical)<br />
Backplane<br />
Electrode<br />
LIQUID CRYSTAL<br />
ON<br />
Segment<br />
Electrode<br />
Rear<br />
Polarizer<br />
(Horizontal)<br />
Reflector<br />
Reflector<br />
© 1997 <strong>Microchip</strong> Technology Inc.
Transmissive displays do not reflect light back to the<br />
observer. Instead, they rely upon a light source behind<br />
the panel to create images. A transmissive display has<br />
front and rear polarizers that are in phase to each other.<br />
Figure 8 shows the OFF and ON diagrams for a transmissive<br />
display. The path of light is described below for<br />
the ON state only in a positive image display.<br />
1. Light enters the panel through the rear polarizer.<br />
At this point the light becomes polarized to the<br />
vertical plane.<br />
2. The polarized light passes unobstructed through<br />
the transparent segment electrode.<br />
3. As the polarized light passes through the LC<br />
fluid it gets twisted into the horizontal plane.<br />
4. The polarized light passes unobstructed through<br />
the transparent backplane electrode.<br />
5. Since the light is now polarized in the horizontal<br />
plane, it is obstructed by the front polarizer<br />
which has a vertical polarization. Very little light<br />
passes through the front polarizer<br />
6. The observer does not detect that the pixel is<br />
ON because the light was obstructed.<br />
FIGURE 8: TRANSMISSIVE <strong>LCD</strong> PATH OF LIGHT (NEGATIVE IMAGE)<br />
Light Source<br />
Light Source<br />
Segment<br />
Electrode<br />
LIQUID CRYSTAL<br />
AN658<br />
An OFF pixel would allow the light to pass through the<br />
display unobstructed because the polarization does not<br />
get twisted by the LC fluid. These displays are very<br />
good for very low light level conditions. They are very<br />
poor when used in direct sunlight because the sunlight<br />
swamps out the backlighting.<br />
The third type of display is called transflective.<br />
As you<br />
can probably tell from the name, it is a combination of<br />
reflective and transmissive. A white or silver translucent<br />
material is applied to the rear of the display. It reflects<br />
some of the ambient light back to the observer while<br />
also allowing backlighting. Transflective displays are<br />
very good for applications which have varying light conditions<br />
such as gas pumps. They must operate during<br />
the day in bright sunlight, but must also operate at night.<br />
Transflective displays have lower contrast ratios than<br />
reflective displays because some of the light passes<br />
through the reflector.<br />
Backplane<br />
Electrode<br />
Rear<br />
Polarizer<br />
ON<br />
Front<br />
Polarizer<br />
(Vertical) (Vertical)<br />
Rear<br />
Polarizer<br />
(Vertical)<br />
Segment<br />
Electrode<br />
LIQUID CRYSTAL<br />
OFF<br />
Common<br />
Electrode<br />
Front<br />
Polarizer<br />
(Vertical)<br />
© 1997 <strong>Microchip</strong> Technology Inc. DS00658A-page 5
AN658<br />
The type of <strong>LCD</strong> that an application requires is largely<br />
dependent on the ambient light available. Table 1 gives<br />
some guidelines for selecting a display according to the<br />
lighting conditions.<br />
TABLE 1: LIGHTING CONDITION REFERENCE<br />
Viewing Mode<br />
Reflective<br />
(Positive)<br />
Transflective<br />
(Positive)<br />
Transflective<br />
(Negative)<br />
Transmissive<br />
(Negative)<br />
Transmissive<br />
(Positive)<br />
DS00658A-page 6<br />
Display<br />
Description<br />
Dark images on<br />
light background<br />
Dark images on<br />
gray background<br />
Light gray images<br />
on dark background<br />
Backlit images on<br />
dark background<br />
DRIVER VOLTAGES<br />
Dark images on a<br />
backlit background<br />
Application Comments<br />
No backlighting. Gives best<br />
contrast and environmental<br />
stability<br />
Can be viewed with both ambient<br />
light and backlighting<br />
Requires high ambient light or<br />
backlighting.<br />
Direct<br />
Sunlight<br />
Office Light<br />
Very Low<br />
Light<br />
Excellent Very Good Unusable<br />
Excellent (no<br />
backlight)<br />
Good<br />
(no backlight)<br />
Cannot be viewed by reflection Poor<br />
(backlight)<br />
Good for very low light conditions<br />
The number one cause of <strong>LCD</strong> damage is having a DC<br />
voltage applied to it. A DC voltage will deteriorate the<br />
LC fluid such that it cannot be energized. The <strong>LCD</strong><br />
driver waveforms are designed to create a 0 VDC<br />
potential<br />
across all pixels. The specifications for a <strong>LCD</strong> panel<br />
will include some RMS voltages such as VOFF<br />
and VON.<br />
A third voltage is VTH<br />
which is the RMS voltage across<br />
an <strong>LCD</strong> pixel when contrast reaches a 10% level. Often<br />
this voltage is used as VOFF.<br />
VON<br />
is defined as the RMS<br />
voltage applied by the <strong>LCD</strong> driver to the segment electrode<br />
that creates an ON pixel which is typically at the<br />
90% contrast level. It is desirable that VON<br />
be much<br />
greater than VOFF.<br />
Poor<br />
(backlight)<br />
Good<br />
(no backlight)<br />
Fair<br />
(no backlight)<br />
Good<br />
(backlight)<br />
Good<br />
(backlight)<br />
Very Good<br />
(backlight)<br />
Very Good<br />
(backlight)<br />
Excellent<br />
(backlight)<br />
Excellent<br />
(backlight)<br />
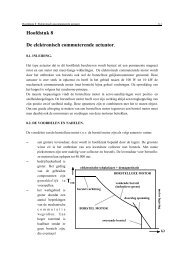
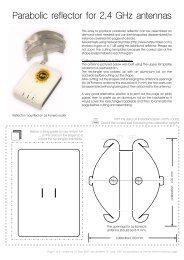
Figure 9 graphically represents the voltage potential<br />
versus the contrast across a pixel. The final specification<br />
for an <strong>LCD</strong> panel is the discrimination ratio which is<br />
VON<br />
divided by VOFF<br />
(VON/VOFF).<br />
The discrimination<br />
ratio specifies what type of contrast levels the <strong>LCD</strong><br />
panel will be able to achieve. Examples of discrimination<br />
ratio calculations will be given in the section “How<br />
are <strong>LCD</strong> Panels Driven?”.<br />
FIGURE 9: CONTRAST vs. RMS VOLTAGE<br />
Brightness<br />
or contrast<br />
100%<br />
90%<br />
10%<br />
VOFF VTH VON<br />
VRMS (between SEG and BP)<br />
© 1997 <strong>Microchip</strong> Technology Inc.
RESPONSE TIME<br />
An <strong>LCD</strong> panel will have a typical ON and OFF response<br />
time. The ON time parameter refers to the time for an<br />
OFF pixel to become visible after the appropriate voltages<br />
have been applied. The OFF time parameter<br />
specifies the time for an ON segment to disappear.<br />
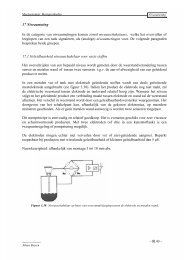
Sometimes these parameters are called rise and<br />
decay, respectively. Temperature plays a key role in<br />
the response time of an <strong>LCD</strong> panel. Figure 10 shows<br />
the response times versus temperature for commercial<br />
type LC fluid. For this reason, there are no <strong>LCD</strong> panels<br />
in gas pumps in Alaska without heaters. Displays with<br />
heaters can help to decrease response time even at<br />
temperatures as low as -55°<br />
C. The drawback of an <strong>LCD</strong><br />
heater is that every square inch of surface on the back<br />
of the display requires 2 to 3 watts.<br />
FIGURE 10: RESPONSE vs. TEMPERATURE<br />
Time (ms)<br />
300<br />
200<br />
100<br />
Decay Time<br />
COMMERCIAL FLUID<br />
Rise Time<br />
-10 0 20 40<br />
Temperature (°C)<br />
FIGURE 11: 1/3 MUX <strong>LCD</strong> EQUIVALENT CIRCUIT<br />
BP0<br />
BP1<br />
BP2<br />
TEMPERATURE EFFECTS<br />
AN658<br />
As previously shown, temperature has a large impact<br />
on the performance of the <strong>LCD</strong> panel. Not only is the<br />
LC fluid affected, but the internal coatings begin to<br />
deteriorate. All LC fluids have well defined operating<br />
temperature limits. If an <strong>LCD</strong> is operated above its fluid<br />
limits, the LC molecules begin to assume random orientations.<br />
The pixels on a positive image display will<br />
become completely dark, while pixels on a negative<br />
image display will become completely transparent. An<br />
<strong>LCD</strong> can recover from these conditions if the exposure<br />
is kept short, however, temperatures above 110°<br />
C will<br />
cause the ITO and polyimide coatings to deteriorate.<br />
On the low end of the temperature spectrum, response<br />
times increase because the viscosity of the LC fluid<br />
increases. At very low temperatures, typically -60°<br />
C,<br />
the LC fluid transitions into a crystalline state. Usually,<br />
the LC fluid can recover from the effects of low temperature.<br />
Many different types of LC fluid are available,<br />
which allows the <strong>LCD</strong> panel to be tailored to the<br />
expected operating conditions. As mentioned in the<br />
previous section, heaters can combat the effects of low<br />
temperature.<br />
CAPACITANCE<br />
The <strong>LCD</strong> panel can be modeled as a lossy, non-linear<br />
capacitor. The area of the pixel, and therefore the size<br />
of the <strong>LCD</strong> panel, has a direct impact on the value of<br />
the capacitance that a common or segment driver must<br />
be able to drive. Typical values of capacitance are in<br />
the range of 1000 - 1500 pF/cm2<br />
. Figure 11 shows an<br />
example of a 1/3 MUX panel. As you can see the backplane<br />
driver must be capable of driving significantly<br />
higher capacitances than the segment driver.<br />
Care must be taken when designing a system such that<br />
your <strong>LCD</strong> driver is capable of driving the capacitance<br />
on the segment and common. Otherwise the <strong>LCD</strong><br />
panel may be damaged due to a DC offset voltage generated<br />
by overloaded segment and common drivers.<br />
<strong>PIC16C92X</strong> microcontrollers are capable of driving<br />
backplanes up to 5000 pF and segments up to 500 pF.<br />
SEG0 SEG1 SEG2 SEGn<br />
© 1997 <strong>Microchip</strong> Technology Inc. DS00658A-page 7
AN658<br />
BACKLIGHTING<br />
A variety of methods exist for backlighting <strong>LCD</strong> panels,<br />
such as, incandescent lamps, LEDs, and electroluminescent<br />
lamps. Incandescent lamps require some type<br />
of reflector to provide uniform lighting to all areas of the<br />
panel. LEDs require some type of lightguide or lightpipe<br />
to evenly distribute light. Electroluminescent lamps typically<br />
come in some type of a panel arrangement. Other<br />
lighting methods are available for specific applications,<br />
such as fluorescent. Table 2 provides a comparison of<br />
these methods of backlighting.<br />
TABLE 2: BACKLIGHTING FEATURES COMPARISON<br />
Brightness<br />
Color<br />
Size<br />
Voltage<br />
Current @5V/sq. in<br />
Temperature<br />
Cost/sq. in<br />
Shock Tolerance<br />
Life (hours)<br />
DS00658A-page 8<br />
Feature LED Incandescent Electroluminescent<br />
Medium High Low-Medium<br />
Limited White White<br />
Small Small-Medium Thin<br />
5V 1.5V - 28V 45V - 100V<br />
10-30 mA 20 mA 1 mA - 10 mA<br />
Warm Hot Cool<br />
$0.10 - $1.00 $0.10 - $0.80 $0.50 - $2.00<br />
Excellent Fragile Excellent<br />
100,000 150 - 10,000 500 - 15,000<br />
© 1997 <strong>Microchip</strong> Technology Inc.
CONNECTION METHODS<br />
The first method of connecting the <strong>LCD</strong> panel to the<br />
world was the dual-in-line pin shown in Figure 12.<br />
These pins provide excellent protection for harsh environments,<br />
vibration or shock. The <strong>LCD</strong> panel is either<br />
soldered directly to the printed circuit board (PCB) or<br />
inserted into headers.<br />
FIGURE 13: ELASTOMERIC CONNECTORS<br />
Elastomeric<br />
Connector<br />
FIGURE 12: DUAL IN-LINE PINS<br />
AN658<br />
The second method is elastomeric connectors. This<br />
method allows fast assembly/disassembly without having<br />
to solder the <strong>LCD</strong> panel. Elastomeric connectors<br />
are used on small applications where space is a concern.<br />
These connectors are relatively resistant to shock<br />
and vibration, but special consideration must be used<br />
when the panel will be exposed to harsh environments.<br />
Figure 13 shows an assembly drawing of an elastomeric<br />
connector.<br />
Elastomeric<br />
Connector<br />
© 1997 <strong>Microchip</strong> Technology Inc. DS00658A-page 9
AN658<br />
One of the newer methods is the flex connector. A PCB<br />
and the <strong>LCD</strong> panel are connected by a flexible cable<br />
using a heat seal process. The flexible cable is typically<br />
a anisotropic connective film that is applied to the PCB<br />
and <strong>LCD</strong> panel using heat and pressure. These connectors<br />
were designed for harsh environments where<br />
the connector must be flexible enough to prevent breakage<br />
during stress. These connectors are becoming<br />
more popular with large or remotely mounted <strong>LCD</strong> panels.<br />
Figure 14 shows a typical application.<br />
FIGURE 14: FLEX CONNECTORS<br />
DS00658A-page 10<br />
L.C. Display<br />
WHAT ARE THE DIFFERENT TYPES<br />
OF <strong>LCD</strong> PANELS?<br />
<strong>LCD</strong> panels come in many flavors depending on the<br />
application and the operating environment. <strong>LCD</strong>s can<br />
be classified in two ways. First of all, <strong>LCD</strong>s come in<br />
direct drive or multiplex drive variations. Direct drive,<br />
otherwise known as static, means that each pixel of the<br />
<strong>LCD</strong> panel has an independent driver. The <strong>LCD</strong> panel<br />
also has only one backplane. A static drive panel also<br />
has static bias. Bias is defined as the number of voltage<br />
levels the <strong>LCD</strong> driver uses to create images on the<br />
screen. The number of voltage levels is equivalent to<br />
Heat Seal<br />
the 1 + 1/bias. Static bias refers to two voltage levels<br />
which create a square wave, ground and VDD.<br />
Static<br />
drive panels also have the best contrast ratios over the<br />
widest temperature range.<br />
Multiplex drive panels reduce the overall amount of<br />
interconnections between the <strong>LCD</strong> and the driver. Put<br />
simply, multiplex panels have more than one backplane.<br />
A multiplex <strong>LCD</strong> driver produces an amplitude-varying,<br />
time synchronized waveform for both the<br />
segment and backplanes. These waveforms allow<br />
access to one pixel on each of the backplanes. This significantly<br />
increases the complexity of the driver. The<br />
number of backplanes a panel has is referred to the<br />
multiplexing ratio or “MUX” of the panel. MUX also<br />
refers to duty cycle. For instance, a 1/3 MUX panel has<br />
three backplanes. The bias for multiplex panels is at<br />
least 1/2 - 1/5 for segment type drivers and from 1/8 -<br />
1/33 for dot matrix. Table 3 illustrates the advantage of<br />
multiplex panels.<br />
PC Board<br />
Contacts<br />
TABLE 3: STATIC vs. MULTIPLEX PIN<br />
COUNT<br />
<strong>LCD</strong> panel<br />
3 - 1/2 digit<br />
8 digits<br />
2 x 16 character dot<br />
matrix,<br />
5 x 7 characters<br />
128 x 240 graphic<br />
display<br />
Back<br />
planes<br />
Segments Total<br />
1 23 24<br />
2 12 14<br />
1 64 65<br />
4 16 20<br />
1 1280 1281<br />
8 160 168<br />
16 80 96<br />
1 30,720 30721<br />
64 480 544<br />
128 240 368<br />
The last time <strong>Microchip</strong> investigated high pin count<br />
packages, 30,000+ was not an option.<br />
© 1997 <strong>Microchip</strong> Technology Inc.
<strong>PIC16C92X</strong> microcontrollers have the following drive<br />
capabilities:<br />
TABLE 4: <strong>PIC16C92X</strong> DRIVE CAPABILITY<br />
MUX Bias Backplanes Segments<br />
Static Static 1 32<br />
1/2 1/3 2 31<br />
1/3 1/3 3 30<br />
1/4 1/3 4 29<br />
The other method of classifying <strong>LCD</strong> panels is the type<br />
of display notation used, i.e. segment, dot matrix, or<br />
functional. Segment displays are usually the 7-segment,<br />
14-segment, or 16-segment (“British Flag”) types<br />
used to create numbers and letters. These type of displays<br />
are static drive which provides the best contrast<br />
and readability in sunlight. Figure 15 shows all three<br />
segment displays mentioned.<br />
FIGURE 15: SEGMENT TYPE DISPLAY<br />
FIGURE 16: 5x7 DOT MATRIX DISPLAY<br />
FIGURE 17: TYPICAL CELLULAR PHONE PANEL<br />
AN658<br />
Dot matrix displays are always multiplex type displays<br />
due to the large number of pixels required and pin limitations<br />
on the driver. Dot matrix displays can create<br />
more natural letters and numbers as well as custom<br />
graphic symbols. Figure 16 shows a typical 5x7 dot<br />
matrix character set.<br />
The third type of display is most commonly used in conjunction<br />
with the previous types. A function indicator or<br />
icon provides status information about the system.<br />
They are only capable of being turned on or off. One<br />
example would be a digital multimeter. The meter has<br />
three 1/2 digits which are 7-segment type and also<br />
some icons for volts, amps, ohms and the ranges for m,<br />
μ, K, and M. Another example would be a cellular telephone.<br />
The <strong>LCD</strong> panel will have eight or more 5x7 dot<br />
matrix characters with icons for events such as in use,<br />
roam, no service, battery status, and signal strength.<br />
Figure 17 shows what a typical cellular phone panel<br />
might resemble.<br />
Pwr In Use No Svc Roam<br />
© 1997 <strong>Microchip</strong> Technology Inc. DS00658A-page 11
AN658<br />
HOW ARE <strong>LCD</strong> PANELS DRIVEN?<br />
So far, the mysteries of how an <strong>LCD</strong> is made, how it<br />
works, and what the different type of panels have been<br />
revealed. This section will demystify the <strong>LCD</strong> waveforms.<br />
An <strong>LCD</strong> can be characterized by the MUX ratio<br />
and bias, but one piece of information is still missing -<br />
Drive Waveforms. <strong>LCD</strong>s can be driven by two types of<br />
waveforms: Type A and Type B. Before the definitions of<br />
the two types are given, the term frame frequency must<br />
be defined. The <strong>LCD</strong> frame frequency is the rate at<br />
which the backplane and segment outputs change. The<br />
frame frequency is then calculated to be the<br />
<strong>LCD</strong> period / 2 • number of backplanes. The range of<br />
frame frequencies is from 25 to 250 Hz with the most<br />
common being between 50 and 150 Hz. Higher frequencies<br />
result in higher power consumption while<br />
lower frequencies cause flicker in the images on the<br />
<strong>LCD</strong> panel. An earlier section mentioned that a <strong>LCD</strong><br />
FIGURE 18: TYPE A vs. TYPE B WAVEFORMS<br />
Common<br />
Segment<br />
Common-<br />
Segment<br />
Type A Waveforms Type B Waveforms<br />
1 Frame<br />
Common<br />
Segment<br />
Common-<br />
Segment<br />
driver must maintain a 0 VDC potential across each<br />
pixel. Type A waveforms maintain 0 VDC over a single<br />
frame whereas Type B takes two frames. Figure 18<br />
shows both types of waveforms with 1/3 MUX and 1/3<br />
Bias. <strong>PIC16C92X</strong> microcontrollers support only Type A<br />
waveforms.<br />
The voltage applied across a particular pixel is the voltage<br />
on the COM pin minus the voltage on the SEG pin.<br />
If the resulting voltage is at or above the VON threshold<br />
then the pixel is visible. Otherwise the voltage will be at<br />
or below the VOFF threshold and the pixel will not be visible.<br />
This formula is used for all drive/bias methods. The<br />
following figures show each of the modes that are currently<br />
supported by the <strong>PIC16C92X</strong> devices. Since the<br />
<strong>PIC16C92X</strong> devices only support Type A waveforms,<br />
only Type A waveforms for each of the modes are<br />
shown. Each figure has the <strong>LCD</strong> period and the frame<br />
locations marked.<br />
1 Frame<br />
DS00658A-page 12 © 1997 <strong>Microchip</strong> Technology Inc.
FIGURE 19: STATIC WAVEFORMS<br />
COM0<br />
SEG7<br />
SEG6<br />
SEG5<br />
SEG4<br />
SEG3<br />
SEG2<br />
SEG1<br />
SEG0<br />
COM0<br />
SEG0<br />
SEG1<br />
COM0-SEG0<br />
COM0-SEG1<br />
1 Frame<br />
AN658<br />
© 1997 <strong>Microchip</strong> Technology Inc. DS00658A-page 13<br />
V 1<br />
V 0<br />
V 1<br />
V 0<br />
V 1<br />
V 0<br />
V 1<br />
V 0<br />
-V 1<br />
V 0
AN658<br />
FIGURE 20: 1/2 MUX, 1/3 BIAS WAVEFORM<br />
COM1<br />
COM0<br />
SEG0<br />
SEG1<br />
SEG2<br />
SEG3<br />
BP0<br />
BP1<br />
SEG0<br />
SEG1<br />
COM0-SEG0<br />
COM0-SEG1<br />
1 Frame<br />
DS00658A-page 14 © 1997 <strong>Microchip</strong> Technology Inc.<br />
V 3<br />
V 2<br />
V 1<br />
V 0<br />
V 3<br />
V 2<br />
V 1<br />
V 0<br />
V 3<br />
V 2<br />
V 1<br />
V 0<br />
V 3<br />
V 2<br />
V 1<br />
V 0<br />
V 3<br />
V 2<br />
V 1<br />
V 0<br />
-V 1<br />
-V 2<br />
-V 3<br />
V 3<br />
V 2<br />
V 1<br />
V 0<br />
-V 1<br />
-V 2<br />
-V 3
FIGURE 21: 1/3 MUX, 1/3 BIAS WAVEFORM<br />
COM2<br />
COM1<br />
COM0<br />
SEG2<br />
SEG1<br />
SEG0<br />
BP0<br />
BP1<br />
BP2<br />
SEG0<br />
SEG1<br />
BP0-SEG0<br />
BP0-SEG1<br />
1 Frame<br />
AN658<br />
© 1997 <strong>Microchip</strong> Technology Inc. DS00658A-page 15<br />
V 3<br />
V 2<br />
V 1<br />
V 0<br />
V 3<br />
V 2<br />
V 1<br />
V 0<br />
V 3<br />
V 2<br />
V 1<br />
V 0<br />
V 3<br />
V 2<br />
V 1<br />
V 0<br />
V 3<br />
V 2<br />
V 1<br />
V 0<br />
V 3<br />
V 2<br />
V 1<br />
V 0<br />
-V 1<br />
-V 2<br />
-V 3<br />
V 3<br />
V 2<br />
V 1<br />
V 0<br />
-V 1<br />
-V 2<br />
-V 3
AN658<br />
FIGURE 22: 1/4 MUX, 1/3 BIAS WAVEFORM<br />
COM3<br />
COM2<br />
COM1<br />
COM0<br />
SEG1<br />
SEG0<br />
BP0<br />
BP1<br />
BP2<br />
BP3<br />
SEG0<br />
SEG1<br />
BP0-SEG0<br />
BP0-SEG1<br />
1 Frame<br />
DS00658A-page 16 © 1997 <strong>Microchip</strong> Technology Inc.<br />
V 3<br />
V 2<br />
V 1<br />
V 0<br />
V 3<br />
V 2<br />
V 1<br />
V 0<br />
V 3<br />
V 2<br />
V 1<br />
V 0<br />
V 3<br />
V 2<br />
V 1<br />
V 0<br />
V 3<br />
V 2<br />
V 1<br />
V 0<br />
V 3<br />
V 2<br />
V 1<br />
V 0<br />
V3 V2 V1 V0 -V1 -V2 -V3 V3 V2 V1 V0 -V1 -V2 -V3
DISCRIMINATION RATIO<br />
Now that the <strong>LCD</strong> waveforms have been presented,<br />
let’s calculate the discrimination ratio for some of them.<br />
The first example is a static waveform from Figure 19.<br />
The voltages V 1 and V 0 will be assigned values of 1<br />
EXAMPLE 1: DISCRIMINATION RATIO CALCULATION FOR STATIC MUX<br />
BPx<br />
SEGx<br />
D =<br />
0 1<br />
1 0<br />
0 1<br />
ON<br />
OFF<br />
BPx - SEGx [ON] = -1 + 1,<br />
BPx - SEGx [OFF] = 0 + 0,<br />
VRMS [ON] = ΔV<br />
VRMS [OFF] = ΔV<br />
VRMS [ON]<br />
VRMS [OFF]<br />
The next example is for Figure 22 which is a 1/4 MUX,<br />
1/3 BIAS waveform. For this example, the values 3, 2,<br />
1 and 0 will be assigned to V 3 , V 2 , V 1 , and V 0 respectively.<br />
The frame matrix, DC voltage, RMS voltage and<br />
discrimination ratio calculations are shown in<br />
Example 2:<br />
VDC = 0<br />
VDC = 0<br />
(-1) 2 + (1) 2<br />
EXAMPLE 2: DISCRIMINATION RATIO CALCULATION 1/4 MUX<br />
BP0 0 3 2 1 2 1 2 1<br />
BP1 2 1 0 3 2 1 2 1<br />
BP2 2 1 2 1 0 3 2 1<br />
BP3 2 1 2 1 2 1 0 3<br />
SEGx 3 0 3 0 3 0 3 0 ON<br />
1 2 1 2 1 2 1 2 OFF<br />
BP0 - SEGx [ON] = - 3 + 3 - 1 + 1 - 1 + 1 - 1 + 1 VDC = 0<br />
BP0 - SEGx [OFF] = - 1 + 1 - 1 + 1 - 1 + 1 - 1 + 1 VDC = 0<br />
VRMS [ON] = ΔV<br />
2<br />
(0) 2 + (0) 2<br />
2<br />
= 1ΔV<br />
0ΔV = ∞<br />
AN658<br />
and 0. The next step is to construct a matrix for one<br />
frame to help visualize the DC and RMS voltages<br />
present on an individual pixel when it is ON and when<br />
it is OFF. The rest of the following shows the calculation<br />
of the DC, RMS, and Discrimination Ratio.<br />
© 1997 <strong>Microchip</strong> Technology Inc. DS00658A-page 17<br />
=<br />
=<br />
1ΔV<br />
0ΔV<br />
(-3) 2 + (3) 2 + (-1) 2 + (1) 2 + (-1) 2 + (1) 2 + (-1) 2 + (1) 2<br />
VRMS [OFF] = ΔV (-1) = ΔV<br />
2 + (1) 2 + (-1) 2 + (1) 2 + (-1) 2 + (1) 2 + (-1) 2 + (1) 2<br />
8<br />
D =<br />
VRMS [ON]<br />
VRMS [OFF]<br />
= 3 ΔV<br />
1 ΔV<br />
= 1.732<br />
8<br />
=<br />
3 ΔV
AN658<br />
As shown in these examples, static displays have<br />
excellent contrast. The higher the multiplex ratio of the<br />
<strong>LCD</strong>, the lower the discrimination ratio, and therefore,<br />
the lower the contrast of the display.<br />
The following table shows the VOFF, VON and discrimination<br />
ratios of the various combinations of MUX and<br />
BIAS.<br />
TABLE 5: DISCRIMINATION RATION vs.<br />
MUX AND BIAS<br />
1/3 BIAS<br />
Voff Von D<br />
STATIC 0 1 ∞<br />
1/2 MUX 0.333 0.745 2.236<br />
1/3 MUX 0.333 0.638 1.915<br />
1/4 MUX 0.333 0.577 1.732<br />
Table 5 shows that as the multiplex of the <strong>LCD</strong> panel<br />
increases, the discrimination ratio decreases. The contrast<br />
of the panel will also decrease, so to provide better<br />
contrast the <strong>LCD</strong> voltages must be increased to<br />
provide greater separation between each level.<br />
<strong>LCD</strong> VOLTAGE GENERATION<br />
Among the many ways to generate <strong>LCD</strong> voltage, two<br />
methods stand out above the crowd: resistor ladder<br />
and charge pump.<br />
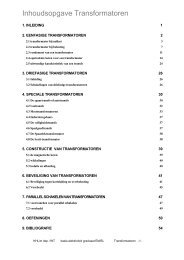
FIGURE 23: RESISTOR LADDER<br />
The resistor ladder methods, shown in Figure 23 is<br />
most commonly used for higher VCC voltages. This<br />
method uses inexpensive resistors to create the multilevel<br />
<strong>LCD</strong> voltages. Regardless of the number of pixels<br />
that are energized the current remains constant. The<br />
voltage at point V3 is typically tied to VCC, either internally<br />
or externally.<br />
The resistance values are determined by two factors:<br />
display quality and power consumption. Display quality<br />
is a function of the <strong>LCD</strong> drive waveforms. Since the<br />
V 3<br />
V 2<br />
V 1<br />
V 0<br />
<strong>LCD</strong> panel is a capacitive load, the waveform is distorted<br />
due to the charging and discharging currents.<br />
This distortion can be reduced by decreasing the value<br />
of resistance. However this change increases the<br />
power consumption due to the increased current now<br />
flowing through the resistors. As the <strong>LCD</strong> panel<br />
increases in size, the resistance value must be<br />
decreased to maintain the image quality of the display.<br />
Sometimes the addition of parallel capacitors to the<br />
resistance can reduce the distortion caused by charging/discharging<br />
currents. This effect is limited since at<br />
some point a large resistor and large capacitor cause a<br />
voltage level shift which negatively impacts the display<br />
quality. In general, R is 1 kΩ to 50 kΩ and the potentiometer<br />
is 5 kΩ to 200 kΩ.<br />
FIGURE 24: RESISTOR LADDER WITH<br />
CAPACITORS<br />
A charge pump is ideal for low voltage battery operation<br />
because the VDD voltage can be boosted up to<br />
drive the <strong>LCD</strong> panel. The charge pump requires a<br />
charging capacitor and filter capacitor for each of the<br />
<strong>LCD</strong> voltages as seen in Figure 25. These capacitors<br />
are typically polyester, polypropylene, or polystyrene<br />
material. Another feature that makes the charge pump<br />
ideal for battery applications is that the current consumption<br />
is proportional to the number of pixels that<br />
are energized.<br />
FIGURE 25: CHARGE PUMP<br />
DS00658A-page 18 © 1997 <strong>Microchip</strong> Technology Inc.<br />
V 3<br />
V 2<br />
V 1<br />
V 0<br />
C 1<br />
C 2<br />
V 3<br />
V 2<br />
V 1<br />
V 0<br />
VADJ<br />
+5V<br />
R<br />
R<br />
R<br />
C<br />
C<br />
C
CONTRAST<br />
Although contrast is heavily dependent on the light<br />
source available and the multiplex mode, it also varies<br />
with the <strong>LCD</strong> voltage levels. As previously seen, a<br />
potentiometer is used to control the contrast of the <strong>LCD</strong><br />
panel. The potentiometer sets the separation between<br />
each of the <strong>LCD</strong> voltages. The larger the separation,<br />
the better the contrast achievable.<br />
CONCLUSION:<br />
AN658<br />
Hopefully you can now answer the questions:<br />
• What are the basic components in an <strong>LCD</strong> panel?<br />
• How does an <strong>LCD</strong> work?<br />
• What are the different types of <strong>LCD</strong> panels?<br />
• How are <strong>LCD</strong> panels driven?<br />
This application note has covered <strong>LCD</strong> fundamentals in<br />
great detail. Please refer to the <strong>PIC16C92X</strong> microcontroller<br />
data sheet for more information. Also application<br />
note AN649, “Yet Another Clock Featuring the<br />
PIC16C924” shows an example application using the<br />
PIC16C924.<br />
© 1997 <strong>Microchip</strong> Technology Inc. DS00658A-page 19
AN658<br />
APPENDIX A: LIST OF <strong>LCD</strong> MANUFACTURERS AND DISTRIBUTORS<br />
AEG-MIS<br />
3340 Peachtree Rd. NE Suite 500<br />
Atlanta, GA 30326<br />
TEL: 404-239-0277<br />
FAX: 404-239-0383<br />
All Shore INDS Inc.<br />
1 Edgewater Plaza<br />
Staten Island, NY 10305<br />
TEL: 718-720-0018<br />
FAX: 718-720-0225<br />
Crystaloid<br />
5282 Hudson Drive<br />
Hudson, OH 44236-3769<br />
TEL: 216-655-2429<br />
FAX: 216-655-2176<br />
DCI Inc.<br />
14812 W. 117th St.<br />
Olathe, KS 66062-9304<br />
TEL: 913-782-5672<br />
FAX: 913-782-5766<br />
Excel Technology International Corporation<br />
Unit 5, Bldg. 4, Stryker Lane<br />
Belle Mead, NJ 08502<br />
TEL: 908-874-4747<br />
FAX: 908-874-3278<br />
F-P Electronics/Mark IV Industries<br />
6030 Ambler Drive<br />
Mississauga, ON Canada L4W 2PI<br />
TEL: 905-624-3020<br />
FAX: 905-238-3141<br />
Hunter Components<br />
24800 Chagrin Blvd, Suite 101<br />
Cleveland, OH 44122<br />
TEL: 216-831-1464<br />
FAX: 216-831-1463<br />
Satori Electric<br />
23717 Hawthorne Blvd. 3rd Floor<br />
Torrance, CA 90505<br />
TEL: 310-214-1791<br />
FAX: 310-214-1721<br />
Interstate Electronics Corp.<br />
1001 E. Bull Rd.<br />
Anaheim, CA 92805<br />
TEL: 800-854-6979<br />
FAX: 714-758-4111<br />
Kent Display Systems<br />
343 Portage Blvd.<br />
Kent, OH 44240<br />
TEL: 330-673-8784<br />
<strong>LCD</strong> Planar Optics Corporation<br />
2100-2 Artic Ave.<br />
Bohemia, NY 11716<br />
TEL: 516-567-4100<br />
FAX: 516-567-8516<br />
LXD Inc.<br />
7650 First Place<br />
Oakwood Village, OH 44146<br />
TEL: 216-786-8700<br />
FAX: 216-786-8711<br />
Nippon Sheet Glass<br />
Tomen America Inc.<br />
1285 Avenue of the Americas<br />
New York, NY 10019<br />
TEL: 212-397-4600<br />
FAX: 212-397-3351<br />
OPTREX America<br />
44160 Plymouth Oaks Blvd.<br />
Plymouth, MI 48170<br />
TEL: 313-416-8500<br />
FAX: 313-416-8520<br />
Phillips Components<br />
<strong>LCD</strong> Business Unit<br />
1273 Lyons Road, Bldg G<br />
Dayton, OH 45459<br />
TEL: 573-436-9500<br />
FAX: 573-436-2230<br />
Varitronix Limited Inc.<br />
3250 Wilshire Blvd. Suite 1901<br />
Los Angeles, CA 90010<br />
TEL: 213-738-8700<br />
FAX: 213-738-5340<br />
DS00658A-page 20 © 1997 <strong>Microchip</strong> Technology Inc.
Seiko Instruments USA Inc.<br />
Electronic Components Division<br />
2990 West Lomita Blvd.<br />
Torrance, CA 90505<br />
TEL: 213-517-7770<br />
213-517-8113<br />
FAX: 213-517-7792<br />
Standish International<br />
European Technical Center<br />
Am Baümstuck II<br />
65520 Bad Camberg/Erbach<br />
Germany<br />
TEL: 011 49 6434 3324<br />
FAX: 011 49 6434 377238<br />
Standish <strong>LCD</strong><br />
W7514 Highway V<br />
Lake Mills, WI 53551<br />
TEL: 414-648-1000<br />
FAX: 414-648-1001<br />
Truly Semiconductors Ltd. (USA)<br />
2620 Concord Ave.<br />
Suite 106<br />
Alhambra, CA 91803<br />
TEL: 818-284-3033<br />
FAX: 818-284-6026<br />
Truly Semiconductor Ltd.<br />
2/F, Chung Shun Knitting Center<br />
1-3 Wing Yip Street,<br />
Kwai Chung, N.T., Hong Kong<br />
TEL: 852 2487 9803<br />
FAX: 852 2480 0126<br />
Varitronix Limited Inc.<br />
4/F, Liven House<br />
61-63 King Yip Street<br />
Kwun Tong, Kowloon<br />
Hong Kong<br />
TEL: 852 2389 4317<br />
FAX: 852 2343 9555<br />
Varitronix (France) S.A.R.L.<br />
13/15 Chemin De Chilly<br />
91160 Champlan<br />
France<br />
TEL: (33) 1 69 09 7070<br />
FAX: (33) 1 69 09 0535<br />
Varitronix Italia, S.R.L.<br />
Via Bruno Buozzi 90<br />
20099 Sesto San Giovanni<br />
Milano, Italy<br />
TEL: (39) 2 2622 2744<br />
FAX: (39) 2 2622 2745<br />
Varitronix (UK) Limited<br />
Display House, 3 Milbanke Court<br />
Milbanke Way, Bracknell<br />
Berkshire RG12 1BR<br />
United Kingdom<br />
TEL: (44) 1344 30377<br />
FAX (44) 1344 300099<br />
Varitronix (Canada) Limited<br />
18 Crown Steel Drive, Suite 101<br />
Markham, Ontario<br />
Canada L3R 9X8<br />
TEL: (905) 415-0023<br />
FAX: (905) 415-0094<br />
Vikay America Inc.<br />
195 W. Main St.<br />
Avon, CT 06001-3685<br />
TEL: 860-678-7600<br />
FAX: 860-678-7625<br />
AN658<br />
© 1997 <strong>Microchip</strong> Technology Inc. DS00658A-page 21
AN658<br />
DISTRIBUTORS<br />
Allied Electronics Inc.<br />
7410 Pebble Drive<br />
Fort Worth, TX 76118<br />
TEL: 800-433-5700<br />
http://www.allied.avnet.com<br />
Digikey Corporation<br />
701 Brooks Ave. South<br />
Thief River Falls, MN 56701-0677<br />
TEL: 800-344-4539<br />
http://www.digikey.com<br />
Newark Electronics<br />
Administrative Office<br />
4801 N. Ravenswood Ave.<br />
Chicago, IL 60640-4496<br />
TEL: 312-784-5700<br />
FAX: 312-907-5217<br />
DS00658A-page 22 © 1997 <strong>Microchip</strong> Technology Inc.
Note the following details of the code protection feature on PICmicro ® MCUs.<br />
The PICmicro family meets the specifications contained in the <strong>Microchip</strong> Data Sheet.<br />
<strong>Microchip</strong> believes that its family of PICmicro microcontrollers is one of the most secure products of its kind on the market today,<br />
when used in the intended manner and under normal conditions.<br />
There are dishonest and possibly illegal methods used to breach the code protection feature. All of these methods, to our knowledge,<br />
require using the PICmicro microcontroller in a manner outside the operating specifications contained in the data sheet.<br />
The person doing so may be engaged in theft of intellectual property.<br />
<strong>Microchip</strong> is willing to work with the customer who is concerned about the integrity of their code.<br />
Neither <strong>Microchip</strong> nor any other semiconductor manufacturer can guarantee the security of their code. Code protection does not<br />
mean that we are guaranteeing the product as “unbreakable”.<br />
Code protection is constantly evolving. We at <strong>Microchip</strong> are committed to continuously improving the code protection features of<br />
our product.<br />
If you have any further questions about this matter, please contact the local sales office nearest to you.<br />
Information contained in this publication regarding device<br />
applications and the like is intended through suggestion only<br />
and may be superseded by updates. It is your responsibility to<br />
ensure that your application meets with your specifications.<br />
No representation or warranty is given and no liability is<br />
assumed by <strong>Microchip</strong> Technology Incorporated with respect<br />
to the accuracy or use of such information, or infringement of<br />
patents or other intellectual property rights arising from such<br />
use or otherwise. Use of <strong>Microchip</strong>’s products as critical components<br />
in life support systems is not authorized except with<br />
express written approval by <strong>Microchip</strong>. No licenses are conveyed,<br />
implicitly or otherwise, under any intellectual property<br />
rights.<br />
© 2002 <strong>Microchip</strong> Technology Inc.<br />
Trademarks<br />
The <strong>Microchip</strong> name and logo, the <strong>Microchip</strong> logo, FilterLab,<br />
KEELOQ, microID, MPLAB, PIC, PICmicro, PICMASTER,<br />
PICSTART, PRO MATE, SEEVAL and The Embedded Control<br />
Solutions Company are registered trademarks of <strong>Microchip</strong> Technology<br />
Incorporated in the U.S.A. and other countries.<br />
dsPIC, ECONOMONITOR, FanSense, FlexROM, fuzzyLAB,<br />
In-Circuit Serial Programming, ICSP, ICEPIC, microPort,<br />
Migratable Memory, MPASM, MPLIB, MPLINK, MPSIM,<br />
MXDEV, PICC, PICDEM, PICDEM.net, rfPIC, Select Mode<br />
and Total Endurance are trademarks of <strong>Microchip</strong> Technology<br />
Incorporated in the U.S.A.<br />
Serialized Quick Turn Programming (SQTP) is a service mark<br />
of <strong>Microchip</strong> Technology Incorporated in the U.S.A.<br />
All other trademarks mentioned herein are property of their<br />
respective companies.<br />
© 2002, <strong>Microchip</strong> Technology Incorporated, Printed in the<br />
U.S.A., All Rights Reserved.<br />
Printed on recycled paper.<br />
<strong>Microchip</strong> received QS-9000 quality system<br />
certification for its worldwide headquarters,<br />
design and wafer fabrication facilities in<br />
Chandler and Tempe, Arizona in July 1999. The<br />
Company’s quality system processes and<br />
procedures are QS-9000 compliant for its<br />
PICmicro ® 8-bit MCUs, KEELOQ ® code hopping<br />
devices, Serial EEPROMs and microperipheral<br />
products. In addition, <strong>Microchip</strong>’s quality<br />
system for the design and manufacture of<br />
development systems is ISO 9001 certified.
M<br />
AMERICAS<br />
Corporate Office<br />
2355 West Chandler Blvd.<br />
Chandler, AZ 85224-6199<br />
Tel: 480-792-7200 Fax: 480-792-7277<br />
Technical Support: 480-792-7627<br />
Web Address: http://www.microchip.com<br />
Rocky Mountain<br />
2355 West Chandler Blvd.<br />
Chandler, AZ 85224-6199<br />
Tel: 480-792-7966 Fax: 480-792-7456<br />
Atlanta<br />
500 Sugar Mill Road, Suite 200B<br />
Atlanta, GA 30350<br />
Tel: 770-640-0034 Fax: 770-640-0307<br />
Boston<br />
2 Lan Drive, Suite 120<br />
Westford, MA 01886<br />
Tel: 978-692-3848 Fax: 978-692-3821<br />
Chicago<br />
333 Pierce Road, Suite 180<br />
Itasca, IL 60143<br />
Tel: 630-285-0071 Fax: 630-285-0075<br />
Dallas<br />
4570 Westgrove Drive, Suite 160<br />
Addison, TX 75001<br />
Tel: 972-818-7423 Fax: 972-818-2924<br />
Detroit<br />
Tri-Atria Office Building<br />
32255 Northwestern Highway, Suite 190<br />
Farmington Hills, MI 48334<br />
Tel: 248-538-2250 Fax: 248-538-2260<br />
Kokomo<br />
2767 S. Albright Road<br />
Kokomo, Indiana 46902<br />
Tel: 765-864-8360 Fax: 765-864-8387<br />
Los Angeles<br />
18201 Von Karman, Suite 1090<br />
Irvine, CA 92612<br />
Tel: 949-263-1888 Fax: 949-263-1338<br />
New York<br />
150 Motor Parkway, Suite 202<br />
Hauppauge, NY 11788<br />
Tel: 631-273-5305 Fax: 631-273-5335<br />
San Jose<br />
<strong>Microchip</strong> Technology Inc.<br />
2107 North First Street, Suite 590<br />
San Jose, CA 95131<br />
Tel: 408-436-7950 Fax: 408-436-7955<br />
Toronto<br />
6285 Northam Drive, Suite 108<br />
Mississauga, Ontario L4V 1X5, Canada<br />
Tel: 905-673-0699 Fax: 905-673-6509<br />
WORLDWIDE SALES AND SERVICE<br />
ASIA/PACIFIC<br />
Australia<br />
<strong>Microchip</strong> Technology Australia Pty Ltd<br />
Suite 22, 41 Rawson Street<br />
Epping 2121, NSW<br />
Australia<br />
Tel: 61-2-9868-6733 Fax: 61-2-9868-6755<br />
China - Beijing<br />
<strong>Microchip</strong> Technology Consulting (Shanghai)<br />
Co., Ltd., Beijing Liaison Office<br />
Unit 915<br />
Bei Hai Wan Tai Bldg.<br />
No. 6 Chaoyangmen Beidajie<br />
Beijing, 100027, No. China<br />
Tel: 86-10-85282100 Fax: 86-10-85282104<br />
China - Chengdu<br />
<strong>Microchip</strong> Technology Consulting (Shanghai)<br />
Co., Ltd., Chengdu Liaison Office<br />
Rm. 2401, 24th Floor,<br />
Ming Xing Financial Tower<br />
No. 88 TIDU Street<br />
Chengdu 610016, China<br />
Tel: 86-28-6766200 Fax: 86-28-6766599<br />
China - Fuzhou<br />
<strong>Microchip</strong> Technology Consulting (Shanghai)<br />
Co., Ltd., Fuzhou Liaison Office<br />
Unit 28F, World Trade Plaza<br />
No. 71 Wusi Road<br />
Fuzhou 350001, China<br />
Tel: 86-591-7503506 Fax: 86-591-7503521<br />
China - Shanghai<br />
<strong>Microchip</strong> Technology Consulting (Shanghai)<br />
Co., Ltd.<br />
Room 701, Bldg. B<br />
Far East International Plaza<br />
No. 317 Xian Xia Road<br />
Shanghai, 200051<br />
Tel: 86-21-6275-5700 Fax: 86-21-6275-5060<br />
China - Shenzhen<br />
<strong>Microchip</strong> Technology Consulting (Shanghai)<br />
Co., Ltd., Shenzhen Liaison Office<br />
Rm. 1315, 13/F, Shenzhen Kerry Centre,<br />
Renminnan Lu<br />
Shenzhen 518001, China<br />
Tel: 86-755-2350361 Fax: 86-755-2366086<br />
Hong Kong<br />
<strong>Microchip</strong> Technology Hongkong Ltd.<br />
Unit 901-6, Tower 2, Metroplaza<br />
223 Hing Fong Road<br />
Kwai Fong, N.T., Hong Kong<br />
Tel: 852-2401-1200 Fax: 852-2401-3431<br />
India<br />
<strong>Microchip</strong> Technology Inc.<br />
India Liaison Office<br />
Divyasree Chambers<br />
1 Floor, Wing A (A3/A4)<br />
No. 11, O’Shaugnessey Road<br />
Bangalore, 560 025, India<br />
Tel: 91-80-2290061 Fax: 91-80-2290062<br />
Japan<br />
<strong>Microchip</strong> Technology Japan K.K.<br />
Benex S-1 6F<br />
3-18-20, Shinyokohama<br />
Kohoku-Ku, Yokohama-shi<br />
Kanagawa, 222-0033, Japan<br />
Tel: 81-45-471- 6166 Fax: 81-45-471-6122<br />
Korea<br />
<strong>Microchip</strong> Technology Korea<br />
168-1, Youngbo Bldg. 3 Floor<br />
Samsung-Dong, Kangnam-Ku<br />
Seoul, Korea 135-882<br />
Tel: 82-2-554-7200 Fax: 82-2-558-5934<br />
Singapore<br />
<strong>Microchip</strong> Technology Singapore Pte Ltd.<br />
200 Middle Road<br />
#07-02 Prime Centre<br />
Singapore, 188980<br />
Tel: 65-334-8870 Fax: 65-334-8850<br />
Taiwan<br />
<strong>Microchip</strong> Technology Taiwan<br />
11F-3, No. 207<br />
Tung Hua North Road<br />
Taipei, 105, Taiwan<br />
Tel: 886-2-2717-7175 Fax: 886-2-2545-0139<br />
EUROPE<br />
Denmark<br />
<strong>Microchip</strong> Technology Nordic ApS<br />
Regus Business Centre<br />
Lautrup hoj 1-3<br />
Ballerup DK-2750 Denmark<br />
Tel: 45 4420 9895 Fax: 45 4420 9910<br />
France<br />
<strong>Microchip</strong> Technology SARL<br />
Parc d’Activite du Moulin de Massy<br />
43 Rue du Saule Trapu<br />
Batiment A - ler Etage<br />
91300 Massy, France<br />
Tel: 33-1-69-53-63-20 Fax: 33-1-69-30-90-79<br />
Germany<br />
<strong>Microchip</strong> Technology GmbH<br />
Gustav-Heinemann Ring 125<br />
D-81739 Munich, Germany<br />
Tel: 49-89-627-144 0 Fax: 49-89-627-144-44<br />
Italy<br />
<strong>Microchip</strong> Technology SRL<br />
Centro Direzionale Colleoni<br />
Palazzo Taurus 1 V. Le Colleoni 1<br />
20041 Agrate Brianza<br />
Milan, Italy<br />
Tel: 39-039-65791-1 Fax: 39-039-6899883<br />
United Kingdom<br />
Arizona <strong>Microchip</strong> Technology Ltd.<br />
505 Eskdale Road<br />
Winnersh Triangle<br />
Wokingham<br />
Berkshire, England RG41 5TU<br />
Tel: 44 118 921 5869 Fax: 44-118 921-5820<br />
01/18/02<br />
© 2002 <strong>Microchip</strong> Technology Inc.