6 Processing Options with KODAK EKTACOLOR Chemicals - 125px
6 Processing Options with KODAK EKTACOLOR Chemicals - 125px
6 Processing Options with KODAK EKTACOLOR Chemicals - 125px
You also want an ePaper? Increase the reach of your titles
YUMPU automatically turns print PDFs into web optimized ePapers that Google loves.
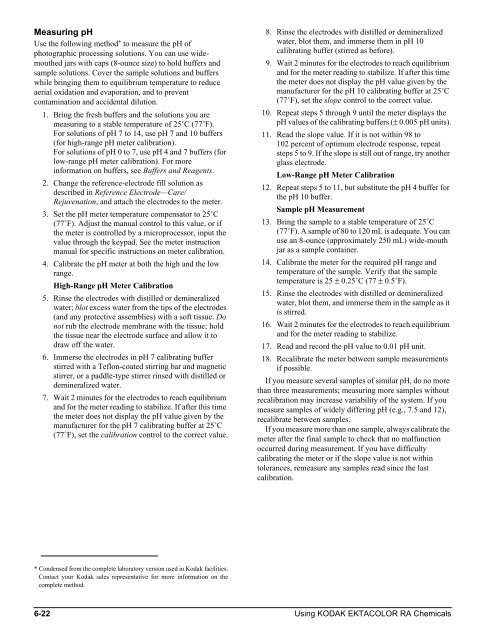
Measuring pH<br />
Use the following method * to measure the pH of<br />
photographic processing solutions. You can use widemouthed<br />
jars <strong>with</strong> caps (8-ounce size) to hold buffers and<br />
sample solutions. Cover the sample solutions and buffers<br />
while bringing them to equilibrium temperature to reduce<br />
aerial oxidation and evaporation, and to prevent<br />
contamination and accidental dilution.<br />
1. Bring the fresh buffers and the solutions you are<br />
measuring to a stable temperature of 25˚C (77˚F).<br />
For solutions of pH 7 to 14, use pH 7 and 10 buffers<br />
(for high-range pH meter calibration).<br />
For solutions of pH 0 to 7, use pH 4 and 7 buffers (for<br />
low-range pH meter calibration). For more<br />
information on buffers, see Buffers and Reagents.<br />
2. Change the reference-electrode fill solution as<br />
described in Reference Electrode—Care/<br />
Rejuvenation, and attach the electrodes to the meter.<br />
3. Set the pH meter temperature compensator to 25˚C<br />
(77˚F). Adjust the manual control to this value, or if<br />
the meter is controlled by a microprocessor, input the<br />
value through the keypad. See the meter instruction<br />
manual for specific instructions on meter calibration.<br />
4. Calibrate the pH meter at both the high and the low<br />
range.<br />
High-Range pH Meter Calibration<br />
5. Rinse the electrodes <strong>with</strong> distilled or demineralized<br />
water; blot excess water from the tips of the electrodes<br />
(and any protective assemblies) <strong>with</strong> a soft tissue. Do<br />
not rub the electrode membrane <strong>with</strong> the tissue; hold<br />
the tissue near the electrode surface and allow it to<br />
draw off the water.<br />
6. Immerse the electrodes in pH 7 calibrating buffer<br />
stirred <strong>with</strong> a Teflon-coated stirring bar and magnetic<br />
stirrer, or a paddle-type stirrer rinsed <strong>with</strong> distilled or<br />
demineralized water.<br />
7. Wait 2 minutes for the electrodes to reach equilibrium<br />
and for the meter reading to stabilize. If after this time<br />
the meter does not display the pH value given by the<br />
manufacturer for the pH 7 calibrating buffer at 25˚C<br />
(77˚F), set the calibration control to the correct value.<br />
* Condensed from the complete laboratory version used in Kodak facilities.<br />
Contact your Kodak sales representative for more information on the<br />
complete method.<br />
8. Rinse the electrodes <strong>with</strong> distilled or demineralized<br />
water, blot them, and immerse them in pH 10<br />
calibrating buffer (stirred as before).<br />
9. Wait 2 minutes for the electrodes to reach equilibrium<br />
and for the meter reading to stabilize. If after this time<br />
the meter does not display the pH value given by the<br />
manufacturer for the pH 10 calibrating buffer at 25˚C<br />
(77˚F), set the slope control to the correct value.<br />
10. Repeat steps 5 through 9 until the meter displays the<br />
pH values of the calibrating buffers (± 0.005 pH units).<br />
11. Read the slope value. If it is not <strong>with</strong>in 98 to<br />
102 percent of optimum electrode response, repeat<br />
steps 5 to 9. If the slope is still out of range, try another<br />
glass electrode.<br />
Low-Range pH Meter Calibration<br />
12. Repeat steps 5 to 11, but substitute the pH 4 buffer for<br />
the pH 10 buffer.<br />
Sample pH Measurement<br />
13. Bring the sample to a stable temperature of 25˚C<br />
(77˚F). A sample of 80 to 120 mL is adequate. You can<br />
use an 8-ounce (approximately 250 mL) wide-mouth<br />
jar as a sample container.<br />
14. Calibrate the meter for the required pH range and<br />
temperature of the sample. Verify that the sample<br />
temperature is 25 ± 0.25˚C (77 ± 0.5˚F).<br />
15. Rinse the electrodes <strong>with</strong> distilled or demineralized<br />
water, blot them, and immerse them in the sample as it<br />
is stirred.<br />
16. Wait 2 minutes for the electrodes to reach equilibrium<br />
and for the meter reading to stabilize.<br />
17. Read and record the pH value to 0.01 pH unit.<br />
18. Recalibrate the meter between sample measurements<br />
if possible.<br />
If you measure several samples of similar pH, do no more<br />
than three measurements; measuring more samples <strong>with</strong>out<br />
recalibration may increase variability of the system. If you<br />
measure samples of widely differing pH (e.g., 7.5 and 12),<br />
recalibrate between samples.<br />
If you measure more than one sample, always calibrate the<br />
meter after the final sample to check that no malfunction<br />
occurred during measurement. If you have difficulty<br />
calibrating the meter or if the slope value is not <strong>with</strong>in<br />
tolerances, remeasure any samples read since the last<br />
calibration.<br />
6-22 Using <strong>KODAK</strong> <strong>EKTACOLOR</strong> RA <strong>Chemicals</strong>


