Ohlins TTX36 Owners Manual
Ohlins TTX36 Owners Manual
Ohlins TTX36 Owners Manual

Create successful ePaper yourself
Turn your PDF publications into a flip-book with our unique Google optimized e-Paper software.
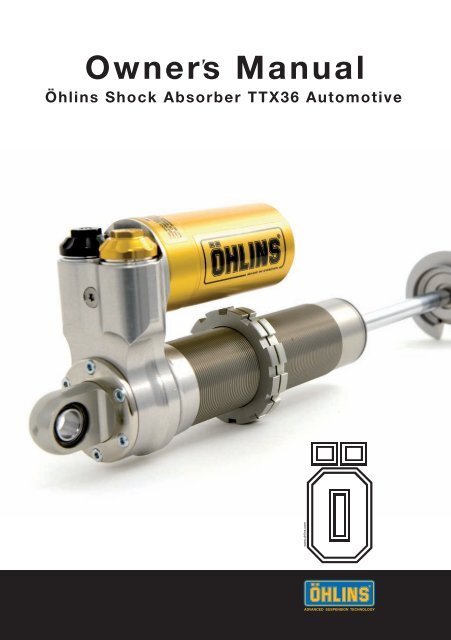
<strong>Owners</strong> <strong>Manual</strong><br />
Öhlins Shock Absorber <strong>TTX36</strong> Automotive
It was the 1970’s, a young man named<br />
Kenth Öhlin spent most of his spare time<br />
pursuing his favourite sport: motocross.<br />
A careful observer, Kenth’s attention<br />
was continually drawn to one specific<br />
detail - motocross bikes had more engine<br />
power than their suspension could<br />
handle. It was not long before Kenth<br />
realised that better performance could be<br />
achieved by improved wheel suspension.<br />
Congratulations!<br />
You are now the owner of an Öhlins<br />
Shock Absorber. More than one hundred<br />
World Championships and other major<br />
world titles are definitive proof that<br />
Öhlins shock absorbers offer outstanding<br />
performance and reliability.<br />
Every product has gone through<br />
rigorous testing and engineers have spent<br />
thousands of hours, doing their very best<br />
to use every possible experience from our<br />
30 years within the racing sport.<br />
Öhlins Racing AB - The Story<br />
Öhlins Racing was established in 976,<br />
and just two years later the company won<br />
its first World Championship title. Despite<br />
being in the business for 30 years, the<br />
search for perfection and new functions is<br />
still the main focus of the company.<br />
The product that you now have in your<br />
possession is pure racing breed that is<br />
built to withstand.<br />
By installing this shock absorber<br />
on your vehicle you have made a clear<br />
statement… you are a serious driver with<br />
a focus on getting the maximal handling<br />
ability and outstanding feedback from<br />
your vehicle. Along comes the fact that<br />
your shock absorber will be a long lasting<br />
friend, delivering the very best of comfort<br />
and performance every time you go<br />
for a ride.<br />
Go explore!
Öhlins Racing AB cannot be held<br />
responsible for any damage to the shock<br />
absorber or vehicle, or injury to persons,<br />
if the instructions for installing and<br />
maintenance are not followed exactly.<br />
Similarly the warranty will become<br />
null and void if the instructions are not<br />
followed.<br />
Safety Signals<br />
In this manual, mounting instructions<br />
and other technical documents,<br />
important information concerning<br />
safety is distinguished by the following<br />
notations:<br />
!<br />
The Safety Alert Symbol means:<br />
Warning! Your safety is involved.<br />
! WARNING!<br />
The Warning Symbol means: Failure to<br />
follow warning instructions can result in<br />
severe or fatal injury to anyone working<br />
with, inspecting or using the shock<br />
absorber, or to bystanders.<br />
CAuTION!<br />
The Caution Symbol means: Special<br />
precautions must be taken to avoid<br />
damage to the shock absorber.<br />
NOTE!<br />
The Note Symbol indicates information<br />
that is of importance regarding<br />
procedures.<br />
!<br />
.<br />
.<br />
3.<br />
Safety Precautions<br />
WARNING!<br />
Installing a shock absorber, that<br />
is not approved by the vehicle<br />
manufacturer, may affect the stability<br />
of your vehicle. Öhlins Racing AB<br />
cannot be held responsible for any<br />
personal injury or damage that may<br />
occur after installing the shock<br />
absorber.<br />
Please study and make certain that<br />
you fully understand this manual and<br />
the mounting instructions before<br />
handling this shock absorber. If<br />
you have any questions regarding<br />
proper installation procedures or<br />
maintenance, please contact an<br />
Öhlins dealer.<br />
Refer to the vehicle service manual<br />
when installing this shock absorber.<br />
NOTE!<br />
Öhlins products are subject to continuous<br />
improvement and development.<br />
Therefore, although these instructions<br />
include the most up-to-date information<br />
available at the time of printing, there<br />
may be minor differences between your<br />
shock absorber and this manual. Please<br />
consult your Öhlins dealer if you have any<br />
questions regarding the contents of the<br />
manual.<br />
Before riding the vehicle, always make<br />
sure that the basic settings made by<br />
Öhlins are correct. See the Mounting<br />
instructions for recommended Set-up<br />
data. Contact an Öhlins dealer if you have<br />
any questions about setting the shock<br />
absorber.<br />
© Öhlins Racing AB. All rights reserved. Any<br />
reprinting or unauthorized use without the<br />
written permission of Öhlins Racing AB is<br />
prohibited. Printed in Sweden.
In This <strong>Manual</strong><br />
Design and Function 4<br />
Spring Pre-load 6<br />
Compression and Rebound 7<br />
Adjustment and Set up 8<br />
Inspection and Maintenance 9<br />
3
Congratulations on choosing the Öhlins<br />
TTX shock absorber - the most unique<br />
and powerful racing shock absorber<br />
available today. The <strong>TTX36</strong> shock<br />
absorber design is the culmination of two<br />
decades of Öhlins successful participation<br />
in World Championship events.<br />
This shock absorber draws on all the<br />
expertise developed by Öhlins while<br />
winning more than one hundred World<br />
Championship titles.<br />
The Öhlins <strong>TTX36</strong> features a patented<br />
concept with a unique concentric twin<br />
tube design, together with a solid main<br />
piston, that allows for the gas pressure<br />
to always back-up the low-pressure<br />
side of the main piston. This design<br />
creates positive pressure build up on<br />
both compression and rebound stroke.<br />
As a result the <strong>TTX36</strong> has a more direct<br />
damping response, less risk for cavitation<br />
and works with lower gas pressure.<br />
Compared to a regular piggy<br />
back single tube shock absorber,<br />
that has positive pressure build up<br />
only on rebound stroke and relies on<br />
compression valve resistance together<br />
with gas pressure to avoid cavitation on<br />
compression stroke, the <strong>TTX36</strong> design is<br />
superior.<br />
Also the twin tube design with<br />
separate channels connecting the<br />
compression valve to the compression<br />
side of the main piston and the rebound<br />
valve to the rebound side of the main<br />
piston, gives the possibility to have<br />
completely separated adjusters for<br />
compression and rebound damping.<br />
Design and Function<br />
4<br />
The whole system is pressurized by<br />
nitrogen gas behind a floating piston to<br />
ensure separation of the gas and fluid.<br />
The Öhlins shim system offers infinite<br />
combinations of shim stacks with a wide<br />
spectrum of different character.<br />
The Öhlins <strong>TTX36</strong> shock absorber is a<br />
user friendly shock absorber, easy to set<br />
up, dial in and rebuild. Support is always<br />
available from the Öhlins distributors<br />
worldwide.<br />
Function<br />
When the shock absorber moves, the<br />
fluid inside is forced to flow through<br />
either the compression valve or rebound<br />
valve first (depending on direction of<br />
movement) ; followed by going through<br />
either the rebound check valve or<br />
compression check valve and on to the<br />
other side of the main piston. The fluid<br />
displaced by the piston rod is directed<br />
either into or out of the reservoir. The<br />
reservoir is connected to the system so,<br />
regardless of direction of movement, it<br />
will be in contact with the low pressure<br />
side of the main piston.<br />
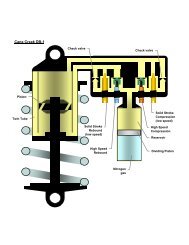
The compression and the rebound<br />
valve are both of the same design. The<br />
valve has three flow paths for the fluid.<br />
Bleed valve, a small orifice that creates<br />
a flow restriction simply by being small.<br />
Shim valve, fluid pressure has to deflect<br />
thin steel washers (shims) to open up an<br />
orifice and allow fluid to flow through it.<br />
Check valve: a spring pre-loaded shim<br />
that opens easily, for return flow of fluid<br />
when the direction of movement of the<br />
shock absorber changes.
The bleed valve and shim valve are used<br />
to build up damping force. At slow stroke<br />
speeds the percentage going through the<br />
bleed valve is higher and at fast strokes<br />
the shim valve takes care of most of the<br />
flow.<br />
The check valve, together with the<br />
bleed valve (since it can flow both<br />
directions), handle return flow.<br />
To control damping force the bleed<br />
valve can be changed in size by the<br />
external adjuster, compression and<br />
rebound.<br />
By altering the stiffness of the shim<br />
stack (number, thickness, diameter<br />
and shape) on the shim valve the<br />
characteristics of the damping action can<br />
be changed.<br />
This should only be done by an<br />
authorized Öhlins service workshop.<br />
Compression Damping<br />
When movement of the vehicle causes<br />
compression of the shock absorber the<br />
fluid above the main piston is pressurized<br />
(more than the set gas pressure) and<br />
goes through the:<br />
•<br />
•<br />
•<br />
•<br />
compression adjuster bleed valve<br />
compression adjuster shim valve<br />
channel connected to the reservoir<br />
rebound adjuster check valve<br />
...and between the outer and inner tube<br />
to the under side of the main piston.<br />
During compression stroke, the<br />
piston rod is entering the main body and<br />
the correspondingly displaced volume<br />
of damper fluid has to flow into the<br />
reservoir; the separating piston moves<br />
accordingly.<br />
Rebound Damping<br />
When the spring forces the shock<br />
absorber to extend again, the fluid below<br />
the piston is pressurized (more than the<br />
set gas pressure) and has to move. In a<br />
similar pattern the flow goes through the:<br />
•<br />
•<br />
•<br />
•<br />
rebound adjuster bleed valve<br />
rebound adjuster shim valve<br />
channel connected to the reservoir<br />
compression adjuster check valve<br />
...and into the inner tube to the upper<br />
side of the main piston.<br />
The fluid that was displaced into the<br />
reservoir during compression stroke, is<br />
now pushed back into the main body by<br />
the pressure of the gas; the separating<br />
piston moves accordingly.
Spring Pre-load<br />
When adjusting the spring pre-load you<br />
move the spring seat. This will decrease<br />
or increase the initial spring force, which<br />
will lower or raise the vehicle.<br />
The spring pre-load is fundamental<br />
for the function of the suspension.<br />
If the pre-load is incorrectly set, any<br />
other adjustments will not help to get<br />
the intended performance from the<br />
suspension.<br />
The spring pre-load affects the height<br />
of the vehicle and the wheel angles. By<br />
changing the pre-load the stability of the<br />
vehicle can be changed.<br />
To set:<br />
Use a C-spanner and move the spring<br />
platform to the desired position ( A).<br />
B<br />
A<br />
6<br />
Spring Pre-load<br />
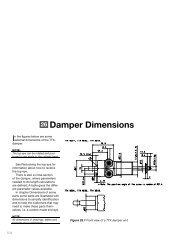
Fig. The spring pre-load is<br />
the difference between A and B;<br />
A<br />
A Free spring length<br />
B Installed spring length<br />
Shock absorber fully extended<br />
A - B = Spring Pre-load<br />
B
Compression and Rebound Damping<br />
Compression and Rebound Damping<br />
Compression damping controls the<br />
energy absorption when the shock<br />
absorber is being compressed, thus<br />
controls how easy the shock absorber<br />
compresses when the wheel is being<br />
loaded, or hits a bump.<br />
Rebound damping controls the energy<br />
absorption when the shock absorber is<br />
being extended and controls how fast<br />
the shock absorber returns to its normal<br />
position after being compressed.<br />
Adjust compression and rebound<br />
damping by turning the knobs on top of<br />
the reservoir. The adjusters have a normal<br />
right hand thread.<br />
To reset the adjuster:<br />
Turn the adjuster clockwise to fully<br />
closed position (position zero [0]).<br />
Then, turn counter clockwise to open,<br />
and count the clicks until you reach<br />
the recommended number of clicks.<br />
See recommended Set-up data in the<br />
Mounting Instructions for the shock<br />
absorber.<br />
CAuTION!<br />
Do not use force, delicate sealing<br />
surfaces can be damaged.<br />
How to Adjust Compression<br />
Adjust by turning the gold knob labelled<br />
“COMP” on the cylinder head ( ). Or,<br />
use a 4 mm socket T-bar and turn the<br />
hexagon nut on the adjuster knob ( ).<br />
Turn clockwise to increase damping, turn<br />
counter clockwise to decrease.<br />
7<br />
REB<br />
REB<br />
COMP<br />
How to Adjust Rebound<br />
COMP<br />
Adjust by turning the black knob labelled<br />
“REB” on the cylinder head ( ). Or, use<br />
a 4 mm socket T-bar and turn the<br />
hexagon nut on the adjuster knob ( ).<br />
Turn clockwise to increase damping, turn<br />
counter clockwise to decrease.
Setting your vehicle<br />
By using the adjustments available on<br />
this product, and testing by trial and error,<br />
you can learn how the adjustments affect<br />
your vehicle.<br />
Always begin by taking your vehicle<br />
for a test ride with all adjustments at<br />
their basic setting. Choose a short run<br />
of varying character with long and sharp<br />
bends, hard and soft bumps. Stay to the<br />
same run and adjust only one setting at<br />
a time.<br />
! WARNING!<br />
Before driving, always ensure that the<br />
basic settings made by Öhlins have<br />
not been changed during delivery.<br />
When adjusting, always make notes,<br />
adjust in small steps and make only one<br />
adjustment at a time. Do not adjust more<br />
than four [4] steps from the basic setting.<br />
Adjust rebound damping first<br />
If the vehicle feels unstable, loose<br />
and rather bouncy; increase rebound<br />
damping. First, turn the adjusting knob<br />
four [4] steps (clicks) clockwise. Test<br />
run, if the vehicle feels hard and bumpy,<br />
adjust two steps back.<br />
If the vehicle is hard and bumpy,<br />
especially over a series of bumps,<br />
decrease rebound damping. Turn the<br />
adjuster knob four [4] steps counter<br />
clockwise. Test run, adjust two [ ] steps<br />
back and try again.<br />
Adjustment and Set up<br />
8<br />
Adjust compression damping<br />
If the vehicle feels soft, has low riding<br />
position and bottoms easily in long dips;<br />
increase compression damping. Turn the<br />
adjuster four [4] steps clockwise and test<br />
run. If the effect was too hard, turn two [ ]<br />
steps back and test run again.<br />
If the vehicle feels harsh and has hard<br />
resilience, for example over changes<br />
in the road paving; decrease the<br />
compression damping. Turn the adjuster<br />
four [4] steps counter clockwise. Test run,<br />
if the effect was too hard, turn two [ ]<br />
steps back and test run again.<br />
NOTE!<br />
If you cannot feel any “clicks” in the<br />
adjuster wheel/ screw the shock absorber<br />
needs to be inspected by an authorized<br />
Öhlins Service Workshop.<br />
When you have achieved a suitable<br />
improvement check the adjustment<br />
by turning the adjuster to the original<br />
position and make the adjustment again.<br />
Note relevant factors such as tyres,<br />
temperature etc. Test run to make sure<br />
if any fine tuning adjustments should be<br />
made.
Preventive maintenance and regular<br />
inspection reduces the risk of functional<br />
disturbance. If there is any need for<br />
additional service, please contact an<br />
authorized Öhlins workshop.<br />
• Cleaning<br />
Clean the shock absorber externally with<br />
a soft detergent. Use compressed air. Be<br />
careful that all dirt is removed. Lift the<br />
bump rubber and clean the area below.<br />
Keep the shock absorber clean and spray<br />
it with oil (WD40, CRC - 6 or equivalent)<br />
after washing.<br />
CAuTION!<br />
Never spray water directly into the<br />
adjuster knobs and/or the ball joints.<br />
• Recommended Service Intervals<br />
Racing: every 0 hours of operation.<br />
Maximum 0 hours of operation without<br />
service and oil change.<br />
Regular street use: every 30 000 km<br />
• Disposal<br />
Discarded Öhlins products should be<br />
handed over to an authorized Öhlins<br />
workshop or distributor for proper<br />
disposal.<br />
Inspection and Maintenance<br />
9<br />
• Inspection<br />
.<br />
.<br />
3.<br />
4.<br />
.<br />
6.<br />
Inspection Points<br />
Check ball joints for possible<br />
excessive play or stiction.<br />
Check the piston shaft for leakage<br />
and damage.<br />
Check the shock absorber body for<br />
external damage.<br />
Check the reservoir for external<br />
damage that can restrict the floating<br />
piston from moving freely.<br />
Check for excessive wear of rubber<br />
components.<br />
Check the attachment points of the<br />
shock absorber to the vehicle.<br />
4<br />
NOTE!<br />
The Öhlins shock absorber should only be<br />
filled with the Öhlins High Performance<br />
Shock Absorber Fluid, art. no. 01306-xx.<br />
Contact your Öhlins dealer for advice.<br />
!<br />
WARNING!<br />
Never alter the gas pressure. Special<br />
purpose charging equipment and access<br />
to nitrogen is required.<br />
3
Read more at<br />
www.ohlins.com<br />
Öhlins Racing AB<br />
Box 722<br />
S 194 27 upplands Väsby<br />
Sweden<br />
Phone +46 8 590 025 00<br />
Fax +46 8 590 025 80<br />
Owner’s <strong>Manual</strong> 0744 -0 <strong>TTX36</strong> Automotive Issued 008 0 4 Tiina Harakka Carlsson Öhlins Racing AB