IMPORTANT NOTICE - Berkel Sales & Service
IMPORTANT NOTICE - Berkel Sales & Service
IMPORTANT NOTICE - Berkel Sales & Service

Create successful ePaper yourself
Turn your PDF publications into a flip-book with our unique Google optimized e-Paper software.
MAIN DRIVE CHAIN AND SPROCKETS LUBRICATION (continued):<br />
Recommended types of chain lubricant are those with Molybdenum Disulphide or Graphite added. Also<br />
bonded lubricants such as Dow Corning Molykote 321R or equivalent are excellent for open chains. The<br />
lubricant should be of a viscosity whereby it will “flow” somewhat and penetrate the internal working surfaces.<br />
Thick stiff greases are of little value because they cannot work into moving parts of the chain.<br />
a. Unplug mixer/grinder from power source and perform lockout/tagout procedures.<br />
b. Remove rear drive cover.<br />
c. Spray or brush lubricant on inside of chain, slowly and carefully turning large sprocket by hand.<br />
d. Reinstall rear drive cover.<br />
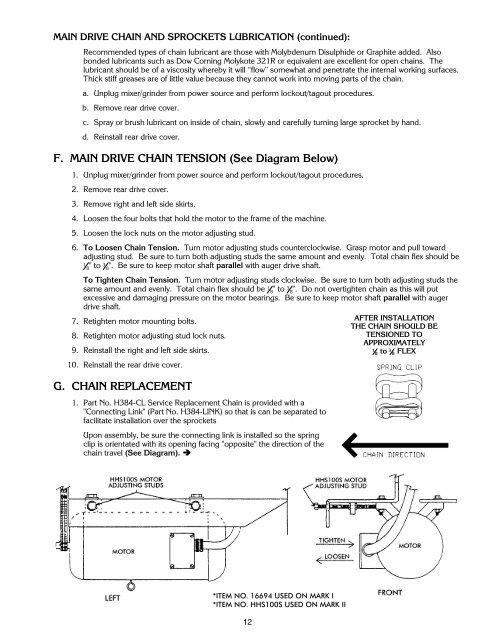
F. MAIN DRIVE CHAIN TENSION (See Diagram Below)<br />
1. Unplug mixer/grinder from power source and perform lockout/tagout procedures.<br />
2. Remove rear drive cover.<br />
3. Remove right and left side skirts.<br />
4. Loosen the four bolts that hold the motor to the frame of the machine.<br />
5. Loosen the lock nuts on the motor adjusting stud.<br />
6. To Loosen Chain Tension. Turn motor adjusting studs counterclockwise. Grasp motor and pull toward<br />
adjusting stud. Be sure to turn both adjusting studs the same amount and evenly. Total chain flex should be<br />
1<br />
8"to3 8". Be sure to keep motor shaft parallel with auger drive shaft.<br />
To Tighten Chain Tension. Turn motor adjusting studs clockwise. Be sure to turn both adjusting studs the<br />
same amount and evenly. Total chain flex should be 1 8"to3 8". Do not overtighten chain as this will put<br />
excessive and damaging pressure on the motor bearings. Be sure to keep motor shaft parallel with auger<br />
drive shaft.<br />
7. Retighten motor mounting bolts.<br />
AFTER INSTALLATION<br />
THE CHAIN SHOULD BE<br />
8. Retighten motor adjusting stud lock nuts.<br />
TENSIONED TO<br />
APPROXIMATELY<br />
9. Reinstall the right and left side skirts.<br />
1<br />
8 to<br />
10. Reinstall the rear drive cover.<br />
3 8 FLEX<br />
G. CHAIN REPLACEMENT<br />
1. Part No. H384-CL <strong>Service</strong> Replacement Chain is provided with a<br />
"Connecting Link" (Part No. H384-LINK) so that is can be separated to<br />
facilitate installation over the sprockets<br />
Upon assembly, be sure the connecting link is installed so the spring<br />
clip is orientated with its opening facing "opposite" the direction of the<br />
chain travel (See Diagram). <br />
12<br />
11