L7821 : Power Wheels Nascar - Mattel
L7821 : Power Wheels Nascar - Mattel
L7821 : Power Wheels Nascar - Mattel

Create successful ePaper yourself
Turn your PDF publications into a flip-book with our unique Google optimized e-Paper software.
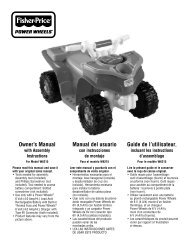
E<br />
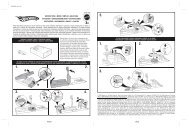
BATTERY CHARGING ASSEMBLY F<br />
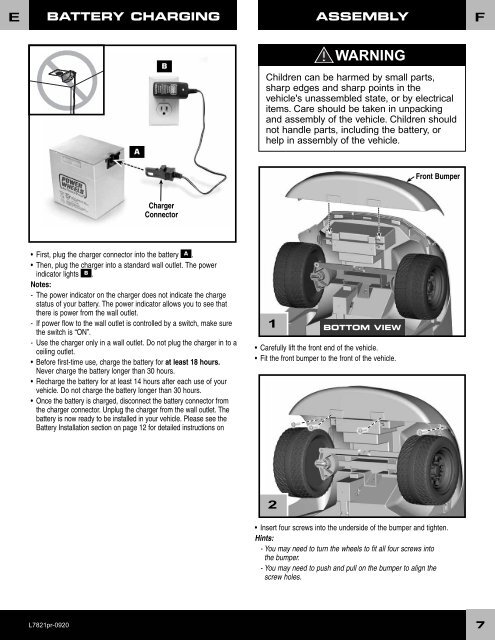
A<br />
B<br />
Charger<br />
Connector<br />
First, plug the charger connector into the battery A .<br />
Then, plug the charger into a standard wall outlet. The power<br />
indicator lights B .<br />
Notes:<br />
- The power indicator on the charger does not indicate the charge<br />
status of your battery. The power indicator allows you to see that<br />
there is power from the wall outlet.<br />
- If power flow to the wall outlet is controlled by a switch, make sure<br />
the switch is “ON”.<br />
- Use the charger only in a wall outlet. Do not plug the charger in to a<br />
ceiling outlet.<br />
Before first-time use, charge the battery for at least 18 hours.<br />
Never charge the battery longer than 30 hours.<br />
Recharge the battery for at least 14 hours after each use of your<br />
vehicle. Do not charge the battery longer than 30 hours.<br />
Once the battery is charged, disconnect the battery connector from<br />
the charger connector. Unplug the charger from the wall outlet. The<br />
battery is now ready to be installed in your vehicle. Please see the<br />
Battery Installation section on page 12 for detailed instructions on<br />
<strong>L7821</strong>pr-0920<br />
WARNING<br />
Children can be harmed by small parts,<br />
sharp edges and sharp points in the<br />
vehicle's unassembled state, or by electrical<br />
items. Care should be taken in unpacking<br />
and assembly of the vehicle. Children should<br />
not handle parts, including the battery, or<br />
help in assembly of the vehicle.<br />
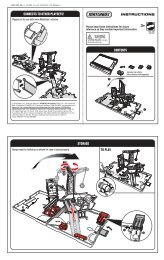
1 BOTTOM VIEW<br />
Carefully lift the front end of the vehicle.<br />
Fit the front bumper to the front of the vehicle.<br />
2<br />
Front Bumper<br />
Insert four screws into the underside of the bumper and tighten.<br />
Hints:<br />
- You may need to turn the wheels to fit all four screws into<br />
the bumper.<br />
- You may need to push and pull on the bumper to align the<br />
screw holes.<br />
7