
Create successful ePaper yourself
Turn your PDF publications into a flip-book with our unique Google optimized e-Paper software.
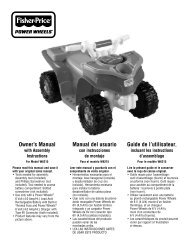
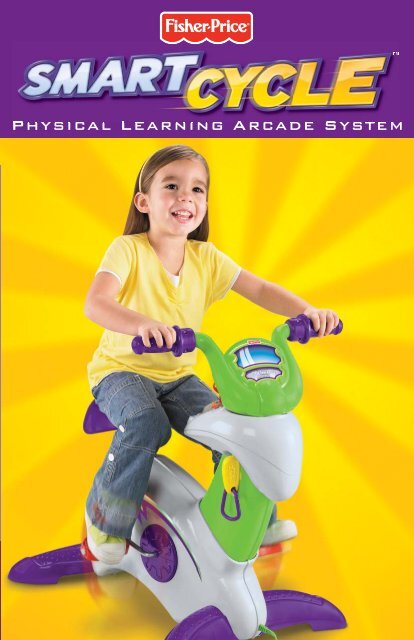
PHYSICAL LEARNING ARCADE SYSTEM<br />
TM
2<br />
Get up. Get smart. Get going!<br />
It’s a stationary bike, a learning center, and an arcade game<br />
system – all rolled into one! <strong>Smart</strong> <strong>Cycle</strong> plugs right into your<br />
TV, ready to take kids on learning adventures like no other.<br />
As they pedal, favorite character friends guide them through<br />
learning discoveries, games, and even exciting races.<br />
Drive<br />
Pedal, steer and learn at your own pace – visit Math Mountain,<br />
Shape Lake, Number Fields, Letter Creek and other stops<br />
along the way.<br />
Learn<br />
Stop and rest, but don’t stop<br />
learning! Use the joystick to reinforce<br />
important learning skills with<br />
plenty of games and activities – with<br />
different levels for growing kids.<br />
Race<br />
Put the pedal to the metal as you race<br />
with cars on-screen, against the clock,<br />
or with another player!
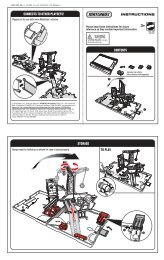
3<br />
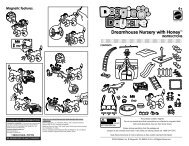
Frame<br />
with Console<br />
and Plug-and-Play Cord<br />
2 Pedals<br />
(Left and Right)<br />
Assembly Tool<br />
#8 x 1" Screws – 6<br />
Parts<br />
Shown Actual Size<br />
Back Base<br />
(Narrow)<br />
Handlebar<br />
Learning Adventure Game Cartridge<br />
with Key Ring<br />
Adult assembly is required. Tools needed for assembly:<br />
Phillips screwdriver (not included) and assembly tool (included).<br />
#10 x 1 1/2" Screws – 4<br />
Front Base<br />
(Wide)<br />
Note: Tighten and loosen all screws with a Phillips screwdriver. Do not over-tighten screws.<br />
TM
4<br />
Seat Peg<br />
1<br />
CAUTION<br />
This product contains<br />
small parts in its<br />
unassembled state. Adult<br />
assembly is required.<br />
Seat<br />
Turn to remove the seat peg from the frame.<br />
Insert the seat into the slot in the frame.<br />
Replace the seat peg and turn to secure.<br />
Hint: You can adjust the seat height (higher<br />
or lower) for your child's comfort. Simply<br />
remove the seat peg and lift or lower the seat.<br />
Replace the seat peg to secure the seat.<br />
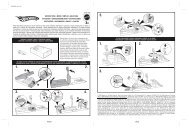
Assembly<br />
2<br />
Console<br />
While tucking the wires into the frame, fi t<br />
the console into the frame.
5<br />
3<br />
Align the screw holes in the frame and<br />
console. Insert four #8 x 1" screws<br />
through the frame and into the console.<br />
Tighten the screws.<br />
Assembly<br />
4<br />
Handlebar<br />
Connector<br />
Post<br />
First, plug the handlebar connector into<br />
the socket in the console.<br />
Hint: The connector will only fi t one way into<br />
the socket. If it does not seem to fi t, turn it<br />
around and try again!<br />
TM
6<br />
Fit the handlebar onto the top of the post.<br />
At an angle, insert the tab on the back of<br />
the handlebar into the slot in the console.<br />
Assembly<br />
Tab<br />
5 6<br />
Next, rock the handlebar forward and<br />
down to "snap" it in place. Make sure<br />
you hear a "snap".<br />
A<br />
B
7<br />
7<br />
Insert two #8 x 1" screws into the handlebar<br />
and tighten.<br />
Assembly<br />
Front Base (wide)<br />
8<br />
Turn the cycle upside down.<br />
Fit the front base (wide) into the groove in<br />
the front of the frame.<br />
Insert two #10 x 1 1 /2" screws through the<br />
tube in the front base and tighten.<br />
TM
8<br />
9<br />
Rear Base (narrow)<br />
Fit the rear base (narrow) into the groove<br />
in the rear of the frame.<br />
Insert two #10 x 1 1 /2" screws through the<br />
tube in the rear base and tighten.<br />
Set the cycle upright.<br />
Assembly<br />
10<br />
Assembly Tool<br />
Right Pedal<br />
Axle (R)<br />
Right Pedal (R)<br />
Right Pedal<br />
Tighten<br />
Clockwise<br />
Locate the right pedal marked with an R<br />
on the outside end.<br />
Now, fi nd the pedal axle marked with an R.<br />
Fit the threaded end of the right pedal into<br />
the hole in the right pedal axle.<br />
Hand-tighten the pedal by turning<br />
it clockwise.<br />
Then, fi t the assembly tool to the end of the<br />
pedal. Turn it clockwise to fully tighten.<br />
Hint: You will not be able to tighten the pedal<br />
if you have tried to attach the left pedal. If you<br />
cannot tighten the pedal, remove it and try<br />
the other. Be sure to match the letters R or L<br />
on each part.
9<br />
Assembly Tool<br />
11<br />
Assembly Battery<br />
Installation<br />
Left Pedal<br />
Tighten<br />
Counter-Clockwise<br />
Pedal Left (L)<br />
Left Pedal<br />
Axle (L)<br />
Fit the threaded end of the left pedal<br />
(marked with an L) into the hole in the left<br />
pedal axle.<br />
Hand-tighten the pedal by turning<br />
it counter-clockwise.<br />
Then, fi t the assembly tool to the end<br />
of the pedal. Turn it counter-clockwise<br />
to fully tighten.<br />
Locate the battery compartment on<br />
underside of the frame.<br />
Loosen the screws in the battery<br />
compartment door and remove the door.<br />
Insert four “D” (LR20) alkaline batteries.<br />
Hint: We recommend using alkaline<br />
batteries for longer battery life.<br />
Replace the battery compartment door<br />
and tighten the screws.<br />
When function is erratic or stops, or<br />
you see a low battery symbol on your<br />
TV screen , it’s time for an adult to<br />
change the batteries!<br />
Protect the environment by not<br />
disposing of this product with household<br />
waste (2002/96/EC). Check<br />
your local authority for recycling<br />
advice and facilities.<br />
TM
10<br />
Battery Safety Information<br />
1.5V x 4<br />
“D” (LR20)<br />
In exceptional circumstances, batteries<br />
may leak fl uids that can cause a chemical<br />
burn injury or ruin your toy. To avoid<br />
battery leakage:<br />
Do not mix old and new batteries or<br />
batteries of different types: alkaline,<br />
standard (carbon-zinc) or rechargeable<br />
(nickel-cadmium).<br />
Insert batteries as indicated inside the<br />
battery compartment.<br />
Remove batteries during long periods<br />
of non-use. Always remove exhausted<br />
batteries from the toy. Dispose of batteries<br />
safely. Do not dispose of the product in<br />
a fi re. The batteries inside may explode<br />
or leak.<br />
Never short-circuit the battery terminals.<br />
Use only batteries of the same or<br />
equivalent type, as recommended.<br />
Do not charge non-rechargeable batteries.<br />
Remove rechargeable batteries from the<br />
toy before charging.<br />
If removable, rechargeable batteries are<br />
used, they are only to be charged under<br />
adult supervision.
11<br />
Connecting <strong>Smart</strong> <strong>Cycle</strong><br />
to your TV<br />
Note: The photo above shows a combination TV/VCR/DVD with input on<br />
the front. Your TV or VCR may have input jacks on the back.<br />
Important! Your TV or VCR must have<br />
audio and video input jacks.<br />
Place the <strong>Smart</strong> <strong>Cycle</strong> in front of your TV.<br />
Locate the plug-and-play cord on the front<br />
of the cycle.<br />
Plug the audio-video pins into the matching<br />
colored input jacks on your TV or VCR<br />
(Yellow for Video In, White for Left Audio<br />
In and Red for Right Audio In).<br />
Hint: We've included a detailed illustration<br />
to show how to connect <strong>Smart</strong> <strong>Cycle</strong> to a<br />
TV or TV and VCR. Please refer to page 21.<br />
Insert the game cartridge into the socket<br />
in the side of the cycle.<br />
Hint: You can easily attach other cartridges<br />
(sold separately and not included) to the<br />
key ring.<br />
Turn your TV or VCR power on.<br />
Slide the power switch on the cycle to<br />
on .<br />
To fi nd the picture on your TV screen,<br />
set your TV's or VCR's mode selector to<br />
INPUT or VIDEO IN.<br />
Hint: The plug-and-play cord is designed<br />
to easily disconnect if it is pulled. Simply<br />
connect the matching connectors in the<br />
middle of the cord.<br />
TM
12<br />
Getting Started<br />
on the Learning Adventure<br />
Horn Button<br />
Press to make<br />
a selection or<br />
hear the horn.<br />
Map Button<br />
Press to see a map of all<br />
activities (see page 19).<br />
Handlebar<br />
Use for steering on the road or in games.<br />
Snap Shot Button<br />
Press to make a selection<br />
or take "pictures" (see<br />
page 13).<br />
Power Switch<br />
Slide the switch to<br />
on or off O.<br />
Joystick<br />
Use to make selections on<br />
the menus or in activities.<br />
Travel Journal Button<br />
Press to see the pictures you<br />
took along your journey.<br />
Exit Button<br />
Press to exit the activities.
13<br />
Customize<br />
your<br />
vehicle<br />
Use the joystick to choose the type of<br />
vehicle you’d like to “drive.”<br />
Press either handlebar button to make<br />
your selection.<br />
Repeat this process to choose the color<br />
of your vehicle, horn sound and a hood<br />
ornament style.<br />
Learning<br />
Adventure<br />
Find the objects!<br />
Pedal the cycle to move down the road.<br />
The faster you pedal the faster you go!<br />
Use the handlebars to steer.<br />
Find all the letters, numbers or shapes<br />
shown in the upper left of the screen.<br />
Simply ride over them. Don't ride over<br />
other objects!<br />
Taking Snap Shots<br />
Press the right handlebar button to<br />
take snap shots in any activity.<br />
TM
14<br />
Off Ramps<br />
Keep traveling down the road and go all<br />
the way around the course or head onto<br />
an off-ramp for other fun games and<br />
activities. Simply bear to the side of the<br />
road as you see one approaching.<br />
Hint: If you miss a ramp, you can pedal in<br />
reverse to back up.<br />
Alphabet<br />
Barn<br />
Find the Letters!<br />
Listen carefully to the letter you need to<br />
fi nd. "Find the upper case G".<br />
Move the joystick to scroll through<br />
choices. Then press either handlebar<br />
button to choose a letter.<br />
Select the correct letter and you complete<br />
a word! “G – Goat”<br />
When you’re fi nished with this activity,<br />
press the exit button to return to<br />
the road. Pedal to the next activity!
15<br />
Letter<br />
Creek<br />
Word Frog Lives Score Pedal as fast as you can to the<br />
Catch the letters to spell words!<br />
Look at the word on the lower left corner<br />
of the screen. This is the word you'll need<br />
to spell. You have 5 frog lives to spell<br />
words correctly in each level of play.<br />
Watch the letter bugs appear on the screen.<br />
Use the joystick to move the frog left<br />
and right. Then, press either handlebar<br />
button to fl ick out the frog’s tongue and<br />
catch the letter bug.<br />
When you spell a word, you score points!<br />
Look at your score in the lower right corner<br />
of the screen. If you choose an incorrect<br />
letter you loose a frog life.<br />
When you spell all words correctly on<br />
one level, move up to the next level. The<br />
words are longer and the bugs fl y faster!<br />
When you’re fi nished with this activity,<br />
press the exit button to return to<br />
the road. Pedal to the next activity!<br />
The<br />
Big Race<br />
fi nish line!<br />
Use the joystick to choose a 1 Player or<br />
2 Player game. Press either handlebar<br />
button to select the game.<br />
1 Player<br />
Pedal down the road as fast as you can<br />
to the fi nish line. Try to speed past the<br />
other cars. Get to the fi nish line fi rst and<br />
you win!<br />
TM
16<br />
2 Player<br />
Each player takes a turn. Pedal down the<br />
road as fast as you can to the fi nish line.<br />
Look at your time.<br />
Now, it's time for Player 2 to beat your time.<br />
The player with the fastest time wins.<br />
When you’re fi nished with this activity,<br />
press the exit button to return to<br />
the road. Pedal to the next activity!<br />
Shape<br />
Lake<br />
Nozzle Shape Score<br />
Match shapes to pop the bubbles!<br />
Look at the shape inside the nozzle. Use<br />
the joystick to aim the nozzle toward the<br />
matching shape.<br />
Press either handlebar button to shoot the<br />
shape and "pop" the bubble.<br />
If you hit the matching shape, you score<br />
points! If you hit the wrong shape, the<br />
bubble fl oats back to the top.<br />
Hint: The blowfi sh can be used to hit<br />
any bubble shape.<br />
Try to pop all the bubbles before they<br />
reach the bottom. When you pop all the<br />
bubbles, move on to the next level. The<br />
bubbles move faster!<br />
When you’re fi nished with this activity,<br />
press the exit button to return to<br />
the road. Pedal to the next activity!
17<br />
Math<br />
Mountain<br />
Lots of counting fun!<br />
Use the joystick to move the clouds over<br />
a number.<br />
Hear the number identifi ed and see it<br />
counted out.<br />
When you’re fi nished with this activity,<br />
press the exit button to return to<br />
the road. Pedal to the next activity!<br />
Number<br />
Fields<br />
Timer Score<br />
Use the tractor to run over numbers<br />
in the fi eld before they disappear!<br />
Use the joystick to move the tractor<br />
around the fi eld. Run over the numbers<br />
before they disappear.<br />
When you hit the numbers, you score<br />
points! Try to get as many points as you<br />
can before time runs out.<br />
Timer<br />
When time runs out, you're on to the next<br />
level. Numbers appear and disappear faster<br />
now and there are obstacles to avoid too.<br />
Don't lose points!<br />
When you’re fi nished with this activity, press<br />
the exit button to return to the road.<br />
Pedal to the next activity!<br />
TM
18<br />
Bonus<br />
Activity<br />
To visit here, you need to visit all of the<br />
activities around the course and complete<br />
the fi rst level of each game.<br />
Watch the ant parade. The ants march by<br />
carrying letters, numbers or shapes.<br />
When you’re fi nished with this activity,<br />
press the exit button to return to<br />
the road. Pedal to the next activity!<br />
See previous<br />
snap shot<br />
Travel<br />
Journal<br />
See next<br />
snap shot<br />
Press the travel journal button . Then<br />
use the joystick and handlebar buttons<br />
to review and select a snap shot.<br />
Stamp Tool Erase<br />
Next, use the joystick and handlebar<br />
buttons to select the stamp tool to<br />
decorate your picture.<br />
Choose a stamp with the joystick and<br />
handlebar buttons and place it on the<br />
snap shot.<br />
Select the erase button to clear the<br />
screen and decorate another picture.
19<br />
The Big Race<br />
Shape Lake<br />
Math Mountain<br />
Customize<br />
Your Vehicle<br />
The Map<br />
Bonus Activity<br />
Letter Creek<br />
Alphabet Barn<br />
Number Fields Learning Adventure<br />
You can travel down the road and head onto an off-ramp to access activities or simply press<br />
the map button to visit any of the activities around the course.<br />
TM
20<br />
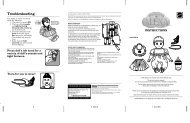
Troubleshooting Guide<br />
Problem Cause Solution<br />
No image on the TV TV or VCR is not set<br />
to proper input<br />
Low battery symbol<br />
appears on TV screen<br />
Image is stretched or distorted<br />
on a wide screen TV<br />
Batteries in the cycle are<br />
weak or dead<br />
Plug-and-play cord<br />
is disconnected<br />
Press the channel down button<br />
on the VCR or TV and check<br />
for an INPUT channel below<br />
channel 2.<br />
Use the menu system on your<br />
TV or VCR to fi nd INPUT or<br />
SOURCE. Change to INPUT<br />
or SOURCE.<br />
Refer to your TV's or VCR’s<br />
instruction manual.<br />
Replace the batteries in the<br />
cycle with four, new “D” (LR20)<br />
alkaline batteries.<br />
Make sure both ends of the<br />
plug-and-play cords are fully<br />
connected to the cycle and<br />
your TV or VCR.<br />
Batteries in the cycle are weak Replace the batteries in the<br />
cycle with four, new “D” (LR20)<br />
alkaline batteries.<br />
TV aspect ratio set incorrectly This product is designed for<br />
use with a 4:3 aspect ratio<br />
(display setting) and you should<br />
see black bars on the sides of<br />
the image. For best picture,<br />
do not use a 16:9 aspect ratio<br />
(stretched) wide screen setting.<br />
For more information on<br />
changing this setting, refer to<br />
your TV owner’s manual.
21<br />
Connecting to a TV<br />
or VCR and TV<br />
White<br />
Red<br />
Yellow<br />
INPUT<br />
AUDIO IN<br />
LEFT<br />
RIGHT<br />
VIDEO IN<br />
Note: Input jacks may be on the back of your TV or VCR.<br />
TV<br />
OR<br />
VCR<br />
TV<br />
TM
22<br />
Consumer Information<br />
Safety Tips<br />
Always sit on the seat.<br />
Always wear shoes.<br />
Only one (1) rider at a time.<br />
Notes<br />
Please keep this owner's manual for future reference, as it contains important information.<br />
Requires four “D” (LR20) alkaline batteries (not included) for operation.<br />
Age: 3 years - 6 years.<br />
This product is intended for indoor use only.<br />
Care<br />
Wipe with a clean cloth dampened with a mild soap and water solution. Do not use bleach.<br />
Do not use harsh or abrasive cleaners. Do not immerse.<br />
This product has no consumer serviceable parts. Do not take this product apart.<br />
Periodically check this product for wear and damage and replace any cracked part.<br />
Visit us on line at www.service.fi sher-price.com<br />
Call our Consumer Relations Department, toll-free at 1-800-432-5437, 9 AM - 7 PM EST<br />
Monday through Friday and 11 AM - 5 PM EST Saturday. Hearing-impaired consumers<br />
using TTY/TDD equipment, please call 1-800-382-7470. Write to us at: Fisher-Price ®<br />
Consumer Relations, 636 Girard Avenue, East Aurora, New York 14052.<br />
For countries outside the United States:<br />
CANADA: Questions? 1-800-432-5437. <strong>Mattel</strong> Canada Inc., 6155 Freemont Blvd., Mississauga, Ontario L5R 3W2;<br />
www.service.mattel.com.<br />
GREAT BRITAIN: <strong>Mattel</strong> UK Ltd, Vanwall Business Park, Maidenhead SL6 4UB. Helpline: 01628 500303.<br />
www.service.mattel.com/uk<br />
AUSTRALIA: <strong>Mattel</strong> Australia Pty. Ltd., 658 Church Street, Locked Bag #870, Richmond, Victoria 3121 Australia.<br />
Consumer Advisory Service 1300 135 312.<br />
NEW ZEALAND: 16-18 William Pickering Drive, Albany 1331, Auckland.<br />
ASIA: <strong>Mattel</strong> East Asia Ltd, Room 1106, South Tower, World Finance Centre, Harbour City, Tsimshatsui, HK, China.
23<br />
FCC Statement<br />
United States Only<br />
Note: This equipment has been tested and found to comply with the limits for a Class B digital<br />
device, pursuant to Part 15 of the FCC Rules. These limits are designed to provide reasonable<br />
protection against harmful interference in a residential installation. This equipment generates,<br />
uses and can radiate radio frequency energy and, if not installed and used in accordance with<br />
the instructions, may cause harmful interference to radio communications. However, there<br />
is no guarantee that interference will not occur in a particular installation. If this equipment<br />
does cause harmful interference to radio or television reception, which can be determined by<br />
turning the equipment off and on, the user is encouraged to try to correct the interference by<br />
one or more of the following measures:<br />
Reorient or relocate the receiving antenna.<br />
Increase the separation between the equipment and receiver.<br />
Consult the dealer or an experienced radio/TV technician for help.<br />
Note: Changes or modifi cations not expressly approved by the manufacturer responsible for<br />
compliance could void the user's authority to operate the equipment.<br />
Fisher-Price, Inc., a subsidiary of <strong>Mattel</strong>, Inc., East Aurora, NY 14052 U.S.A.<br />
©2007 <strong>Mattel</strong>, Inc. All Rights Reserved. ® and designate U.S. trademarks of <strong>Mattel</strong>, Inc.<br />
TM
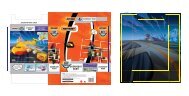
Stretch your mind with<br />
other software titles for<br />
your <strong>Smart</strong> <strong>Cycle</strong>!<br />
Each sold separately and subject to availability.<br />
©2007 Viacom International, Inc. All Rights Reserved. Dora the Explorer, Go Diego Go, SpongeBob SquarePants and all related titles,<br />
logos and characters are trademarks of Viacom International, Inc. SpongeBob SquarePants created by Stephen Hillenburg.<br />
www.fi sher-price.com<br />
PRINTED IN CHINA <strong>K5054</strong>a-0920