D170 Output Shaft Bearing Cup Replacement Procedure - Spicer
D170 Output Shaft Bearing Cup Replacement Procedure - Spicer
D170 Output Shaft Bearing Cup Replacement Procedure - Spicer

Create successful ePaper yourself
Turn your PDF publications into a flip-book with our unique Google optimized e-Paper software.
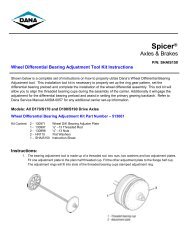
<strong>D170</strong> <strong>Output</strong> <strong>Shaft</strong> <strong>Bearing</strong> <strong>Cup</strong> <strong>Replacement</strong> <strong>Procedure</strong><br />
Affected Models: <strong>D170</strong> Drive Axles<br />
<strong>Spicer</strong> ®<br />
Drive Axles<br />
P/N: SHAIS193<br />
This repair procedure should be followed when retro fitting a Dana <strong>D170</strong> forward carrier output shaft assembly with an<br />
industry standard 382A (Dana p/n 139980) design outer bearing cup. In this repair a unique housing spacer (Dana p/n<br />
139979) is also required and is located between the outer bearing cup and the snap ring. It’s important to follow all of the<br />
instructions to insure a proper repair. The service kit contents and procedures are listed below.<br />
New Service Repair Kit: 504054 Kit - D-Housing Repair<br />
1 - Oil seal 210737<br />
2 - <strong>Bearing</strong> cone 131211<br />
1 - <strong>Bearing</strong> cup (inner) 131212<br />
1 - <strong>Bearing</strong> cup (outer) 139980<br />
1 - Housing spacer 139979<br />
1 - <strong>Output</strong> nut 128049<br />
1 - Snap Ring (.094”) 078937<br />
1 - Instruction sheet shais193<br />
<strong>Procedure</strong>:<br />
1. Block the wheels of the steer axle front and rear.<br />
2. Disconnect the inter-axle driveshaft at the output yoke position.<br />
3. Disconnect the driveshaft from the pinion yoke and remove driveshaft.<br />
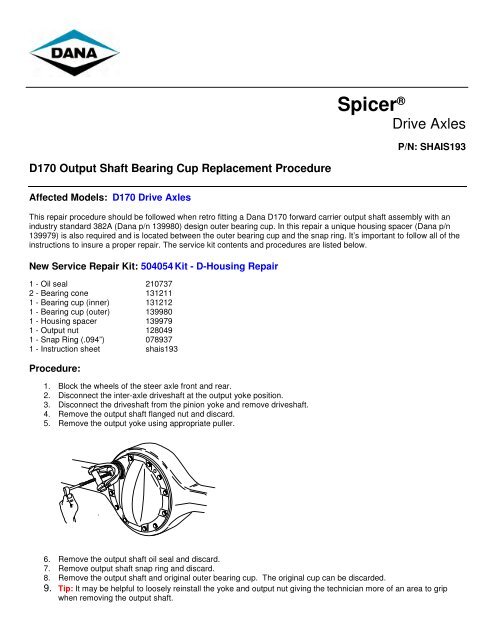
4. Remove the output shaft flanged nut and discard.<br />
5. Remove the output yoke using appropriate puller.<br />
6. Remove the output shaft oil seal and discard.<br />
7. Remove output shaft snap ring and discard.<br />
8. Remove the output shaft and original outer bearing cup. The original cup can be discarded.<br />
9. Tip: It may be helpful to loosely reinstall the yoke and output nut giving the technician more of an area to grip<br />
when removing the output shaft.
10. With a press, remove both the inner and outer bearing cones from the output shaft.<br />
11. Install the new inner bearing cone onto the output shaft so that the large end is facing towards the threaded end<br />
of the shaft. Now install the outer bearing cone so that the large end is facing the inner bearing, the large ends of<br />
the bearings should be back to back. Using a press and sleeve, press the bearings and space until the inner<br />
bearing race is fully seated against the shoulder of the shaft. Be careful not to damage the bearing cages during<br />
the pressing operation.<br />
12. Before the output shaft assembly is installed inspect the inner cup for damage. If any pitting or contamination<br />
damage (denting) is found, replace the cup.<br />
13. Apply a thin layer of lubricant to the bearing rollers then install the output shaft assembly into the housing.<br />
14. Install the replacement outer bearing cup making sure it is fully seated against the bearing cone.<br />
15. Now install the new housing spacer. The spacer should be installed between the outer bearing cup and the snap<br />
ring.<br />
16. Install the snap ring.<br />
17. With a dial indicator measure the output shaft endplay it should be .001” and .015”.<br />
18. Install the oil seal. Use the proper seal driver when installing the seal. Dana part number 131471.<br />
19. Reinstall the output yoke.<br />
20. Install new output shaft nut and torque to 800 – 1000 ft. lbs. (1084 – 1355 N.M).<br />
21. Install the new inter-axle driveshaft supplied.<br />
22. Grease both U-joints making sure grease is purged from all positions.<br />
For spec’ing or service assistance, call 1-800- 24 hours a day, 7 days a week,<br />
Or visit our web site at: http://www..com<br />
Dana Holding Corporation<br />
SHAIS193A Copyright Dana Holding Corporation, 2010 Commercial Vehicle Products Division<br />
Feb 2010 All Rights Reserved. P.O. Box 321<br />
Printed in U.S.A. www.dana.com Toledo, Ohio 43697-0321<br />
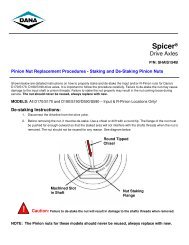
Center<br />
Punch<br />
2