TS-590S - Kenwood
TS-590S - Kenwood
TS-590S - Kenwood

You also want an ePaper? Increase the reach of your titles
YUMPU automatically turns print PDFs into web optimized ePapers that Google loves.
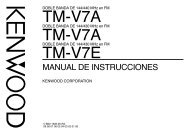
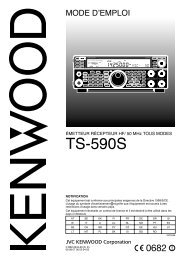
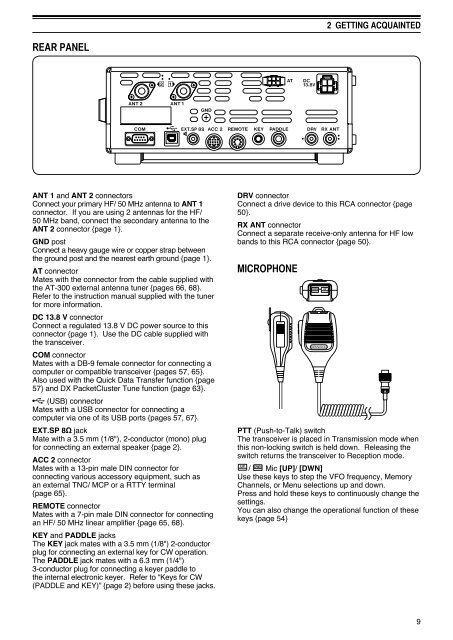
REAR PANEL<br />
ANT 1 and ANT 2 connectors<br />
Connect your primary HF/ 50 MHz antenna to ANT 1<br />
connector. If you are using 2 antennas for the HF/<br />
50 MHz band, connect the secondary antenna to the<br />
ANT 2 connector {page 1}.<br />
GND post<br />
Connect a heavy gauge wire or copper strap between<br />
the ground post and the nearest earth ground {page 1}.<br />
AT connector<br />
Mates with the connector from the cable supplied with<br />
the AT-300 external antenna tuner {pages 66, 68}.<br />
Refer to the instruction manual supplied with the tuner<br />
for more information.<br />
DC 13.8 V connector<br />
Connect a regulated 13.8 V DC power source to this<br />
connector {page 1}. Use the DC cable supplied with<br />
the transceiver.<br />
COM connector<br />
Mates with a DB-9 female connector for connecting a<br />
computer or compatible transceiver {pages 57, 65}.<br />
Also used with the Quick Data Transfer function {page<br />
57} and DX PacketCluster Tune function {page 63}.<br />
(USB) connector<br />
Mates with a USB connector for connecting a<br />
computer via one of its USB ports {pages 57, 67}.<br />
EXT.SP 8Ω jack<br />
Mate with a 3.5 mm (1/8"), 2-conductor (mono) plug<br />
for connecting an external speaker {page 2}.<br />
ACC 2 connector<br />
Mates with a 13-pin male DIN connector for<br />
connecting various accessory equipment, such as<br />
an external TNC/ MCP or a RTTY terminal<br />
{page 65}.<br />
REMOTE connector<br />
Mates with a 7-pin male DIN connector for connecting<br />
an HF/ 50 MHz linear amplifier {page 65, 68}.<br />
KEY and PADDLE jacks<br />
The KEY jack mates with a 3.5 mm (1/8") 2-conductor<br />
plug for connecting an external key for CW operation.<br />
The PADDLE jack mates with a 6.3 mm (1/4")<br />
3-conductor plug for connecting a keyer paddle to<br />
the internal electronic keyer. Refer to “Keys for CW<br />
(PADDLE and KEY)” {page 2} before using these jacks.<br />
2 GETTING ACQUAINTED<br />
DRV connector<br />
Connect a drive device to this RCA connector {page<br />
50}.<br />
RX ANT connector<br />
Connect a separate receive-only antenna for HF low<br />
bands to this RCA connector {page 50}.<br />
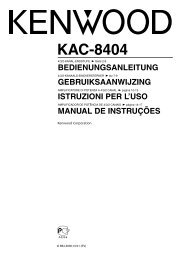
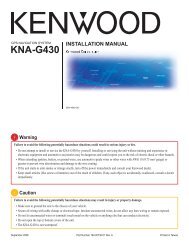
MICROPHONE<br />
PTT (Push-to-Talk) switch<br />
The transceiver is placed in Transmission mode when<br />
this non-locking switch is held down. Releasing the<br />
switch returns the transceiver to Reception mode.<br />
/ Mic [UP]/ [DWN]<br />
Use these keys to step the VFO frequency, Memory<br />
Channels, or Menu selections up and down.<br />
Press and hold these keys to continuously change the<br />
settings.<br />
You can also change the operational function of these<br />
keys {page 54}<br />
9