TS-590S - Kenwood
TS-590S - Kenwood
TS-590S - Kenwood

You also want an ePaper? Increase the reach of your titles
YUMPU automatically turns print PDFs into web optimized ePapers that Google loves.
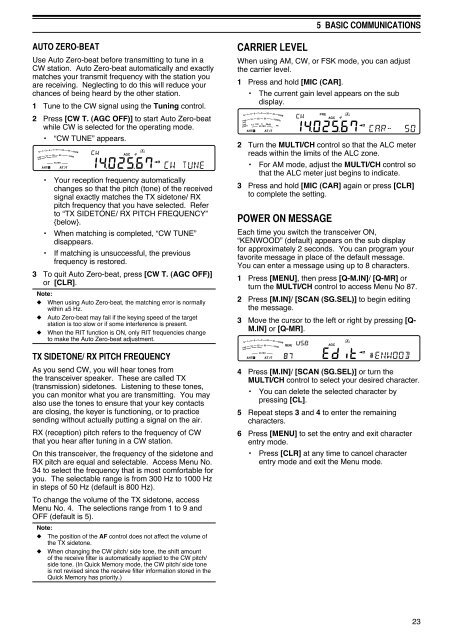
AUTO ZERO-BEAT<br />
Use Auto Zero-beat before transmitting to tune in a<br />
CW station. Auto Zero-beat automatically and exactly<br />
matches your transmit frequency with the station you<br />
are receiving. Neglecting to do this will reduce your<br />
chances of being heard by the other station.<br />
1 Tune to the CW signal using the Tuning control.<br />
2 Press [CW T. (AGC OFF)] to start Auto Zero-beat<br />
while CW is selected for the operating mode.<br />
• “CW TUNE” appears.<br />
• Your reception frequency automatically<br />
changes so that the pitch (tone) of the received<br />
signal exactly matches the TX sidetone/ RX<br />
pitch frequency that you have selected. Refer<br />
to “TX SIDETONE/ RX PITCH FREQUENCY”<br />
{below}.<br />
• When matching is completed, “CW TUNE”<br />
disappears.<br />
• If matching is unsuccessful, the previous<br />
frequency is restored.<br />
3 To quit Auto Zero-beat, press [CW T. (AGC OFF)]<br />
or [CLR].<br />
Note:<br />
◆ When using Auto Zero-beat, the matching error is normally<br />
within ±5 Hz.<br />
◆ Auto Zero-beat may fail if the keying speed of the target<br />
station is too slow or if some interference is present.<br />
◆ When the RIT function is ON, only RIT frequencies change<br />
to make the Auto Zero-beat adjustment.<br />
TX SIDETONE/ RX PITCH FREQUENCY<br />
As you send CW, you will hear tones from<br />
the transceiver speaker. These are called TX<br />
(transmission) sidetones. Listening to these tones,<br />
you can monitor what you are transmitting. You may<br />
also use the tones to ensure that your key contacts<br />
are closing, the keyer is functioning, or to practice<br />
sending without actually putting a signal on the air.<br />
RX (reception) pitch refers to the frequency of CW<br />
that you hear after tuning in a CW station.<br />
On this transceiver, the frequency of the sidetone and<br />
RX pitch are equal and selectable. Access Menu No.<br />
34 to select the frequency that is most comfortable for<br />
you. The selectable range is from 300 Hz to 1000 Hz<br />
in steps of 50 Hz (default is 800 Hz).<br />
To change the volume of the TX sidetone, access<br />
Menu No. 4. The selections range from 1 to 9 and<br />
OFF (default is 5).<br />
Note:<br />
◆ The position of the AF control does not affect the volume of<br />
the TX sidetone.<br />
◆ When changing the CW pitch/ side tone, the shift amount<br />
of the receive filter is automatically applied to the CW pitch/<br />
side tone. (In Quick Memory mode, the CW pitch/ side tone<br />
is not revised since the receive filter information stored in the<br />
Quick Memory has priority.)<br />
CARRIER LEVEL<br />
5 BASIC COMMUNICATIONS<br />
When using AM, CW, or FSK mode, you can adjust<br />
the carrier level.<br />
1 Press and hold [MIC (CAR].<br />
• The current gain level appears on the sub<br />
display.<br />
2 Turn the MULTI/CH control so that the ALC meter<br />
reads within the limits of the ALC zone.<br />
• For AM mode, adjust the MULTI/CH control so<br />
that the ALC meter just begins to indicate.<br />
3 Press and hold [MIC (CAR] again or press [CLR]<br />
to complete the setting.<br />
POWER ON MESSAGE<br />
Each time you switch the transceiver ON,<br />
“KENWOOD” (default) appears on the sub display<br />
for approximately 2 seconds. You can program your<br />
favorite message in place of the default message.<br />
You can enter a message using up to 8 characters.<br />
1 Press [MENU], then press [Q-M.IN]/ [Q-MR] or<br />
turn the MULTI/CH control to access Menu No 87.<br />
2 Press [M.IN]/ [SCAN (SG.SEL)] to begin editing<br />
the message.<br />
3 Move the cursor to the left or right by pressing [Q-<br />
M.IN] or [Q-MR].<br />
4 Press [M.IN]/ [SCAN (SG.SEL)] or turn the<br />
MULTI/CH control to select your desired character.<br />
• You can delete the selected character by<br />
pressing [CL].<br />
5 Repeat steps 3 and 4 to enter the remaining<br />
characters.<br />
6 Press [MENU] to set the entry and exit character<br />
entry mode.<br />
• Press [CLR] at any time to cancel character<br />
entry mode and exit the Menu mode.<br />
23