TRAKKER Antares 248X Badge Scanner Instruction Sheet - Intermec
TRAKKER Antares 248X Badge Scanner Instruction Sheet - Intermec
TRAKKER Antares 248X Badge Scanner Instruction Sheet - Intermec
You also want an ePaper? Increase the reach of your titles
YUMPU automatically turns print PDFs into web optimized ePapers that Google loves.
<strong>TRAKKER</strong> ® <strong>Antares</strong> <strong>248X</strong> <strong>Badge</strong> <strong>Scanner</strong> <strong>Instruction</strong> <strong>Sheet</strong><br />
The badge scanner on your <strong>TRAKKER</strong> ® <strong>Antares</strong> 2480, 2481, 2485, or 2486 terminal allows<br />
you to easily scan bar codes from badges or other cards. This instruction sheet explains<br />
how to install the badge scanner.<br />
Caution<br />
Integrated circuits on printed circuit boards (PCB) in this equipment are sensitive to<br />
damage by electrostatic discharge (ESD). Prevent ESD by always wearing skin<br />
contact ground straps firmly attached to the equipment metal base assembly when<br />
working inside of the equipment housing. Failure to comply may result in damage to<br />
PCB components.<br />
Conseil<br />
Les circuits intégrés des cartes de circuit imprimé (PCB) de cet équipement sont sensibles à<br />
l'endommagement dû à la décharge électrostatique (ESD). Évitez la décharge<br />
électrostatique en mettant toujours contre la peau des courroies neutralisantes attachées<br />
fermement à l'assemblage de la base en métale de l'équipement lorsque vous travaillez à<br />
l'intérieur du boîtier de l'équipement, faute de quoi vous risquez d'endommager les pièces<br />
des PCB.<br />
To install the badge scanner<br />
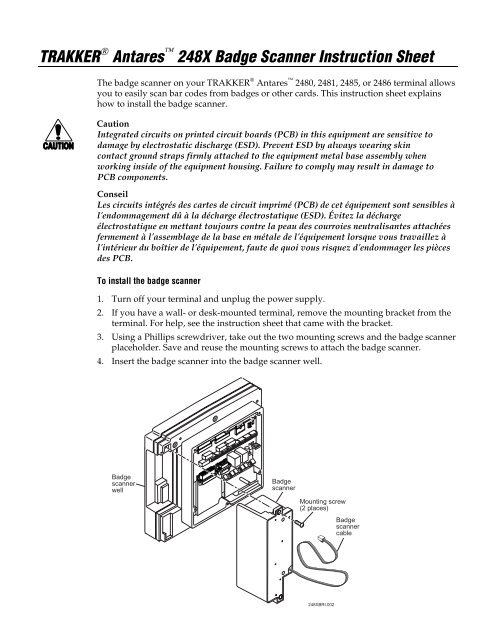
1. Turn off your terminal and unplug the power supply.<br />
2. If you have a wall- or desk-mounted terminal, remove the mounting bracket from the<br />
terminal. For help, see the instruction sheet that came with the bracket.<br />
3. Using a Phillips screwdriver, take out the two mounting screws and the badge scanner<br />
placeholder. Save and reuse the mounting screws to attach the badge scanner.<br />
4. Insert the badge scanner into the badge scanner well.<br />
<strong>Badge</strong><br />
scanner<br />
well<br />
<strong>Badge</strong><br />
scanner<br />
Mounting screw<br />
(2 places)<br />
<strong>248X</strong>BRI.002<br />
<strong>Badge</strong><br />
scanner<br />
cable
5. Insert and tighten the two mounting screws to secure the badge scanner to the<br />
terminal.<br />
6. Take out the six screws and remove the terminal’s back panel. Save and reuse the<br />
screws to replace the back panel.<br />
<strong>Badge</strong><br />
scanner<br />
<strong>Badge</strong><br />
scanner<br />
cable<br />
<strong>248X</strong>BRI.006<br />
<strong>Badge</strong><br />
scanner<br />
connector<br />
Cable<br />
restraint<br />
Scissors<br />
seal<br />
7. Keeping the scanner cable snug against the bottom edge of the rear enclosure, gently<br />
pull up on the scissors seal, pass the cable through the seal and under the cable<br />
restraint bar, and close the seal.<br />
8. Loosen the screw on the cable restraint and pass the scanner cable under the cable<br />
restraint. Tighten the screw to secure the cable.<br />
9. Plug the badge scanner cable into the badge scanner connector.<br />
10. Replace the terminal’s back panel and remount the terminal on the desk or wall.<br />
11. Plug in the power supply and turn on the terminal.<br />
6001 36th Avenue West<br />
P.O. Box 4280<br />
Everett, WA 98203-9280<br />
© 1998 <strong>Intermec</strong> Corporation<br />
All Rights Reserved<br />
P/N 066993-001


