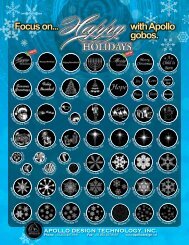
Exclusive U.S. Distributor - Apollo Design Technology
Exclusive U.S. Distributor - Apollo Design Technology
Exclusive U.S. Distributor - Apollo Design Technology

Create successful ePaper yourself
Turn your PDF publications into a flip-book with our unique Google optimized e-Paper software.
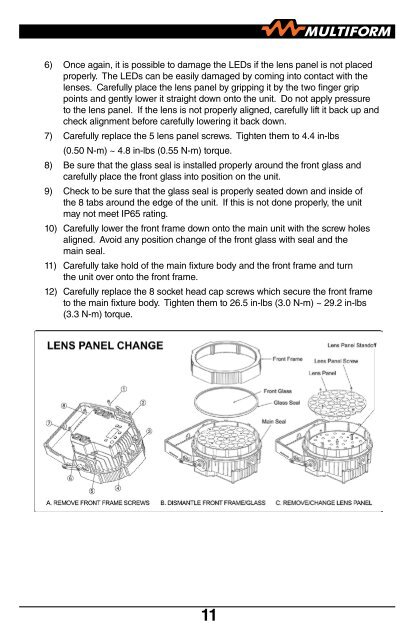
6) Once again, it is possible to damage the LEDs if the lens panel is not placed<br />
properly. The LEDs can be easily damaged by coming into contact with the<br />
lenses. Carefully place the lens panel by gripping it by the two finger grip<br />
points and gently lower it straight down onto the unit. Do not apply pressure<br />
to the lens panel. If the lens is not properly aligned, carefully lift it back up and<br />
check alignment before carefully lowering it back down.<br />
7) Carefully replace the 5 lens panel screws. Tighten them to 4.4 in-lbs<br />
(0.50 N-m) ~ 4.8 in-lbs (0.55 N-m) torque.<br />
8) Be sure that the glass seal is installed properly around the front glass and<br />
carefully place the front glass into position on the unit.<br />
9) Check to be sure that the glass seal is properly seated down and inside of<br />
the 8 tabs around the edge of the unit. If this is not done properly, the unit<br />
may not meet IP65 rating.<br />
10) Carefully lower the front frame down onto the main unit with the screw holes<br />
aligned. Avoid any position change of the front glass with seal and the<br />
main seal.<br />
11) Carefully take hold of the main fixture body and the front frame and turn<br />
the unit over onto the front frame.<br />
12) Carefully replace the 8 socket head cap screws which secure the front frame<br />
to the main fixture body. Tighten them to 26.5 in-lbs (3.0 N-m) ~ 29.2 in-lbs<br />
(3.3 N-m) torque.<br />
11