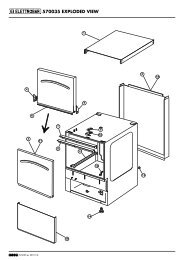
MOD. 90/40 FRG 22 90/80 FRG 22 110/40 FRG 22 GB-IE - EMGA
MOD. 90/40 FRG 22 90/80 FRG 22 110/40 FRG 22 GB-IE - EMGA
MOD. 90/40 FRG 22 90/80 FRG 22 110/40 FRG 22 GB-IE - EMGA

Create successful ePaper yourself
Turn your PDF publications into a flip-book with our unique Google optimized e-Paper software.
6.5 CHECKING FOR GAS LEAKS<br />
Once installed, check there are no gas leaks on pipe joints using a soapy water solution.<br />
You will know if there are leaks by the foamy bubbles that form. Never use bare flames to<br />
check for leaks.<br />
When the appliance is ready to use, check there are no gas leaks, checking on the gauge,<br />
if used (for a time of 30 minutes), that there is no passage or consumption of gas.<br />
7. MAINTENANCE<br />
There is very little maintenance thanks to the correct way the appliances have been made.<br />
However, we do advise having the systems checked by qualified people at least twice a<br />
year.<br />
N.B.: the manufacturer declines all responsibility for direct or indirect damages<br />
caused by an incorrect installation, bad maintenance, tampering, improper<br />
uses and by the failure to comply with the accident prevention norms<br />
regarding the prevention of fire and safety for gas systems.<br />
7.1 CONVERTING FOR USE WITH A DIFFERENT TYPE OF GAS - FRYER<br />
The appliance is tested and set for working with gas according to the characteristics table<br />
affixed in proximity of the appliance’s gas inlet.<br />
If it has to work with a different type of gas, proceed as follows:<br />
• It must be converted by qualified personnel<br />
• The set of nozzles for changeover to another type of gas, different from the type for<br />
which the unit was set up, is normally contained in a nylon bag with relative additional<br />
labels that show all the types of gas.<br />
If the set is not provided, it must be requested from the dealer/importer, first<br />
ascertaining that the unit can in fact work with other types of gas.<br />
Once changeover and necessary adjustments are complete, the label for the<br />
corresponding gas must be place in the appropriate place on the characteristics tag,<br />
cutting out the correct one.<br />
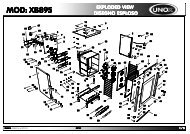
• Changing the burner nozzles (Fig. 1):<br />
open the compartment doors, change the nozzles (30) according to the type of gas<br />
(see the TECHNICAL DATA table).<br />
• Changing the pilot burner nozzle:<br />
remove the panel (20), unscrew the pilot burner nut and change the nozzle (19)<br />
according to the type of gas (see the TECHNICAL DATA table).