MOD. 90/40 FRG 22 90/80 FRG 22 110/40 FRG 22 GB-IE - EMGA
MOD. 90/40 FRG 22 90/80 FRG 22 110/40 FRG 22 GB-IE - EMGA
MOD. 90/40 FRG 22 90/80 FRG 22 110/40 FRG 22 GB-IE - EMGA

Create successful ePaper yourself
Turn your PDF publications into a flip-book with our unique Google optimized e-Paper software.
• Adjusting the burners, checking supply pressures and working order:<br />
once the nozzles have been changed, check that gas pressure, both in valve output<br />
and input, is as given in the TECHNICAL DATA table. To do this, remove the screw on<br />
the valve’s (1) pressure tap (11), insert a rubber pipe connected to a gauge and check<br />
pressure. If it is different to that specified, find the cause and correct it.<br />
• Adjusting the pilot burner:<br />
this burner needs no adjusting.<br />
• Regulating the minimum flame – burner:<br />
The valve has a on/off function so needs no adjusting.<br />
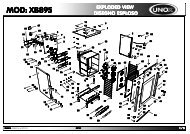
7.2 CHANGING SPARE PARTS - FRYER<br />
Thermostatic cock (1):<br />
Open the compartment doors, unscrew the inlet (2) and outlet (3) connection fittings.<br />
Unscrew the small pilot pipe fitting (4) and the thermocouple (5). Pull the thermostat bulb<br />
(6) out from the bowl after having emptied it of oil and having unscrewed the nut (7).<br />
Change the valve and put everything back in place checking for oil leaks on the thermostat<br />
(6) with hot oil in the bowl.<br />
Safety thermostat (8)<br />
drain the oil from the bowl, unscrew the nut (9), extract the thermostat bulb (10) and<br />
change the thermostat. Put everything back in place checking for oil leaks on the<br />
thermostat bulb (10) with hot oil in the bowl.<br />
Thermocouple (5):<br />
unscrew the thermocouple (5) from the valve (1) and from the pilot (18) and then change it.<br />
Ignition plug (21):<br />
Unscrew the plug securing nut (21) on the pilot and change the plug.<br />
Piezoelectric lighter (13):<br />
pull the plug connecting cable out, remove the valve cap (1) where the piezoelectric lighter<br />
is inserted, and change it.<br />
Changing the pilot (14):<br />
Unscrew the two burner securing screws on the bowl, unscrew the nut (15) securing the<br />
burner to the gas distribution shaft. Change the burner and then put everything back in<br />
place.<br />
N.B.: After each change or repair, check that the parts changed are working properly and<br />
adjust them if necessary.<br />
Check for leaks on the gas pipe fittings with a soapy water solution – never use a bare<br />
flame.