L1 Compact Owners Guide - Bose
L1 Compact Owners Guide - Bose
L1 Compact Owners Guide - Bose

You also want an ePaper? Increase the reach of your titles
YUMPU automatically turns print PDFs into web optimized ePapers that Google loves.
OPERATING INFORMATION<br />
8<br />
TAB TAB TAB TAB 4, 11 TAB 3, 10 TAB 2, 9, 16 English<br />
Setting the Channel 1 (microphone) controls<br />
Channel 1 is only intended for use with a dynamic handheld microphone. Do not<br />
connect any other sources to this input.<br />
1. Before using the microphone, adjust the Channel 1 Volume control fully counterclockwise.<br />
2. While speaking into the microphone, adjust the Volume control to the desired<br />
level.<br />
For best results, keep the microphone close to your lips when speaking.<br />
Holding the microphone more than 3 inches (7.6 cm) away from your lips when<br />
speaking will lead to less overall volume and may impact overall clarity.<br />
The Channel 1 Microphone Input is equipped with an integrated ToneMatch ®<br />
preset to automatically optimize the sound of your microphone.<br />
3. Adjust the Treble and Bass controls to make further refinements based on your<br />
personal preference.<br />
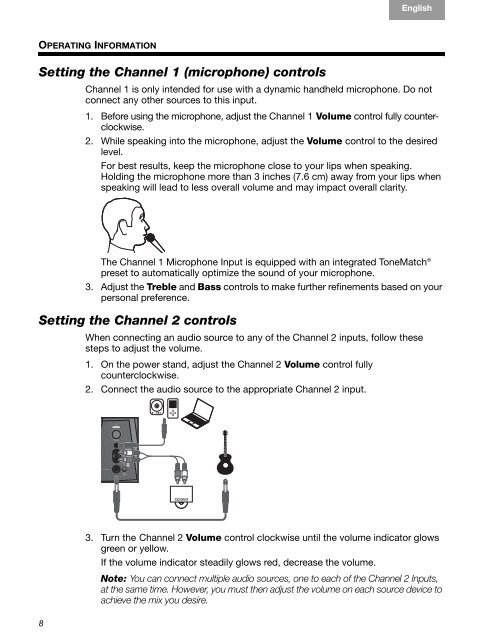
Setting the Channel 2 controls<br />
When connecting an audio source to any of the Channel 2 inputs, follow these<br />
steps to adjust the volume.<br />
1. On the power stand, adjust the Channel 2 Volume control fully<br />
counterclockwise.<br />
2. Connect the audio source to the appropriate Channel 2 input.<br />
3. Turn the Channel 2 Volume control clockwise until the volume indicator glows<br />
green or yellow.<br />
If the volume indicator steadily glows red, decrease the volume.<br />
Note: You can connect multiple audio sources, one to each of the Channel 2 Inputs,<br />
at the same time. However, you must then adjust the volume on each source device to<br />
achieve the mix you desire.