DIamond TII Reservoir B - Clarkson Laboratory and Supply
DIamond TII Reservoir B - Clarkson Laboratory and Supply
DIamond TII Reservoir B - Clarkson Laboratory and Supply

You also want an ePaper? Increase the reach of your titles
YUMPU automatically turns print PDFs into web optimized ePapers that Google loves.
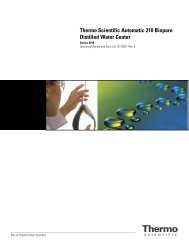
LOOP OUT TO UNIT LOOP IN FROM UNIT<br />
Figure 9: Water Connections on <strong>Reservoir</strong><br />
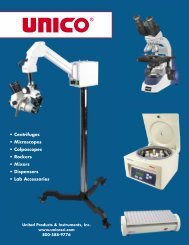
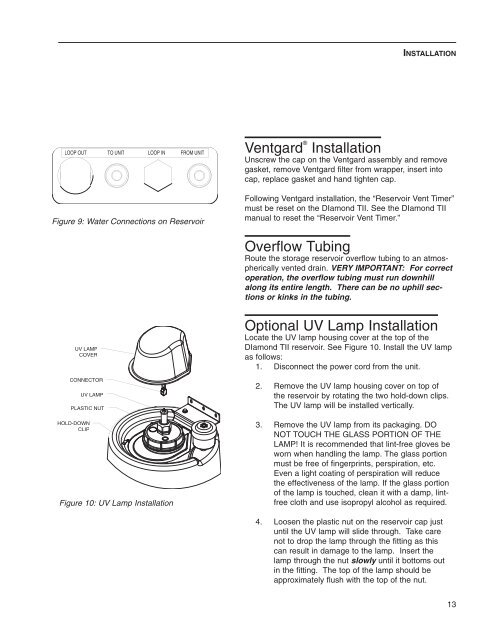
UV LAMP<br />
COVER<br />
CONNECTOR<br />
HOLD-DOWN<br />
CLIP<br />
UV LAMP<br />
PLASTIC NUT<br />
Figure 10: UV Lamp Installation<br />
Ventgard ®<br />
Installation<br />
INSTALLATION<br />
Unscrew the cap on the Ventgard assembly <strong>and</strong> remove<br />
gasket, remove Ventgard filter from wrapper, insert into<br />
cap, replace gasket <strong>and</strong> h<strong>and</strong> tighten cap.<br />
Following Ventgard installation, the “<strong>Reservoir</strong> Vent Timer”<br />
must be reset on the <strong>DIamond</strong> <strong>TII</strong>. See the <strong>DIamond</strong> <strong>TII</strong><br />
manual to reset the “<strong>Reservoir</strong> Vent Timer.”<br />
Overflow Tubing<br />
Route the storage reservoir overflow tubing to an atmospherically<br />
vented drain. VERY IMPORTANT: For correct<br />
operation, the overflow tubing must run downhill<br />
along its entire length. There can be no uphill sections<br />
or kinks in the tubing.<br />
Optional UV Lamp Installation<br />
Locate the UV lamp housing cover at the top of the<br />
<strong>DIamond</strong> <strong>TII</strong> reservoir. See Figure 10. Install the UV lamp<br />
as follows:<br />
1. Disconnect the power cord from the unit.<br />
2. Remove the UV lamp housing cover on top of<br />
the reservoir by rotating the two hold-down clips.<br />
The UV lamp will be installed vertically.<br />
3. Remove the UV lamp from its packaging. DO<br />
NOT TOUCH THE GLASS PORTION OF THE<br />
LAMP! It is recommended that lint-free gloves be<br />
worn when h<strong>and</strong>ling the lamp. The glass portion<br />
must be free of fingerprints, perspiration, etc.<br />
Even a light coating of perspiration will reduce<br />
the effectiveness of the lamp. If the glass portion<br />
of the lamp is touched, clean it with a damp, lintfree<br />
cloth <strong>and</strong> use isopropyl alcohol as required.<br />
4. Loosen the plastic nut on the reservoir cap just<br />
until the UV lamp will slide through. Take care<br />
not to drop the lamp through the fitting as this<br />
can result in damage to the lamp. Insert the<br />
lamp through the nut slowly until it bottoms out<br />
in the fitting. The top of the lamp should be<br />
approximately flush with the top of the nut.<br />
13