DIamond TII Reservoir B - Clarkson Laboratory and Supply
DIamond TII Reservoir B - Clarkson Laboratory and Supply
DIamond TII Reservoir B - Clarkson Laboratory and Supply

You also want an ePaper? Increase the reach of your titles
YUMPU automatically turns print PDFs into web optimized ePapers that Google loves.
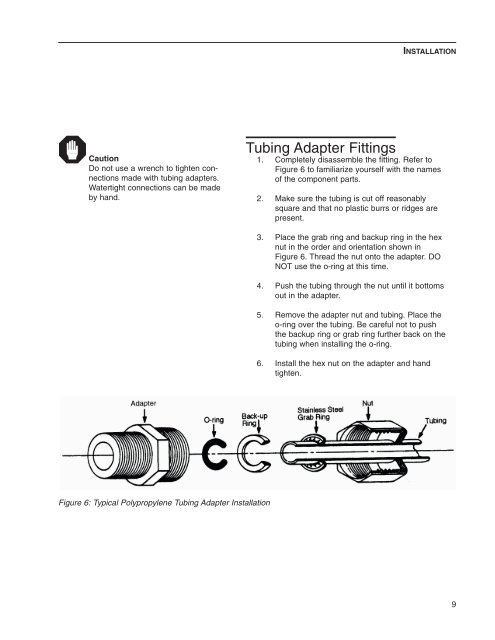
Caution<br />
Do not use a wrench to tighten connections<br />
made with tubing adapters.<br />
Watertight connections can be made<br />
by h<strong>and</strong>.<br />
Figure 6: Typical Polypropylene Tubing Adapter Installation<br />
INSTALLATION<br />
Tubing Adapter Fittings<br />
1. Completely disassemble the fitting. Refer to<br />
Figure 6 to familiarize yourself with the names<br />
of the component parts.<br />
2. Make sure the tubing is cut off reasonably<br />
square <strong>and</strong> that no plastic burrs or ridges are<br />
present.<br />
3. Place the grab ring <strong>and</strong> backup ring in the hex<br />
nut in the order <strong>and</strong> orientation shown in<br />
Figure 6. Thread the nut onto the adapter. DO<br />
NOT use the o-ring at this time.<br />
4. Push the tubing through the nut until it bottoms<br />
out in the adapter.<br />
5. Remove the adapter nut <strong>and</strong> tubing. Place the<br />
o-ring over the tubing. Be careful not to push<br />
the backup ring or grab ring further back on the<br />
tubing when installing the o-ring.<br />
6. Install the hex nut on the adapter <strong>and</strong> h<strong>and</strong><br />
tighten.<br />
9