1760-GR001A-EN-P, Pico Controller User Manual
1760-GR001A-EN-P, Pico Controller User Manual
1760-GR001A-EN-P, Pico Controller User Manual

You also want an ePaper? Increase the reach of your titles
YUMPU automatically turns print PDFs into web optimized ePapers that Google loves.
<strong>Pico</strong> <strong>Controller</strong><br />
(Catalog Numbers <strong>1760</strong>-L12AWA,<br />
-L12AWA-NC, -L12AWA-ND,<br />
-L12BWB, -L12BWB-NC, and<br />
-L18AWA)<br />
Getting Results
Important <strong>User</strong><br />
Information<br />
Because of the variety of uses for the products described in this publication, those<br />
responsible for the application and use of this control equipment must satisfy<br />
themselves that all necessary steps have been taken to assure that each application<br />
and use meets all performance and safety requirements, including any applicable<br />
laws, regulations, codes and standards.<br />
The illustrations, charts, sample programs and layout examples shown in this<br />
guide are intended solely for purposes of example. Since there are many variables<br />
and requirements associated with any particular installation, Rockwell<br />
International Corporation does not assume responsibility or liability (to include<br />
intellectual property liability) for actual use based upon the examples shown in<br />
this publication.<br />
Rockwell Automation publication SGI-1.1, Safety Guidelines for the Application,<br />
Installation and Maintenance of Solid-State Control (available from your local<br />
Rockwell Automation office), describes some important differences between<br />
solid-state equipment and electromechanical devices that should be taken into<br />
consideration when applying products such as those described in this publication.<br />
Reproduction of the contents of this copyrighted publication, in whole or part,<br />
without written permission of Rockwell Automation, is prohibited.<br />
Throughout this manual we use notes to make you aware of safety considerations:<br />
ATT<strong>EN</strong>TION Identifies information about practices or circumstances that<br />
can lead to personal injury or death, property damage or<br />
economic loss<br />
Attention statements help you to:<br />
• identify a hazard<br />
• avoid a hazard<br />
• recognize the consequences<br />
IMPORTANT<br />
<br />
Identifies information that is critical for successful<br />
application and understanding of the product.
Table of Contents<br />
Preface Who Should Use this <strong>Manual</strong> . . . . . . . . . . . . . . . . . . . . . . . . . . . . . P-1<br />
Purpose of this <strong>Manual</strong> . . . . . . . . . . . . . . . . . . . . . . . . . . . . . . . . . . P-1<br />
Related Documentation . . . . . . . . . . . . . . . . . . . . . . . . . . . . . . P-1<br />
Common Techniques Used in this <strong>Manual</strong> . . . . . . . . . . . . . . . . . . . P-2<br />
Rockwell Automation Support . . . . . . . . . . . . . . . . . . . . . . . . . . . . P-2<br />
Local Product Support . . . . . . . . . . . . . . . . . . . . . . . . . . . . . . . P-2<br />
Technical Product Assistance. . . . . . . . . . . . . . . . . . . . . . . . . . . P-2<br />
Your Questions or Comments on this <strong>Manual</strong> . . . . . . . . . . . . . P-2<br />
Chapter 1<br />
<strong>Pico</strong> <strong>Controller</strong> Safety Information . . . . . . . . . . . . . . . . . . . . . . . . . . . . . . . . . . . . . 1-1<br />
Simply <strong>Pico</strong>. . . . . . . . . . . . . . . . . . . . . . . . . . . . . . . . . . . . . . . . . . . 1-1<br />
Clever Switching and Controlling . . . . . . . . . . . . . . . . . . . . . . . 1-1<br />
Applications Everywhere . . . . . . . . . . . . . . . . . . . . . . . . . . . . . . 1-1<br />
Overview of <strong>Pico</strong> . . . . . . . . . . . . . . . . . . . . . . . . . . . . . . . . . . . 1-2<br />
Mounting <strong>Pico</strong> . . . . . . . . . . . . . . . . . . . . . . . . . . . . . . . . . . . . . . . . 1-2<br />
Mounting on DIN Rail. . . . . . . . . . . . . . . . . . . . . . . . . . . . . . . 1-2<br />
Mounting on a Mounting Plate. . . . . . . . . . . . . . . . . . . . . . . . . 1-3<br />
Connecting <strong>Pico</strong> . . . . . . . . . . . . . . . . . . . . . . . . . . . . . . . . . . . . . . . 1-3<br />
<strong>Pico</strong> Inputs <strong>1760</strong>-L12BWB and <strong>1760</strong>-L12BWB-NC . . . . . . . . 1-3<br />
<strong>Pico</strong> Inputs <strong>1760</strong>-L12AWA-NC, <strong>1760</strong>-L12AWA, and<br />
<strong>1760</strong>-L12AWA-ND . . . . . . . . . . . . . . . . . . . . . . . . . . . . . . . . . 1-4<br />
<strong>Pico</strong> Outputs <strong>1760</strong>-L12AWA-xx and <strong>1760</strong>-L12BWB-xx . . . . . 1-4<br />
<strong>Pico</strong> Inputs <strong>1760</strong>-L18AWA . . . . . . . . . . . . . . . . . . . . . . . . . . . 1-5<br />
<strong>Pico</strong> Outputs <strong>1760</strong>-L18AWA . . . . . . . . . . . . . . . . . . . . . . . . . 1-5<br />
<strong>Pico</strong> Operating Principle . . . . . . . . . . . . . . . . . . . . . . . . . . . . . . . . . 1-6<br />
<strong>Pico</strong> Operating Buttons. . . . . . . . . . . . . . . . . . . . . . . . . . . . . . . 1-6<br />
Move Through Menus to Choose Values . . . . . . . . . . . . . . . . . 1-6<br />
12-Point Status Display. . . . . . . . . . . . . . . . . . . . . . . . . . . . . . . 1-6<br />
18-Point Status Display. . . . . . . . . . . . . . . . . . . . . . . . . . . . . . . 1-7<br />
Menu Display . . . . . . . . . . . . . . . . . . . . . . . . . . . . . . . . . . . . . . 1-7<br />
Cursor Display . . . . . . . . . . . . . . . . . . . . . . . . . . . . . . . . . . . . . 1-7<br />
Circuit Diagram Menu . . . . . . . . . . . . . . . . . . . . . . . . . . . . . . . 1-8<br />
Circuit Diagram Symbols . . . . . . . . . . . . . . . . . . . . . . . . . . . . . 1-8<br />
Menu Structure. . . . . . . . . . . . . . . . . . . . . . . . . . . . . . . . . . . . . . . . 1-9<br />
Main Menu Without Optional Password Protection. . . . . . . . . 1-9<br />
Main Menu with Password Protection . . . . . . . . . . . . . . . . . . 1-10<br />
System Menu . . . . . . . . . . . . . . . . . . . . . . . . . . . . . . . . . . . . . 1-11<br />
Chapter 2<br />
Drawing a Circuit with <strong>Pico</strong> Operation of <strong>Pico</strong> . . . . . . . . . . . . . . . . . . . . . . . . . . . . . . . . . . . . . . 2-1<br />
Buttons for Drawing Circuit Diagrams . . . . . . . . . . . . . . . . . . . 2-1<br />
Setting the Menu Language. . . . . . . . . . . . . . . . . . . . . . . . . . . . . . . 2-1<br />
Powering Up <strong>Pico</strong> for the First Time. . . . . . . . . . . . . . . . . . . . . 2-1<br />
Setting the Time . . . . . . . . . . . . . . . . . . . . . . . . . . . . . . . . . . . . . . . 2-2<br />
Setting the Real Time Clock . . . . . . . . . . . . . . . . . . . . . . . . . . . 2-2<br />
i Publication <strong>1760</strong>-<strong>GR001A</strong>-<strong>EN</strong>-P
Table of Contents ii<br />
Publication <strong>1760</strong>-<strong>GR001A</strong>-<strong>EN</strong>-P<br />
Setting Week Day and Time. . . . . . . . . . . . . . . . . . . . . . . . . . . 2-3<br />
Winter/Summer Time (Daylight Savings Time) . . . . . . . . . . . . 2-3<br />
Choose <strong>Pico</strong> Operating Mode. . . . . . . . . . . . . . . . . . . . . . . . . . . . . 2-3<br />
Selectable Start-up Behavior . . . . . . . . . . . . . . . . . . . . . . . . . . . 2-4<br />
<strong>Pico</strong> Circuit Diagram Elements. . . . . . . . . . . . . . . . . . . . . . . . . . . . 2-4<br />
Contacts . . . . . . . . . . . . . . . . . . . . . . . . . . . . . . . . . . . . . . . . . . 2-4<br />
Relays . . . . . . . . . . . . . . . . . . . . . . . . . . . . . . . . . . . . . . . . . . . . 2-4<br />
Retentive Actual Values . . . . . . . . . . . . . . . . . . . . . . . . . . . . . . 2-5<br />
Retentive Relays . . . . . . . . . . . . . . . . . . . . . . . . . . . . . . . . . . . . 2-5<br />
Example: Creating a Circuit Diagram . . . . . . . . . . . . . . . . . . . . . . 2-7<br />
Interconnecting Contacts and Relays . . . . . . . . . . . . . . . . . . . . 2-7<br />
Draw Circuit in Circuit Diagram Menu . . . . . . . . . . . . . . . . . . 2-7<br />
Insert Contact “I1” . . . . . . . . . . . . . . . . . . . . . . . . . . . . . . . . . . 2-7<br />
Insert Contact “I2” . . . . . . . . . . . . . . . . . . . . . . . . . . . . . . . . . . 2-8<br />
Draw Connection Between Contact and Relay Coil . . . . . . . . . 2-8<br />
Choose Relay Coil “Q1”. . . . . . . . . . . . . . . . . . . . . . . . . . . . . . 2-8<br />
Change Operating Mode . . . . . . . . . . . . . . . . . . . . . . . . . . . . . 2-9<br />
Test Circuit Diagram . . . . . . . . . . . . . . . . . . . . . . . . . . . . . . . . 2-9<br />
Operate Switch “S1” and “S2” . . . . . . . . . . . . . . . . . . . . . . . . 2-10<br />
Return to Status Display with ESC. . . . . . . . . . . . . . . . . . . . . 2-10<br />
Function Relay Types . . . . . . . . . . . . . . . . . . . . . . . . . . . . . . . . . . 2-11<br />
Timing Relay . . . . . . . . . . . . . . . . . . . . . . . . . . . . . . . . . . . . . 2-11<br />
Parameter Display for Timing Relays . . . . . . . . . . . . . . . . . . . 2-13<br />
Counter Relay. . . . . . . . . . . . . . . . . . . . . . . . . . . . . . . . . . . . . 2-13<br />
Parameter Display for Counter Relays. . . . . . . . . . . . . . . . . . . 2-14<br />
Real Time Switch . . . . . . . . . . . . . . . . . . . . . . . . . . . . . . . . . . 2-14<br />
Parameter Display for Real Time Switches . . . . . . . . . . . . . . . 2-14<br />
Analog Comparator . . . . . . . . . . . . . . . . . . . . . . . . . . . . . . . . 2-15<br />
Parameter Displays for Analog Comparators. . . . . . . . . . . . . . 2-15<br />
Text Display (<strong>1760</strong>-L18AWA Only) . . . . . . . . . . . . . . . . . . . 2-16<br />
Example: Using a Function Relay . . . . . . . . . . . . . . . . . . . . . . . . 2-17<br />
Conventional Circuit . . . . . . . . . . . . . . . . . . . . . . . . . . . . . . . 2-17<br />
Select an Internal Marker Relay . . . . . . . . . . . . . . . . . . . . . . . 2-17<br />
Select Marker Contact and Connect to New Output Relay. . . 2-17<br />
Select Trigger Relay for Time . . . . . . . . . . . . . . . . . . . . . . . . . 2-18<br />
Insert Timing Relay Contact. . . . . . . . . . . . . . . . . . . . . . . . . . 2-18<br />
Select Parameter Access. . . . . . . . . . . . . . . . . . . . . . . . . . . . . . 2-18<br />
Set “10 Seconds”. . . . . . . . . . . . . . . . . . . . . . . . . . . . . . . . . . . 2-19<br />
Connect Timing Relay Contact to New Output Relay . . . . . . 2-19<br />
Basic Circuits . . . . . . . . . . . . . . . . . . . . . . . . . . . . . . . . . . . . . . . . 2-20<br />
Significance of Logic Values . . . . . . . . . . . . . . . . . . . . . . . . . . 2-20
Table of Contents iii<br />
Chapter 3<br />
<strong>Pico</strong> Interface Socket Memory Module. . . . . . . . . . . . . . . . . . . . . . . . . . . . . . . . . . . . 3-1<br />
Loading or Storing the Circuit Diagram . . . . . . . . . . . . . . . . . . 3-2<br />
Available Memory Modules. . . . . . . . . . . . . . . . . . . . . . . . . . . . 3-2<br />
<strong>Pico</strong>Soft. . . . . . . . . . . . . . . . . . . . . . . . . . . . . . . . . . . . . . . . . . . 3-2<br />
Appendix A<br />
Specifications Physical Specifications. . . . . . . . . . . . . . . . . . . . . . . . . . . . . . . . . . . A-1<br />
Electrical Specifications . . . . . . . . . . . . . . . . . . . . . . . . . . . . . . . . . . A-1<br />
Accessories. . . . . . . . . . . . . . . . . . . . . . . . . . . . . . . . . . . . . . . . . . . . A-1<br />
Dimensions. . . . . . . . . . . . . . . . . . . . . . . . . . . . . . . . . . . . . . . . . . . A-2<br />
<strong>Pico</strong> <strong>1760</strong>-L12BWB-NC, -L12BWB, -L12AWA-NC, -L12AWA,<br />
L12AWA-ND . . . . . . . . . . . . . . . . . . . . . . . . . . . . . . . . . . . . . . A-2<br />
<strong>Pico</strong> <strong>1760</strong>-L18AWA . . . . . . . . . . . . . . . . . . . . . . . . . . . . . . . . . A-2<br />
Index<br />
Publication <strong>1760</strong>-<strong>GR001A</strong>-<strong>EN</strong>-P
Table of Contents iv<br />
Publication <strong>1760</strong>-<strong>GR001A</strong>-<strong>EN</strong>-P
Who Should Use this<br />
<strong>Manual</strong><br />
Preface<br />
Read this preface to familiarize yourself with the rest of the manual. It provides<br />
information concerning:<br />
• who should use this manual<br />
• the purpose of this manual<br />
• related documentation<br />
• conventions used in this manual<br />
• Rockwell Automation support<br />
Use this manual if you are responsible for designing, installing, programming, or<br />
troubleshooting control systems that use <strong>Pico</strong> controllers.<br />
You should have a basic understanding of electrical circuitry and familiarity with<br />
relay logic. If you do not, obtain the proper training before using this product.<br />
Purpose of this <strong>Manual</strong> This manual provides a basic overview of <strong>Pico</strong> and an introduction to <strong>Pico</strong><br />
programming. For more a more detailed description of how to install and use your<br />
<strong>Pico</strong> <strong>Controller</strong>, refer to publication <strong>1760</strong>-UM001A-<strong>EN</strong>-P, <strong>Pico</strong> <strong>Controller</strong> <strong>User</strong><br />
<strong>Manual</strong>.<br />
Related Documentation<br />
The following documents contain additional information concerning Rockwell<br />
Automation products. To obtain a copy, contact your local Rockwell Automation<br />
office or distributor.<br />
For Read this Document Document Number<br />
A more detailed description of how to install and use your <strong>Pico</strong><br />
controller.<br />
<strong>Pico</strong> <strong>Controller</strong> <strong>User</strong> <strong>Manual</strong> <strong>1760</strong>-UM001A-<strong>EN</strong>-P<br />
In-depth information on grounding and wiring Allen-Bradley<br />
programmable controllers<br />
A description of important differences between solid-state<br />
programmable controller products and hard-wired electromechanical<br />
devices<br />
Allen-Bradley Programmable<br />
<strong>Controller</strong> Grounding and Wiring<br />
Guidelines<br />
Application Considerations for<br />
Solid-State Controls<br />
1770-4.1<br />
SGI-1.1<br />
An article on wire sizes and types for grounding electrical equipment National Electrical Code - Published by the National Fire<br />
Protection Association of Boston, MA.<br />
A complete listing of current documentation, including ordering<br />
instructions. Also indicates whether the documents are available on<br />
CD-ROM or in multi-languages.<br />
Allen-Bradley Publication Index SD499<br />
A glossary of industrial automation terms and abbreviations Allen-Bradley Industrial Automation<br />
Glossary<br />
AG-7.1<br />
P-1 Publication <strong>1760</strong>-<strong>GR001A</strong>-<strong>EN</strong>-P
Preface P-2<br />
Common Techniques<br />
Used in this <strong>Manual</strong><br />
Rockwell Automation<br />
Support<br />
Publication <strong>1760</strong>-<strong>GR001A</strong>-<strong>EN</strong>-P<br />
The following conventions are used throughout this manual:<br />
• Bulleted lists such as this one provide information, not procedural steps.<br />
• Numbered lists provide sequential steps or hierarchical information.<br />
• Italic type is used for emphasis.<br />
Rockwell Automation offers support services worldwide, with over 75 Sales/<br />
Support Offices, 512 authorized Distributors and 260 authorized Systems<br />
Integrators located throughout the United States alone, plus Rockwell Automation<br />
representatives in every major country in the world.<br />
Local Product Support<br />
Contact your local Rockwell Automation representative for:<br />
• sales and order support<br />
• product technical training<br />
• warranty support<br />
• support service agreements<br />
Technical Product Assistance<br />
If you need to contact Rockwell Automation for technical assistance, please review<br />
the Troubleshooting chapter in the <strong>Pico</strong> <strong>Controller</strong> <strong>User</strong> <strong>Manual</strong> first. Then call your<br />
local Rockwell Automation representative.<br />
You can also contact Rockwell Automation Technical Support at:<br />
• http://www.ab.com.support<br />
• racleasktheexpert@ra.rockwell.com<br />
• 440-646-6800 - Technical Support Line<br />
Your Questions or Comments on this <strong>Manual</strong><br />
If you find a problem with this manual, or you have any suggestions for how this<br />
manual could be made more useful to you, please contact us at the address below:<br />
Rockwell Automation<br />
Control and Information Group<br />
Technical Communication, Dept. A602V<br />
P.O. Box 2086<br />
Milwaukee, WI 53201-2086<br />
or visit our internet page at:<br />
http://www.ab.com/pico or http://www.rockwellautomation.com
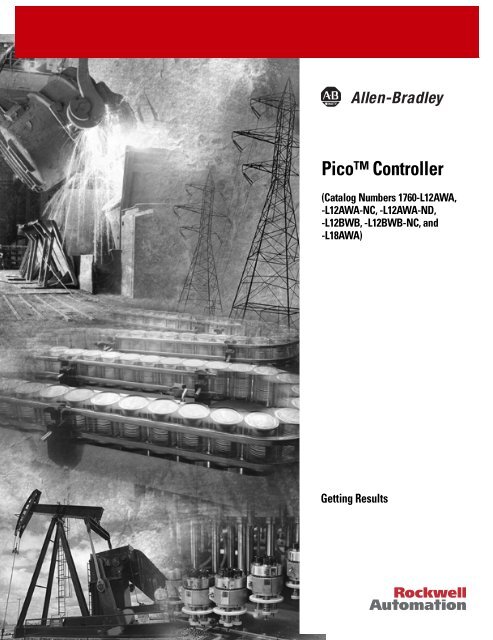
Safety Information<br />
<strong>Pico</strong> <strong>Controller</strong><br />
ATT<strong>EN</strong>TION<br />
Electrical Shock Hazard<br />
Simply <strong>Pico</strong> Clever Switching and Controlling<br />
Chapter 1<br />
<strong>Pico</strong> is a compact, user-friendly and low-cost controller for simple control<br />
applications. Applications range from building and domestic automation to<br />
machine and plant control. <strong>Pico</strong> has built-in user-friendly operating elements and<br />
an LCD display.<br />
Connect <strong>Pico</strong> and draw a circuit diagram on the display by pressing the buttons on<br />
the device. <strong>Pico</strong> works with make contacts, break contacts, and relays.<br />
Enter a circuit diagram in <strong>Pico</strong> just like it is sketched on paper. <strong>Pico</strong> has basic and<br />
advanced functions for relays, time switches and contactors, among other<br />
functions. Make changes to the circuit by pressing the buttons on the device. Time<br />
consuming rewiring is not necessary.<br />
Applications Everywhere<br />
The electrical installation and commissioning work must only be<br />
carried out by suitably qualified personnel.<br />
Do not work on the device when the power is turned on.<br />
Observe the relevant safety regulations:<br />
• Turn off the power<br />
• Make sure that the device cannot be powered on again<br />
inadvertently<br />
• Check to make sure that no dangerous voltages are present<br />
before working on the device<br />
• Building and domestic automation, controllers for lighting, doors, window<br />
shutters<br />
• Control ventilators, rotating doors, greenhouses, exterior lighting, window<br />
controllers, shop display lighting<br />
• Create controllers for temperature, ventilation and brightness levels<br />
• Control machines and plant, presses, conveyor belts, oscillating conveyors,<br />
sorters, pumps<br />
1 Publication <strong>1760</strong>-<strong>GR001A</strong>-<strong>EN</strong>-P
1-2 <strong>Pico</strong> <strong>Controller</strong><br />
Publication <strong>1760</strong>-<strong>GR001A</strong>-<strong>EN</strong>-P<br />
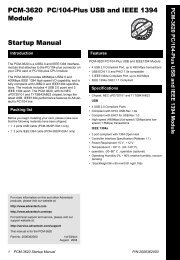
Overview of <strong>Pico</strong><br />
Mounting <strong>Pico</strong> Mounting on DIN Rail<br />
8<br />
8<br />
7<br />
8<br />
7<br />
Del Alt<br />
Esc Ok<br />
Del Alt<br />
Esc Ok<br />
Item Description<br />
1 Incoming Power<br />
2 Inputs<br />
3 Power/Run LED<br />
4 Keypad<br />
5 Socket for memory module or PC interface cable<br />
6 Outputs<br />
7 LCD display<br />
8 Write-On Surface<br />
1. 1. Hook <strong>Pico</strong> to the top edge of the DIN rail and rotate<br />
into place while pressing down slightly as shown by the<br />
arrow.<br />
2. 2. <strong>Pico</strong> will clip into place and is secured by the built-in<br />
spring mechanism.<br />
1<br />
3<br />
5<br />
2<br />
5<br />
1<br />
2<br />
6<br />
3<br />
4<br />
5
Mounting on a Mounting Plate<br />
<strong>Pico</strong> <strong>Controller</strong> 1-3<br />
<strong>Pico</strong> can be screwed to a mounting plate with the three or four feet which are<br />
included.<br />
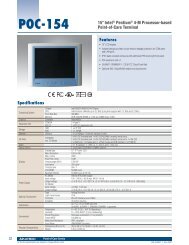
Connecting <strong>Pico</strong> <strong>Pico</strong> Inputs <strong>1760</strong>-L12BWB and <strong>1760</strong>-L12BWB-NC<br />
+24 V<br />
0 V<br />
> 1 A<br />
Click<br />
Ue = 24 V ---<br />
(20.4-28.8 V ---)<br />
Ie = 80 mA<br />
5-7 lb-in<br />
3.5 mm<br />
+24 V<br />
COM<br />
28.8 V<br />
1 15 V<br />
0 5 V<br />
l = 3.3 mA/24 V<br />
I7, I8 = 2.2 mA/24 V<br />
l7, l8<br />
0 V<br />
+10 V<br />
l1 I2 I3 I4 I5 I6 I7 I8<br />
10 V<br />
5 V<br />
0 V<br />
0 5 10<br />
Publication <strong>1760</strong>-<strong>GR001A</strong>-<strong>EN</strong>-P
1-4 <strong>Pico</strong> <strong>Controller</strong><br />
Publication <strong>1760</strong>-<strong>GR001A</strong>-<strong>EN</strong>-P<br />
<strong>Pico</strong> Inputs <strong>1760</strong>-L12AWA-NC, <strong>1760</strong>-L12AWA, and <strong>1760</strong>-L12AWA-ND<br />
L1<br />
L2<br />
>1A<br />
5-7 lb-in.<br />
3.5 mm<br />
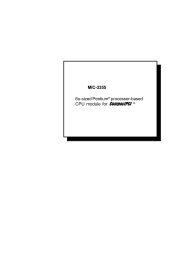
<strong>Pico</strong> Outputs <strong>1760</strong>-L12AWA-xx and <strong>1760</strong>-L12BWB-xx<br />
0 V , N<br />
8 A / B 16<br />
L1, L2, L3 (120/240 V )<br />
+ 24 V<br />
Ue = 120/240 V<br />
50/60 Hz<br />
(90 to 264V)<br />
le = 40 mA 120V<br />
20 mA 240V<br />
L1<br />
L2<br />
1 2 1 2 1 2 1 2<br />
Q1 Q2 Q3 Q4<br />
10 000 000<br />
264V<br />
1 ≥ 79V<br />
0 ≤ 40V<br />
l1–I6 = 0.5 mA 240 V<br />
l1–I6 = 0.25 mA 120 V<br />
I7, I8<br />
l = 6 mA 240 V<br />
l = 4 mA 120V<br />
l1 I2 I3 I4 I5 I6 I7 I8<br />
24 V 8 A<br />
120 V 8 A<br />
240 V 8 A<br />
R L<br />
1000 W<br />
10 x 58 W<br />
2 A<br />
2 A<br />
2 A<br />
25.000
<strong>Pico</strong> Inputs <strong>1760</strong>-L18AWA<br />
L1<br />
L2<br />
> 1 A<br />
Ue = 120/240 V<br />
50/60 Hz<br />
(85–264 V)<br />
le = 70 mA 120 V<br />
35 mA 240 V<br />
5-7 lb-in.<br />
3.5 mm<br />
<strong>Pico</strong> Outputs <strong>1760</strong>-L18AWA<br />
0 V , N<br />
< 10 000 000<br />
Q1<br />
8 A / B 16<br />
L1, L2, L3 (120/240 V )<br />
+ 24 V<br />
L1<br />
L2<br />
264 V<br />
1 > 79 V<br />
0 < 40 V<br />
l1 I2 I3 I4 I5 I6 I7 I8 I9 I10 I11 I12<br />
120/240 V Input 120/240 V<br />
1 2 1 2 1 2 1 2 1 2 1 2<br />
Q2<br />
Q3<br />
Q4<br />
Q5<br />
l1–I6, I9 –I12 = 0.5 mA 240 V<br />
l1–I6, I9 –I12 = 0.25 mA 120 V<br />
I7, I8<br />
l = 6 mA 240 V<br />
l = 4 mA 120 V<br />
Q6<br />
R<br />
24 V 8A<br />
120 V 8 A<br />
240 V 8A<br />
1000 W<br />
10 x 58 W<br />
<strong>Pico</strong> <strong>Controller</strong> 1-5<br />
2A<br />
2A<br />
2A<br />
< 25.000<br />
Publication <strong>1760</strong>-<strong>GR001A</strong>-<strong>EN</strong>-P
1-6 <strong>Pico</strong> <strong>Controller</strong><br />
<strong>Pico</strong> Operating Principle <strong>Pico</strong> Operating Buttons<br />
Publication <strong>1760</strong>-<strong>GR001A</strong>-<strong>EN</strong>-P<br />
Del<br />
Esc<br />
Alt<br />
Ok<br />
Move Through Menus to Choose Values<br />
12-Point Status Display<br />
Button Function<br />
Del Delete object in the circuit diagram<br />
Alt Special functions in the circuit diagram<br />
Cursor Move cursor<br />
Buttons<br />
Select menu item<br />
Choose contact numbers, values, times, etc.<br />
Ok Next menu level, store your entry<br />
Esc Previous menu level, cancel your entry<br />
Press To<br />
Show system menu (press both keys at the same time).<br />
DelAlt<br />
and<br />
Esc<br />
Ok<br />
Inputs<br />
Outputs<br />
• Go to next menu level.<br />
• Select menu item.<br />
• Store your entry.<br />
Cancel your entry since the last Ok.<br />
• Change menu item.<br />
• Change value.<br />
• Change position.<br />
I12345678<br />
MO<br />
12:50<br />
Q1234 RUN<br />
On/ Off<br />
Weekday<br />
Time<br />
RUN/STOP mode
18-Point Status Display<br />
Inputs<br />
Retention Enabled<br />
Day, Time<br />
Outputs<br />
Menu Display<br />
Current choice<br />
blinks in the <strong>Pico</strong><br />
menu<br />
Cursor Display<br />
1...5..8....<br />
RE I P<br />
MO 02:00 ST<br />
.2..5..8 RUN<br />
Inputs 1, 5, 8 ON<br />
Outputs 2, 5, 8 ON<br />
PROGRAM...<br />
RUN...<br />
PARAMETER<br />
SET CLOCK..<br />
There are two different cursor types:<br />
<strong>Pico</strong> <strong>Controller</strong> 1-7<br />
Debounce Enabled/P-Buttons Enabled<br />
Start-up Mode<br />
Mode<br />
PASSWORD..<br />
RUN...<br />
PARAMETER<br />
SET CLOCK..<br />
Main menu with and without password enabled<br />
Full block navigation is shown as a flashing block:<br />
• Move cursor with the left/right arrows<br />
• When in circuit diagram, also use up/down<br />
arrows<br />
Parameter change cursor flashes the selected<br />
parameter:<br />
• Change position with left/right arrows<br />
• Change values with up/down arrows<br />
Flashing values/menus are highlighted in grey in<br />
this manual.<br />
WINTER TIME<br />
DAY : MO<br />
TIME : 01 25<br />
WINTER TIME<br />
DAY : MO<br />
TIME : 01:25<br />
Publication <strong>1760</strong>-<strong>GR001A</strong>-<strong>EN</strong>-P
1-8 <strong>Pico</strong> <strong>Controller</strong><br />
Publication <strong>1760</strong>-<strong>GR001A</strong>-<strong>EN</strong>-P<br />
Circuit Diagram Menu<br />
Circuit Connections/<br />
Rungs<br />
Each rung can hold four instructions, three input instructions (contacts) and one<br />
output instruction (coil or relay). Rungs are connected together through branches<br />
at the three positions between instructions. All programming of <strong>Pico</strong> can be done<br />
using the display and keypad.<br />
Circuit Diagram Symbols<br />
P<br />
I<br />
Q<br />
M<br />
T<br />
C<br />
A<br />
D<br />
:<br />
R<br />
S<br />
I1 -M2 -T1 -{Q1<br />
I2 -Q1<br />
I3-M2-T2----{Q2<br />
(1) For <strong>1760</strong>-L18AWA only.<br />
Cursor button as input<br />
Contact for input<br />
Input<br />
Contacts<br />
Output<br />
Coil Field<br />
I1 -I2 -T1 -{Q1<br />
I2 - 1<br />
Branch Connections<br />
Contact for output<br />
Contact for internal marker relay<br />
Contact for timer relay<br />
Contact for counter relay<br />
Contact for real time clock switch<br />
Analog comparator contact<br />
Contact for text display (1)<br />
Contact for jump (1)<br />
Reserved contact (1)<br />
Contact for internal marker relay (1)<br />
Coil Field<br />
1st circuit connection<br />
2nd circuit connection<br />
3rd circuit connection<br />
…<br />
41st circuit connection<br />
…<br />
Last circuit connection
Menu Structure Main Menu Without Optional Password Protection<br />
RUN<br />
PROGRAM...<br />
RUN<br />
STOP<br />
PARAMETER<br />
SET CLOCK PROGRAM<br />
DELETE PROG<br />
CARD ...<br />
PROGRAM...<br />
RUN<br />
PARAMETER<br />
SET CLOCK<br />
PROGRAM...<br />
RUN<br />
PARAMETER<br />
SET CLOCK<br />
PROGRAM...<br />
RUN<br />
PARAMETER<br />
SET CLOCK<br />
PROGRAM<br />
DELETE PROG<br />
CARD ...<br />
PROGRAM<br />
DELETE PROG<br />
CARD ...<br />
RUN<br />
STOP<br />
Parameter Display<br />
TIMERS<br />
COUNTERS<br />
REAL TIME CLOCK<br />
ANALOG COMPARES<br />
SET CLOCK<br />
SUMMER TIME<br />
SET CLOCK<br />
SUMMER TIME<br />
STOP: Circuit diagram menu<br />
RUN: Power flow display<br />
Circuit Diagram<br />
DELETE ?<br />
DEVICE->CARD<br />
CARD->DEVICE<br />
DELETE CARD<br />
DEVICE->CARD<br />
CARD->DEVICE<br />
DELETE CARD<br />
DEVICE->CARD<br />
CARD->DEVICE<br />
DELETE CARD<br />
Display for<br />
Setting Clock<br />
WINTER TIME<br />
DAY : MO<br />
TIME :<br />
14:05<br />
SUMMER TIME<br />
WINTER TIME<br />
<strong>Pico</strong> <strong>Controller</strong> 1-9<br />
Parameter<br />
Display<br />
Parameters<br />
REPLACE ?<br />
REPLACE ?<br />
DELETE ?<br />
Publication <strong>1760</strong>-<strong>GR001A</strong>-<strong>EN</strong>-P
1-10 <strong>Pico</strong> <strong>Controller</strong><br />
Publication <strong>1760</strong>-<strong>GR001A</strong>-<strong>EN</strong>-P<br />
Main Menu<br />
Main Menu with Password Protection<br />
PASSWORD...<br />
RUN<br />
PARAMETER<br />
SET CLOCK<br />
PASSWORD...<br />
RUN<br />
NOTE<br />
Unlock<br />
Password Entry<br />
Password<br />
Four Wrong<br />
Entries<br />
DELETE ALL<br />
Status Display<br />
Correct Entry<br />
If you do not know the password, you can delete the old<br />
password, but the circuit diagram and data will also be deleted.<br />
To delete the password, press Ok to DELETE ALL after entering<br />
four incorrect passwords. (Pressing Esc retains the circuit diagram<br />
and data. You can then make another four attempts to enter the<br />
password.)
System<br />
PASSWORD...<br />
SYSTEM<br />
GB D F E I .<br />
System Menu<br />
Set Password<br />
Change Password<br />
PASSWORD...<br />
SYSTEM DEBOUNCE OFF<br />
GB D F E I . P ON<br />
STOP MODE<br />
DEBOUNCE OFF<br />
P ON<br />
STOP MODE<br />
DEBOUNCE OFF<br />
P ON<br />
STOP MODE<br />
Password<br />
CHANGE PW<br />
ACTIVATE<br />
CHANGE PW<br />
ACTIVATE<br />
DEBOUNCE OFF<br />
DEBOUNCE ON<br />
P ON<br />
P OFF<br />
MODE: STOP<br />
DEBOUNCE OFF<br />
P ON<br />
STOP MODE<br />
MODE: RUN<br />
(2)<br />
RET<strong>EN</strong>TION ON RET<strong>EN</strong>TION ON<br />
(2)<br />
PASSWORD...<br />
SYSTEM<br />
RET<strong>EN</strong>TION OFF(2)<br />
GB D F E I . <strong>EN</strong>GLISH<br />
DEUTSCH<br />
FRANCAIS<br />
ESPANOL<br />
ITALIANO<br />
PORTUGUES (1)<br />
NEDERLAND (1)<br />
SW<strong>EN</strong>SKA (1)<br />
POLSKI (1)<br />
TURKCE (1)<br />
Password Entry<br />
<strong>Pico</strong> <strong>Controller</strong> 1-11<br />
Password Entry<br />
Password<br />
ACTIVATE<br />
The menu functions are described in the<br />
<strong>Pico</strong> <strong>Controller</strong> <strong>User</strong> <strong>Manual</strong>, publication<br />
number <strong>1760</strong>-UM001A-<strong>EN</strong>-P.<br />
(1) Only for <strong>Pico</strong> <strong>1760</strong>-L18AWA<br />
(2) Not for <strong>Pico</strong> <strong>1760</strong>-L12AWA-xx<br />
Publication <strong>1760</strong>-<strong>GR001A</strong>-<strong>EN</strong>-P
1-12 <strong>Pico</strong> <strong>Controller</strong><br />
Publication <strong>1760</strong>-<strong>GR001A</strong>-<strong>EN</strong>-P
Drawing a Circuit with <strong>Pico</strong><br />
Operation of <strong>Pico</strong> Buttons for Drawing Circuit Diagrams<br />
Setting the Menu<br />
Language<br />
Powering Up <strong>Pico</strong> for the First Time<br />
Choose language with the up/down cursor keys.<br />
Chapter 2<br />
Button Function<br />
Delete branch, contact, relay, or empty rung in the circuit<br />
Del<br />
diagram<br />
• Toggle between break and make contact<br />
• Connect contacts and relays<br />
• Add circuit connections<br />
Up/down arrows:<br />
• Change value<br />
• Move cursor up and down<br />
Left/right arrows:<br />
• Move cursor to left and right<br />
• Change between parameters<br />
• Go to previous menu level<br />
• Undo settings from previous Ok<br />
• Exit current display<br />
• Go to next menu level<br />
• Change, add contact/relay<br />
• Save setting<br />
Esc<br />
NOTE<br />
Alt<br />
Ok<br />
Abbreviation Language<br />
GB English<br />
D German<br />
F French<br />
E Spanish<br />
I Italian<br />
A brief current surge is produced when powering on the unit for<br />
the first time. Do not switch the unit using reed contacts, since<br />
these may burn or melt.<br />
<strong>EN</strong>GLISH<br />
GB D F E I ...<br />
1 Publication <strong>1760</strong>-<strong>GR001A</strong>-<strong>EN</strong>-P
2-2 Drawing a Circuit with <strong>Pico</strong><br />
Setting the Time<br />
Publication <strong>1760</strong>-<strong>GR001A</strong>-<strong>EN</strong>-P<br />
<strong>Pico</strong> <strong>1760</strong>-L18AWA also supports the following languages:<br />
• Portuguese<br />
• Dutch<br />
• Swedish<br />
• Polish<br />
• Turkish<br />
1. 1. Use the arrow keys to select a language.<br />
2. 2. Confirm with Ok.<br />
3. 3. <strong>Pico</strong> then shows the status display.<br />
I12345678<br />
MO<br />
01:00<br />
Q1234 STOP<br />
12-I/O <strong>Pico</strong> 18-I/O <strong>Pico</strong><br />
<strong>Controller</strong>s with the “-NC” designation do not have real time clocks.<br />
Setting the Real Time Clock<br />
I 12 3 4 5 6 7 8<br />
MO<br />
14:15<br />
Q1234 STOP<br />
or<br />
12-I/O <strong>Pico</strong> 18-I/O <strong>Pico</strong><br />
or<br />
1 ...5 ..8 ....<br />
RE I P<br />
MO 02:00 ST<br />
.2 ..5 ..8 RUN<br />
1 ...5 ..8 ....<br />
RE I P<br />
MO 02:00 ST<br />
.2 ..5 ..8 RUN<br />
Ok<br />
Ok<br />
PROGRAM ...<br />
RUN<br />
PARAMETER<br />
PROGRAM ...<br />
RUN<br />
PARAMETER<br />
SET CLOCK<br />
SET CLOCK<br />
SUMMER TIME
Choose <strong>Pico</strong> Operating<br />
Mode<br />
Setting Week Day and Time<br />
SET CLOCK<br />
SUMMER TIME<br />
Winter/Summer Time (Daylight Savings Time)<br />
SET CLOCK<br />
SUMMER TIME<br />
The two <strong>Pico</strong> operating modes are RUN and STOP.<br />
• RUN: <strong>Pico</strong> processes the circuit diagram.<br />
• STOP: Create and modify the circuit diagram.<br />
The alternating RUN/STOP menu shows either RUN or<br />
STOP as follows:<br />
Esc<br />
Esc<br />
Ok<br />
Ok<br />
• STOP mode active: RUN is shown<br />
• RUN mode active: STOP is shown<br />
WINTER TIME<br />
DAY : MO<br />
TIME : 14:15<br />
left/right arrows: Move cursor<br />
up/down arrows: Change values<br />
Save setting<br />
Keep previous value<br />
Exit Menu<br />
Display: SUMMER TIME<br />
Winter time is set<br />
Display: WINTER TIME<br />
Summer time is set<br />
Esc<br />
Ok<br />
Drawing a Circuit with <strong>Pico</strong> 2-3<br />
Toggle Settings<br />
Exit Menu<br />
PROGRAM ...<br />
RUN<br />
PARAMETER<br />
SET CLOCK ..<br />
Publication <strong>1760</strong>-<strong>GR001A</strong>-<strong>EN</strong>-P
2-4 Drawing a Circuit with <strong>Pico</strong><br />
<strong>Pico</strong> Circuit Diagram<br />
Elements<br />
Publication <strong>1760</strong>-<strong>GR001A</strong>-<strong>EN</strong>-P<br />
Selectable Start-up Behavior<br />
It is possible to select the operating mode to be activated when <strong>Pico</strong> is powered up.<br />
You can choose start-up in “RUN” mode or in “STOP” mode through the System<br />
Menu.<br />
Contacts<br />
Contact Type Make<br />
Contact<br />
Relays<br />
Break<br />
Contact<br />
<strong>1760</strong>-L12xx <strong>1760</strong>-L18AWA<br />
Inputs I I I1 to I8 I1 to I12<br />
Soft Inputs - Keypad P P P1 to P4 P1 to P4<br />
Outputs Q Q Q1 to Q4 Q1 to Q6<br />
Internal Marker bits M M M1 to M16 M1 to M16<br />
Counters C C C1 to C8 C1 to C8<br />
Timers<br />
Real Time Clock<br />
T T T1 to T8 T1 to T8<br />
Analog Setpoint Compare (1) A A A1 to A8 –<br />
Text Display D D – D1 to D8<br />
Jump to Label : – – :1 to :8<br />
Internal Marker Bits S S – S1 to S8<br />
Reserve R R – R1 to R16<br />
(1) This applies only to the <strong>1760</strong>-L12BWB and <strong>1760</strong>-L12BWB-NC.<br />
Relay Type <strong>Pico</strong><br />
Symbol<br />
<strong>1760</strong>-L12xx <strong>1760</strong>-L18AWA Coil<br />
Function<br />
Inputs I I1 to I8 I1 to I12 – –<br />
Soft Inputs - Keypad P P1 to P4 P1 to P4 – –<br />
Outputs Q Q1 to Q4 Q1 to Q6 X –<br />
Internal Marker Bits M M1 to M16 M1 to M16 X –<br />
Counters C C1 to C8 C1 to C8 X X<br />
Timers T T1 to T8 T1 to T8 X X<br />
Real Time Clock – X<br />
Analog Setpoint Compare (1) A A1 to A8 – – X<br />
Text Display D – D1 to D8 X X<br />
Jump to Label : – :1 to :8 X –<br />
Internal Marker Bit S – S1 to S8 X –<br />
Reserve R – R1 to R16 – –<br />
(1) This applies only to the <strong>1760</strong>-L12BWB and <strong>1760</strong>-L12BWB-NC.<br />
1 to 4 1 to 4<br />
1 to 4 1 to 4<br />
Parameter
Retentive Actual Values<br />
Drawing a Circuit with <strong>Pico</strong> 2-5<br />
With <strong>Pico</strong> <strong>1760</strong>-L12BWB, <strong>1760</strong>-L12BWB-NC, and <strong>1760</strong>-L18AWA, it is possible<br />
to save the actual values of markers, timers and counters in the event of a power<br />
failure. The quantities and values that may be retained are found in the following<br />
table.<br />
For further information see the <strong>Pico</strong> <strong>Controller</strong> <strong>User</strong> <strong>Manual</strong>, publication number<br />
<strong>1760</strong>-UM001A-<strong>EN</strong>-P.<br />
Retentive Relays<br />
Relay Type <strong>Pico</strong><br />
Symbol<br />
<strong>1760</strong>-L12BWB-xx <strong>1760</strong>-L18AWA<br />
Internal Marker Bits M 4 (M13 to M16) 4 (M13 to M16)<br />
Counters C 1 (C8) 4 (C5, C6, C7, C8)<br />
Timers T 1 (T8) 2 (T7, T8)<br />
Text Display D – 8 (D1 to D8)<br />
Publication <strong>1760</strong>-<strong>GR001A</strong>-<strong>EN</strong>-P
2-6 Drawing a Circuit with <strong>Pico</strong><br />
Publication <strong>1760</strong>-<strong>GR001A</strong>-<strong>EN</strong>-P<br />
Instruction<br />
Output<br />
Instruction<br />
Output<br />
Set Instruction<br />
Reset Instruction<br />
Output<br />
{<br />
S,R<br />
Basic Output Energize<br />
On<br />
On<br />
Maintained/Flip-Flop Output<br />
On<br />
On<br />
Latching Output<br />
On<br />
On<br />
On
Example: Creating a<br />
Circuit Diagram<br />
Interconnecting Contacts and Relays<br />
S1 S2<br />
Draw Circuit in Circuit Diagram Menu<br />
I 12 3 4 5 6 7 8<br />
MO<br />
14:15<br />
Q1234 STOP<br />
CR1<br />
12-I/O <strong>Pico</strong> 18-I/O <strong>Pico</strong><br />
or<br />
Insert Contact “I1”<br />
Circuit Diagram Display<br />
CR1<br />
M1<br />
Start Status Display<br />
1 ...5 ..8 ....<br />
RE I P<br />
MO 02:00 ST<br />
.2 ..5 ..8 RUN<br />
Ok<br />
Ok<br />
Ok<br />
I1<br />
I1-I2----{Q1<br />
Drawing a Circuit with <strong>Pico</strong> 2-7<br />
Connecting <strong>Pico</strong><br />
1. Connect S1 to <strong>Pico</strong> input terminal I1<br />
2. Connect S2 to <strong>Pico</strong> input I2<br />
3. Connect load M1 to <strong>Pico</strong> output Q1<br />
<strong>Pico</strong> circuit diagram<br />
I1<br />
Ok<br />
Ok Ok<br />
Ok Ok<br />
I1<br />
PROGRAM...<br />
RUN<br />
PROGRAM...<br />
DELETE PROG<br />
Publication <strong>1760</strong>-<strong>GR001A</strong>-<strong>EN</strong>-P
2-8 Drawing a Circuit with <strong>Pico</strong><br />
Publication <strong>1760</strong>-<strong>GR001A</strong>-<strong>EN</strong>-P<br />
Insert Contact “I2”<br />
I1<br />
Draw Connection Between Contact and Relay Coil<br />
I1-I2<br />
Choose Relay Coil “Q1”<br />
I1-I2---<br />
Ok<br />
Ok<br />
Ok<br />
Alt<br />
Ok<br />
Ok<br />
Ok<br />
I1 I1<br />
I1 I1<br />
I1-I2<br />
I1 I2<br />
I1 I2<br />
I1-I2---<br />
I1-I2---<br />
I1-I2------{Q1<br />
I1-I2------{Q1<br />
I1-I2------{Q1
Change Operating Mode<br />
I1-I1----{Q1<br />
Test Circuit Diagram<br />
PROGRAM...<br />
STOP<br />
PARAMETER<br />
SET CLOCK...<br />
Esc<br />
Esc<br />
Ok<br />
PROGRAM<br />
DELETE PROG<br />
PROGRAM...<br />
RUN<br />
<strong>Pico</strong> now in RUN mode<br />
Ok<br />
Drawing a Circuit with <strong>Pico</strong> 2-9<br />
PROGRAM...<br />
RUN<br />
PARAMETER<br />
SET CLOCK..<br />
PROGRAM...<br />
STOP<br />
PARAMETER<br />
SET CLOCK...<br />
Power flow display<br />
I1-I2----{Q1<br />
Publication <strong>1760</strong>-<strong>GR001A</strong>-<strong>EN</strong>-P
2-10 Drawing a Circuit with <strong>Pico</strong><br />
Publication <strong>1760</strong>-<strong>GR001A</strong>-<strong>EN</strong>-P<br />
Operate Switch “S1” and “S2”<br />
“S1” on<br />
“S2” on<br />
Relay “Q1” picks up<br />
I1-I2----{Q1<br />
I1-I2----{Q1<br />
Return to Status Display with ESC<br />
I1-I2----{Q1 I 12 3 4 5 6 7 8<br />
Esc<br />
Esc<br />
MO<br />
13:34<br />
Q1234 STOP<br />
I1-I2----{Q1<br />
12-I/O <strong>Pico</strong> 18-I/O <strong>Pico</strong><br />
In the next example, a timing relay will be added to the circuit.<br />
Status display is activated.<br />
Choose STOP mode.<br />
Ok<br />
or<br />
Ok<br />
12............<br />
RE I P<br />
MO 02:00 ST<br />
1.........RUN<br />
PROGRAM...<br />
RUN<br />
PARAMETER<br />
SET CLOCK..
Function Relay Types<br />
Circuit Diagram<br />
Symbol<br />
Timing Relay<br />
Trigger<br />
Reset<br />
Timer Output<br />
Function Relay Type<br />
Drawing a Circuit with <strong>Pico</strong> 2-11<br />
Timing relay with on-delay, with and without random switching<br />
Timing relay with off-delay, with and without random switching<br />
Timing relay, single pulse<br />
Timing relay, flashing<br />
Counter relay, up/down counter<br />
Time switch, weekday/time (only in <strong>Pico</strong> models with clock)<br />
Analog comparator relay (only in <strong>Pico</strong> models with 24V dc)<br />
on<br />
on<br />
on<br />
Timing Relay with on delay, with and<br />
without random switching<br />
t t t<br />
Publication <strong>1760</strong>-<strong>GR001A</strong>-<strong>EN</strong>-P
2-12 Drawing a Circuit with <strong>Pico</strong><br />
Publication <strong>1760</strong>-<strong>GR001A</strong>-<strong>EN</strong>-P<br />
Trigger<br />
Reset<br />
Timer Output<br />
?<br />
on<br />
on<br />
on<br />
Timing Relay with Off-Delay, with and without<br />
Random Switching<br />
t t<br />
With random switching, the relay contact switches randomly at any time up to the<br />
specified time value (shown shaded in figure).<br />
Trigger<br />
Reset<br />
Output<br />
Timing Relay, Single Pulse<br />
on<br />
on<br />
on<br />
t t
Trigger<br />
Reset<br />
Timer Output<br />
Parameter Display for Timing Relays<br />
Counter Relay<br />
Switch Function<br />
Time Units<br />
Trigger (Connected)<br />
Reset (Not Connected)<br />
Count Input<br />
Direction<br />
Reset<br />
Accumulated Value<br />
(setpoint = 6)<br />
Counter Output<br />
Timing Relay, Flashing<br />
Flash Frequency = 1/2 x setpoint<br />
on<br />
on<br />
on<br />
8<br />
7<br />
6<br />
5<br />
4<br />
3<br />
2<br />
1<br />
0<br />
t t<br />
t<br />
00.00<br />
S 30.00<br />
{ TRG<br />
on<br />
on<br />
on<br />
on<br />
RES<br />
T1<br />
+<br />
Drawing a Circuit with <strong>Pico</strong> 2-13<br />
Accumulated Time<br />
Setpoint<br />
Timer Number<br />
Parameter Display<br />
(Access Control)<br />
Publication <strong>1760</strong>-<strong>GR001A</strong>-<strong>EN</strong>-P
2-14 Drawing a Circuit with <strong>Pico</strong><br />
Publication <strong>1760</strong>-<strong>GR001A</strong>-<strong>EN</strong>-P<br />
Parameter Display for Counter Relays<br />
Setpoint<br />
Opt. direction (connected)<br />
Count Input<br />
Reset (not connected)<br />
Real Time Switch<br />
0230<br />
DIR<br />
0000<br />
CNT C1<br />
RES +<br />
Example: Example: Real Time Switch 1 switches on Monday through Friday between 6:30<br />
and 9:00 and again between 17:00 and 22:30 (5:00 pm and 10:30 pm).<br />
MO-FR<br />
Parameter Display for Real Time Switches<br />
{<br />
{<br />
ON 06:30 A<br />
OFF 09:00 +<br />
on<br />
on<br />
on<br />
Week Day(s) from - to<br />
Actual Time<br />
On Time<br />
Off Time<br />
MO-FR<br />
1 1<br />
ON 17:00 B<br />
OFF 22:30 +<br />
MO<br />
01:00 1<br />
ON --:-- A<br />
OFF --:-- +<br />
Accumulated Value<br />
Counter Number<br />
Parameter Display<br />
(Access Control)<br />
Real Time Switch Number<br />
Channel<br />
Parameter Display<br />
(Access Control)
Analog Comparator<br />
Available functions:<br />
• I7 ≥ I8, I7 ≤ I8<br />
• I7 ≥ Setpoint, I7 ≤ Setpoint<br />
• I8 ≥ Setpoint, I8 ≤ Setpoint<br />
Drawing a Circuit with <strong>Pico</strong> 2-15<br />
The analog comparator can compare voltages from 0V to 10V (setpoints “0.0” to<br />
“10.0”).<br />
NOTE<br />
Parameter Displays for Analog Comparators<br />
Compare inputs I7 and I8.<br />
Analog signals of sensors typically fluctuate by several millivolts.<br />
For stable switching the setpoints should differ by at least 0.2V<br />
(switching hysteresis). Do not use any relay with output energize<br />
or impulse relay coil functions.<br />
Input I7<br />
Compare Function<br />
Input I8<br />
Input I7/I8<br />
Compare Function<br />
Setpoint<br />
ANALOG<br />
I7 8.0 V<br />
A1<br />
I8 4.2 V +<br />
Compare input “I7” to a setpoint.<br />
ANALOG<br />
I7 8.0 V<br />
3.2<br />
A1<br />
+<br />
Current Value<br />
Analog Compare Number<br />
Parameter Display<br />
(Access Control)<br />
Current Value<br />
Current Value<br />
Relay Number<br />
Parameter Display<br />
(Access Control)<br />
Publication <strong>1760</strong>-<strong>GR001A</strong>-<strong>EN</strong>-P
2-16 Drawing a Circuit with <strong>Pico</strong><br />
Publication <strong>1760</strong>-<strong>GR001A</strong>-<strong>EN</strong>-P<br />
Text Display (<strong>1760</strong>-L18AWA Only)<br />
The Text Display is used to display eight freely definable messages on the <strong>Pico</strong><br />
screen. Each text block displays up to 48 characters from the <strong>Pico</strong> display character<br />
set (ASCII + <strong>Pico</strong> special characters). If the Text Display is enabled, the text entered<br />
via <strong>Pico</strong>Soft is displayed. If several Text Displays are enabled, the next screen is<br />
displayed every 4 seconds. When Text Display D1 is enabled it stays displayed<br />
(fault indication).<br />
Press Ok to switch to the menus at any time.<br />
Current values or parameters of function relays can be displayed in lines 2 and 3.<br />
Examples:<br />
Fault Signals Time with Text Display<br />
CAUTION!<br />
PUMP 1<br />
MOTOR<br />
MALFUNCTION<br />
Display Counter Value<br />
QUANTITY<br />
ACTV 0042<br />
PCS<br />
SETP0100<br />
THE TIME<br />
IS<br />
14:42<br />
Display Current Value and<br />
Parameter of Timing Relay<br />
TIME RELAY 1<br />
SETP99.00 S<br />
ACTV 42.00 S
Example: Using a<br />
Function Relay<br />
Conventional Circuit<br />
S1 S2<br />
CR1<br />
T1<br />
CR1 10.0 sec<br />
T1<br />
M1<br />
Select an Internal Marker Relay<br />
Start Circuit from first example<br />
I1-I2----{Q1<br />
<strong>Pico</strong> switches M1 with<br />
10 seconds delay.<br />
Select Marker Contact and Connect to New Output Relay<br />
I1-I2----{M1<br />
2 X 2 X<br />
Ok<br />
Alt<br />
2 X<br />
3 X<br />
Ok<br />
Ok<br />
Ok<br />
Ok<br />
Drawing a Circuit with <strong>Pico</strong> 2-17<br />
I1-I2----{M1<br />
M1-------TT1<br />
T1-------{Q1<br />
<strong>Pico</strong> Circuit Diagram<br />
Position cursor on “Q”<br />
I1-I2----{Q1<br />
I1-I2----{M1<br />
I1-I2----{M1<br />
I1-I2----{M1<br />
I1<br />
I1-I2----{M1<br />
M1------ {Q1<br />
Publication <strong>1760</strong>-<strong>GR001A</strong>-<strong>EN</strong>-P
2-18 Drawing a Circuit with <strong>Pico</strong><br />
Publication <strong>1760</strong>-<strong>GR001A</strong>-<strong>EN</strong>-P<br />
Select Trigger Relay for Time<br />
I1-I2----{M1 I1-I2----{M1<br />
M1-------{Q1 M1-------TT1<br />
Insert Timing Relay Contact<br />
Select Parameter Access<br />
2 X<br />
Ok<br />
I1-I2----{M1<br />
M1-------TT1<br />
I1-I2----{M1 I1-I2----{M1<br />
M1-------TT1<br />
I1-I2----{M1<br />
M1-------TT1<br />
T1<br />
2 X<br />
2 X<br />
Ok<br />
Ok<br />
M1-------TT1<br />
I1<br />
I1-I2----{M1<br />
M1-------TT1<br />
T1<br />
X<br />
S 00.00<br />
{ TRG T1<br />
RES +
Set “10 Seconds”<br />
X<br />
S 00.00<br />
{ TRG T1<br />
RES +<br />
Connect Timing Relay Contact to New Output Relay<br />
2 X<br />
2 X<br />
Ok<br />
Drawing a Circuit with <strong>Pico</strong> 2-19<br />
X<br />
S 00.00<br />
{ TRG T1<br />
RES +<br />
X<br />
S 10.00<br />
{ TRG T1<br />
RES +<br />
back to circuit diagram<br />
I1-I2----{M1 I1-I2----{M1<br />
M1-------TT1<br />
T1<br />
M1-------TT1<br />
T1<br />
3 X 3 X<br />
I1-I2----{M1<br />
M1-------TT1<br />
T1-------{Q1<br />
Change <strong>Pico</strong> to RUN to test the program. Test the circuit as shown for the first<br />
example. To display and access the parameters for the timing relay and change the<br />
time value in RUN mode, position the cursor in the circuit diagram on the “T” of<br />
“T1” and press Ok.<br />
Alt<br />
Ok<br />
Publication <strong>1760</strong>-<strong>GR001A</strong>-<strong>EN</strong>-P
2-20 Drawing a Circuit with <strong>Pico</strong><br />
Basic Circuits Significance of Logic Values<br />
Publication <strong>1760</strong>-<strong>GR001A</strong>-<strong>EN</strong>-P<br />
Value Function<br />
“0” Make contact open, break contact closed, relay coil not energized<br />
“1” Make contact closed, break contact open, relay coil energized<br />
Negation (NOR)<br />
I1 Q1<br />
1 0<br />
0 1<br />
Permanent Contact (Unconditional Rung)<br />
--- Q1<br />
1 1<br />
Flip-Flop Output<br />
I1 State Q1 Q1<br />
0 0 0<br />
0 to 1 0 1<br />
0 1 1<br />
0 to 1 1 0<br />
Series Connection (AND)<br />
I1 I2 I3 Q1 Q2<br />
0 0 0 0 1<br />
1 0 0 0 0<br />
0 1 0 0 0<br />
1 1 0 0 0<br />
0 0 1 0 0<br />
1 0 1 0 0<br />
0 1 1 0 0<br />
1 1 1 1 0<br />
I1---------{Q1<br />
-----------{Q1<br />
I1--------- Q1<br />
I1-I2-I3-{Q1<br />
I1-I2-I3-{Q2
Parallel Connection (OR)<br />
I1 I2 I3 Q1 Q2<br />
0 0 0 0 1<br />
1 0 0 1 1<br />
0 1 0 1 1<br />
1 1 0 1 1<br />
0 0 1 1 1<br />
1 0 1 1 1<br />
0 1 1 1 1<br />
1 1 1 1 0<br />
Exclusive OR Circuit (XOR)<br />
I1 I2 Q1<br />
0 0 0<br />
1 0 1<br />
0 1 1<br />
1 1 0<br />
Motor Start/Stop Circuit<br />
I1 I2 Contact Q1 Coil Q1<br />
0 0 0 0<br />
1 0 1 1<br />
0 0 1 1<br />
0 1 0 0<br />
1 1 0 0<br />
Drawing a Circuit with <strong>Pico</strong> 2-21<br />
I1--------{Q1<br />
I2<br />
I3<br />
I1--------{Q2<br />
I2<br />
I3<br />
I1-I2------{Q1<br />
I1-I2<br />
I1--I2-----{Q1<br />
Q1<br />
Alternatively:<br />
I1--------SQ1<br />
I2--------RQ1<br />
Publication <strong>1760</strong>-<strong>GR001A</strong>-<strong>EN</strong>-P
2-22 Drawing a Circuit with <strong>Pico</strong><br />
Publication <strong>1760</strong>-<strong>GR001A</strong>-<strong>EN</strong>-P
<strong>Pico</strong> Interface Socket<br />
Chapter 3<br />
The <strong>Pico</strong> interface socket, which is beneath a protective cap, accepts the optional<br />
<strong>Pico</strong> memory module, or connects <strong>Pico</strong> to a PC using the optional PC interface<br />
cable and the <strong>Pico</strong>Soft software. This allows you to copy the circuit diagrams to<br />
and from the PC and/or memory module.<br />
Memory Module<br />
Memory modules are available as an optional accessory. Each memory module can<br />
store a single <strong>Pico</strong> circuit diagram. Information stored on the memory module is<br />
non-volatile (the information is not lost when the power is turned off). The<br />
memory module can be used to make a backup copy of a program and/or to<br />
transfer it to another <strong>Pico</strong> controller.<br />
Each memory module stores:<br />
• the circuit diagram<br />
• all parameter settings of the circuit diagram<br />
• system settings<br />
<strong>1760</strong>-MM1 for all <strong>1760</strong>-L12xxx<br />
controllers<br />
ATT<strong>EN</strong>TION<br />
<strong>1760</strong>-MM2 for the <strong>1760</strong>-L18AWA<br />
controller<br />
ELECTRICAL SHOCK HAZARD<br />
The memory module and PC-cable socket are at the potential of<br />
L2. There is a danger of electric shock if L2 is not grounded. Do<br />
not make contact with electrical components under the socket<br />
cover.<br />
1 Publication <strong>1760</strong>-<strong>GR001A</strong>-<strong>EN</strong>-P
3-2 <strong>Pico</strong> Interface Socket<br />
Publication <strong>1760</strong>-<strong>GR001A</strong>-<strong>EN</strong>-P<br />
Loading or Storing the Circuit Diagram<br />
You can only transfer the program from <strong>Pico</strong> to the memory module or vice versa<br />
in the STOP mode.<br />
DEVICE ->CARD: Transfer circuit diagram and parameter<br />
settings from <strong>Pico</strong> to the memory module.<br />
CARD->DEVICE: Transfer circuit diagram and parameter<br />
settings from the memory module to <strong>Pico</strong>.<br />
DELETE CARD: Delete the contents of the memory module.<br />
Available Memory Modules<br />
Use the <strong>1760</strong>-MM1 memory module for the 12-I/O <strong>Pico</strong> controllers and use the<br />
<strong>1760</strong>-MM2 memory module for the <strong>1760</strong>-L18AWA <strong>Pico</strong> controller. The<br />
<strong>1760</strong>-L18AWA controller is able to read from the <strong>1760</strong>-MM1 memory module,<br />
but cannot write to it. The <strong>1760</strong>-MM2 memory module will not physically fit on a<br />
12-I/O <strong>Pico</strong> controller.<br />
<strong>Pico</strong>Soft<br />
<strong>Pico</strong>Soft is an optional PC program that creates, stores, and manages <strong>Pico</strong> circuit<br />
diagrams. It transfers the circuit diagrams from the PC to <strong>Pico</strong> or vice versa using a<br />
special PC interface cable.<br />
ATT<strong>EN</strong>TION The PC interface cable is catalog number <strong>1760</strong>-CBL-PM02 and<br />
is available as an accessory item. Only use the <strong>Pico</strong> interface<br />
cable. Do not attempt to make your own cable as this can cause<br />
damage to the unit or present a shock hazard.<br />
The <strong>Pico</strong>Soft software also includes extensive on-line Help.<br />
DEVICE - CARD<br />
CARD - DEVICE<br />
DELETE CARD<br />
To use the on-line Help, start <strong>Pico</strong>Soft and choose Contents in the Help menu.<br />
Context sensitive help is also available. Choose a menu item with the mouse and<br />
press F1 while keeping the mouse button pressed.
Physical Specifications<br />
Electrical<br />
Specifications<br />
Accessories<br />
Specifications<br />
Specification <strong>1760</strong>-L12xxx <strong>1760</strong>-L18AWA<br />
Weight 200g (7 oz) 300g (10.6 oz)<br />
Ambient temperature, (operation) 0°C to + 55°C (+32°F to 131°F)<br />
Storage Temperature -40°C to +70°C (-40°F to +158°F)<br />
Operating Humidity 5 to 95%, non-condensing<br />
Emitted interference, interference<br />
immunity<br />
<strong>EN</strong> 55011, <strong>EN</strong> 55022, Class B<br />
Standards and regulations<br />
<strong>EN</strong> 50178<br />
Approvals<br />
UL, CSA, CE<br />
Appendix A<br />
Specification <strong>1760</strong>-<br />
L12BWB-NC L12BWB -L12AWA-NC -L12AWA -L12AWA-ND -L18AWA<br />
Power Supply 24V dc 120/240V ac, 50/60 Hz ±5%<br />
Digital Inputs 8 (24V dc) (2 can also be used<br />
as 0 to 10V analog inputs)<br />
8 (120/240V ac) 12 (120/240V ac)<br />
Relay Outputs 4 4 4 4 4 6<br />
LCD Display X X X X - X<br />
Keypad X X X X - X<br />
Real Time Clock - X - X X X<br />
Text Display Feature - - - - - X<br />
Retentive Actual Values X X - - - X<br />
Accessory <strong>1760</strong>-<br />
L12BWB-NC L12BWB -L12AWA-NC -L12AWA -L12AWA-ND -L18AWA<br />
Software <strong>Pico</strong>Soft (catalog number <strong>1760</strong>-<strong>Pico</strong>Soft), for Windows 95/98, Windows NT<br />
PC - <strong>Pico</strong> interface cable <strong>Pico</strong> <strong>1760</strong>-CBL-PM02<br />
Memory Card <strong>Pico</strong> <strong>1760</strong>-MM1 <strong>Pico</strong> <strong>1760</strong>-MM2<br />
Input/Output Simulator <strong>Pico</strong> <strong>1760</strong>-SIM - - - -<br />
Documentation Getting Results <strong>Manual</strong> (publication number <strong>1760</strong>-<strong>GR001A</strong>-<strong>EN</strong>-P)<br />
<strong>User</strong> <strong>Manual</strong> (publication number <strong>1760</strong>-UM001A-<strong>EN</strong>-P)<br />
1 Publication <strong>1760</strong>-<strong>GR001A</strong>-<strong>EN</strong>-P
A-2 Specifications<br />
Dimensions <strong>Pico</strong> <strong>1760</strong>-L12BWB-NC, -L12BWB, -L12AWA-NC, -L12AWA,<br />
L12AWA-ND<br />
Publication <strong>1760</strong>-<strong>GR001A</strong>-<strong>EN</strong>-P<br />
10.75 50 1.97"<br />
0.423"<br />
M4<br />
35.75 1.41"<br />
71.5 2.81"<br />
<strong>Pico</strong> <strong>1760</strong>-L18AWA<br />
16.25<br />
0.640"<br />
90 3.54"<br />
75 2.96" 16.25<br />
0.640"<br />
M4<br />
107.5 4.23"<br />
102 4.02"<br />
110 4.33"<br />
90 3.54"<br />
102 4.02"<br />
110 4.33"<br />
4.5 0.177"<br />
47.5 1.87"<br />
56.5 2.22"<br />
58 2.28"<br />
4.5 0.177"<br />
47.5 1.87"<br />
56.5 2.22"<br />
58 2.28"<br />
45 1.77"<br />
45 1.77"
A<br />
Allen-Bradley<br />
contacting for assistance P-2<br />
support P-2<br />
Analog comparator 2-15<br />
B<br />
Basic circuit<br />
Exclusive OR circuit (XOR) 2-21<br />
Flip-flop output 2-20<br />
Impulse relay 2-20<br />
Motor start/stop circuit 2-21<br />
Negation (NOR) 2-20<br />
Permanent contact 2-20<br />
Series connection (AND) 2-20<br />
Break contact 2-4<br />
Buttons 1-6<br />
Use in circuit diagrams 2-1<br />
C<br />
Cable 3-2<br />
Change operating mode 2-3<br />
Circuit diagram<br />
Access relay parameters 2-18<br />
Choosing relay type 2-8<br />
Displaying 2-7<br />
Example 2-7, 2-17<br />
Inserting contacts 2-7<br />
Loading 3-2<br />
Select marker relay 2-17<br />
Storing 3-2<br />
Symbols 1-8<br />
Testing 2-9<br />
Using a function relay 2-17<br />
Using buttons in 2-1<br />
Circuit diagram elements 2-4<br />
Coil function 2-6<br />
common techniques used in this manual P-2<br />
contacting Allen-Bradley for assistance P-2<br />
Contactor function 2-6<br />
Contacts<br />
Overview 2-4<br />
Counter relay 2-13<br />
Parameter display 2-14<br />
Cursor display 1-7<br />
E<br />
Example<br />
Basic circuits 2-20<br />
Circuit diagram 2-7<br />
Contacts and relays 2-7<br />
Example of function relay 2-17<br />
F<br />
Function relays<br />
Analog comparator 2-15<br />
Counter relay 2-13<br />
Overview 2-11<br />
Text display 2-16<br />
Time switch 2-14<br />
Timing relay 2-11<br />
K<br />
Keypad 1-6<br />
L<br />
Logic tables 2-20-??<br />
M<br />
Make contact 2-4<br />
manuals, related P-1<br />
Memory Module (optional) 3-1<br />
Menu guidance 1-6<br />
Menu structure 1-9<br />
Models A-1<br />
Mounting 1-2<br />
O<br />
Operating buttons 1-6<br />
P<br />
Parameter display<br />
Analog comparator 2-15<br />
Counter relay 2-14<br />
For timing relays 2-13<br />
Time switch 2-14<br />
Overview of <strong>Pico</strong> 1-2<br />
<strong>Pico</strong>Soft 3-2<br />
Programming cable 3-2<br />
publications, related P-1<br />
Purpose of this <strong>Manual</strong> P-1<br />
Index<br />
Publication <strong>1760</strong>-<strong>GR001A</strong>-<strong>EN</strong>-P
2 Index<br />
R<br />
related publications P-1<br />
Relay types<br />
Overview 2-4<br />
S<br />
Setting the time 2-3<br />
Setting week day 2-3<br />
Software 3-2<br />
Startup behavior 2-4<br />
Status display 1-7<br />
Summer time 2-3<br />
Symbols in circuit diagram 1-8<br />
T<br />
Terminals, inputs/outputs 1-3<br />
Publication <strong>1760</strong>-<strong>GR001A</strong>-<strong>EN</strong>-P<br />
Text display 2-16<br />
Time switch 2-14<br />
Parameter display 2-14<br />
Timing relays 2-11<br />
Parameter display 2-13<br />
troubleshooting<br />
contacting Allen-Bradley for assistance P-2<br />
W<br />
Winter time 2-3<br />
Wiring diagrams<br />
<strong>1760</strong>-L12AWA-NC, <strong>1760</strong>-L12AWA, and<br />
<strong>1760</strong>-L12AWA-ND 1-4<br />
<strong>1760</strong>-L12AWA-xx and <strong>1760</strong>-L12BWB-xx 1-4<br />
<strong>1760</strong>-L12BWB and <strong>1760</strong>-L12BWB-NC 1-3<br />
<strong>1760</strong>-L18AWA 1-5
Back Cover<br />
Publication <strong>1760</strong>-<strong>GR001A</strong>-<strong>EN</strong>-P - June 2000 2 PN 40072-085-01(A)<br />
Supersedes Publication 1764-6.1 - February 1999 and 1764-6.1-DU1 - September 1999 © 2000 Rockwell International Corporation. Printed in the U.S.A.