Installation Instructions for SHARP Built-in Kits model number RK ...
Installation Instructions for SHARP Built-in Kits model number RK ...
Installation Instructions for SHARP Built-in Kits model number RK ...

You also want an ePaper? Increase the reach of your titles
YUMPU automatically turns print PDFs into web optimized ePapers that Google loves.
A39990,<strong>RK</strong>-J40W,J40K,J40S,J90S o/m<br />
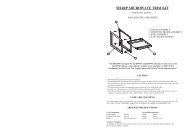
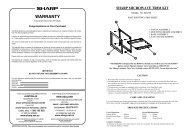
<strong>Installation</strong> <strong>Instructions</strong> <strong>for</strong> <strong>SHARP</strong> <strong>Built</strong>-<strong>in</strong> <strong>Kits</strong><br />
<strong>model</strong> <strong>number</strong> <strong>RK</strong>-J40W/<strong>RK</strong>-J40K/<strong>RK</strong>-J40S/<strong>RK</strong>-J90W/<strong>RK</strong>-J90S<br />
Be<strong>for</strong>e <strong>in</strong>stall<strong>in</strong>g a Sharp Microwave Oven, read and check the follow<strong>in</strong>g po<strong>in</strong>ts.<br />
SAFETY INFORMATION<br />
1. Disconnect the oven from the power supply be<strong>for</strong>e <strong>in</strong>stallation.<br />
2. To avoid damage caused by heat, do not <strong>in</strong>stall directly adjacent to a conventional oven (<strong>in</strong> particular<br />
front vent<strong>in</strong>g ovens). The manufacture nor the distributors can accept liability <strong>for</strong> damage to the<br />
microwave oven or built-<strong>in</strong> kit caused by <strong>in</strong>correct <strong>in</strong>stallation.<br />
3. Surround<br />
a. Make sure that the Sharp <strong>Built</strong>-<strong>in</strong> Kit is the correct surround <strong>for</strong> your oven.<br />
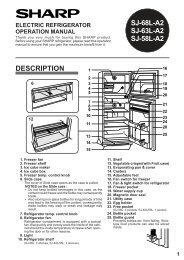
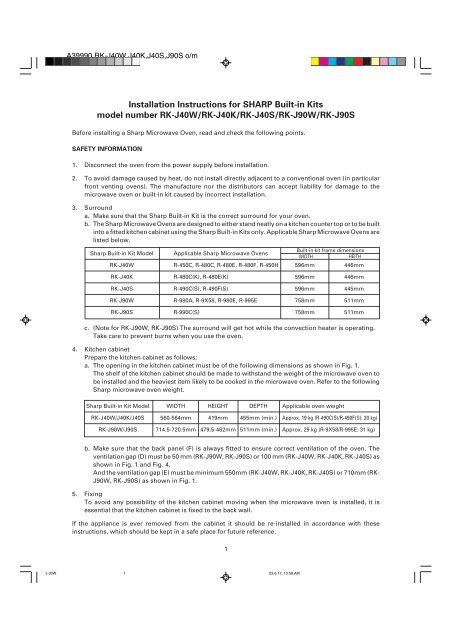
b. The Sharp Microwave Ovens are designed to either stand neatly on a kitchen counter top or to be built<br />
<strong>in</strong>to a fitted kitchen cab<strong>in</strong>et us<strong>in</strong>g the Sharp <strong>Built</strong>-<strong>in</strong> <strong>Kits</strong> only. Applicable Sharp Microwave Ovens are<br />
listed below.<br />
Sharp <strong>Built</strong>-<strong>in</strong> Kit Model Applicable Sharp Microwave Ovens<br />
<strong>RK</strong>-J40W R-450C, R-480C, R-480E, R-480F, R-450H 596mm 446mm<br />
<strong>RK</strong>-J40K R-480C(K), R-480E(K) 596mm 446mm<br />
<strong>RK</strong>-J40S R-490C(S), R-490F(S) 596mm 445mm<br />
<strong>RK</strong>-J90W R-980A, R-9X58, R-980E, R-995E 758mm 511mm<br />
<strong>RK</strong>-J90S R-990C(S) 758mm 511mm<br />
c. (Note <strong>for</strong> <strong>RK</strong>-J90W, <strong>RK</strong>-J90S) The surround will get hot while the convection heater is operat<strong>in</strong>g.<br />
Take care to prevent burns when you use the oven.<br />
4. Kitchen cab<strong>in</strong>et<br />
Prepare the kitchen cab<strong>in</strong>et as follows;<br />
a. The open<strong>in</strong>g <strong>in</strong> the kitchen cab<strong>in</strong>et must be of the follow<strong>in</strong>g dimensions as shown <strong>in</strong> Fig. 1.<br />
The shelf of the kitchen cab<strong>in</strong>et should be made to withstand the weight of the microwave oven to<br />
be <strong>in</strong>stalled and the heaviest item likely to be cooked <strong>in</strong> the microwave oven. Refer to the follow<strong>in</strong>g<br />
Sharp microwave oven weight.<br />
Sharp <strong>Built</strong>-<strong>in</strong> Kit Model WIDTH HEIGHT DEPTH Applicable oven weight<br />
<strong>RK</strong>-J40W/J40K/J40S 560-564mm 419mm 455mm (m<strong>in</strong>.) Approx. 19 kg (R-490C(S)/R-490F(S): 20 kg)<br />
<strong>RK</strong>-J90W/J90S 714.5-720.5mm 479.5-482mm 511mm (m<strong>in</strong>.) Approx. 29 kg (R-9X58/R-995E: 31 kg)<br />
b. Make sure that the back panel (F) is always fitted to ensure correct ventilation of the oven. The<br />
ventilation gap (D) must be 50 mm (<strong>RK</strong>-J90W, <strong>RK</strong>-J90S) or 100 mm (<strong>RK</strong>-J40W, <strong>RK</strong>-J40K, <strong>RK</strong>-J40S) as<br />
shown <strong>in</strong> Fig. 1 and Fig. 4.<br />
And the ventilation gap (E) must be m<strong>in</strong>imum 550mm (<strong>RK</strong>-J40W, <strong>RK</strong>-J40K, <strong>RK</strong>-J40S) or 710mm (<strong>RK</strong>-<br />
J90W, <strong>RK</strong>-J90S) as shown <strong>in</strong> Fig. 1.<br />
5. Fix<strong>in</strong>g<br />
To avoid any possibility of the kitchen cab<strong>in</strong>et mov<strong>in</strong>g when the microwave oven is <strong>in</strong>stalled, it is<br />
essential that the kitchen cab<strong>in</strong>et is fixed to the back wall.<br />
If the appliance is ever removed from the cab<strong>in</strong>et it should be re-<strong>in</strong>stalled <strong>in</strong> accordance with these<br />
<strong>in</strong>structions, which should be kept <strong>in</strong> a safe place <strong>for</strong> future reference.<br />
J-30W 1<br />
03.6.17, 10:58 AM<br />
1<br />
<strong>Built</strong>-<strong>in</strong> kit frame dimensions<br />
WIDTH HEITH<br />
ENGLISH<br />
DEUTSCH<br />
FRANÇAIS<br />
ESPAÑOL
A39990,<strong>RK</strong>-J40W,J40K,J40S,J90S o/m<br />
PROVIDED PARTS<br />
1 SPACING BRACKET 2 PARTITION ANGLE 3 CUSHION (SIDE) 4 CUSHION (BACK)<br />
5 SASH<br />
(<strong>for</strong> <strong>RK</strong>-J40W,<br />
<strong>RK</strong>-J40K)<br />
NO.<br />
1<br />
2<br />
3<br />
4<br />
5<br />
6<br />
7<br />
8<br />
<strong>RK</strong>-J40W<br />
LANGKA931WRWZ<br />
LANGKA930WRWZ<br />
PCUSUA537WRPZ<br />
PCUSUA536WRPZ<br />
GWAKPA177WRF0<br />
GWAKPA707WRFZ<br />
XMMSD41P13000<br />
XMMSD41P20000<br />
5 SASH<br />
(<strong>for</strong> <strong>RK</strong>-J40S,<br />
<strong>RK</strong>-J90W,<strong>RK</strong>-J90S)<br />
PART NUMBER<br />
<strong>RK</strong>-J40K<br />
LANGKA931WRWZ<br />
LANGKA930WRWZ<br />
PCUSUA537WRPZ<br />
PCUSUA536WRPZ<br />
GWAKPA175WRF0<br />
GWAKPA708WRFZ<br />
XMMSD41P13000<br />
XMMSD41P20000<br />
INSTALLATION INSTRUCTIONS<br />
6 SASH (SIDE)<br />
(<strong>for</strong> <strong>RK</strong>-J40W,<br />
<strong>RK</strong>-J40K)<br />
<strong>RK</strong>-J40S<br />
LANGKA931WRWZ<br />
LANGKA930WRWZ<br />
PCUSUA537WRPZ<br />
PCUSUA536WRPZ<br />
GWAKMA028WRE0<br />
GWAKMA034WREZ<br />
XMMSD41P13000<br />
XMMSE41P20000<br />
2<br />
6 SASH (SIDE)<br />
(<strong>for</strong> <strong>RK</strong>-J40S,<br />
<strong>RK</strong>-J90W,<strong>RK</strong>-J90S)<br />
<strong>RK</strong>-J90W<br />
LANGKA931WRWZ<br />
LANGKA932WRWZ<br />
PCUSUA534WRPZ<br />
PCUSUA535WRPZ<br />
GWAKMA035WRE0<br />
GWAKMA036WREZ<br />
XMMSD41P13000<br />
LX-MZA002WREZ<br />
7 SCREW<br />
(SHORT)<br />
<strong>RK</strong>-J90S<br />
LANGKA931WRWZ<br />
LANGKA932WRWZ<br />
PCUSUA534WRPZ<br />
PCUSUA535WRPZ<br />
GWAKMA033WRE0<br />
GWAKMA032WRE0<br />
XMMSD41P13000<br />
XMMSE41P20000<br />
8 SCREW<br />
(LONG)<br />
1. Provide a suitable hole <strong>in</strong> the right side wall of the kitchen cab<strong>in</strong>et beh<strong>in</strong>d the partition angle 2 <strong>for</strong> the power supply<br />
cord and plug. If you want to have a hole <strong>in</strong> the left wall of the cab<strong>in</strong>et, the hole should be provided down the wall.<br />
2. Set one spac<strong>in</strong>g bracket 1 on the shelf keep<strong>in</strong>g a distance (A) between the left wall of the kitchen cab<strong>in</strong>et and<br />
the spac<strong>in</strong>g bracket, and a distance (B) between the front end of the shelf and the spac<strong>in</strong>g bracket as shown<br />
<strong>in</strong> Fig. 1. Attach it with the two screws 7 as shown <strong>in</strong> Fig. 1. And then attach the other spac<strong>in</strong>g bracket 1 on<br />
the shelf keep<strong>in</strong>g a distance (C) between the two spac<strong>in</strong>g brackets, and a distance (B) between the front end<br />
of the shelf and the spac<strong>in</strong>g bracket with two screws 7 as shown <strong>in</strong> Fig. 1.<br />
Caution: The arrow marks on each spac<strong>in</strong>g bracket should be po<strong>in</strong>t<strong>in</strong>g towards you.<br />
3. Place the partition angle 2 at the end of the spac<strong>in</strong>g brackets 1, and attach it with the two screws 7 as shown<br />
<strong>in</strong> Fig. 1.<br />
4. Remove the back<strong>in</strong>g papers from the two cushions 3. Attach the cushions 3 along the spac<strong>in</strong>g brackets<br />
1 from the front end of the shelf as shown <strong>in</strong> Fig. 2.<br />
5. Remove the back<strong>in</strong>g paper from the cushion 4. Attach the cushion 4 to the partition angle 2 as shown<br />
<strong>in</strong> Fig. 3 and Fig. 4.<br />
J-30W 2<br />
03.6.16, 2:36 PM<br />
Q'TY<br />
2<br />
1<br />
2<br />
1<br />
2<br />
2<br />
6<br />
4
A39990,<strong>RK</strong>-J40W,J40K,J40S,J90S o/m<br />
Fig. 1 <strong>for</strong> <strong>RK</strong>-J40W, <strong>RK</strong>-J40K<br />
419mm<br />
(A)<br />
(C)<br />
455mm (m<strong>in</strong>.)<br />
600mm<br />
560~564mm<br />
7<br />
1<br />
Shelf of kitchen cab<strong>in</strong>et<br />
Fig. 1 <strong>for</strong> <strong>RK</strong>-J90W<br />
479.5~482mm<br />
(C)<br />
511mm (m<strong>in</strong>.)<br />
(A)<br />
760mm<br />
714.5~720.5mm<br />
7<br />
1<br />
(B)<br />
Shelf of kitchen cab<strong>in</strong>et<br />
1<br />
1<br />
(E): 550mm (m<strong>in</strong>.)<br />
7<br />
2<br />
(D)<br />
(A) 2mm<br />
(C) 356.5mm<br />
100 mm<br />
(F)<br />
* (B) is not necessary <strong>for</strong><br />
<strong>RK</strong>-J40W, <strong>RK</strong>-J40K.<br />
(E): 710mm (m<strong>in</strong>.)<br />
7<br />
2<br />
(A) 75.5mm<br />
(B) 26mm<br />
(C) 367mm<br />
50 mm<br />
(F)<br />
3<br />
Fig. 1 <strong>for</strong> <strong>RK</strong>-J40S<br />
419mm<br />
(C)<br />
(A)<br />
600mm<br />
560~564mm<br />
7<br />
1<br />
(B)<br />
Shelf of kitchen cab<strong>in</strong>et<br />
Fig. 1 <strong>for</strong> <strong>RK</strong>-J90S<br />
479.5~482mm<br />
(C)<br />
455mm (m<strong>in</strong>.)<br />
511mm (m<strong>in</strong>.)<br />
(A)<br />
760mm<br />
714.5~720.5mm<br />
7<br />
1<br />
(B)<br />
Shelf of kitchen cab<strong>in</strong>et<br />
J-30W 3<br />
03.6.16, 2:36 PM<br />
(D)<br />
1<br />
1<br />
(E): 550mm (m<strong>in</strong>.)<br />
7<br />
7<br />
2<br />
(A) 2mm<br />
(B) 11mm<br />
(E): 710mm (m<strong>in</strong>.)<br />
(D)<br />
(C) 356.5mm<br />
(D)<br />
2<br />
(A) 75.5mm<br />
(B) 31mm<br />
(C) 367mm<br />
100 mm<br />
(F)<br />
50 mm<br />
(F)<br />
ENGLISH<br />
DEUTSCH<br />
FRANÇAIS<br />
ESPAÑOL
A39990,<strong>RK</strong>-J40W,J40K,J40S,J90S o/m<br />
6. Place the oven on the spac<strong>in</strong>g brackets 1 on the shelf of the kitchen cab<strong>in</strong>et.<br />
7. Connect the oven to the power supply.<br />
Caution: Connect the oven to the power supply 230 - 240 V, 50Hz.<br />
8. Adjust the position of the oven so that the feet of the oven are fitted <strong>in</strong>to the recesses of the spac<strong>in</strong>g<br />
brackets as shown <strong>in</strong> Fig. 4.<br />
Fig. 2<br />
3<br />
1<br />
Fig. 4 <strong>for</strong> <strong>RK</strong>-J40W, <strong>RK</strong>-J40K, <strong>RK</strong>-J40S<br />
(Note: This picture does not <strong>in</strong>clude the cushion 3<br />
<strong>for</strong> your reference.)<br />
<strong>Built</strong>-<strong>in</strong> frame<br />
(Complete)<br />
Foot<br />
Recess<br />
Microwave Oven<br />
Exhaust air<br />
(D)<br />
4<br />
2<br />
100mm<br />
(F)<br />
2<br />
Air vent open<strong>in</strong>gs<br />
4<br />
4<br />
10<br />
Fig. 3<br />
Fig. 4 <strong>for</strong> <strong>RK</strong>-J90W, <strong>RK</strong>-J90S<br />
<strong>Built</strong>-<strong>in</strong> frame<br />
(Complete)<br />
Foot<br />
Recess<br />
Microwave Oven<br />
J-30W 4<br />
03.6.17, 10:58 AM<br />
4<br />
3<br />
3<br />
2<br />
0 1 2 3 4 5 6 7 8 9<br />
3<br />
4<br />
(D)<br />
2<br />
50mm<br />
Exhaust air<br />
(F)<br />
Air vent open<strong>in</strong>gs<br />
*This picture does<br />
not <strong>in</strong>clude the<br />
cushion 3 <strong>for</strong><br />
your reference.<br />
10<br />
cm
A39990,<strong>RK</strong>-J40W,J40K,J40S,J90S o/m<br />
9. (For <strong>RK</strong>-J40W, <strong>RK</strong>-J40K) Place the sash 5 on top of the oven mak<strong>in</strong>g sure that it is level both vertically<br />
and horizontally. Secure to the kitchen cab<strong>in</strong>et with two screws 8 as shown <strong>in</strong> Fig. 5.<br />
(For <strong>RK</strong>-J40S, <strong>RK</strong>-J90W, <strong>RK</strong>-J90S) Place the sash 5 over the sashes 6 on top of the oven mak<strong>in</strong>g sure<br />
that it is level both vertically and horizontally. Secure loosely to the kitchen cab<strong>in</strong>et with two screws 8<br />
as shown <strong>in</strong> Fig. 5.<br />
10. (For <strong>RK</strong>-J40W, <strong>RK</strong>-J40K) Place the second sash 5 at bottom edge of the oven. Check location by<br />
measur<strong>in</strong>g distance between upper and lower sashes 5 with each sashes 6. Secure to the kitchen<br />
cab<strong>in</strong>et with two screws 8 as shown <strong>in</strong> Fig. 5. And then <strong>in</strong>stall two sashes 6 by snapp<strong>in</strong>g them <strong>in</strong>to place<br />
as shown <strong>in</strong> Fig. 5.<br />
(For <strong>RK</strong>-J40S, <strong>RK</strong>-J90W, <strong>RK</strong>-J90S) Install the second sash 5 over the sashes 6 at bottom edge of the<br />
oven. And secure the sash 5 to the cab<strong>in</strong>et through the holes of the sashes 6 with two screws 8 as<br />
shown <strong>in</strong> Fig. 5. And tighten all screws.<br />
Fig. 5 <strong>for</strong> <strong>RK</strong>-J40W, <strong>RK</strong>-J40K<br />
6<br />
8<br />
Fig. 5 <strong>for</strong> <strong>RK</strong>-J40S, <strong>RK</strong>-J90W, <strong>RK</strong>-J90S<br />
8<br />
8<br />
8<br />
J-30W 5<br />
03.6.16, 2:36 PM<br />
5<br />
5<br />
8<br />
6<br />
5<br />
8<br />
5<br />
6<br />
8<br />
5<br />
6<br />
ENGLISH<br />
DEUTSCH<br />
FRANÇAIS<br />
ESPAÑOL
A39990,<strong>RK</strong>-J40W,J40K,J40S,J90S o/m<br />
<strong>SHARP</strong> CORPORATION Osaka, Japan<br />
J-30W 6<br />
03.6.16, 2:36 PM<br />
6<br />
TINSEA833WRRZ - J33<br />
PRINTED IN JAPAN


![R-291Z(ST) [Cover].indd - Sharp Australia Support](https://img.yumpu.com/19344699/1/184x260/r-291zst-coverindd-sharp-australia-support.jpg?quality=85)