HT-SB60 - Sharp Australia Support - Sharp Corporation of Australia
HT-SB60 - Sharp Australia Support - Sharp Corporation of Australia
HT-SB60 - Sharp Australia Support - Sharp Corporation of Australia

You also want an ePaper? Increase the reach of your titles
YUMPU automatically turns print PDFs into web optimized ePapers that Google loves.
MODEL<br />
<strong>HT</strong>-<strong>SB60</strong><br />
SOUND BAR HOME THEATER SYSTEM<br />
OPERATION MANUAL<br />
Thank you for purchasing this SHARP product. To obtain the best performance from this product, please read this<br />
manual carefully. It will guide you in operating your SHARP product.<br />
<strong>HT</strong>-<strong>SB60</strong> Sound Bar Home Theater system consisting <strong>of</strong> <strong>HT</strong>-<strong>SB60</strong> (sound bar system) and CP-SW60 (active<br />
subwo<strong>of</strong>er system).<br />
3D<br />
AUDIO<br />
BASS TREBLE<br />
Note:<br />
This product is recommended for flat panel TV (LED, LCD and plasma).<br />
TINSEA417AWZZ<br />
ENGLISH<br />
12K R AS 1
Accessories<br />
The following accessories are included.<br />
3D<br />
AUDIO<br />
BASS TREBLE<br />
Remote Control Subwo<strong>of</strong>er Stand x 2 Audio Cable x 1 HDMI Cable x 1<br />
Wall Mount Angle x 2 Pattern Paper “AA” size battery<br />
(UM/SUM-3, R6, HP-7 or similar) x 1<br />
Special Notes<br />
Manufactured under license under U.S. Patent Nos:<br />
5,956,674; 5,974,380; 6,487,535 & other U.S. and<br />
worldwide patents issued & pending. DTS, the Symbol,<br />
& DTS and the Symbol together are registered<br />
trademarks & DTS Digital Surround and the DTS logos<br />
are trademarks <strong>of</strong> DTS, Inc. Product includes s<strong>of</strong>tware.<br />
© DTS, Inc. All Rights Reserved.<br />
Manufactured under license from Dolby Laboratories.<br />
Dolby and the double-D symbol are trademarks <strong>of</strong> Dolby<br />
Laboratories.<br />
HDMI, the HDMI Logo, and High-Definition Multimedia<br />
Interface are trademarks or registered trademarks <strong>of</strong><br />
HDMI Licensing LLC in the United States and other<br />
countries.<br />
E-2<br />
Warning:<br />
● When the ON/STAND-BY button is set at STAND-BY<br />
position, mains voltage is still present inside the unit.<br />
When the ON/STAND-BY button is set at STAND-BY<br />
position, the unit may be brought into operation by the<br />
timer mode or remote control.<br />
● This unit contains no user serviceable parts. Never<br />
remove covers unless qualified to do so. This unit<br />
contains dangerous voltages, always remove mains<br />
plug from the socket before any service operation and<br />
when not in use for a long period.<br />
● To prevent fire or shock hazard, do not expose this<br />
appliance to dripping or splashing. No objects filled with<br />
liquids, such as vases, shall be placed on the<br />
apparatus.
Precautions<br />
General<br />
● Please ensure that the equipment is positioned in a<br />
well-ventilated area and ensure that there is at least<br />
10 cm <strong>of</strong> free space along the sides, top and back <strong>of</strong><br />
the equipment.<br />
10 cm<br />
10 cm 10 cm<br />
10 cm 10 cm<br />
● Use the unit on a firm, level surface free from vibration.<br />
● Keep the unit away from direct sunlight, strong<br />
magnetic fields, excessive dust, humidity and<br />
electronic/electrical equipment (home computers,<br />
facsimiles, etc.) which generate electrical noise.<br />
● Do not place anything on top <strong>of</strong> the unit.<br />
● Do not expose the unit to moisture, to temperatures<br />
higher than 60°C (140°F) or to extremely low<br />
temperatures.<br />
● If your system does not work properly, disconnect the<br />
AC power lead from the wall socket and replug.<br />
● In case <strong>of</strong> an electrical storm, unplug the unit for safety.<br />
● Hold the AC power plug by the head when removing it<br />
from the wall socket, as pulling the lead can damage<br />
internal wires.<br />
● The AC power plug is used as a disconnect device and<br />
shall always remain readily operable.<br />
Controls and indicators<br />
Sound Bar Front Panel<br />
Reference page<br />
1. Left Channel Speakers<br />
2. Right Channel Speakers<br />
3. On/Stand-by Button . . . . . . . . . . . . . . . . . . . . 10, 13<br />
4. SOURCE Button . . . . . . . . . . . . . . . . . . . . . . 8, 9, 12<br />
5. Pairing Button . . . . . . . . . . . . . . . . . . . . . . . . . . . . 10<br />
1<br />
10 cm<br />
10 cm<br />
E-3<br />
● Do not remove the outer cover, as this may result<br />
in electric shock. Refer internal service to your<br />
local SHARP service facility.<br />
● The ventilation should not be impeded by covering the<br />
ventilation openings with items, such as newspapers,<br />
tablecloths, curtains, etc.<br />
● No naked flame sources, such as lighted candles,<br />
should be placed on the apparatus.<br />
● Attention should be drawn to the environmental aspects<br />
<strong>of</strong> battery disposal.<br />
● This unit should only be used within the range <strong>of</strong> 5°C -<br />
35°C (41°F - 95°F).<br />
● SHARP is not responsible for damage due to improper<br />
use. Refer all servicing to a SHARP authorised service<br />
centre.<br />
Warnings:<br />
● The voltage used must be the same as that specified on<br />
this unit. Using this product with a higher voltage other<br />
than that which is specified is dangerous and may<br />
result in a fire or other type <strong>of</strong> accident causing<br />
damage. SHARP will not be held responsible for any<br />
damage resulting from use <strong>of</strong> this unit with a voltage<br />
other than that which is specified.<br />
● In case <strong>of</strong> repairing, please bring the entire system set<br />
to the service centre.<br />
Volume control<br />
3 4 5 6 7<br />
8 9 10<br />
The sound level at a given volume setting depends on<br />
speaker efficiency, location and various other factors. It is<br />
advisable to avoid exposure to high volume levels. Do not<br />
turn the volume on to full at switch on. Listen to music at<br />
moderate levels.<br />
2<br />
Reference page<br />
6. Remote Sensor . . . . . . . . . . . . . . . . . . . . . . . . . . 10<br />
7. Demo Indicator. . . . . . . . . . . . . . . . . . . . . . . . 10, 14<br />
8. Sound Mode Button. . . . . . . . . . . . . . . . . . . . 11, 13<br />
9. Volume Down Button . . . . . . . . . . . . . . . . . . . . . 11<br />
10. Volume Up Button . . . . . . . . . . . . . . . . . . . . . . . . 11
Controls and indicators (continued)<br />
Display<br />
1 2<br />
DIGITAL<br />
DIGITAL<br />
3<br />
Reference Page<br />
1. Dolby Digital Indicator . . . . . . . . . . . . . . . . . . . . . 12<br />
2. DTS Indicator . . . . . . . . . . . . . . . . . . . . . . . . . . . . 12<br />
3. Muting Indicator . . . . . . . . . . . . . . . . . . . . . . . . . . 11<br />
Sound Bar Rear Panel<br />
1<br />
Reference page<br />
1. HDMI OUT (TV ARC) socket. . . . . . . . . . . . . . . . . 8<br />
2. HDMI IN 1 socket . . . . . . . . . . . . . . . . . . . . . . . . . 8<br />
3. HDMI IN 2 socket . . . . . . . . . . . . . . . . . . . . . . . . . 8<br />
2<br />
E-4<br />
1<br />
2<br />
Subwo<strong>of</strong>er<br />
3<br />
Reference page<br />
1. Power/Pairing Indicator . . . . . . . . . . . . . . . . . . . 10<br />
2. Bass Reflect Duct<br />
3. Wo<strong>of</strong>er<br />
4. Pairing button . . . . . . . . . . . . . . . . . . . . . . . . . . . 10<br />
5. AC Power Lead . . . . . . . . . . . . . . . . . . . . . . . . . . . 7<br />
3<br />
FRONT VIEW REAR VIEW<br />
4<br />
6<br />
5<br />
Reference page<br />
4. Optical IN socket . . . . . . . . . . . . . . . . . . . . . . . . . 9<br />
5. Audio IN Terminal . . . . . . . . . . . . . . . . . . . . . . . . . 9<br />
6. AC Power Lead . . . . . . . . . . . . . . . . . . . . . . . . . . . 7<br />
4<br />
PAIRING<br />
AC INPUT<br />
5
Controls and indicators (continued)<br />
1<br />
2<br />
3<br />
4<br />
5<br />
6<br />
7<br />
8<br />
9<br />
10<br />
11<br />
12<br />
13<br />
AUDIO<br />
14<br />
15<br />
16<br />
17<br />
18<br />
19<br />
20<br />
21<br />
22<br />
23<br />
24<br />
25<br />
E-5<br />
Remote Control<br />
Reference page<br />
1. Remote Control Transmitter. . . . . . . . . . . . . . . . 10<br />
2. TV ARC Button. . . . . . . . . . . . . . . . . . . . . . . . . 8, 12<br />
3. Music (Sound Mode) Button. . . . . . . . . . . . . . . . 11<br />
4. Cinema (Sound Mode) Button . . . . . . . . . . . . . . 11<br />
5. Sport (Sound Mode) Button . . . . . . . . . . . . . . . . 11<br />
6. BYPASS Button . . . . . . . . . . . . . . . . . . . . . . . . . . 11<br />
7. 3D AUDIO Button. . . . . . . . . . . . . . . . . . . . . . . . . 12<br />
8. APC Button . . . . . . . . . . . . . . . . . . . . . . . . . . . . . 12<br />
9. TV Operation Button . . . . . . . . . . . . . . . . . . . . . . 12<br />
10. AV SYNC Down Button . . . . . . . . . . . . . . . . . . . . 11<br />
11. Source Button . . . . . . . . . . . . . . . . . . . . . . . 8, 9, 12<br />
12. Subwo<strong>of</strong>er Level Down Button . . . . . . . . . . . . . 11<br />
13. Bass Button . . . . . . . . . . . . . . . . . . . . . . . . . . . . . 11<br />
14. On/Stand-by Button. . . . . . . . . . . . . . . . . . . . . . . 10<br />
15. Game (Sound Mode) Button . . . . . . . . . . . . . . . . 11<br />
16. News (Sound Mode) Button . . . . . . . . . . . . . . . . 11<br />
17. Night (Sound Mode) Button . . . . . . . . . . . . . . . . 11<br />
18. Dimmer Button. . . . . . . . . . . . . . . . . . . . . . . . . . . 11<br />
19. Demo Button . . . . . . . . . . . . . . . . . . . . . . . . . . . . 10<br />
20. MUTE/Speaker Output Selection<br />
Button . . . . . . . . . . . . . . . . . . . . . . . . . . . . . . . 11, 12<br />
21. AV SYNC Up Button . . . . . . . . . . . . . . . . . . . . . . 11<br />
22. Volume Up Button . . . . . . . . . . . . . . . . . . . . . . . . 11<br />
23. Subwo<strong>of</strong>er Level Up Button . . . . . . . . . . . . . . . . 11<br />
24. Treble Button . . . . . . . . . . . . . . . . . . . . . . . . . . . . 11<br />
25. Volume Down Button . . . . . . . . . . . . . . . . . . . . . 11<br />
TV Operation Buttons (Only SHARP TV):<br />
On/Stand-by<br />
Button<br />
Channel Up<br />
and Down<br />
Buttons<br />
Sets the TV<br />
power to<br />
“ON” or<br />
“STAND-BY”.<br />
Switch up/<br />
down the TV<br />
channels.<br />
Input Select<br />
Button (TV)<br />
Volume Up<br />
and Down<br />
Buttons<br />
Press the<br />
button to<br />
switch the<br />
input source.<br />
Turn up/<br />
down the TV<br />
volume.<br />
Note:<br />
Some models <strong>of</strong> SHARP TV may not be operable.
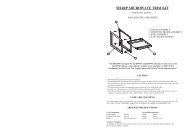
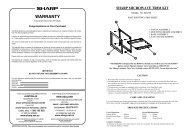
Sound bar preparation<br />
To mount the sound bar on the wall<br />
Caution:<br />
● Be very careful to prevent the sound bar 3.6 kg from falling<br />
when mounting on the wall.<br />
● Before mounting, check the wall strength. (Do not put<br />
on the veneer plaster or whitewashed wall. The sound<br />
bar may fall.) If unsure, consult a qualified service<br />
technician.<br />
● Mounting screws are not supplied. Use appropriate<br />
ones.<br />
● Check all wall mount angle screws for looseness.<br />
● Select a good location. If not, accidents may occur or<br />
the sound bar may get damaged.<br />
● SHARP is not responsible for accidents resulting<br />
from improper installation.<br />
Driving screws<br />
SHARP designed the sound bar so you may hang them on<br />
the wall. Use proper screws (not supplied). See below for<br />
size and type.<br />
3.2 mm<br />
5 mm<br />
Min. 22 mm<br />
Fixing wall mount angle<br />
(Horizontal position)<br />
9 mm<br />
1 Fix the pattern paper to the wall in horizontal<br />
position as below.<br />
Wall surface<br />
29 mm<br />
926 mm<br />
44 mm<br />
44 mm<br />
29 mm<br />
Pattern paper<br />
2 Make a hole on the wall following the screw point<br />
marks on the pattern paper by using a drill.<br />
8-9 mm<br />
32 mm<br />
Wall surface<br />
3 Fix a wall mount plug (not supplied) into the hole<br />
using a hammer, until it is flush with the wall<br />
surface.<br />
32 mm<br />
8-9 mm<br />
Wall surface<br />
E-6<br />
4 Screw the wall mount angle to the wall as shown in<br />
the illustration. (Total screw is 8 pieces)<br />
Wall mount angle<br />
Wall mount<br />
angle<br />
Wall<br />
(screws x 4) surface<br />
Wall surface<br />
(screws x 4)<br />
Wall surface<br />
Note:<br />
Make sure all screws are fully tightened. (screws are not<br />
supplied)<br />
Installing the sound bar<br />
Wall<br />
mount<br />
angle<br />
1 Align the wall mount slot at the sound bar to the<br />
wall mount angle.<br />
2 Slot the sound bar into the wall mount angle.<br />
3 Fix them securely.<br />
Wall surface<br />
Falling prevention<br />
Safety wires (not supplied) are useful to prevent the sound<br />
bar from falling <strong>of</strong>f the table.<br />
Loop the safety wires (not supplied) into each hole as<br />
shown and tie the safety wires to the LCD TV stand.
Placing the system<br />
Installation image:<br />
TV<br />
Sound Bar<br />
VCR DVD player Subwo<strong>of</strong>er<br />
Place the system as shown.<br />
Remove the protective film covering the sound bar and<br />
subwo<strong>of</strong>er before turn on the system.<br />
System connections<br />
Caution<br />
● Do not allow any objects to fall into or to be placed in the bass reflex duct.<br />
● Do not stand or sit on the sound bar/subwo<strong>of</strong>er. You may be injured.<br />
E-7<br />
Notes:<br />
● As the sound from the system is omni-directional, you can<br />
place the sound bar anywhere you like. However, it is<br />
recommended to place it as close to the TV as possible.<br />
● The front panel <strong>of</strong> the sound bar is not removable.<br />
Caution:<br />
● Do not change the installation direction when the sound<br />
bar is turned on.<br />
● Do not stand or sit on the sound bar and subwo<strong>of</strong>er as<br />
you may be injured.<br />
Placing the stand<br />
Place the stand as shown.<br />
Make sure to unplug the AC power lead before making any connections.<br />
PAIRING<br />
AC INPUT<br />
Subwo<strong>of</strong>er<br />
Sound bar and Subwo<strong>of</strong>er connection<br />
Wall socket<br />
AC 220 - 240 V ~ 50/60 Hz<br />
Stand<br />
Wall socket<br />
AC 220 - 240 V ~ 50/60 Hz<br />
Sound Bar
System connections (continued)<br />
HDMI Connection<br />
Caution:<br />
Turn <strong>of</strong>f all other equipment before making this connection.<br />
The illustration below shows the flows <strong>of</strong> the signals.<br />
TV<br />
Audio and Video signal<br />
1. Method 1<br />
This connection is for HDMI TV with ARC (Audio Return Channel).<br />
To HDMI (TV ARC) input terminal<br />
To HDMI OUT (TV ARC) output terminal<br />
Sound Bar<br />
2. Method 2<br />
This connection is for HDMI TV without ARC (Audio Return Channel).<br />
To HDMI input terminal<br />
To audio output terminal<br />
To Headphone<br />
terminal<br />
To HDMI OUT (TV ARC) output terminal<br />
To select HDMI 1, 2 or TV ARC function (Source):<br />
Sound Bar<br />
To HDMI input terminal<br />
Press SOURCE button repeatedly until “HDMI 1”, “HDMI 2” or “TV ARC” appears on the display, or<br />
press TV ARC button on the remote control to select the TV ARC.<br />
Notes:<br />
● This sound bar supports HDMI which enables ARC (Audio Return Channel).<br />
● To enable ARC make sure to use High Speed HDMI cable (with ARC).<br />
● This ARC feature requires TV that supports ARC. Refer the operation manual <strong>of</strong> the TV to determine which terminal supports ARC.<br />
● To listen to the sound from a non-ARC-compatible TV, connect the audio output from TV to this system’s. (refer page 9)<br />
● This sound bar can be operated (power on/<strong>of</strong>f or volume up/down) via a TV or similar component which supports HDMI CEC<br />
(Consumer Electronics Control). If this does not work, it does not mean this system is faulty. Refer to the operation manual <strong>of</strong><br />
the respective component on how to activate the CEC.<br />
Example: Go to the Menu <strong>of</strong> the component to search and enable the CEC. Different brands may have different naming for the<br />
CEC. For SHARP LCD TV, it is named as AQUOS LINK.<br />
● CEC is not available during Low power consumption mode.<br />
● To listen to the sound from this system, you will need to press and hold the (MUTE) button (refer page 12) or adjust<br />
the speaker output settings within the TV menu.<br />
For details, refer to the operation manual <strong>of</strong> the TV.<br />
● If you are unable to select external speaker setting from the TV menu (E.g. For SHARP LCD TV, it is named as AQUOS<br />
AUDIO SP), turn the CEC OFF and ON again.<br />
● To enjoy 3D images, this system must be connected to a 3D-compatible TV and components (3D BD player, etc.) via High Speed<br />
HDMI cables. Put on the 3D glasses, otherwise 3D images may not be viewed properly.<br />
● If you want to use HDMI IN 1 socket, please use the supplied HDMI cable.<br />
E-8<br />
DVD/Blu-ray<br />
Digital tuner<br />
TV DVD, Blu-ray disc<br />
player or similar<br />
TV<br />
DVD, Blu-ray disc<br />
player or similar<br />
To HDMI output<br />
terminal<br />
To HDMI output<br />
terminal<br />
To HDMI input<br />
terminal
Audio connections to TVs, DVD players, VCRs, etc.<br />
Other connection (without HDMI)<br />
The illustration below shows the flows <strong>of</strong> audio and video signals.<br />
Audio signal<br />
Video signal<br />
Notes:<br />
● Refer to the operation manual <strong>of</strong> the equipment to be connected.<br />
● Fully insert the plugs to avoid fuzzy pictures or noises.<br />
● Connecting via this method may disable TV internal speakers.<br />
● In some cases, a small background noise could emit from the sound bar, when you use the RCA audio output terminal<br />
connection from a TV-Set/DVD/Blu-ray Disc Player. In such case, please change the connection to the HDMI/ARC or<br />
headphone terminal connection. This effect depends on the used TV/DVD/Blu-ray Disc Player-Brand, model and age,<br />
and it is not a quality matter from the sound bar.<br />
Connecting a TV, or DVD player, etc.<br />
Connect to the TV using an optical digital cable or an audio cable.<br />
TV<br />
or<br />
Blu-Ray/<br />
DVD player/Digital<br />
Tuner<br />
Optical digital<br />
audio cable<br />
(commercially<br />
available)<br />
Sound Bar<br />
To<br />
HEADPHONE<br />
terminal<br />
To optical<br />
digital audio<br />
output<br />
terminal<br />
To OPTICAL<br />
IN (optical)<br />
input terminal<br />
To audio output terminals<br />
To select OPTICAL function:<br />
Press SOURCE button repeatedly until “OPTICAL” appears on the display.<br />
To select AUDIO IN function:<br />
Press SOURCE button repeatedly until “AUDIO IN” appears on the display.<br />
Audio signal<br />
E-9<br />
Audio cable<br />
(commercially<br />
available)<br />
To AUDIO IN<br />
input terminals<br />
TV<br />
DVD/Blu-ray<br />
Disc Player<br />
Digital tuner, etc.<br />
Note:<br />
Make sure that the audio cable end<br />
with ferrite core is connected to the<br />
sound bar AUDIO IN terminal.<br />
Ferrite core
Remote control<br />
Battery installation<br />
1 Open the battery cover.<br />
2 Insert the supplied battery according to the terminal<br />
indicated in the battery compartment.<br />
When inserting or removing the battery, push it towards<br />
the battery terminals.<br />
3 Close the battery cover.<br />
Caution:<br />
● Remove the battery if the sound bar will not be used for<br />
a long period <strong>of</strong> time. This will prevent potential damage<br />
due to battery leakage.<br />
● Do not use rechargeable battery (nickel-cadmium<br />
battery, etc.).<br />
● Installing the battery incorrectly may cause the sound<br />
bar to malfunction.<br />
● Batteries (battery pack or batteries installed) shall not<br />
be exposed to excessive heat such as sunshine, fire or<br />
the like.<br />
Notes concerning use:<br />
● Replace the battery if the operating distance is reduced<br />
or if the operation becomes erratic. Purchase a “AA”<br />
size battery (UM/SUM-3, R6, HP-7 or similar).<br />
● Periodically clean the transmitter on the remote control<br />
and the sensor on the sound bar with a s<strong>of</strong>t cloth.<br />
● Exposing the sensor on the sound bar to strong light<br />
may interfere with operation. Change the lighting or the<br />
direction <strong>of</strong> the sound bar.<br />
● Keep the remote control away from moisture, heat,<br />
shock, and vibrations.<br />
Test <strong>of</strong> the remote control<br />
Point the remote control directly at the remote sensor on<br />
the sound bar.<br />
The remote control can be used within the range<br />
shown below:<br />
0.2 m - 6 m<br />
Remote sensor<br />
15° 15°<br />
E-10<br />
General control<br />
Make sure to enable the HDMI CEC when making<br />
HDMI connection. For details, refer to the operation<br />
manual <strong>of</strong> the TV.<br />
To turn the power on<br />
Press the ON/STAND-BY button on the sound bar or the<br />
remote control.<br />
● The power turns on and the subwo<strong>of</strong>er indicator turns<br />
blue. If the power does not turn on, check whether the<br />
AC power lead is plugged in properly.<br />
● The system will automatically power on if TV or similar<br />
component which supports HDMI CEC, is turned on.<br />
To set the sound bar to stand-by mode:<br />
Press the ON/STAND-BY button again on the main unit or<br />
the remote control and the subwo<strong>of</strong>er indicator turns red.<br />
Notes:<br />
● A slight audio delay after TV is turned ON does not<br />
mean that the system is faulty. This is normal.<br />
● “AQUOS speaker is enabled” message will be<br />
displayed if SHARP LCD TV does not detect <strong>HT</strong>-<strong>SB60</strong><br />
during power on. However the message “AQUOS audio<br />
with AQUOS LINK is enabled” will be displayed soon as<br />
<strong>HT</strong>-<strong>SB60</strong> is detected. These messages may vary for<br />
other TV model.<br />
Demonstration mode<br />
● The first time the sound bar is plugged in, the sound bar<br />
will enter the demonstration mode.<br />
● To cancel the demonstration mode, press the DEMO<br />
button on the remote control during power stand-by<br />
mode.<br />
● To enter to the low power consumption mode, press<br />
and hold the DEMO button (Demo indicator turns <strong>of</strong>f).<br />
Connecting the wireless Subwo<strong>of</strong>er<br />
The sound bar and subwo<strong>of</strong>er will link automatically<br />
(wirelessly) when turned on as it is already pre-linked at<br />
the factory. If the link cannot be established, please set the<br />
connection by the following method.<br />
1. Press and hold the PAIRING button on the sound bar for<br />
more than 3 seconds.<br />
2. Within 2 minutes, press and hold the PAIRING button on<br />
the subwo<strong>of</strong>er for more than 3 seconds.<br />
● During pairing process:<br />
On sound bar: “PAIRING” will blink.<br />
On subwo<strong>of</strong>er: indicator will blink in blue.<br />
AUDIO
General control (continued)<br />
● When pairing is successful:<br />
On sound bar: “PAIRING” disappears.<br />
On subwo<strong>of</strong>er: indicator turns blue.<br />
Sound Bar<br />
Subwo<strong>of</strong>er<br />
Notes:<br />
● If a device such as microwave oven, wireless LAN card,<br />
Bluetooth device or any other device that uses the<br />
same 2.4GHz frequency near the system, some sound<br />
interruption may be heard due to interference.<br />
● The transmission distance <strong>of</strong> the wireless signal<br />
between the subwo<strong>of</strong>er and sound bar is about 10m,<br />
but may vary depending on your operating<br />
environment. If a steel-concrete or metallic wall is<br />
between the subwo<strong>of</strong>er and the sound bar, the system<br />
may not operate at all, because the wireless signal<br />
cannot penetrate metal.<br />
Caution:<br />
● Keep the subwo<strong>of</strong>er away from water and moisture.<br />
● To get the optimum listening performance, make sure<br />
the area around the sound bar and subwo<strong>of</strong>er is clear<br />
<strong>of</strong> any obstacles.<br />
Display brightness control<br />
Press the DIMMER button to adjust the brightness <strong>of</strong> the<br />
display.<br />
Dimmer 1<br />
Dimmer 2<br />
Dimmer Off<br />
(Display is dim)<br />
(Display gets dimmer)<br />
(Display is bright)<br />
Volume auto fade-in<br />
If you turn <strong>of</strong>f and on the sound bar with the volume set to<br />
80 or higher, the volume starts at 40 and fades in to the last<br />
set level.<br />
Volume control<br />
Sound bar operation:<br />
Press the VOLUME +<br />
button to increase the<br />
volume and the VOLUME –<br />
button for decreasing.<br />
Remote control operation:<br />
Min 1 2 ..... 99 Max<br />
Press the VOL + button to increase the volume and the<br />
VOL – button to decrease the volume.<br />
PAIRING<br />
E-11<br />
Muting<br />
The volume is muted temporarily when pressing the (MUTE)<br />
button on the remote control. Press again to restore the volume.<br />
Note:<br />
When the sound bar is turned <strong>of</strong>f and back on again,<br />
muting is cancelled.<br />
Sound Mode<br />
Sound bar operation:<br />
To change to a different mode, press the SOUND MODE<br />
button repeatedly until the desired sound mode is<br />
displayed.<br />
Remote control operation:<br />
Press the desired sound mode button on the remote<br />
control.<br />
CINEMA (for cinema sound effect)<br />
MUSIC (for standard sound effect)<br />
GAME (for game sound effect)<br />
SPORT (for sport broadcasting)<br />
NEWS (for news)<br />
NIG<strong>HT</strong> (for night)<br />
BYPASS (for flat sound effect)<br />
Bass and Treble Control<br />
Bass and Treble control is applicable during BYPASS<br />
mode only.<br />
Bass Control<br />
1. Press the BASS button.<br />
2. Within 5 seconds, press the VOL (+ or –) button to adjust<br />
the bass.<br />
Treble Control<br />
1. Press the TREBLE button.<br />
2. Within 5 seconds, press the VOL (+ or –) button to adjust<br />
the bass.<br />
Subwo<strong>of</strong>er level control<br />
The subwo<strong>of</strong>er level can be<br />
adjusted.<br />
To increase the level,<br />
press the SW LEVEL<br />
button.<br />
To decrease the level, press the SW LEVEL button.<br />
Notes:<br />
● When sound from the speaker is distorted, decrease<br />
the subwo<strong>of</strong>er level.<br />
● When changing the subwo<strong>of</strong>er level, the output level <strong>of</strong><br />
the subwo<strong>of</strong>er is also changed.<br />
AV SYNC level control<br />
The AV SYNC (Audio Video<br />
Synchronization) level can<br />
be adjusted.<br />
To increase the level, press<br />
the AV SYNC + button.<br />
–5 –4 ..... +4<br />
0 +1 .....<br />
+3<br />
To decrease the level, press the AV SYNC – button.<br />
+5
General control (continued)<br />
Speaker output selection (HDMI connection)<br />
Press and hold (MUTE) button on the remote control<br />
until “TV SPEAKER” or “SB SPEAKER” appears on the<br />
display to toggle sound output between this sound bar or<br />
TV.<br />
Function<br />
HDMI 1<br />
HDMI 2 TV ARC OPTICAL AUDIO IN<br />
When pressing the SOURCE button, the input source will<br />
change. Press the SOURCE button repeatedly to select<br />
desired input source, or<br />
press TV ARC button on the remote control to select TV ARC.<br />
Note:<br />
The backup function will protect the memorised function<br />
mode for a few hours should there be a power failure or the<br />
AC power lead becomes disconnected.<br />
APC (Auto Power Off Control)<br />
This sound bar can be set to turn <strong>of</strong>f automatically if no signal is<br />
detected.<br />
1. Press the APC button repeatedly to select the time.<br />
APC 20 min<br />
APC 5 min<br />
2. The sound bar will enter the power stand-by mode automatically<br />
if no signal is detected after the preset time has elapsed.<br />
Audio Return Channel (ARC) (Audio<br />
Return Channel submenu)<br />
The audio return channel (ARC) function enables an HDMI<br />
ARC-capable TV to send the audio stream to the HDMI OUT<br />
socket <strong>of</strong> the receiver. To use this function, you must select<br />
the TV ARC input and your TV must supports the ARC.<br />
3D sound mode<br />
APC 15 min<br />
APC 10 min<br />
S+ 3D technology creates 3D sound through speakers<br />
regardless <strong>of</strong> the type <strong>of</strong> sound source, whether it is<br />
monaural, stereo or multichannel. It simulates sound<br />
transmission characteristics using digital signal processing<br />
to create a widening effect on the sound in the ambient<br />
space around the sound source.<br />
By using this technology, multichannel surround sound can<br />
be produced from 2.1ch source.<br />
E-12<br />
General control (continued)<br />
Press the 3D AUDIO button repeatedly to select:<br />
3D AUDIO 1 : Sound effect that emphasizes 3D<br />
sound.<br />
3D AUDIO 2 : Sound effect that maintains the 3D<br />
sound and improve vocal clarity.<br />
3D AUDIO OFF : 3D sound effect <strong>of</strong>f.<br />
This product incorporates decoders supporting the Dolby<br />
Digital system and DTS system.<br />
DTS (Digital<br />
Theatre<br />
Systems)<br />
You can operate <strong>Sharp</strong> TVs with this system’s remote<br />
control.<br />
Other operable button<br />
One <strong>of</strong> the digital audio systems for theatrical<br />
use. As the sound quality is emphasized, you<br />
can enjoy the realistic sound effect in the home<br />
theatre system.<br />
Lights up when detecting DTS signal.<br />
Dolby Digital One <strong>of</strong> the digital audio systems for theatrical<br />
use. You can also enjoy the stereophonic effect<br />
in the home theatre system.<br />
Lights up when detecting Dolby Digital signal.<br />
PCM<br />
(Pulse Code<br />
Modulation)<br />
This is a general term for digitally encoded audio<br />
signals on a CD or DVD.<br />
This sound bar lets you enjoy playback <strong>of</strong> digital<br />
signals from sources such as CD or DVD.<br />
Operating the TV with the remote<br />
control<br />
Watching TV<br />
Point the remote control at the TV.<br />
1 Press the TV (<br />
the TV.<br />
) ON/STAND-BY button to turn on<br />
2 Pressing the TV CH<br />
channel switching.<br />
or button enables TV<br />
3 Press the TV VOL + or – button to adjust the TV<br />
volume.<br />
Input Select Button
Troubleshooting chart<br />
Many potential problems can be resolved by the owner without<br />
calling a service technician.<br />
If something is wrong with this product, check the following<br />
before calling your authorised SHARP dealer or service centre.<br />
General<br />
Symptom Possible cause<br />
● No sound is heard. ● Is the input signal (selection)<br />
set properly?<br />
● Is the volume level set to “Min”?<br />
● Is muting activated?<br />
● Is HDMI compliant equipment<br />
being used?<br />
● Is the HDMI cable connected<br />
correctly?<br />
Connect the HDMI cable<br />
correctly and then perform the<br />
reset procedure. (refer this<br />
page)<br />
● Do not connect or disconnect<br />
an HDMI cable whilst power is<br />
on. This may lead to operation<br />
problems.<br />
● The sound from<br />
subwo<strong>of</strong>er is not well<br />
balanced.<br />
● Power turns <strong>of</strong>f<br />
suddenly.<br />
● Noise is heard during<br />
playback.<br />
● When a button is<br />
pressed, the sound bar<br />
does not respond.<br />
● The power is not turned<br />
on.<br />
● 3D images not displayed<br />
on the TV.<br />
● Background noise<br />
appears when<br />
connecting with RCA<br />
audio output terminal<br />
connection from a TVset/<br />
DVD/Blu-ray Disc<br />
Player.<br />
● Wireless connection<br />
cannot be established.<br />
● Is the subwo<strong>of</strong>er level set to the<br />
minimum or maximum level?<br />
● Is the HDMI cable connected<br />
correctly? Connect the HDMI<br />
cable correctly and then<br />
perform the reset procedure.<br />
● Move the speaker away from<br />
any computers or mobile<br />
phones.<br />
● Set the sound bar to the standby<br />
mode and then turn it back<br />
on.<br />
● Is the sound bar unplugged?<br />
● The protection circuit may be<br />
activated. Unplug and plug in<br />
the power lead again after 5<br />
minutes or more.<br />
● Depending on the TV and<br />
Video component, 3D images<br />
may not be displayed.<br />
Check the operation manual <strong>of</strong><br />
the respective component.<br />
● HDMI cable not support 3D<br />
image.<br />
● Please change to HDMI/ARC<br />
or headphone terminal from<br />
TV-Set/DVD/Blu-ray Disc<br />
Player. This effect may occur<br />
depending on TV/DVD/Blu-ray<br />
Disc Player-Brand, model and<br />
age, and it is not the sound bar<br />
problem.<br />
● Check the distance between<br />
the sound bar and subwo<strong>of</strong>er<br />
(less than 10m (32 feet)).<br />
● Make sure there is no other<br />
wireless devices near the unit.<br />
E-13<br />
Symptom Possible cause<br />
● Wireless connection<br />
cannot be established.<br />
Remote control<br />
● Make sure there is no obstacles<br />
(especially metal) blocking<br />
between the sound bar and<br />
subwo<strong>of</strong>er.<br />
● Manually re-link the sound bar<br />
and subwo<strong>of</strong>er (refer page 10).<br />
Symptom Possible cause<br />
● The remote control does<br />
not operate properly.<br />
● The sound bar cannot<br />
be turned on with the<br />
remote control.<br />
● Is the battery polarity correct?<br />
● Is the battery dead?<br />
● Is the distance or angle<br />
incorrect?<br />
● Are there any obstructions in<br />
front <strong>of</strong> the sound bar?<br />
● Is there a strong light shining<br />
on the remote sensor?<br />
● Is the remote control for<br />
another equipment used<br />
simultaneously?<br />
● Is the AC power lead <strong>of</strong> the<br />
sound bar plugged in?<br />
● Is the battery inserted?<br />
Condensation<br />
Sudden temperature changes, storage or operation in an extremely<br />
humid environment may cause condensation inside the cabinet or<br />
on the transmitter on the remote control. Condensation can cause<br />
the sound bar to malfunction. If this happens, leave the power on<br />
until normal playback is possible (about 1 hour). Wipe <strong>of</strong>f any<br />
condensation on the transmitter with a s<strong>of</strong>t cloth before operating the<br />
sound bar.<br />
If problem occurs during operation<br />
When this product is subject to strong external interference<br />
(mechanical shock, excessive static electricity, abnormal supply<br />
voltage due to lightning, etc.) or if it is operated incorrectly, it may<br />
malfunction.<br />
If such a problem occurs, do the following:<br />
1. Set the sound bar to the stand-by mode and turn the power on<br />
again.<br />
2. If the sound bar is not restored in the previous operation, unplug<br />
and plug in the sound bar again, and then turn the power on.<br />
Factory reset, clearing all memory<br />
Make sure to disconnect all output and input cables attached to the<br />
sound bar before performing the factory reset.<br />
1. Press the ON/STAND-BY button to enter the power stand-by<br />
mode.<br />
2. Whilst pressing the SOUND MODE button, press and hold the<br />
ON/STAND-BY button until “RESET” appears.<br />
Caution:<br />
This operation will erase all data stored in memory.
Maintenance<br />
Cleaning the cabinet<br />
Periodically wipe the cabinet with a s<strong>of</strong>t cloth.<br />
Caution:<br />
● Do not use chemicals for cleaning (petrol, paint thinner,<br />
etc.). It may damage the cabinet finish.<br />
● Do not apply oil to the inside <strong>of</strong> each component. It may<br />
cause malfunctions.<br />
Error indicators and warnings<br />
When you fail to perform operations properly, the following<br />
messages are displayed on the sound bar.<br />
Display Meaning<br />
● When there is no input signal.<br />
Play back the connected<br />
equipment.<br />
● Nonstandard signal. Cannot<br />
be recognized.<br />
● Signals other than DOLBY<br />
DIGITAL, DTS, Linear PCM<br />
cannot be recognized.<br />
(Display blinks) ● Poor connection <strong>of</strong> the digital<br />
audio input terminal.<br />
● Turn <strong>of</strong>f the sound bar and<br />
check if the cable is<br />
connected properly.<br />
Demo indicator<br />
(blinks red)<br />
● When the protection circuit is<br />
activated.<br />
E-14<br />
Specifications<br />
As part <strong>of</strong> our policy <strong>of</strong> continuous improvement, SHARP<br />
reserves the right to make design and specification changes<br />
for product improvement without prior notice. The<br />
performance specification figures indicated are nominal<br />
values <strong>of</strong> production unit. There maybe some deviations<br />
from these values in individual unit.<br />
Power source AC 220 - 240 V ~ 50/60 Hz<br />
Power<br />
consumption<br />
Power on: 38 W<br />
Power standby: 0.4 W<br />
Dimension Width: 1385 mm<br />
Height: 73 mm<br />
Depth: 68 mm<br />
Weight 3.6 kg<br />
Output power MPO: 160W (80W + 80W) (10% T.H.D.)<br />
RMS: Total 160 watts<br />
RMS: 160 W (80 W + 80 W) (10% T.H.D.)<br />
RMS: 120 W (60 W + 60 W) (1% T.H.D.)<br />
Output<br />
terminal<br />
Sound Bar<br />
HDMI output: (audio/video support up<br />
to 1080p) x 1<br />
Input terminal analogue input (AUDIO IN): x 1<br />
500 mV / 47 kohms<br />
Optical digital input (OPTICAL):<br />
Square type x 1<br />
HDMI input: (audio/video support up to<br />
1080p) x 2<br />
Type 2 Way speaker system<br />
5.7 cm wo<strong>of</strong>er<br />
2.5 cm S<strong>of</strong>t Dome<br />
Maximum 160 W<br />
input power<br />
Rated input 80 W<br />
power<br />
Impedance 4 ohms<br />
Subwo<strong>of</strong>er<br />
Power source AC 220 - 240 V ~ 50/60 Hz<br />
Power 33 W<br />
consumption<br />
Output power MPO: 150W (10% T.H.D.)<br />
RMS: 150 W (10% T.H.D.)<br />
RMS: 120 W (1% T.H.D.)<br />
Type Subwo<strong>of</strong>er system<br />
16 cm wo<strong>of</strong>er<br />
Maximum 300 W<br />
input power<br />
Rated input 150 W<br />
power<br />
Impedance 3 ohms<br />
Dimensions Width: 144 mm<br />
Height: 430 mm<br />
Depth: 306 mm<br />
Weight 6.1 kg
For <strong>Australia</strong> and New Zealand customers<br />
SPform019(AUGUST 2011)<br />
FOR LOCATION ENQUIRIES WITHIN<br />
AUSTRALIA<br />
REGARDING YOUR LOCAL<br />
SHARP APPROVED SERVICE CENTRE<br />
VISIT OUR WEBSITE AT<br />
www.sharp.net.au<br />
OR CALL SHARP CUSTOMER CARE<br />
1300 135 022<br />
(LOCAL CALL COSTS APPLY WITHIN AUSTRALIA)<br />
SHARP CORPORATION OF AUSTRALIA PTY LTD<br />
FOR LOCATION ENQUIRIES WITHIN<br />
NEW ZEALAND<br />
REGARDING YOUR LOCAL<br />
SHARP APPROVED SERVICE CENTRE<br />
VISIT OUR WEBSITE AT<br />
www.sharp.net.nz<br />
CONTACT YOUR SELLING DEALER/RETAILER<br />
OR CALL<br />
SHARP CUSTOMER SERVICES<br />
TELEPHONE: 09 573 0111<br />
FACSIMILE: 09 573 0113<br />
SHARP CORPORATION OF NEW ZEALAND LIMITED
Congratulations on Your Purchase!<br />
This <strong>Sharp</strong> product is warranted against faults in material and manufacture for the<br />
period as stated in the table below.<br />
If service is required during the warranty period, please contact your nearest <strong>Sharp</strong><br />
Approved Service Centre. These repairs would be carried out at no charge to the<br />
owner, subject to the conditions specified herein.<br />
This warranty does not extend to defects or injuries caused by or resulting from causes<br />
not attributable to faulty parts or the manufacture <strong>of</strong> the product, including but not<br />
limited to, defect or injury caused by or resulting from misuse, abuse, neglect, lack <strong>of</strong><br />
maintenance, accidental damage, improper voltage, liquid spillage, vermin infestation,<br />
s<strong>of</strong>tware, or any alterations made to the product which are not authorised by <strong>Sharp</strong>.<br />
Please retain your sales documentation, as this should be produced to validate a<br />
warranty claim. This warranty is in addition to and in no way limits, varies or excludes<br />
any implied rights and remedies under any relevant legislation in the country <strong>of</strong> sale.<br />
WARRANTY PERIODS<br />
Home Theatre Projector 12 months<br />
Audio/Home Theatre 12 months<br />
Microwave Oven 12 months<br />
Steam Oven 12 months<br />
Refrigerator 24 months<br />
DVD/Blu-ray 12 months<br />
Air Conditioner 60 months<br />
Portable Air Conditioner 12 months<br />
LCD Television 12 months<br />
Air Purifier 12 months<br />
Vacuum Cleaner 24 months<br />
WARRANTY<br />
Consumer Electronic Products<br />
This warranty does not cover transportation to and from the <strong>Sharp</strong> Approved Service<br />
Centre. Goods presented for repair may be replaced by refurbished goods <strong>of</strong> the same<br />
type rather than being repaired. Refurbished parts may be used to repair the goods.<br />
The repair <strong>of</strong> your goods may result in the loss <strong>of</strong> user generated data, please ensure<br />
that you have saved this data elsewhere prior to repair.<br />
<strong>Australia</strong>n customers: Our goods come with guarantees that cannot be excluded<br />
under the <strong>Australia</strong>n Consumer Law. You are entitled to a replacement or refund<br />
for a major failure and for compensation for any other reasonably foreseeable<br />
loss or damage. You are also entitled to have the goods repaired or replaced<br />
if the goods fail to be <strong>of</strong> acceptable quality and the failure does not amount<br />
to a major failure. The criteria <strong>of</strong> a major failure is defined in the <strong>Australia</strong>n<br />
Consumer Law. Should you require any assistance with a major failure please<br />
contact <strong>Sharp</strong> Customer Care.<br />
(excluding lamps and air filters)<br />
IMPORTANT NOTICE: This warranty applies only to products sold in <strong>Australia</strong> & New Zealand<br />
SHARP CORPORATION<br />
SHARP CORPORATION OF SHARP CORPORATION OF<br />
AUSTRALIA PTY. LIMITED NEW ZEALAND LIMITED<br />
ABN 40 003 039 405<br />
59 Hugo Johnston Drive<br />
1 Huntingwood Drive Penrose, Auckland<br />
Huntingwood NSW 2148<br />
SPform 040 (JUNE 2012)


![R-291Z(ST) [Cover].indd - Sharp Australia Support](https://img.yumpu.com/19344699/1/184x260/r-291zst-coverindd-sharp-australia-support.jpg?quality=85)