PG-D40W3D SETUP MANUAL (GB) - Sharp Australia Support
PG-D40W3D SETUP MANUAL (GB) - Sharp Australia Support
PG-D40W3D SETUP MANUAL (GB) - Sharp Australia Support

You also want an ePaper? Increase the reach of your titles
YUMPU automatically turns print PDFs into web optimized ePapers that Google loves.
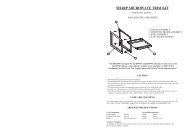
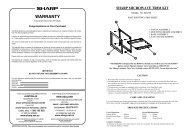
DATA PROJECTOR<br />
MODEL<br />
<strong>PG</strong>-<strong>D40W3D</strong><br />
<strong>SETUP</strong> <strong>MANUAL</strong><br />
Connecting Pin Assignments .............................. 2<br />
RS-232C Specifi cations and Commands ........... 4<br />
Setting up the Projector Network Environment ... 10<br />
1. Connecting the Projector to a Computer ...........11<br />
2. Setting an IP Address for the Computer ............12<br />
3. Setting up a Network Connection for the<br />
Projector .......................................................14<br />
Controlling the Projector via LAN ..................... 16<br />
Controlling the Projector Using Internet Explorer<br />
(Version 5.0 or later)......................................16<br />
Confi rming the Projector Status (Status) ................17<br />
Controlling the Projector (Control) ..........................17<br />
Setting and Adjusting the Projector<br />
(Settings & Adjustments) ..............................18<br />
Setting the Security (Network – Security) ...............18<br />
Making General Settings for the Network<br />
(Network – General) .....................................19<br />
Setting for Sending E-mail when an Error Occurs<br />
(Mail – Originator Settings) ..........................19<br />
Setting Error Items and Destination Addresses<br />
to which E-mail is to be Sent when an<br />
Error Occurs (Mail – Recipient Settings) ......20<br />
Setting Error Items and the URL that are to be<br />
Displayed when an Error Occurs<br />
(Service & <strong>Support</strong> – Access URL) ...............20<br />
Setting up the Projector Using RS-232C or<br />
Telnet .......................................................... 21<br />
When Connecting Using RS-232C .........................21<br />
When Connecting Using Telnet ..............................22<br />
<strong>SETUP</strong> MENU (Main Menu) ....................................23<br />
ADVANCED <strong>SETUP</strong> MENU ....................................23<br />
View Setting Detail List ([V]View All Setting) ...........24<br />
Set Items ................................................................24<br />
Save Settings and Quit ([S]Save & Quit) .................25<br />
Quit without Saving Settings ([Q]Quit Unchanged) ...25<br />
IP Address Setting ([1]IP Address) .........................26<br />
Subnet Mask Setting ([2]Subnet Mask) ..................26<br />
Default Gateway Setting ([3]Default Gateway) .......26<br />
User Name Setting ([4]User Name) ........................26<br />
Password Setting ([5]Password) .............................27<br />
RS-232C Baud Rate Setting<br />
([6]RS-232C Baud Rate) ...............................27<br />
Projector Name Setting ([7]Projector Name) ..........27<br />
DHCP Client Setting ([8]DHCP Client) ....................27<br />
Disconnecting All Connections<br />
([D]Disconnect All) ........................................28<br />
Entering ADVANCED <strong>SETUP</strong> MENU<br />
([A]Advanced Setup) .....................................28<br />
Setting Auto Logout Time<br />
(ADVANCED[1]Auto Logout Time) ................28<br />
Data Port Setting (ADVANCED[2]Data Port) ...........28<br />
Carrying out Network Ping Test<br />
(ADVANCED[5]Network Ping Test) ...............29<br />
Setting of Accept IP Address (ADVANCED<br />
[6]Accept IP Addr(1) – [8]Accept IP Addr(3)) ...29<br />
Accepting All IP Addresses<br />
(ADVANCED[9]Accept All IP Addr) ...............29<br />
Setting of Search Port<br />
(ADVANCED[0]Search Port) ..........................30<br />
Return to Default Settings<br />
(ADVANCED[!]Restore Default Setting) ........30<br />
Return to Main Menu<br />
(ADVANCED[Q]Return to Main Menu) ..........30<br />
Resetting the Lamp Timer of the Projector<br />
via LAN ....................................................... 31<br />
Troubleshooting .................................................. 33
Connecting Pin Assignments<br />
COMPUTER/COMPONENT input and COMPUTER/COMPONENT output Terminals: mini<br />
D-sub 15 pin female connector<br />
HDMI Terminal<br />
18<br />
2<br />
-2<br />
19<br />
11<br />
1<br />
6<br />
15<br />
5<br />
10<br />
1<br />
COMPUTER Input/Output COMPUTER Input/Output<br />
Pin No. Signal Pin No. Signal<br />
1. Video input (red)<br />
1. PR (CR)<br />
2. Video input (green/sync on green)<br />
2. Y<br />
3. Video input (blue)<br />
3. PB (CB)<br />
4. Not connected<br />
4. Not connected<br />
5. Not connected<br />
5. Not connected<br />
6. Earth (red)<br />
6. Earth (PR)<br />
7. Earth (green/sync on green)<br />
7. Earth (Y)<br />
8. Earth (blue)<br />
8. Earth (PB)<br />
9. Not connected<br />
9. Not connected<br />
10. GND<br />
10. Not connected<br />
11. Not connected<br />
11. Not connected<br />
12. Bi-directional data<br />
12. Not connected<br />
13. Horizontal sync signal: TTL level<br />
13. Not connected<br />
14. Vertical sync signal: TTL level<br />
14. Not connected<br />
15. Data clock<br />
15. Not connected<br />
Pin No. Name Pin No. Name Pin No. Name<br />
1.<br />
2.<br />
3.<br />
4.<br />
5.<br />
6.<br />
7.<br />
T.M.D.S data 2+<br />
T.M.D.S data 2 shield<br />
T.M.D.S data 2–<br />
T.M.D.S data 1+<br />
T.M.D.S data 1 shield<br />
T.M.D.S data 1–<br />
T.M.D.S data 0+<br />
8.<br />
9.<br />
10.<br />
11.<br />
12.<br />
13.<br />
T.M.D.S data 0 shield<br />
T.M.D.S data 0–<br />
T.M.D.S clock+<br />
T.M.D.S clock shield<br />
T.M.D.S clock–<br />
CEC<br />
14.<br />
15.<br />
16.<br />
17.<br />
18.<br />
19.<br />
Reserved<br />
SCL<br />
SDA<br />
DDC/CEC ground<br />
+5V power<br />
Hot plug detection
RS-232C Terminal: D-sub 9 pin male connector<br />
1 5<br />
6 9<br />
Pin No. Signal Name I/O Reference<br />
1.<br />
2.<br />
3.<br />
4.<br />
5.<br />
6.<br />
7.<br />
8.<br />
9.<br />
RD<br />
SD<br />
SG<br />
RS<br />
CS<br />
Receive Data<br />
Send Data<br />
Signal Ground<br />
Request to Send<br />
Clear to Send<br />
Input<br />
Output<br />
RS-232C Cable recommended connection: D-sub 9 pin female connector<br />
5 1<br />
9 6<br />
Pin No. Signal Pin No. Signal<br />
1.<br />
2.<br />
3.<br />
4.<br />
5.<br />
6.<br />
7.<br />
8.<br />
9.<br />
CD<br />
RD<br />
SD<br />
ER<br />
SG<br />
DR<br />
RS<br />
CS<br />
CI<br />
Projector<br />
Pin No.<br />
4<br />
5<br />
6<br />
1.<br />
2.<br />
3.<br />
4.<br />
5.<br />
6.<br />
7.<br />
8.<br />
9.<br />
Computer<br />
Pin No.<br />
4<br />
5<br />
6<br />
USB Terminal: Type B USB connector LAN Terminal: LAN (RJ-45)<br />
Not connected<br />
Connected to internal circuit<br />
Connected to internal circuit<br />
Not connected<br />
Connected to internal circuit<br />
Not connected<br />
Connected to CS in internal circuit<br />
Connected to RS in internal circuit<br />
Not connected<br />
Note<br />
Depending on the controlling device used, it may be necessary to connect Pin 4 and Pin 6 on the<br />
controlling device (e.g. computer).<br />
4 3<br />
1 2<br />
Pin No. Signal Name Pin No. Signal Pin No. Signal<br />
1.<br />
2.<br />
3.<br />
4.<br />
VCC<br />
USB–<br />
USB+<br />
SG<br />
USB power<br />
USB data–<br />
USB data+<br />
Signal Ground<br />
8 ... 8 1 ... 1<br />
Connecting Pin Assignments<br />
1.<br />
2.<br />
3.<br />
4.<br />
CD<br />
RD<br />
SD<br />
ER<br />
SG<br />
DR<br />
RS<br />
CS<br />
CI<br />
TX+<br />
TX–<br />
RX+<br />
5.<br />
6.<br />
7.<br />
8.<br />
RX–<br />
-3
RS-232C Specifi cations and Commands<br />
Computer control<br />
A computer can be used to control the projector by connecting an RS-232C serial control cable (cross<br />
type, commercially available) to the projector. (See page 24 of the projector's operation manual for<br />
connection.)<br />
Communication conditions<br />
Set the serial port settings of the computer to match that of the table.<br />
Signal format: Conforms to RS-232C standard. Parity bit: None<br />
Baud rate*: 9,600 bps / 38,400 bps / 115,200 bps Stop bit: 1 bit<br />
Data length: 8 bits Flow control: None<br />
*Set the projector's baud rate to the same rate as used by the computer.<br />
Basic format<br />
Commands from the computer are sent in the following order: command, parameter, and return code.<br />
After the projector processes the command from the computer, it sends a response code to the<br />
computer.<br />
Command format<br />
C1 C2 C3 C4 P1 P2 P3 P4 Return code (0DH)<br />
-4<br />
Command 4-digit Parameter 4-digit<br />
Response code format<br />
Normal response Problem response (communication error or incorrect command)<br />
O K Return code (0DH) E R R Return code (0DH)<br />
Info<br />
When controlling the projector using RS-232C commands from a computer, wait for at least 30 seconds<br />
after the power has been turned on, and then transmit the commands.<br />
After sending an input selection or picture adjustment command and then receiving an “OK” response<br />
code, the projector may take some time to process the command. If a second command is sent while the<br />
projector is still processing the fi rst command, you may receive an “ERR” response code. If this happens,<br />
try resending the second command.<br />
When more than one code is being sent, send each command only after the response code for the<br />
previous command from the projector is verifi ed.<br />
“POWR????”, “TABN _ _ _ 1”, “TLPS _ _ _ 1”, “TPOW _ _ _ 1”, “TLPN _ _ _ 1”, “TLTT _ _ _ 1”,<br />
“TLTM _ _ _ 1”, “TLTL _ _ _ 1”, “TNAM _ _ _ 1”, “MNRD _ _ _ 1”, “PJN0 _ _ _ 1”<br />
− When the projector receives the special commands shown above:<br />
* The on-screen display will not disappear.<br />
* The “Auto Power Off” timer will not be reset.<br />
− The special commands are available for applications that require continuous polling.<br />
Note<br />
If an underbar (_) appears in the parameter column, enter a space.<br />
If an asterisk (*) appears in the parameter column, enter a value in the range indicated in brackets under<br />
Control Contents.<br />
PJLink TM Compliant:<br />
This product conforms with the PJLink standard Class 1 and all Class 1 commands are implemented.<br />
This product confi rms with the PJLink standard specifi cation version 1.00.<br />
For additional information, visit “http://pjlink.jbmia.or.jp/english/”.
RS-232C Specifi cations and Commands<br />
Commands<br />
Example: When turning on the projector, make the following setting.<br />
Compuer Projector<br />
P O W R _ _ _ 1<br />
→<br />
← O K<br />
RETURN<br />
CONTROL CONTENTS COMMAND PARAMETER<br />
Power ON<br />
Standby mode<br />
(or 30-second startup time)<br />
Power On P O W R _ _ _ 1 OK or ERR OK<br />
Off P O W R _ _ _ 0 OK OK or ERR<br />
Status P O W R ? ? ? ? 1 0<br />
Projector Condition T A B N _ _ _ 1 0: Normal<br />
0: Normal<br />
1: Temp High<br />
1: Temp High<br />
8: Lamp Life 5% or less 2: Fan Error<br />
16: Lamp Burn-out<br />
4: Cover Open<br />
32: Lamp Ignition Failure 8: Lamp Life 5% or less<br />
16: Lamp Burn-out<br />
32: Lamp Ignition Failure<br />
64: Temp Abnormally High<br />
Lamp Status T L P S _ _ _ 1 0: Off, 1: On, 2: Retry<br />
3: Waiting, 4: Lamp Error<br />
0: Off, 4: Lamp Error<br />
Power Status T P O W _ _ _ 1 1: On, 2: Cooling 0: Standby<br />
Quantity T L P N _ _ _ 1 1<br />
Usage Time(Hour) T L T T _ _ _ 1 0 – 9999(Integer)<br />
Usage Time(Minute) T L T M _ _ _ 1 0, 15, 30, 45<br />
Life(Percentage) T L T L _ _ _ 1 0% – 100%(Integer)<br />
Name Model Name Check T N A M _ _ _ 1 <strong>PG</strong><strong>D40W3D</strong><br />
Model Name Check M N R D _ _ _ 1 <strong>PG</strong>-<strong>D40W3D</strong><br />
Projector Name Setting 1<br />
(First 4 characters) *1<br />
P J N 1 * * * * OK or ERR<br />
Projector Name Setting 2<br />
(Middle 4 characters) *1<br />
P J N 2 * * * * OK or ERR<br />
Projector Name Setting 3<br />
(Last 4 characters) *1<br />
P J N 3 * * * * OK or ERR<br />
Projector Name Check P J N 0 _ _ _ 1 Projector Name<br />
Input Change Computer1 I R G B _ _ _ 1 OK or ERR ERR<br />
Computer2 I R G B _ _ _ 2 OK or ERR ERR<br />
HDMI I R G B _ _ _ 3 OK or ERR ERR<br />
S-Video I V E D _ _ _ 1 OK or ERR ERR<br />
Video I V E D _ _ _ 2 OK or ERR ERR<br />
Input R<strong>GB</strong> Check I R G B ? ? ? ? 1: Computer1, 2: Computer2, ERR<br />
3: HDMI, ERR<br />
Input Video Check I V E D ? ? ? ? 1: S-Video, 2: Video or ERR ERR<br />
Input Mode Check I M O D ? ? ? ? 1: R<strong>GB</strong>, 2: Video ERR<br />
Input Check I C H K ? ? ? ? 1: Computer1, 2: Computer2, ERR<br />
3: HDMI, 4: S-Video,<br />
5: Video<br />
Volume Volume(0 – 60) V O L A _ _ * * OK or ERR ERR<br />
Volume up/down(-10 – +10) V O U D _ * * * OK or ERR ERR<br />
Keystone -80 – +80 K E Y S * * * * OK or ERR ERR<br />
AV Mute On I M B K _ _ _ 1 OK or ERR ERR<br />
Off I M B K _ _ _ 0 OK or ERR ERR<br />
Freeze On F R E Z _ _ _ 1 OK or ERR ERR<br />
Off F R E Z _ _ _ 0 OK or ERR ERR<br />
Auto Sync Start A D J S _ _ _ 1 OK or ERR ERR<br />
Resize Computer1 Normal R A S R _ _ _ 1 OK or ERR ERR<br />
Stretch R A S R _ _ _ 2 OK or ERR ERR<br />
Dot By Dot R A S R _ _ _ 3 OK or ERR ERR<br />
Full R A S R _ _ _ 5 OK or ERR ERR<br />
Area Zoom R A S R _ _ 1 0 OK or ERR ERR<br />
V-Stretch R A S R _ _ 1 1 OK or ERR ERR<br />
Computer2 Normal R B S R _ _ _ 1 OK or ERR ERR<br />
Stretch R B S R _ _ _ 2 OK or ERR ERR<br />
Dot By Dot R B S R _ _ _ 3 OK or ERR ERR<br />
Full R B S R _ _ _ 5 OK or ERR ERR<br />
Area Zoom R B S R _ _ 1 0 OK or ERR ERR<br />
V-Stretch R B S R _ _ 1 1 OK or ERR ERR<br />
HDMI Normal R C S R _ _ _ 1 OK or ERR ERR<br />
Stretch R C S R _ _ _ 2 OK or ERR ERR<br />
Dot By Dot R C S R _ _ _ 3 OK or ERR ERR<br />
Full R C S R _ _ _ 5 OK or ERR ERR<br />
Area Zoom R C S R _ _ 1 0 OK or ERR ERR<br />
V-Stretch R C S R _ _ 1 1 OK or ERR ERR<br />
-5
RS-232C Specifi cations and Commands<br />
-6<br />
CONTROL CONTENTS COMMAND PARAMETER<br />
Power ON<br />
Resize S-Video Normal R A S V _ _ _ 1 OK or ERR ERR<br />
RETURN<br />
Stretch R A S V _ _ _ 2 OK or ERR ERR<br />
Area Zoom R A S V _ _ 1 0 OK or ERR ERR<br />
V-Stretch R A S V _ _ 1 1 OK or ERR ERR<br />
Video Normal R B S V _ _ _ 1 OK or ERR ERR<br />
Stretch R B S V _ _ _ 2 OK or ERR ERR<br />
Area Zoom R B S V _ _ 1 0 OK or ERR ERR<br />
V-Stretch R B S V _ _ 1 1 OK or ERR ERR<br />
ALL Reset A L R E _ _ _ 1 OK or ERR ERR<br />
Computer1 INPUT Picture Mode Standard R A P S _ _ 1 0 OK or ERR ERR<br />
Presentation R A P S _ _ 1 1 OK or ERR ERR<br />
Movie R A P S _ _ 1 2 OK or ERR ERR<br />
Game R A P S _ _ 1 3 OK or ERR ERR<br />
sR<strong>GB</strong> R A P S _ _ 1 4 OK or ERR ERR<br />
Contrast -30 – +30 R A P I _ * * * OK or ERR ERR<br />
Bright -30 – +30 R A B R _ * * * OK or ERR ERR<br />
Red -30 – +30 R A R D _ * * * OK or ERR ERR<br />
Blue -30 – +30 R A B E _ * * * OK or ERR ERR<br />
Color -30 – +30 R A C O _ * * * OK or ERR ERR<br />
Tint -30 – +30 R A T I _ * * * OK or ERR ERR<br />
<strong>Sharp</strong> -30 – +30 R A S H _ * * * OK or ERR ERR<br />
CLR Temp -1 – +1 R A C T _ _ * * OK or ERR ERR<br />
BrilliantColor 0 – +2 R A W E _ _ _ * OK or ERR ERR<br />
Progressive 2D Progressive R A I P _ _ _ 0 OK or ERR ERR<br />
3D Progressive R A I P _ _ _ 1 OK or ERR ERR<br />
Film Mode R A I P _ _ _ 2 OK or ERR ERR<br />
DNR Off R A N R _ _ _ 0 OK or ERR ERR<br />
Level 1 R A N R _ _ _ 1 OK or ERR ERR<br />
Level 2 R A N R _ _ _ 2 OK or ERR ERR<br />
Picture Reset R A R E _ _ _ 1 OK or ERR ERR<br />
Signal Type Auto I A S I _ _ _ 0 OK or ERR ERR<br />
R<strong>GB</strong> I A S I _ _ _ 1 OK or ERR ERR<br />
Component I A S I _ _ _ 2 OK or ERR ERR<br />
Audio Input Audio 1 R A A I _ _ _ 1 OK or ERR ERR<br />
Audio 2 R A A I _ _ _ 2 OK or ERR ERR<br />
Computer2 INPUT Picture Mode Standard R B P S _ _ 1 0 OK or ERR ERR<br />
Presentation R B P S _ _ 1 1 OK or ERR ERR<br />
Movie R B P S _ _ 1 2 OK or ERR ERR<br />
Game R B P S _ _ 1 3 OK or ERR ERR<br />
sR<strong>GB</strong> R B P S _ _ 1 4 OK or ERR ERR<br />
Contrast -30 – +30 R B P I _ * * * OK or ERR ERR<br />
Bright -30 – +30 R B B R _ * * * OK or ERR ERR<br />
Red -30 – +30 R B R D _ * * * OK or ERR ERR<br />
Blue -30 – +30 R B B E _ * * * OK or ERR ERR<br />
Color -30 – +30 R B C O _ * * * OK or ERR ERR<br />
Tint -30 – +30 R B T I _ * * * OK or ERR ERR<br />
<strong>Sharp</strong> -30 – +30 R B S H _ * * * OK or ERR ERR<br />
CLR Temp -1 – +1 R B C T _ _ * * OK or ERR ERR<br />
BrilliantColor 0 – +2 R B W E _ _ _ * OK or ERR ERR<br />
Progressive 2D Progressive R B I P _ _ _ 0 OK or ERR ERR<br />
3D Progressive R B I P _ _ _ 1 OK or ERR ERR<br />
Film Mode R B I P _ _ _ 2 OK or ERR ERR<br />
DNR Off R B N R _ _ _ 0 OK or ERR ERR<br />
Level 1 R B N R _ _ _ 1 OK or ERR ERR<br />
Level 2 R B N R _ _ _ 2 OK or ERR ERR<br />
Picture Reset R B R E _ _ _ 1 OK or ERR ERR<br />
Signal Type Auto I B S I _ _ _ 0 OK or ERR ERR<br />
R<strong>GB</strong> I B S I _ _ _ 1 OK or ERR ERR<br />
Component I B S I _ _ _ 2 OK or ERR ERR<br />
Audio Input Audio 1 R B A I _ _ _ 1 OK or ERR ERR<br />
Audio 2 R B A I _ _ _ 2 OK or ERR ERR<br />
Standby mode<br />
(or 30-second startup time)
CONTROL CONTENTS COMMAND PARAMETER<br />
RS-232C Specifi cations and Commands<br />
Power ON<br />
HDMI INPUT Picture Mode Standard R C P S _ _ 1 0 OK or ERR ERR<br />
RETURN<br />
Presentation R C P S _ _ 1 1 OK or ERR ERR<br />
Movie R C P S _ _ 1 2 OK or ERR ERR<br />
Game R C P S _ _ 1 3 OK or ERR ERR<br />
sR<strong>GB</strong> R C P S _ _ 1 4 OK or ERR ERR<br />
Contrast -30 – +30 R C P I _ * * * OK or ERR ERR<br />
Bright -30 – +30 R C B R _ * * * OK or ERR ERR<br />
Red -30 – +30 R C R D _ * * * OK or ERR ERR<br />
Blue -30 – +30 R C B E _ * * * OK or ERR ERR<br />
Color -30 – +30 R C C O _ * * * OK or ERR ERR<br />
Tint -30 – +30 R C T I _ * * * OK or ERR ERR<br />
<strong>Sharp</strong> -30 – +30 R C S H _ * * * OK or ERR ERR<br />
CLR Temp -1 – +1 R C C T _ _ * * OK or ERR ERR<br />
BrilliantColor 0 – +2 R C W E _ _ _ * OK or ERR ERR<br />
DNR Off R C N R _ _ _ 0 OK or ERR ERR<br />
Level 1 R C N R _ _ _ 1 OK or ERR ERR<br />
Level 2 R C N R _ _ _ 2 OK or ERR ERR<br />
Picture Reset R C R E _ _ _ 1 OK or ERR ERR<br />
Signal Type Auto I C S I _ _ _ 0 OK or ERR ERR<br />
R<strong>GB</strong> I C S I _ _ _ 1 OK or ERR ERR<br />
Component I C S I _ _ _ 2 OK or ERR ERR<br />
Audio Input Audio 1 R C A I _ _ _ 1 OK or ERR ERR<br />
Audio 2 R C A I _ _ _ 2 OK or ERR ERR<br />
HDMI R C A I _ _ _ 3 OK or ERR ERR<br />
Dynamic Auto H M C D _ _ _ 0 OK or ERR ERR<br />
Range<br />
Standard H M C D _ _ _ 1 OK or ERR ERR<br />
Enhanced H M C D _ _ _ 2 OK or ERR ERR<br />
S-Video INPUT Picture Mode Standard V A P S _ _ 1 0 OK or ERR ERR<br />
Presentation V A P S _ _ 1 1 OK or ERR ERR<br />
Movie V A P S _ _ 1 2 OK or ERR ERR<br />
Game V A P S _ _ 1 3 OK or ERR ERR<br />
Contrast -30 – +30 V A P I _ * * * OK or ERR ERR<br />
Bright -30 – +30 V A B R _ * * * OK or ERR ERR<br />
Red -30 – +30 V A R D _ * * * OK or ERR ERR<br />
Blue -30 – +30 V A B E _ * * * OK or ERR ERR<br />
Color -30 – +30 V A C O _ * * * OK or ERR ERR<br />
Tint -30 – +30 V A T I _ * * * OK or ERR ERR<br />
<strong>Sharp</strong> -30 – +30 V A S H _ * * * OK or ERR ERR<br />
CLR Temp -1 – +1 V A C T _ _ * * OK or ERR ERR<br />
BrilliantColor 0 – +2 V A W E _ _ _ * OK or ERR ERR<br />
Progressive 2D Progressive V A I P _ _ _ 0 OK or ERR ERR<br />
3D Progressive V A I P _ _ _ 1 OK or ERR ERR<br />
Film Mode V A I P _ _ _ 2 OK or ERR ERR<br />
DNR Off V A N R _ _ _ 0 OK or ERR ERR<br />
Level 1 V A N R _ _ _ 1 OK or ERR ERR<br />
Level 2 V A N R _ _ _ 2 OK or ERR ERR<br />
Picture Reset V A R E _ _ _ 1 OK or ERR ERR<br />
Audio Input Audio 1 V A A I _ _ _ 1 OK or ERR ERR<br />
Audio 2 V A A I _ _ _ 2 OK or ERR ERR<br />
Standby mode<br />
(or 30-second startup time)<br />
-7
RS-232C Specifi cations and Commands<br />
-8<br />
CONTROL CONTENTS COMMAND PARAMETER<br />
Power ON<br />
Video INPUT Picture Mode Standard V B P S _ _ 1 0 OK or ERR ERR<br />
RETURN<br />
Presentation V B P S _ _ 1 1 OK or ERR ERR<br />
Movie V B P S _ _ 1 2 OK or ERR ERR<br />
Game V B P S _ _ 1 3 OK or ERR ERR<br />
Contrast -30 – +30 V B P I _ * * * OK or ERR ERR<br />
Bright -30 – +30 V B B R _ * * * OK or ERR ERR<br />
Red -30 – +30 V B R D _ * * * OK or ERR ERR<br />
Blue -30 – +30 V B B E _ * * * OK or ERR ERR<br />
Color -30 – +30 V B C O _ * * * OK or ERR ERR<br />
Tint -30 – +30 V B T I _ * * * OK or ERR ERR<br />
<strong>Sharp</strong> -30 – +30 V B S H _ * * * OK or ERR ERR<br />
CLR Temp -1 – +1 V B C T _ _ * * OK or ERR ERR<br />
BrilliantColor 0 – +2 V B W E _ _ _ * OK or ERR ERR<br />
Progressive 2D Progressive V B I P _ _ _ 0 OK or ERR ERR<br />
3D Progressive V B I P _ _ _ 1 OK or ERR ERR<br />
Film Mode V B I P _ _ _ 2 OK or ERR ERR<br />
DNR Off V B N R _ _ _ 0 OK or ERR ERR<br />
Level 1 V B N R _ _ _ 1 OK or ERR ERR<br />
Level 2 V B N R _ _ _ 2 OK or ERR ERR<br />
Picture Reset V B R E _ _ _ 1 OK or ERR ERR<br />
Audio Input Audio 1 V B A I _ _ _ 1 OK or ERR ERR<br />
Audio 2 V B A I _ _ _ 2 OK or ERR ERR<br />
C.M.S. Setting On C M C S _ _ 1 1 OK or ERR ERR<br />
Off C M C S _ _ 0 0 OK or ERR ERR<br />
C.M.S. Hue Red C M H R _ * * * OK or ERR ERR<br />
Yellow C M H Y _ * * * OK or ERR ERR<br />
Green C M H G _ * * * OK or ERR ERR<br />
Cyan C M H C _ * * * OK or ERR ERR<br />
Blue C M H B _ * * * OK or ERR ERR<br />
Magenta C M H M _ * * * OK or ERR ERR<br />
Reset C M R E _ _ _ 2 OK or ERR ERR<br />
Saturation Red C M S R _ * * * OK or ERR ERR<br />
Yellow C M S Y _ * * * OK or ERR ERR<br />
Green C M S G _ * * * OK or ERR ERR<br />
Cyan C M S C _ * * * OK or ERR ERR<br />
Blue C M S B _ * * * OK or ERR ERR<br />
Magenta C M S M _ * * * OK or ERR ERR<br />
Reset C M R E _ _ _ 3 OK or ERR ERR<br />
Value Red C M V R _ * * * OK or ERR ERR<br />
Yellow C M V Y _ * * * OK or ERR ERR<br />
Green C M V G _ * * * OK or ERR ERR<br />
Cyan C M V C _ * * * OK or ERR ERR<br />
Blue C M V B _ * * * OK or ERR ERR<br />
Magenta C M V M _ * * * OK or ERR ERR<br />
Reset C M R E _ _ _ 4 OK or ERR ERR<br />
C.M.S. All Reset C M R E _ _ _ 1 OK or ERR ERR<br />
Clock -150 – +150 I N C L * * * * OK or ERR ERR<br />
Phase -30 – +30 I N P H _ * * * OK or ERR ERR<br />
H-position -150 – +150 I A H P * * * * OK or ERR ERR<br />
V-position -60 – +60 I A V P _ * * * OK or ERR ERR<br />
Fine Sync Adjustment Reset I A R E _ _ _ 1 OK or ERR ERR<br />
Image Shift -40 – +40 L N D S _ * * * OK or ERR ERR<br />
Overscan On O V S N _ _ _ 1 OK or ERR ERR<br />
Off O V S N _ _ _ 0 OK or ERR ERR<br />
OSD Display On I M D I _ _ _ 1 OK or ERR ERR<br />
Off I M D I _ _ _ 0 OK or ERR ERR<br />
Video System Auto M E S Y _ _ _ 1 OK or ERR ERR<br />
PAL M E S Y _ _ _ 2 OK or ERR ERR<br />
SECAM M E S Y _ _ _ 3 OK or ERR ERR<br />
NTSC4.43 M E S Y _ _ _ 4 OK or ERR ERR<br />
NTSC3.58 M E S Y _ _ _ 5 OK or ERR ERR<br />
PAL-M M E S Y _ _ _ 6 OK or ERR ERR<br />
PAL-N M E S Y _ _ _ 7 OK or ERR ERR<br />
PAL-60 M E S Y _ _ _ 8 OK or ERR ERR<br />
Standby mode<br />
(or 30-second startup time)
CONTROL CONTENTS COMMAND PARAMETER<br />
RS-232C Specifi cations and Commands<br />
Power ON<br />
Background Logo I M B G _ _ _ 1 OK or ERR ERR<br />
RETURN<br />
Blue I M B G _ _ _ 3 OK or ERR ERR<br />
None I M B G _ _ _ 4 OK or ERR ERR<br />
Eco+Quiet On T H M D _ _ _ 1 OK or ERR ERR<br />
Off T H M D _ _ _ 0 OK or ERR ERR<br />
Auto Sync On A A D J _ _ _ 1 OK or ERR ERR<br />
Off A A D J _ _ _ 0 OK or ERR ERR<br />
Auto Power Off On A P O W _ _ _ 1 OK or ERR ERR<br />
Off A P O W _ _ _ 0 OK or ERR ERR<br />
Auto Restart On A R E S _ _ _ 1 OK or ERR ERR<br />
Off A R E S _ _ _ 0 OK or ERR ERR<br />
STANDBY Mode Standard M O U T _ _ _ 1 OK or ERR ERR<br />
Eco M O U T _ _ _ 0 OK or ERR ERR<br />
PRJ Mode Reverse On I M R E _ _ _ 1 OK or ERR ERR<br />
Off I M R E _ _ _ 0 OK or ERR ERR<br />
Invert On I M I N _ _ _ 1 OK or ERR ERR<br />
Off I M I N _ _ _ 0 OK or ERR ERR<br />
Language English M E L A _ _ _ 1 OK or ERR ERR<br />
Deutsch M E L A _ _ _ 2 OK or ERR ERR<br />
Español M E L A _ _ _ 3 OK or ERR ERR<br />
Nederlands M E L A _ _ _ 4 OK or ERR ERR<br />
Français M E L A _ _ _ 5 OK or ERR ERR<br />
Italiano M E L A _ _ _ 6 OK or ERR ERR<br />
Svenska M E L A _ _ _ 7 OK or ERR ERR<br />
M E L A _ _ _ 8 OK or ERR ERR<br />
Português M E L A _ _ _ 9 OK or ERR ERR<br />
M E L A _ _ 1 0 OK or ERR ERR<br />
M E L A _ _ 1 1 OK or ERR ERR<br />
M E L A _ _ 1 2 OK or ERR ERR<br />
M E L A _ _ 1 3 OK or ERR ERR<br />
polski M E L A _ _ 1 4 OK or ERR ERR<br />
Türkçe M E L A _ _ 1 5 OK or ERR ERR<br />
M E L A _ _ 1 6 OK or ERR ERR<br />
Magyar M E L A _ _ 1 7 OK or ERR ERR<br />
System Sound On S S N D _ _ _ 1 OK or ERR ERR<br />
Off S S N D _ _ _ 0 OK or ERR ERR<br />
Audio Out FAO A O U T _ _ _ 1 OK or ERR ERR<br />
VAO A O U T _ _ _ 2 OK or ERR ERR<br />
Internal Speaker On A S P K _ _ _ 1 OK or ERR ERR<br />
Off A S P K _ _ _ 0 OK or ERR ERR<br />
R<strong>GB</strong> Frequency Check Horizontal T F R Q _ _ _ 1 kHz(***.* or ERR) ERR<br />
Vertical T F R Q _ _ _ 2 Hz(***.* or ERR) ERR<br />
Fan Mode Normal H L M D _ _ _ 0 OK or ERR ERR<br />
High H L M D _ _ _ 1 OK or ERR ERR<br />
Balance -30 − +30 A A B L _ * * * OK or ERR ERR<br />
Treble -30 − +30 A A T E _ * * * OK or ERR ERR<br />
Bass -30 − +30 A A B A _ * * * OK or ERR ERR<br />
Audio Adjustment Reset A A R E _ _ _ 1 OK or ERR ERR<br />
DLP ® LinkTM Off 3 D E N _ _ _ 0 OK or ERR ERR<br />
On 3 D E N _ _ _ 1 OK or ERR ERR<br />
DLP ® LinkTM Invert 3 D I V _ _ _ 1 OK or ERR ERR<br />
Video Setup 0 IRE V I S U _ _ _ 0 OK or ERR ERR<br />
7.5 IRE V I S U _ _ _ 1 OK or ERR ERR<br />
Closed Caption<br />
Off C L C A _ _ _ 0 OK or ERR ERR<br />
(For Americas only)<br />
CC1 C L C A _ _ _ 1 OK or ERR ERR<br />
CC2 C L C A _ _ _ 2 OK or ERR ERR<br />
Lamp Timer Reset *3 L P R E 0 0 0 1 ERR OK or ERR<br />
Standby mode<br />
(or 30-second startup time)<br />
*1 For setting the projector name, send the commands in the order of PJN1, PJN2 and PJN3.<br />
*2 This command should be sent only after the “IR<strong>GB</strong> _ _ _ 2” command is sent and an “OK” response code is<br />
received.<br />
*3 The Lamp Timer Reset command is available only in standby mode.<br />
-9
Setting up the Projector Network Environment<br />
This section describes the basic procedure for using the projector via the network.<br />
If the network is already constructed, the projector's network settings may need to be<br />
changed. Please consult your network administrator for assistance with these settings.<br />
You can make network settings both on the projector and on the computer. The following<br />
procedure is for making settings on the computer.<br />
Network settings on the computer<br />
1. Connecting the projector to a computer<br />
Connect a LAN cable (Category 5, cross-over type) between the computer and projector.<br />
LAN cable<br />
(commercially available)<br />
-10<br />
Page 11<br />
2. Setting an IP address for the computer<br />
Adjust the IP settings of the computer to enable one-to-one communications with the projector.<br />
3. Setting up a network connection for the projector<br />
Adjust the projector network settings to conform to your network.<br />
Temporarily change<br />
the computer's IP<br />
address.<br />
Use Internet Explorer<br />
(version 5.0 or later)<br />
to make various<br />
projector settings.<br />
Pages 12, 13<br />
Pages 14, 15<br />
Microsoft ® , Windows ® and Windows Vista ® are registered trademarks of Microsoft Corporation in the<br />
United States and/or other countries.<br />
PJLink is a registered trademark or an application trademark in Japan, the United States, Canada, E.U.,<br />
China and/or other countries/regions.<br />
All other company or product names are trademarks or registered trademarks of their respective<br />
companies.
1. Connecting the Projector<br />
to a Computer<br />
Establishing a one-to-one connection from<br />
the projector to a computer. Using a<br />
commercially available LAN cable (UTP<br />
cable, Category 5, cross-over type) you can<br />
confi gure the projector via the computer.<br />
1<br />
2<br />
3<br />
4<br />
Disconnect the computer's LAN<br />
cable from the existing network.<br />
Connect a commercially available<br />
LAN cable (UTP cable, Category 5,<br />
cross-over type) to the projector's<br />
LAN terminal and connect the<br />
other end of the cable to the<br />
computer's LAN terminal.<br />
Plug the power cord into the AC<br />
socket of the projector.<br />
Turn on the computer.<br />
Info<br />
Confi rm that the LINK LED on the rear of the<br />
projector illuminates. If the LINK LED does not<br />
illuminate, check the following:<br />
The LAN cable is properly connected.<br />
The power switches of both the projector and<br />
the computer are on.<br />
Setting up the Projector Network Environment<br />
A LAN cable being<br />
connected to the network<br />
LAN cable<br />
(cross-over type, commercially available)<br />
This completes the connection. Now proceed to “2. Setting an IP Address for the Computer”.<br />
ON<br />
-11
Setting up the Projector Network Environment<br />
2. Setting an IP Address for<br />
the Computer<br />
The following describes how to make<br />
settings in Windows Vista ® .<br />
1<br />
2<br />
3<br />
4<br />
-12<br />
Log on the network using the<br />
administrator's account for the<br />
computer.<br />
Click “start”, and click “Control<br />
Panel”.<br />
Click “View network status and<br />
tasks” of “Network and Internet”,<br />
and click “View status” in the new<br />
window.<br />
This manual uses examples to explain the<br />
operations in Category View. If you are using<br />
Classic View, double-click “Network and<br />
Sharing Center”.<br />
Click “Properties”.<br />
When the user account control display is<br />
displayed, click “Continue”.<br />
1<br />
1<br />
1<br />
2<br />
2
5<br />
6<br />
Click “Internet Protocol Version 4<br />
(TCP/IPv4)”, and click the<br />
“Properties” button.<br />
Confi rm or change an IP address<br />
for the setup computer.<br />
1 Confi rm and note the current IP<br />
address, Subnet mask and Default<br />
gateway.<br />
Make sure to note the current IP address,<br />
Subnet mask and Default gateway as you<br />
will be required to reset them later.<br />
2 Set temporarily as follows:<br />
IP address: 192.168.150.3<br />
Subnet mask: 255.255.255.0<br />
Default gateway: (Do not input any<br />
values.)<br />
Note<br />
The factory default settings for the projector are<br />
as follows:<br />
DHCP Client: OFF<br />
IP address: 192.168.150.2<br />
Subnet mask: 255.255.255.0<br />
Default gateway: 0.0.0.0<br />
7<br />
After setting, click the “OK”<br />
button, and then restart the<br />
computer.<br />
Setting up the Projector Network Environment<br />
After confi rming or setting, proceed to “3. Setting up Network Connection for the Projector”.<br />
1<br />
2<br />
-13
Setting up the Projector Network Environment<br />
3. Setting up a Network Connection<br />
for the Projector<br />
Settings for such items as the projector's<br />
IP address and subnet mask are<br />
compatible with the existing network.<br />
Set each item on the projector as follows.<br />
(See page 50 of the projector's operation<br />
manual for setting.)<br />
DHCP Client: Off<br />
IP Address: 192.168.150.002<br />
Subnet Mask: 255.255.255.000<br />
1<br />
2<br />
3<br />
-14<br />
Start Internet Explorer (version 5.0<br />
or later) on the computer, and<br />
enter “http://192.168.150.2/” in<br />
“Address”, and then press the<br />
“Enter” key.<br />
If a user name and a password<br />
have not yet been set, just click<br />
the “OK” button.<br />
If a user name and a password have been<br />
set, input the user name and the password,<br />
and click the “OK” button.<br />
If the user name or password is entered<br />
incorrectly three times, an error message will<br />
be displayed.<br />
When you are using Internet Explorer 7, other<br />
setup screen may be displayed. In this case,<br />
make the proper adjustments for the setup<br />
screen.<br />
When the screen as shown on the<br />
right appears, click “TCP/IP”.
4<br />
The TCP/IP setting screen<br />
appears, ready for network<br />
settings for the projector.<br />
Items Setting example / Remarks<br />
New<br />
Password<br />
DHCP<br />
Client<br />
IP<br />
Address<br />
Subnet<br />
Mask<br />
Default<br />
Gateway<br />
DNS<br />
Server<br />
You can set the password to protect<br />
the TCP/IP setting.<br />
Select “ON” or “OFF” to determine<br />
whether to use DHCP Client.<br />
You can set this item when “DHCP<br />
Client” is set to “OFF”.<br />
Factory default setting: 192.168.150.2<br />
Enter an IP address appropriate for<br />
the network.<br />
You can set this item when “DHCP<br />
Client” is set to “OFF”.<br />
Factory default setting:<br />
255.255.255.0<br />
Set the subnet mask to the same as<br />
that of the computer and equipment<br />
on the network.<br />
You can set this item when “DHCP<br />
Client” is set to “OFF”.<br />
Factory default setting: 0.0.0.0<br />
* When not in use, set to “0.0.0.0”.<br />
Factory default setting: 0.0.0.0<br />
* When not in use, set to “0.0.0.0”.<br />
Note<br />
Confi rm the existing network's segment (IP<br />
address group) to avoid setting an IP address<br />
that duplicates the IP addresses of other<br />
network equipment or computers. If<br />
“192.168.150.2” is not used in the network<br />
having an IP address of “192.168.150.XXX”, you<br />
don't have to change the projector IP address.<br />
For details about each setting, consult your<br />
network administrator.<br />
5<br />
6<br />
Click the “Apply” button.<br />
The set values appear. Confi rm<br />
that the values are set properly,<br />
and then click the “Confi rm”<br />
button.<br />
Setting up the Projector Network Environment<br />
Close the browser.<br />
This completes the network settings.<br />
After setting items, wait for about 15 seconds and then re-access.<br />
Change the IP address of the setting computer back to its original address, which you have noted down in<br />
Step 6-1 on page 13, and then connect the computer and the projector to the network.<br />
-15
Controlling the Projector via LAN<br />
After connecting the projector to your network, enter the projector IP address in<br />
“Address” on Internet Explorer (version 5.0 or later) using a computer on the network to<br />
start a setup screen that will enable control of the projector via the network.<br />
Controlling the Projector<br />
Using Internet Explorer<br />
(Version 5.0 or later)<br />
Complete connections to external<br />
equipment before starting the operation.<br />
(See pages 21-25 of the projector's<br />
operation manual.)<br />
Complete the AC cord connection. (See<br />
page 25 of the projector's operation<br />
manual.)<br />
Note<br />
When connecting the projector to the LAN, use<br />
a commercially available LAN cable (UTP cable,<br />
Category 5, cross-over type). When<br />
connecting the projector to a hub, use a<br />
straight-through cable.<br />
1<br />
2<br />
3<br />
-16<br />
Start Internet Explorer (version 5.0<br />
or later) on the computer.<br />
Enter “http://” followed by the<br />
projector IP address set by the<br />
procedure on page 15 followed by<br />
“/” in “Address”, and then press<br />
the “Enter” key.<br />
When “DHCP Client” is set to “OFF” on the<br />
projector, IP address is 192.168.150.2. If you<br />
did not change the IP address in “3. Setting<br />
up a Network Connection for the<br />
Projector” (pages 14-15), enter<br />
“http://192.168.150.2/”.<br />
A screen for controlling the<br />
projector appears, ready for<br />
performing various status<br />
conditions, control, and settings.
Confi rming the Projector<br />
Status (Status)<br />
On this screen, you can confi rm the<br />
projector status. You can confi rm the<br />
following items:<br />
• MAC Address<br />
• Power<br />
• Condition<br />
• Lamp Timer<br />
• Lamp Life<br />
• Input<br />
• Signal Info<br />
• Serial Number<br />
Note<br />
If you click the “Refresh” button before the<br />
screen is displayed completely, an error<br />
message (“Server Busy Error”) will be<br />
displayed. Wait for a moment and then operate<br />
again.<br />
For details about each item, refer to the<br />
projector's operation manual.<br />
Controlling the Projector via LAN<br />
Controlling the Projector<br />
(Control)<br />
On this screen, you can perform projector<br />
control. You can control the following<br />
items:<br />
• Power<br />
• Input Select<br />
• Volume<br />
•<br />
AV Mute<br />
Note<br />
If you click the “Refresh” button before the<br />
screen is displayed completely, an error<br />
message (“Server Busy Error”) will be<br />
displayed. Wait for a moment and then operate<br />
again.<br />
You cannot operate this page while the<br />
projector is warming up.<br />
While the projector is in standby mode, you can<br />
only control “Power ON”.<br />
For details about each item, refer to the<br />
projector's operation manual.<br />
-17
Controlling the Projector via LAN<br />
Setting and Adjusting the<br />
Projector (Settings & Adjustments)<br />
Example: “Picture” screen display for COMPUTER1<br />
On these screens, you can make projector<br />
settings or adjustments. You can set or<br />
adjust the following items:<br />
Picture Mode<br />
CLR Temp<br />
BrilliantColorTM •<br />
•<br />
•<br />
• Progressive<br />
• DNR<br />
• Eco + Quiet Mode<br />
• Resolution Setting<br />
• Signal Type<br />
• Video System<br />
• Dynamic Range<br />
• Resize<br />
• Overscan<br />
• OSD Display<br />
• Background<br />
-18<br />
Projection Mode<br />
DLP ® LinkTM DLP ® LinkTM •<br />
•<br />
•<br />
Invert<br />
• Video Setup<br />
• OSD Language<br />
• Auto Sync<br />
• Auto Power Off<br />
• Auto Restart<br />
• System Sound<br />
• Audio Out<br />
• Internal Speaker<br />
• Audio Input<br />
• RS-232C Speed<br />
• Fan Mode<br />
• All Reset<br />
Note<br />
If you click the “Refresh” button before the<br />
screen is displayed completely, an error<br />
message (“Server Busy Error”) will be<br />
displayed. Wait for a moment and then operate<br />
again.<br />
You cannot operate this page while the<br />
projector is warming up.<br />
For details about each item, refer to the<br />
projector's operation manual.<br />
Setting the Security<br />
(Network – Security)<br />
On this screen, you can make settings<br />
relating to security.<br />
Items Description<br />
User Name Setting of user name for security<br />
protection.<br />
Password Setting of password for security<br />
protection.<br />
Accept IP<br />
Address<br />
All IP<br />
Addresses<br />
From only<br />
specifi c IP<br />
addresses<br />
It is possible to set up to three IP<br />
addresses allowing connection to the<br />
projector.<br />
No limits are set to IP addresses<br />
connecting to the projector.<br />
For security improvement, only an IP<br />
address set by “Address 1-3” can be<br />
connected to the projector.<br />
Note<br />
User Name and Password can be up to 8<br />
characters.<br />
You can input the characters below:<br />
a-z, A-Z, 0-9, -, _
Making General Settings for<br />
the Network (Network - General)<br />
On this screen, you can make general<br />
settings relating to the network.<br />
Items Description<br />
Projector<br />
Name<br />
Setting the projector name.<br />
Auto Logout<br />
Time<br />
Setting the time interval in which the<br />
projector will be automatically<br />
disconnected from the network in units<br />
of a minute (from 1 to 65535 minutes).<br />
If the set value is made 0, the Auto<br />
Logout function is disabled.<br />
Data Port Setting the TCP port number used<br />
when exchanging data with the<br />
projector (from 1025 to 65535).<br />
Search Port Setting the port number used when<br />
searching for the projector (from 1025<br />
to 65535).<br />
After clicking the “Apply” button, the set<br />
values appear. Confi rm that the values are<br />
set properly, and then click the “Confi rm”<br />
button.<br />
Note<br />
After setting items, wait for about 15 seconds<br />
and then re-access.<br />
Projector Name can be up to 12 characters.<br />
You can input the characters below:<br />
A-Z, 0-9, -, _, (,), space<br />
(When “a-z” are input, they are converted to<br />
“A-Z” automatically.)<br />
Controlling the Projector via LAN<br />
Setting for Sending E-mail<br />
when an Error Occurs<br />
(Mail – Originator Settings)<br />
On this screen, you can make settings for<br />
sending e-mail to report when the<br />
projector has generated an error.<br />
Items Setting example / Remarks<br />
SMTP Server Setting an SMTP server address for email<br />
transmission.<br />
e.g.1: 192.168.150.253<br />
e.g.2: smtp123.sharp.co.jp<br />
* When using a domain name, make<br />
settings for the DNS server.<br />
Originator Email<br />
Address<br />
Originator<br />
Name<br />
Setting the projector's e-mail address.<br />
The e-mail address set here becomes<br />
Originator E-mail Address.<br />
Setting the sender's name. The name<br />
set here appears in the “Originator<br />
Name” column of the body of the<br />
message.<br />
Note<br />
SMTP Server, Originator E-mail Address and<br />
Originator Name can be up to 64 characters.<br />
You can input the characters below:<br />
SMTP Server and Originator E-mail Address:<br />
a-z, A-Z, 0-9, !, #, $, %, &, *, +, -, /, =, ?, ^, {, |, },<br />
~ , _, ', ., @, `<br />
(You can input “@” only one time for “Originator<br />
E-mail Address”.)<br />
Originator Name : a-z, A-Z, 0-9, -, _, (,), space<br />
If the settings of “3. Setting up a Network<br />
Connection for the Projector” on pages 14<br />
and 15 are incorrectly set, e-mail will not be<br />
sent.<br />
-19
Controlling the Projector via LAN<br />
Setting Error Items and<br />
Destination Addresses to<br />
which E-mail is to be Sent<br />
when an Error Occurs<br />
(Mail – Recipient Settings)<br />
On this screen, you can input e-mail<br />
destinations to which error notifi cation<br />
(error items) e-mails are sent.<br />
E-mail<br />
Address<br />
-20<br />
Items Description<br />
Error Mail<br />
(Lamp, Temp,<br />
Fan,Cover)<br />
Set addresses to which error<br />
notifi cation e-mail is sent. You can set<br />
up to fi ve addresses.<br />
Error e-mail is sent on the error items<br />
checked in their check boxes.<br />
Test Send test e-mail. This allows you to<br />
confi rm that the settings for e-mail<br />
transmission are properly set.<br />
Note<br />
E-mail Address can be up to 64 characters.<br />
You can input the characters below:<br />
a-z, A-Z, 0-9, !, #, $, %, &, *, +, -, /, =, ?, ^, {, |, },<br />
~ , _, ', ., @, `<br />
(You can input “@” only one time.)<br />
For details about error items, refer to the<br />
projector's operation manual.<br />
Setting Error Items and the<br />
URL that are to be<br />
Displayed when an Error<br />
Occurs (Service & <strong>Support</strong> –<br />
Access URL)<br />
On this screen, you can make settings of<br />
the URL and error items that are to be<br />
displayed when the projector has<br />
generated an error.<br />
Items Description<br />
Access URL Set the URL that is to be displayed<br />
when an error occurs. You can set up<br />
to fi ve addresses.<br />
Condition<br />
(Always,<br />
Lamp, Temp,<br />
Fan,Cover)<br />
The URL is displayed when an error<br />
checked in their check boxes occurs.<br />
Test The set URL site is test-displayed. This<br />
allows you to confi rm that the URL site<br />
is properly displayed.<br />
Example of the display when an error<br />
occurs
Setting up the Projector Using RS-232C or Telnet<br />
Connect the projector to a computer using RS-232C or Telnet, and open the <strong>SETUP</strong><br />
MENU on the computer to carry out various settings for the projector.<br />
When Connecting Using<br />
RS-232C<br />
1<br />
2<br />
3<br />
4<br />
5<br />
6<br />
Launch general purpose terminal<br />
emulator.<br />
Input settings for the RS-232C<br />
port of the terminal emulator as<br />
follows.<br />
Baud Rate : 9600 bps*<br />
Data Length : 8 bit<br />
Parity Bit : None<br />
Stop Bit : 1 bit<br />
Flow Control : None<br />
* This is the factory default setting. If the value<br />
of Baud Rate for the projector has been<br />
changed, set Baud Rate here according to<br />
the changed value on the projector.<br />
Input “PJS11234” and press the<br />
“Enter” key.<br />
“OK” is displayed. Input<br />
“PJS25678” and press the “Enter”<br />
key within 10 seconds.<br />
“User Name:” is displayed. Input<br />
the user name and press the<br />
“Enter” key.<br />
If a user name has not yet been set, just<br />
press the “Enter” key.<br />
“Password:” is displayed. Input<br />
the password and press the<br />
“Enter” key.<br />
If a password has not yet been set, just press<br />
the “Enter” key.<br />
7<br />
Input “setup” and press the<br />
“Enter” key.<br />
<strong>SETUP</strong> MENU will be displayed.<br />
▼<strong>SETUP</strong> MENU<br />
-----------------------------<strong>SETUP</strong> MENU----------------------------<br />
[1]IP Address [2]Subnet Mask [3]Default Gateway<br />
[4]User Name [5]Password<br />
[6]RS-232C Baud Rate [7]Projector Name [8]DHCP Client<br />
[A]Advanced Setup [D]Disconnect All<br />
[V]View All Setting [S]Save & Quit [Q]Quit Unchanged<br />
setup><br />
Note<br />
User name and password are not set in the<br />
factory default settings.<br />
If the user name or password is entered<br />
incorrectly three times, <strong>SETUP</strong> MENU will be<br />
quit.<br />
-21
Setting up the Projector Using RS-232C or Telnet<br />
When Connecting Using<br />
Telnet<br />
1<br />
2<br />
3<br />
4<br />
5<br />
6<br />
-22<br />
Click “Start” from the Windows®<br />
desktop and select “Run”.<br />
Enter “telnet 192.168.150.2” in the<br />
text box that opens up. (If the IP<br />
address of the projector is<br />
192.168.150.2.)<br />
Click the “OK” button.<br />
“User Name:” is displayed. Input<br />
the user name and press the<br />
“Enter” key.<br />
If a user name has not yet been set, just<br />
press the “Enter” key.<br />
“Password:” is displayed. Input<br />
the password and press the<br />
“Enter” key.<br />
If a password has not yet been set, just press<br />
the “Enter” key.<br />
Input “setup” and press the<br />
“Enter” key.<br />
<strong>SETUP</strong> MENU will be displayed.<br />
▼<strong>SETUP</strong> MENU<br />
-----------------------------<strong>SETUP</strong> MENU----------------------------<br />
[1]IP Address [2]Subnet Mask [3]Default Gateway<br />
[4]User Name [5]Password<br />
[6]RS-232C Baud Rate [7]Projector Name [8]DHCP Client<br />
[A]Advanced Setup [D]Disconnect All<br />
[V]View All Setting [S]Save & Quit [Q]Quit Unchanged<br />
setup><br />
Note<br />
If the IP address has been changed, be sure to<br />
enter the new IP address in step 2.<br />
User name and password are not set in the<br />
factory default settings.<br />
If the user name or password is entered<br />
incorrectly three times in steps 4 or 5, <strong>SETUP</strong><br />
MENU will be quit.
<strong>SETUP</strong> MENU (Main Menu)<br />
▼<strong>SETUP</strong> MENU<br />
-----------------------------<strong>SETUP</strong> MENU----------------------------<br />
[1]IP Address [2]Subnet Mask [3]Default Gateway<br />
[4]User Name [5]Password<br />
[6]RS-232C Baud Rate [7]Projector Name [8]DHCP Client<br />
[A]Advanced Setup [D]Disconnect All<br />
[V]View All Setting [S]Save & Quit [Q]Quit Unchanged<br />
setup><br />
[1] IP Address<br />
IP address settings. (Page 26)<br />
[2] Subnet Mask<br />
Subnet mask settings. (Page 26)<br />
[3] Default Gateway<br />
Default gateway settings. (Page 26)<br />
[4] User Name (Factory default setting: Not<br />
Required)<br />
Setting of user name for security protection.<br />
(Page 26)<br />
[5] Password (Factory default setting: Not<br />
Required)<br />
Setting of password for security protection.<br />
(Page 27)<br />
[6] RS-232C Baud Rate (Factory default setting:<br />
9600 bps)<br />
Baud rate settings for the RS-232C terminals.<br />
(Page 27)<br />
[7] Projector Name<br />
It is possible to assign a projector name. (Page 27)<br />
[8] DHCP Client<br />
DHCP Client settings. (Page 27)<br />
[A] Advanced Setup<br />
Enters ADVANCED <strong>SETUP</strong> MENU. (Page 28)<br />
[D] Disconnect All<br />
Disconnect all connections. (Page 28)<br />
[V] View All Setting<br />
Displays all setting values. (Page 24)<br />
Can also be used with ADVANCED <strong>SETUP</strong><br />
MENU.<br />
[S] Save & Quit<br />
Save set values and quit menu. (Page 25)<br />
[Q] Quit Unchanged<br />
Quit menu without saving setting values. (Page 25)<br />
Note<br />
When “DHCP Client” is set to “OFF” on the<br />
projector:<br />
IP address: 192.168.150.2<br />
Subnet mask: 255.255.255.0<br />
Default gateway: 0.0.0.0<br />
Setting up the Projector Using RS-232C or Telnet<br />
ADVANCED <strong>SETUP</strong> MENU<br />
▼ADVANCED <strong>SETUP</strong> MENU<br />
********************** ADVANCED <strong>SETUP</strong> MENU ***************************<br />
[1]Auto Logout Time [2]Data Port<br />
[5]Network Ping Test<br />
[6]Accept IP Addr(1) [7]Accept IP Addr(2) [8]Accept IP Addr(3)<br />
[9]Accept All IP Addr [0]Search Port<br />
[!]Restore Default Setting<br />
[Q]Return to Main Menu<br />
advanced><br />
[1] Auto Logout Time (Factory default setting:<br />
5 minutes)<br />
Setting of time until automatic disconnection of<br />
network connection. (Page 28)<br />
[2] Data Port (Factory default setting: 10002)<br />
Setting the TCP port number used when<br />
exchanging data. (Page 28)<br />
[5] Network Ping Test<br />
It is possible to confi rm that a network<br />
connection between the projector and a<br />
computer etc. is working normally. (Page 29)<br />
[6] Accept IP Addr(1)<br />
[7] Accept IP Addr(2)<br />
[8] Accept IP Addr(3)<br />
[9] Accept All IP Addr (Factory default setting:<br />
Accept All)<br />
For improved security, it is possible to set up<br />
to three IP addresses allowing connection to<br />
the projector.<br />
Set IP addresses can be cancelled using [9]<br />
Accept All IP Addr. (Page 29)<br />
[0] Search Port (Factory default setting: 5006)<br />
Setting the port number used when searching<br />
for the projector. (Page 30)<br />
[!] Restore Default Setting<br />
Restores all setting values that can be set<br />
using the menu to the default state. (Page 30)<br />
[Q] Return to Main Menu<br />
Return to the main <strong>SETUP</strong> MENU. (Page 30)<br />
-23
Setting up the Projector Using RS-232C or Telnet<br />
Enter number or symbol of item to be selected on the <strong>SETUP</strong> MENU. When setting, input<br />
the details to be set. Setting is carried out one item at a time, and saved at the end.<br />
View Setting Detail List<br />
([V]View All Setting)<br />
▼<strong>SETUP</strong> MENU<br />
-----------------------------<strong>SETUP</strong> MENU----------------------------<br />
[1]IP Address [2]Subnet Mask [3]Default Gateway<br />
[4]User Name [5]Password<br />
[6]RS-232C Baud Rate [7]Projector Name [8]DHCP Client<br />
[A]Advanced Setup [D]Disconnect All<br />
[V]View All Setting [S]Save & Quit [Q]Quit Unchanged<br />
setup>v<br />
Model Name : XX-XXXX<br />
Projector Name : XX-XXXX<br />
MAC Address : XX:XX:XX:XX:XX:XX<br />
DHCP Client : Disable<br />
IP Address : 192.168.150.2<br />
Subnet Mask : 255.255.255.0<br />
Default Gateway : Not Used<br />
RS-232 Baud Rate : 9600 bps<br />
Password : Not Required<br />
**********(Advanced Status)**********<br />
Data Port : 10002<br />
Accept IP Address : Accept All<br />
Auto Logout Time : 5 minutes<br />
Search Port : 5006<br />
1 Enter “v” and press the “Enter” key.<br />
Display all setting values(*).<br />
-24<br />
1<br />
*<br />
Set Items<br />
Example: When setting IP Address (change<br />
from 192.168.150.2 to 192.168.150.3)<br />
▼<strong>SETUP</strong> MENU<br />
-----------------------------<strong>SETUP</strong> MENU----------------------------<br />
[1]IP Address [2]Subnet Mask [3]Default Gateway<br />
[4]User Name [5]Password<br />
[6]RS-232C Baud Rate [7]Projector Name [8]DHCP Client<br />
[A]Advanced Setup [D]Disconnect All<br />
[V]View All Setting [S]Save & Quit [Q]Quit Unchanged<br />
setup>1<br />
IP Address : 192.168.150.2<br />
Please Enter : 192.168.150.3<br />
(change) —> 192.168.150.3<br />
-----------------------------<strong>SETUP</strong> MENU----------------------------<br />
[1]IP Address [2]Subnet Mask [3]Default Gateway<br />
[4]User Name [5]Password<br />
[6]RS-232C Baud Rate [7]Projector Name [8]DHCP Client<br />
[A]Advanced Setup [D]Disconnect All<br />
[V]View All Setting [S]Save & Quit [Q]Quit Unchanged<br />
setup>v<br />
Model Name : XX-XXXX<br />
Projector Name : XX-XXXX<br />
MAC Address : XX:XX:XX:XX:XX:XX<br />
DHCP Client : Disable<br />
IP Address : 192.168.150.3<br />
Subnet Mask : 255.255.255.0<br />
Default Gateway : Not Used<br />
RS-232C Baud Rate : 9600 bps<br />
Password : Not Required<br />
**********(Advanced Status)**********<br />
Data Port : 10002<br />
Accept IP Address : Accept All<br />
Auto Logout Time : 5 minutes<br />
Search Port : 5006<br />
1<br />
*1<br />
2<br />
*2<br />
3<br />
1 Enter “1” (number of item to be set), and<br />
press the “Enter” key.<br />
Display current IP address (*1).<br />
2 Enter IP address to be set and press the<br />
“Enter” key.<br />
Display IP address after change (*2).<br />
3 Enter “v” and press the “Enter” key to verify<br />
setting detail list.<br />
IP address is being changed (*3).<br />
Note<br />
Verifi cation of setting detail list can be omitted.<br />
Setting details are not effective until they have<br />
been saved. (Page 25)<br />
If an invalid number is entered, an error<br />
message (“Parameter Error!”) will be displayed.<br />
*3
Save Settings and Quit<br />
([S]Save & Quit)<br />
Save set values and quit menu.<br />
▼<strong>SETUP</strong> MENU<br />
----------------------------<strong>SETUP</strong> MENU---------------------------<br />
[1]IP Address [2]Subnet Mask [3]Default Gateway<br />
[4]User Name [5]Password<br />
[6]RS-232C Baud Rate [7]Projector Name [8]DHCP Client<br />
[A]Advanced Setup [D]Disconnect All<br />
[V]View All Setting [S]Save & Quit [Q]Quit Unchanged<br />
setup>s<br />
All Connection will be disconnect.<br />
Continue(y/n)? y<br />
Apply New setting...Done.<br />
1 Enter “s” and press the “Enter” key.<br />
2 Enter “y” and press the “Enter” key.<br />
Setting up the Projector Using RS-232C or Telnet<br />
1<br />
2<br />
Quit without Saving Settings<br />
([Q]Quit Unchanged)<br />
Quit menu without saving setting values.<br />
▼<strong>SETUP</strong> MENU<br />
----------------------------<strong>SETUP</strong> MENU---------------------------<br />
[1]IP Address [2]Subnet Mask [3]Default Gateway<br />
[4]User Name [5]Password<br />
[6]RS-232C Baud Rate [7]Projector Name [8]DHCP Client<br />
[A]Advanced Setup [D]Disconnect All<br />
[V]View All Setting [S]Save & Quit [Q]Quit Unchanged<br />
setup>q<br />
Quit Without Saving(y/n)? y<br />
Setting Unchanged.<br />
1 Enter “q” and press the “Enter” key.<br />
2 Enter “y” and press the “Enter” key.<br />
1<br />
2<br />
-25
Setting up the Projector Using RS-232C or Telnet<br />
The setting procedure for each item will be explained. For the basic procedure, please<br />
refer to “Set Items” on page 24.<br />
IP Address Setting<br />
([1]IP Address)<br />
Setting of IP address.<br />
setup>1<br />
IP Address :192.168.150.2<br />
Please Enter :192.168.150.3<br />
(change) —> 192.168.150.3<br />
1 Enter “1” and press the “Enter” key.<br />
2 Enter numerical value to be set and press<br />
the “Enter” key.<br />
Display IP address after change (*).<br />
Subnet Mask Setting<br />
([2]Subnet Mask)<br />
Setting subnet mask.<br />
setup>2<br />
Subnet Mask :255.255.255.0<br />
Please Enter :255.0.0.0<br />
(change) —> 255.0.0.0<br />
1 Enter “2” and press the “Enter” key.<br />
2 Enter numerical value to be set and press<br />
the “Enter” key.<br />
Display subnet mask after change (*).<br />
-26<br />
1<br />
2<br />
*<br />
1<br />
2<br />
*<br />
Default Gateway Setting<br />
([3]Default Gateway)<br />
Setting default gateway.<br />
setup>3<br />
note: “0.0.0.0” means “Using no default gateway.”<br />
Gateway Address :0.0.0.0<br />
Please Enter :192.168.150.1<br />
(change) —> 192.168.150.1<br />
1 Enter “3” and press the “Enter” key.<br />
2 Enter numerical value to be set and press<br />
the “Enter” key.<br />
Display gateway address after change (*).<br />
Note<br />
If the values for IP Address, Subnet Mask or<br />
Gateway of the projector have been changed<br />
via Telnet, the computer cannot be connected<br />
to the projector depending on the computer's<br />
network settings.<br />
User Name Setting<br />
([4]User Name)<br />
Carrying out security protection using user<br />
name.<br />
setup>4<br />
User Name :<br />
Please Enter : XX-XXXX<br />
(change) —> XX-XXXX<br />
1 Enter “4” and press the “Enter” key.<br />
2 Enter user name and press the “Enter” key.<br />
Display set user name (*).<br />
Note<br />
User name can be up to 8 characters.<br />
You can input the characters below:<br />
a-z, A-Z, 0-9, -, _<br />
In the default state, user name is not set.<br />
1<br />
2<br />
*<br />
1<br />
2<br />
*
Password Setting<br />
([5]Password)<br />
Carrying out security protection using<br />
password.<br />
setup>5<br />
Password :<br />
Please Enter : sharppj<br />
(change) —> sharppj<br />
1 Enter “5” and press the “Enter” key.<br />
2 Enter password and press the “Enter” key.<br />
Display set password (*).<br />
Note<br />
Password can be up to 8 characters.<br />
You can input the characters below:<br />
a-z, A-Z, 0-9, -, _<br />
In the default state, the password is not set.<br />
RS-232C Baud Rate Setting<br />
([6]RS-232C Baud Rate)<br />
Setting of baud rate for RS-232C terminals.<br />
setup>6<br />
0 ... 9600 bps<br />
1 ... 38400 bps<br />
2 ... 115200 bps<br />
Baud Rate Select[0-2] :2<br />
RS-232C Baud Rate : 115200 bps<br />
1 Enter “6” and press the “Enter” key.<br />
2 Select and enter the number 0, 1 or 2 and<br />
press the “Enter” key.<br />
Display set baud rate (*).<br />
Note<br />
Set the projector's baud rate to the same rate<br />
as that used by the computer.<br />
Setting up the Projector Using RS-232C or Telnet<br />
1<br />
2<br />
*<br />
1<br />
2<br />
*<br />
Projector Name Setting<br />
([7]Projector Name)<br />
It is possible to assign a projector name.<br />
setup>7<br />
Projector Name : XX-XXXX<br />
Please Enter : MY XX-XXXX<br />
(change) —> MY XX-XXXX<br />
1 Enter “7” and press the “Enter” key.<br />
2 Enter projector name.<br />
Display set projector name (*).<br />
Note<br />
Projector name can be up to 12 characters.<br />
You can input the characters below:<br />
A-Z, 0-9, -, _, (,), space<br />
(When “a-z” are input, they are converted to<br />
“A-Z” automatically.)<br />
It is the same as the name which can be<br />
confi rmed or set, using RS-232C commands<br />
“PJN0”, “PJN1”, “PJN2” and “PJN3”.<br />
DHCP Client Setting<br />
([8]DHCP Client)<br />
Setting DHCP Client to “Enable” or “Disable”.<br />
Example: When setting DHCP Client to<br />
“Enable”<br />
setup>8<br />
note: It sets DHCP Client.<br />
0 ... Disable<br />
1 ... Enable<br />
DHCP Select[0-1] : 1<br />
DHCP Client : Enable<br />
Success get data from DHCP server.<br />
[MAC Address ] : [XX:XX:XX:XX:XX:XX]<br />
[IP Address ] : [192.168.150.2]<br />
[Subnet Mask ] : [255.255.255.0]<br />
[Default Gateway ] : [0.0.0.0]<br />
[DHCP IP Address] : [192.168.150.1]<br />
1 Enter “8” and press the “Enter” key.<br />
2 Enter “1” and press the “Enter” key.<br />
Display the obtained values (*).<br />
1<br />
2<br />
*<br />
1<br />
2<br />
*<br />
-27
Setting up the Projector Using RS-232C or Telnet<br />
Disconnecting All Connections<br />
([D]Disconnect All)<br />
It is possible to disconnect all the TCP/IP<br />
connections currently recognized by the<br />
projector. Even if the COM Redirect port is<br />
fi xed in the Busy status due to a problem, it is<br />
possible to force the Ready status back by<br />
carrying out this disconnection.<br />
setup>d<br />
Disconnect All Connections(y/n)?y<br />
Now Disconnecting...<br />
1 Enter “d” and press the “Enter” key.<br />
2 Enter “y” and press the “Enter” key.<br />
Note<br />
If Disconnect All is performed, the connection<br />
to the projector via network will be forcibly<br />
disconnected.<br />
Entering ADVANCED<br />
<strong>SETUP</strong> MENU<br />
([A]Advanced Setup)<br />
Enters ADVANCED <strong>SETUP</strong> MENU.<br />
setup>a<br />
********************** ADVANCED <strong>SETUP</strong> MENU *************************<br />
[1]Auto Logout Time [2]Data Port<br />
[5]Network Ping Test<br />
[6]Accept IP Addr(1) [7]Accept IP Addr(2) [8]Accept IP Addr(3)<br />
[9]Accept All IP Addr [0]Search Port<br />
[!]Restore Default Setting<br />
[Q]Return to Main Menu<br />
advanced><br />
1 Enter “a” and press the “Enter” key.<br />
-28<br />
1<br />
2<br />
1<br />
Setting Auto Logout Time<br />
(ADVANCED[1]Auto Logout Time)<br />
If there is no input after a fi xed time, the<br />
projector automatically disconnects network<br />
connection using the Auto Logout function. It<br />
is possible to set the time until the projector<br />
is automatically disconnected in units of a<br />
minute (from 1 to 65535 minutes).<br />
advanced>1<br />
Valid range : 0 to 65535 (minute)<br />
note: if you enter “0”, auto logout function will be disable.<br />
Auto Logout Time : 5<br />
Please Enter :15<br />
(change) —> 15<br />
1 Enter “1” and press the “Enter” key.<br />
2 Enter numerical value and press the<br />
“Enter” key.<br />
Display set numerical value (*).<br />
Note<br />
If the set value is made 0, the Auto Logout<br />
function is disabled.<br />
If an invalid number is entered, an error<br />
message (“Parameter Error!”) will be displayed<br />
and the screen returns to the ADVANCED<br />
<strong>SETUP</strong> MENU.<br />
Data Port Setting<br />
(ADVANCED[2]Data Port)<br />
Setting of TCP port number. It is possible to<br />
set in the range of 1025 to 65535.<br />
advanced>2<br />
Valid range :1025 to 65535<br />
Data Port :10002<br />
Please Enter :10005<br />
(change) —> 10005<br />
1 Enter “2” and press the “Enter” key.<br />
2 Enter numerical value and press the<br />
“Enter” key.<br />
Display set numerical value (*).<br />
Note<br />
Set according to need. Normally, use with the<br />
factory default setting.<br />
1<br />
2<br />
*<br />
1<br />
2<br />
*
Carrying out Network Ping<br />
Test<br />
(ADVANCED[5]Network Ping Test)<br />
It is possible to confi rm that a network<br />
connection between the projector and a<br />
computer etc. is working normally.<br />
advanced>5<br />
Ping Test IP addr :192.168.150.1<br />
Please Enter :192.168.150.152<br />
(change) —> 192.168.150.152<br />
32 bytes from 192.168.150.152: icmp_seq = 1, time = 0 ms<br />
32 bytes from 192.168.150.152: icmp_seq = 2, time = 0 ms<br />
32 bytes from 192.168.150.152: icmp_seq = 3, time = 0 ms<br />
32 bytes from 192.168.150.152: icmp_seq = 4, time = 0 ms<br />
1<br />
2<br />
*1<br />
1 Enter “5” and press the “Enter” key.<br />
2 Enter IP address of device to be tested and<br />
press the “Enter” key.<br />
Display entered IP address (*1).<br />
Display test result (*2).<br />
Note<br />
If the “Enter” key is pressed without entering an<br />
IP address, the Ping Test IP address used<br />
previously is entered.<br />
If there is a fault with the connection, “Error: No<br />
answer” is displayed after a 5 second retry. In<br />
this case, please confi rm the settings for the<br />
projector and the computer, and contact your<br />
network administrator.<br />
Setting up the Projector Using RS-232C or Telnet<br />
*2<br />
Setting of Accept IP Address<br />
(ADVANCED[6]Accept IP<br />
Addr(1) - [8]Accept IP Addr(3))<br />
It is possible to improve security of the<br />
projector by allowing connection from only a<br />
prescribed IP address. It is possible to set up<br />
to three IP addresses allowing connection to<br />
the projector.<br />
advanced>6<br />
Accept IP Addr(1) : 0.0.0.0<br />
Please Enter : 192.168.150.152<br />
(change) —> 192.168.150.152<br />
1 Enter “6”, “7” or “8” and press the “Enter”<br />
key.<br />
2 Enter numerical value and press the<br />
“Enter” key.<br />
Display set numerical value (*).<br />
Note<br />
To invalidate the Accept IP Address being<br />
currently set, enter “0.0.0.0”.<br />
If there is one or more Accept IP Addr being<br />
set, no connections are allowed from IP<br />
addresses that are not yet set. They can be<br />
cancelled using [9]Accept All IP Addr.<br />
Accepting All IP Addresses<br />
(ADVANCED[9]Accept All IP Addr)<br />
Removes IP addresses set with “Accept IP<br />
Addr”.<br />
advanced>9<br />
Accept All IP Addresses(y/n)? y<br />
1 Enter “9” and press the “Enter” key.<br />
2 Enter “y” and press the “Enter” key.<br />
Note<br />
At the point in time where “y” was entered, the<br />
numerical values for Accept IP Addr(1)-(3) are<br />
reset to “0.0.0.0”.<br />
If “n” is entered, setting is not altered.<br />
1<br />
2<br />
*<br />
1<br />
2<br />
-29
Setting up the Projector Using RS-232C or Telnet<br />
Setting of Search Port<br />
(ADVANCED[0]Search Port)<br />
Sets the port number used when searching<br />
for the projector from the network.<br />
advanced>0<br />
Please Enter Port Number for Search from Computer.<br />
Valid range : 1025 to 65535<br />
Search Port : 5006<br />
Please Enter : 5004<br />
(change) —> 5004<br />
1 Enter “0” and press the “Enter” key.<br />
2 Enter numerical value and press the<br />
“Enter” key.<br />
Display set numerical value (*).<br />
Note<br />
Set according to need. Normally, use with the<br />
factory default setting.<br />
Return to Default Settings<br />
(ADVANCED[!]Restore Default<br />
Setting)<br />
Returns all menu setting values to the default<br />
state.<br />
advanced>!<br />
Restore All Setting to Default(y/n)? y<br />
— User Setting Initialized —<br />
1 Enter “!” and press the “Enter” key.<br />
2 Enter “y” and press the “Enter” key.<br />
Note<br />
If the values for IP Address, Subnet Mask or<br />
Gateway of the projector have been returned to<br />
the default settings via Telnet, the computer<br />
cannot be connected to the projector<br />
depending on the computer's network settings.<br />
-30<br />
1<br />
2<br />
*<br />
1<br />
2<br />
Return to Main Menu<br />
(ADVANCED[Q]Return to Main<br />
Menu)<br />
Returns to the main <strong>SETUP</strong> MENU.<br />
advanced>q<br />
----------------------------<strong>SETUP</strong> MENU---------------------------<br />
[1]IP Address [2]Subnet Mask [3]Default Gateway<br />
[4]User Name [5]Password<br />
[6]RS-232C Baud Rate [7]Projector Name [8]DHCP Client<br />
[A]Advanced Setup [D]Disconnect All<br />
[V]View All Setting [S]Save & Quit [Q]Quit Unchanged<br />
setup><br />
1 Enter “q” and press the “Enter” key.<br />
Returns to the <strong>SETUP</strong> MENU.<br />
1
Resetting the Lamp Timer of the Projector via LAN<br />
When the projector is connected to a network, you can use the communications program<br />
to send a command to reset the lamp timer. The example below uses Windows ® XP as the<br />
operating system. When you use Windows Vista ® , use other communications program<br />
referring to the following steps, because Windows Vista ® does not come with<br />
HyperTerminal.<br />
1<br />
2<br />
3<br />
4<br />
Click “Start” – “All Programs” –<br />
“Accessories” – “Communications”<br />
– “HyperTerminal”.<br />
If you do not have HyperTerminal installed,<br />
see the operation manual of your computer.<br />
Depending on the settings of your computer,<br />
you may be required to enter your area code<br />
and other details. Enter the information as<br />
required.<br />
Enter a name in the “Name” fi eld,<br />
and click “OK”.<br />
If you are required to enter the<br />
area code, enter it in the “Area<br />
code” fi eld. From the “Connect<br />
using” drop-down menu, select<br />
“TCP/IP (Winsock)”, and click<br />
“OK”.<br />
Enter the IP address of the<br />
projector in the “Host address”<br />
fi eld (see “TCP/IP” on the<br />
“Network” menu of the projector),<br />
and enter the data port of the<br />
projector in the “Port number”<br />
fi eld (“10002” is the factory default<br />
setting), and click “OK”.<br />
Select<br />
“TCP/IP (Winsock)”<br />
-31
Resetting the Lamp Timer of the Projector via LAN<br />
5<br />
6<br />
7<br />
8<br />
9<br />
10<br />
-32<br />
Click “Properties” on the “File”<br />
menu.<br />
Click the “Settings” tab, and then<br />
click “ASCII Setup”.<br />
Select the check boxes next to<br />
“Send line ends with line feeds”,<br />
“Echo typed characters locally”,<br />
and “Append line feeds to<br />
incoming line ends”, and click<br />
“OK”.<br />
The LAMPRESET Properties window<br />
appears, click “OK”.<br />
If a user name and/or password is<br />
set for the projector, enter the<br />
user name and password.<br />
Send the lamp reset command<br />
“LPRE0001”.<br />
This command can only be sent when the<br />
projector is in standby mode.<br />
When “OK” is received, this indicates that the<br />
lamp was successfully reset.<br />
Close HyperTerminal.
Troubleshooting<br />
Communication cannot be established with the projector<br />
When connecting the projector using serial-connection<br />
\ Check that the RS-232C terminal of the projector and a computer or the commercially<br />
available controller are connected correctly.<br />
\ Check that the RS-232C cable is a cross-over cable.<br />
\ Check that the RS-232C port setting for the projector corresponds to the setting for the<br />
computer or the commercially available controller.<br />
When connecting the projector to a computer using network (LAN)connection<br />
\ Check that the cable's connector is fi rmly inserted in the LAN terminal of the projector.<br />
\ Check that the cable is fi rmly inserted into a LAN port for a computer or a network device<br />
such as a hub.<br />
\ Check that the LAN cable is a Category 5 cable.<br />
\ Check that the LAN cable is a cross-over cable when connecting the projector to a computer<br />
directly.<br />
\ Check that the LAN cable is a straight-through cable when connecting the projector with a<br />
network device such as a hub.<br />
\ Check that the power supply is turned on for the network device such as a hub between the<br />
projector and a computer.<br />
Check the network settings for the computer and the projector<br />
\ Check the following network settings for the projector.<br />
IP Address<br />
Check that the IP address for the projector is not duplicated on the network.<br />
Subnet Mask<br />
When the gateway setting for the projector is “0.0.0.0” (Not Used), or the gateway setting<br />
for the projector and the default gateway setting for the computer are the same:<br />
The subnet masks for the projector and the computer should be the same.<br />
The IP address parts shown by the subnet mask for the projector and the computer<br />
should be the same.<br />
(Example)<br />
When the IP address is “192.168.150.2” and the subnet mask is “255.255.255.0” for the<br />
projector, the IP address for the computer should be “192.168.150.X” (X=3-254) and the<br />
subnet mask should be “255.255.255.0”.<br />
Gateway<br />
When the gateway setting for the projector is “0.0.0.0” (Not Used), or the gateway setting<br />
for the projector and the default gateway setting for the computer are the same:<br />
The subnets for the projector and the computer should be the same.<br />
The IP address parts shown by the subnet mask for the projector and the computer<br />
should be the same.<br />
(Example)<br />
When the IP address is “192.168.150.2” and the subnet mask is “255.255.255.0” for the<br />
projector, the IP address for the computer should be “192.168.150.X” (X=3-254) and the<br />
subnet mask should be “255.255.255.0”.<br />
Note<br />
When “DHCP Client” is set to “OFF” on the projector:<br />
IP address: 192.168.150.2<br />
Subnet mask: 255.255.255.0<br />
Gateway address: 0.0.0.0 (Not Used)<br />
For network settings for the projector, refer to page 14.<br />
-33
Troubleshooting<br />
-34<br />
\ Take the following steps for checking the network settings for the computer.<br />
1. Open a command prompt.<br />
In the case of Windows ® 2000: click “start” ➔ “Programs” ➔ “Accessories”<br />
➔ “Command Prompt” in order.<br />
In the case of Windows ® XP, Windows Vista ® : click “start” ➔ “All Programs”<br />
➔ “Accessories” ➔ “Command Prompt” in order.<br />
2. After launching the command prompt, enter the command “ipconfi g”, and press the “Enter”<br />
key.<br />
Note<br />
Communication may not be established even after carrying out the network settings<br />
for the computer. In such cases, restart your computer.<br />
C:\>ipconfi g<br />
Note<br />
Usage examples of ipconfi g<br />
C:\>ipconfi g /? displays how to use “ipconfi g.exe”.<br />
C:\>ipconfi g displays the set IP address, subnet mask and default gateway.<br />
C:\>ipconfi g /all displays all the setting information related to TCP/IP.<br />
3. To return to the Windows ® screen, enter “exit” and press the “Enter” key.
\ Check if the “TCP/IP” protocol is operating correctly using the “PING” command. Also, check<br />
if an IP address is set.<br />
1. Open a command prompt.<br />
In the case of Windows ® 2000: click “start” ➔ “Programs” ➔ “Accessories” ➔<br />
“Command Prompt” in order.<br />
In the case of Windows ® XP, Windows Vista ® : click “start” ➔ “All Programs” ➔<br />
“Accessories” ➔ “Command Prompt” in order.<br />
2. After launching the command prompt enter a command “PING”.<br />
Entry example C:\>ping XXX.XXX.XXX.XXX<br />
“XXX.XXX.XXX.XXX” should be entered with an IP address to be connected to, such as the<br />
projector.<br />
3. When connecting normally, the display will be as follows.<br />
(The screen may be slightly different depending on the OS type.)<br />
when the IP address connected to is “192.168.150.1”<br />
4. When a command cannot be sent, “Request time out” will be displayed.<br />
Check the network setting again.<br />
If communication can still not be established properly, contact your network administrator.<br />
5. To return to the Windows ® screen, enter “exit” and then press the “Enter” key.<br />
\ When the projector cannot be connected, even though the “PING” command is checked:<br />
1. When “Accept IP Address” is set on the projector, set the IP address of the PC to be<br />
connected.<br />
2. When a security software is installed on the PC, or when a fi re wall has been set up for the<br />
network system, connection may not be possible. Consult the system administrator when,<br />
for example, you want to change the settings to enable use of the TCP port set as the data<br />
port.<br />
3. When neither of the above two items applies, change the settings for the data port.<br />
A connection cannot be made because you have forgotten your user name<br />
or your password.<br />
\ Initialize the settings. (See page 51 of the projector's operation manual.)<br />
\ After the initialization, carry out setting again.<br />
Troubleshooting<br />
-35


![R-291Z(ST) [Cover].indd - Sharp Australia Support](https://img.yumpu.com/19344699/1/184x260/r-291zst-coverindd-sharp-australia-support.jpg?quality=85)