PRODUCING - Alabama Cooperative Extension System
PRODUCING - Alabama Cooperative Extension System
PRODUCING - Alabama Cooperative Extension System

Create successful ePaper yourself
Turn your PDF publications into a flip-book with our unique Google optimized e-Paper software.
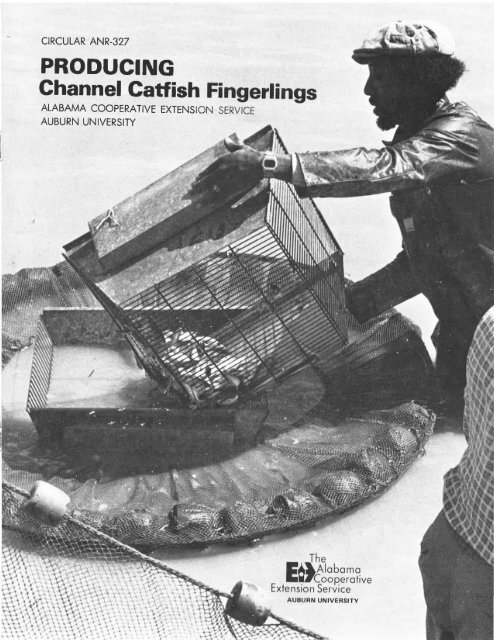
CIRCULAR ANR-327<br />
<strong>PRODUCING</strong><br />
Channel Catfish Fingerlings<br />
ALABAMA COOPERATIVE EXTENSION SERVICE<br />
AUBURN UNIVERSITY<br />
The<br />
E .6.1Aiobamo<br />
i7Cooperotive<br />
<strong>Extension</strong> Service<br />
AUBURN UNIVERSITY
CIRCULAR ANR-327<br />
<strong>PRODUCING</strong><br />
Channel Catfish Fingerlings<br />
CATFISH HATCHERIES range from relatively<br />
simple, open-pond spawning systems to complex<br />
systems where eggs are incubated in troughs, depending<br />
on the size and purpose of the operation.<br />
Private hatcheries supply channel catfish fingerlings<br />
for commercial food fish production, recreational<br />
fee-fishing and home-use. Some hatcheries<br />
sell fingerlings to other producers, while<br />
others limit their operations to supplying their<br />
own needs. A careful study of the market should<br />
be conducted before investing in catfish fingerling<br />
production to avoid losses caused by insufficient<br />
demand.<br />
Whatever the size or purpose of the operation,<br />
there must be a sufficient supply of good quality<br />
water and the soil and terrain must be suitable<br />
for pond construction.<br />
Success in fingerling production ca,lls for<br />
healthy, disease-free catfish brood stock, suitable<br />
ponds for holding brood stock and, in most cases,<br />
nursery ponds for rearing fingerlings. Commercial<br />
fingerling producers usually have separate<br />
hatchery troughs and tanks where eggs are incubated<br />
and the newly hatched fish, called fry, are<br />
trained to feed before they are stocked into nursery<br />
ponds. Tanks equipped with a dependable<br />
water supply and aeration are needed to hold and<br />
grade fingerlings before shipment. Seines of suitable<br />
mesh size, length and depth and a fish transporter<br />
are needed to harvest and transport fry<br />
and fingerlings.<br />
- Water of sufficient quantity and quality is critical<br />
for all hatchery systems. The water supply<br />
must be free of contamination such as pesticides.<br />
JoHN JENSEN, Fisheries Specialist, <strong>Alabama</strong> <strong>Cooperative</strong><br />
<strong>Extension</strong> Service<br />
REx DuNHAM, Assistant Professor, Department of Fisheries<br />
and Allied Aquacultures, School of Agriculture,<br />
Forestry and the Biological Sciences and the <strong>Alabama</strong><br />
Agricultural Experiment Station I<br />
JoHN FLYNN, formerly Graduate Aide-Fisheries, <strong>Alabama</strong><br />
<strong>Cooperative</strong> <strong>Extension</strong> Service<br />
AUBURN UNIVERSITY<br />
-3-<br />
Total alkalinity and total hardness should exceed<br />
20 parts per million, and the pH should range between<br />
6.5 and 8.0. Acid and soft pond water can<br />
usually be corrected with agricultural limestone<br />
to meet these requirements. The conditioning of<br />
well water can be more difficult. Your county <strong>Extension</strong><br />
agent can assist in getting your water<br />
tested.<br />
Catfish fingerling production requires more<br />
technical skill and management than producing<br />
food-size fish from fingerlings. The fingerling<br />
producer manages the reproductive behavior of<br />
the catfish brood stock to meet his needs. The objective<br />
is to produce a given number of fingerlings<br />
of a certain size by a specified time. This requires<br />
careful planning, a good understanding of the catfish<br />
reproductive process and selection of an appropriate<br />
production system. Most successful operations<br />
start small and expand as the operator<br />
gains experience.<br />
Brood Stock Selection<br />
Cattle and hog producers recognize that the<br />
quantity and quality of young animals produced<br />
is directly related to the selection and care of<br />
brood animals. Likewise, successful fingerling<br />
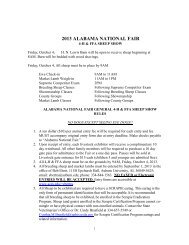
Figure 1. Healthy brood fish in the 3 to 10 pound size range are<br />
needed to produce abundant, healthy fingerlings.
producers select the best brood fish and care for<br />
them properly.<br />
Channel catfish generally reach prime breeding<br />
condition in three to four years. Fish less than<br />
four years old are unreliable spawners. Only 20<br />
percent of two-year-old fish can be expected to<br />
spawn. A 40 percent spawning rate for threeyear-old<br />
fish is considered good. Catfish are prime<br />
spawners at four years. With good care, high<br />
spawning rates of about 50 percent are common.<br />
Fish older than six years become too large to handle<br />
easily.<br />
SOURCES AND SELECTION FACTORS<br />
You may want to buy mature fish nearly ready<br />
to spawn rather than waiting for fingerlings to<br />
reach spawning age. The desirable size for brood<br />
fish is 3 to 10 pounds if the fish have had proper<br />
care ( Figure 1 ) .<br />
Probably the best source of brood fish is a<br />
reputable hatchery. However, be careful not to<br />
buy culls. Fish-fanning trade magazines often<br />
carry advertisements for brood stock. Some growers<br />
may have oversized food fish that make good<br />
brood stock. Catfish processors sometimes harvest<br />
large fish and sell them for brood stock.<br />
A void fish recently taken from the wild. They<br />
are often unreliable spawners, and their fingerlings<br />
may grow more slowly and be more susceptible<br />
to disease than fingerlings from established<br />
hatchery stocks.<br />
A void a source having a history of channel<br />
catfish virus disease. This disease can be spread<br />
from the brood stock to all the catfish on your<br />
farm. Check the brooders thoroughly before buying.<br />
The fish should be full-bodied and free of<br />
sores or hemorrhages on the skin. Thin fish may<br />
be old, diseased or underfed.<br />
Be certain that you get enough males and females.<br />
A ratio of about three females for every<br />
two males is a good mix, because one male can<br />
mate with two or more females during a single<br />
spawning season. Although catfish generally produce<br />
offspring in a 50:50 sex ratio, do not take this<br />
ratio for granted in the brooders you purchase.<br />
Determine the sex of each fish you buy.<br />
DETERMINING SEX<br />
Both primary and secondary sex characteristics<br />
are useful in telling males from females. Secondary<br />
characteristics are those not directly related<br />
to reproduction, such as body shape and coloration.<br />
Males are usually larger and have broader<br />
heads than females. As the spawning season<br />
approaches, males become lean, develop large<br />
-4-<br />
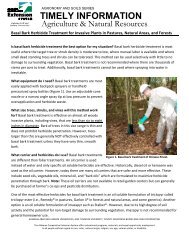
Figure 2. Just prior to sp•wnlng, females (left) develop soft, swollen<br />
bellies and have heads narrower than their bodies. Males<br />
(right) have large muscular heads wider than their bodies<br />
and are often darker in color.<br />
Figure 3. To determine sex of brood catfish look at the belly of the<br />
fish. You will see two openings. The opening nearest the<br />
head is the anus. The opening nearest the tail is the genital<br />
opening. On the male (left) the genital opening looks like<br />
a tiny raised nipple. On the female (right) the genital<br />
opening is not raised but is oval. Just before spawning,<br />
the genital opening of the female is often swollen and<br />
reddish.<br />
muscular heads, and sometimes become darker.<br />
Females' heads are narrower than their bodies<br />
when viewed from above. They also develop soft,<br />
swollen bellies (Figure 2).<br />
Always confirm sex by examining the genitals,<br />
the primary sex characteristic. This is particularly<br />
important with young fish and during the<br />
non-spawning season when secondary sex characteristics<br />
are less pronounced. Experienced operators<br />
can sex fish as small as one pound by examining<br />
the genitals.<br />
Turn the fish belly up to examine the genitals.<br />
Two or three openings are present (Figure 3).
The opening nearest the head is the anus, while<br />
the one nearest the tail is the genital opening. The<br />
genital opening of the male is at the end of a<br />
fleshy, nipple-like structure called the genital papilla.<br />
The papilla usually becomes swollen and<br />
rigid as spawning season approaches. The genital<br />
area of the female catfish is oval and flat and has<br />
two openings separated by a small flap of skin. A<br />
slit or groove is located at the head end of the<br />
genital area. A small urinary opening is located<br />
at the tail end. The female genital area often becomes<br />
red, swollen and covered with mucus as<br />
spawning time approaches. Sometimes a pulsating<br />
of the genital area can be seen.<br />
A probe can be used to distinguish the sexes,<br />
particularly in young fish or those not in spawning<br />
condition. A sharp pencil or straw works well.<br />
Hold the fish belly up with one hand grasping the<br />
head and the other hand clasping the fish firmly<br />
at the tail region. This helps immobilize the fish.<br />
With the fish's head just below your chest and<br />
the tail held away from your body, arch the fish's<br />
belly upward. This action causes the male papilla<br />
or female genital slit to become more visible.<br />
Then have an assistant gently slide the probe<br />
over the genital area toward the tail, with the<br />
point leading the probe. If the point of the probe<br />
catches in the genital opening, the fish is a female<br />
(Figure 4).<br />
Brood Stock Management<br />
NUTRITION<br />
Good nutrition is essential to successful spawning.<br />
In warm weather feed a nutritionally complete<br />
diet containing at least 36 percent protein<br />
at about 2 percent of the fishes' body weight daily<br />
(Table 1). Feeding is unnecessary when water<br />
temperature is below 55°F. When water tempera-<br />
Figure 4. Use a probe to distinguish sexes when brood fish ••• not<br />
in spawning condition.<br />
-5-<br />
Ingredient<br />
Soybean meal ( 44% protein)<br />
Ground corn<br />
\i\Theat shorts<br />
Distillers dried solubles<br />
Fish meal<br />
Animal fat<br />
Pellet binder<br />
Dicalcium phosphate<br />
Vitamin premix<br />
Coated vitamin C<br />
Trace mineral mix<br />
Table 1. BRooD FisH DIET.<br />
Analysis:<br />
Total crude protein<br />
Digestible energy<br />
Energy to protein ratio ( kcal/ g),<br />
Percent of total<br />
50.5<br />
14.93<br />
6.0<br />
7.5<br />
15.0<br />
3.0<br />
2.5<br />
0.5<br />
0.75<br />
0.057<br />
0.075<br />
35.6%<br />
2640 kcal/kg<br />
7.3:1.0<br />
ture is between 55°F and 70°F, feed approximately<br />
one percent of the fishes' body weight three<br />
days per week. Estimate the amount to feed by<br />
observing feeding vigor. Offer all the fish will eat<br />
in about 10 minutes during warm weather. Feeding<br />
activity slows greatly with the onset of the<br />
spawning season.<br />
STOCKING DENSITIES<br />
Total weight of brood fish should not exceed<br />
1200 pounds per acre at any time of the year.<br />
Therefore, stock brood ponds at about 600 to 800<br />
pounds of fish per acre. This will allow for weight<br />
gain. For good spawning success they should gain<br />
about 50% of their weight from one spawning season<br />
to the next. Each year unwanted brood fish<br />
should be culled and substituted. By replacing<br />
old fish with young fish the total initial stocking<br />
rate can be maintained.<br />
The most convenient size for a brood pond is<br />
from one to five acres. The extreme temperature<br />
changes in very small ponds can reduce spawning<br />
activity and harm spawned eggs. Ponds over five<br />
acres, on the other hand, are more difficult to<br />
manage.<br />
Be sure to keep brood fish in more than one<br />
pond. This minimizes the risk of losing your entire<br />
stock to a catastrophe such as low oxygen or<br />
disease.<br />
Spawning Management<br />
Spawning ponds should be stocked with not<br />
more than 1200 pounds of brood fish per acre.<br />
Spawning activity usually begins when the water<br />
temperature reaches about 75°F in the spring.<br />
Males nest in hollow logs or similar protected<br />
places in nature. Females are attracted to the<br />
nests and mating begins. Females deposit a layer<br />
of eggs which are fertilized by the male. This
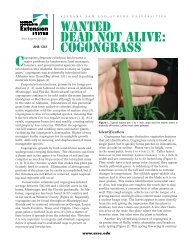
Figure 5. Eggs are laid in a jelly-like mass of up to 4,000 eggs per<br />
pound of female body weight.<br />
process is repeated over several hours until a<br />
jelly-like egg mass of up to two to three pounds,<br />
depending on fish size, is deposited (Figure 5).<br />
Female catfish usually produce from 2,000 to<br />
3,000 eggs per pound of body weight when they<br />
reach five pounds. Smaller females produce up to<br />
4,000 eggs per pound of body weight. The male<br />
guards the eggs, fanning them with his pelvic fins<br />
and tail to force oxygen-rich water into the mass.<br />
USE OF SPAWNING CONTAINERS<br />
Spawning containers should be provided.<br />
Some materials used are milk cans, nail kegs,<br />
earthen crocks, ammunition cans and wooden<br />
boxes. The spawning container must be large<br />
enough to accommodate the brooding pair. The<br />
opening should be just large enough for them to<br />
enter (Figure 6).<br />
Place the containers in one to two and a half<br />
feet of water, one to ten yards apart with the open<br />
end toward the pond center (Figure 7). Mark<br />
each one with a float so that it can be found. Provide<br />
containers for 50 to 90 percent of the brooding<br />
pairs.<br />
Wait until the water temperature reaches 75°F<br />
before putting out the spawning containers. This<br />
discourages early spawning. Gradually move the<br />
containers to deeper, cooler water as the water<br />
warms. However, do not use this technique if the<br />
water becomes stratified by temperature and<br />
oxygen.<br />
Spawning activity sometimes diminishes for<br />
no apparent reason. Lowering the water level<br />
about a foot and rapidly refilling the pond may<br />
encourage additional spawning. Moving the<br />
spawning containers may also stimulate spawning.<br />
-6-<br />
Figure 6. Spawning containers:<br />
a) galvanized ammo can with hinged lid.<br />
b) plastic buckets joined together.<br />
c) wooden box to be staked to pond bottom.
Figure 7. Sp•wning boxes in position.<br />
Considering that not all females spawn and<br />
not all of the eggs, fry and fingerlings survive, estimate<br />
that about 800 to 1,000 fingerlings will be<br />
produced per pound of healthy female brooder.<br />
SPAWNING METHODS<br />
Three methods for spawning channel catfish<br />
allow the fish to spawn naturally in the pond. ·Pen<br />
spawning is used for mating selected pairs.<br />
SPAWNING/REARING PoND METHOD. This approach<br />
requires the least skill, labor and facilities.<br />
However, it is unreliable and not recommended<br />
for commercial operations. Place the spawning<br />
containers in the pond and allow the fish to spawn<br />
naturally. The male hatches the eggs in the container<br />
and the fry remain in the pond.<br />
Drain the pond to harvest fingerlings using a<br />
seine, or trap them as needed, using a technique<br />
described later. The operator using this method<br />
does not know the quantity of fingerlings present<br />
until harvest. Survival of fry is usually poor with<br />
this technique because it is difficult to control disease,<br />
aquatic insects and wild fish that eat fry.<br />
FRY TRANSFER METHOD, OPEN PoND SPAWNING.<br />
The fry transfer method is more productive than<br />
the spawning/rearing pond method but requires<br />
more skill and labor. The newly-hatched fry are<br />
transferred from the spawning container to previously<br />
prepared nursery ponds. Check spawning<br />
containers every three days. When an egg mass is<br />
found, gently pinch off a clump of 6 to 10 eggs<br />
from the edge. Determine the age of the eggs<br />
to predict the hatching date (Table 2).<br />
Allow the male to incubate the eggs. Remove<br />
the fry one day after the predicted hatching date.<br />
The male catfish is capable of inflicting painful<br />
bites to hands and bare feet, so chase him from<br />
-7-<br />
Table 2. EsTIMATING" THE AcE oF CATFISH EGGS.<br />
Egg description<br />
No pulsation<br />
Pulsating motion<br />
Bloody streak<br />
Blood throughout egg<br />
Eyes visible<br />
Eyes visible, embryo turns inside shell<br />
Complete fish visible, no bloody streak<br />
Hatching begins<br />
Estimated age<br />
(water at 78°F)<br />
Less than 24 hours<br />
1 to 2 days<br />
2 to 3 days<br />
3 to 4 days<br />
4 to 5 days<br />
5 to 6 days<br />
6 to 7 days<br />
7 to 8 days<br />
Note: For every 2°F above or below 78°F, subtract or<br />
add one day, respectively, to hatching time.<br />
Source: Howard P. Clemens and Kermit E. Sneed, 1957.<br />
Spawning behavior of the channel catfish Ictalurus<br />
punctatus. Special Scientific Report-Fisheries<br />
No. 219. U.S. Department of Interior, Fish and<br />
Wildlife Service.<br />
the spawning container using a stick or gloved<br />
hand or lift the container gently off the pond bottom<br />
until he exits.<br />
Transfer the fry to a bucket containing pond<br />
water by gently pouring them from the spawning<br />
container. Release the fry into the nursery pond<br />
by slowly submerging the bucket, allowing them<br />
to escape into the pond near a shelter. The spawning<br />
container can be moved to the nursery pond<br />
and left for shelter.<br />
If the water temperature is not the same in<br />
both ponds, the fry must be slowly acclimated to<br />
the nursery pond temperature before stocking.<br />
When temperature differences are more than two<br />
to three degrees, slowly replace water in the<br />
bucket with nursery pond water until the water<br />
temperature is equalized.<br />
EGG TRANSFER METHOD, OPEN POND SPAWNING.<br />
Egg transfer is the most productive of the three<br />
methods but also requires the most skill, labor and<br />
facilities. The fish are allowed to spawn in the<br />
containers as with the other methods, but the eggs<br />
are removed and incubated in a hatchery.<br />
Check the spawning containers every two to<br />
four days. Late morning is the best time, because<br />
most spawning probably occurs at night or early<br />
morning. Checking at this time thus does not interrupt<br />
spawning activity and allows for timely<br />
removal of eggs. Remove eggs immediately after<br />
finding them. Disturbed brood fish may sometimes<br />
eat eggs or dislodge them.<br />
The egg mass sticks to the container floor.<br />
Gently scrape it from the container with a plastic<br />
credit card, kitchen spatula or similar device (Figure<br />
8). Float the egg mass into a bucket and car-
Figure I. Treat egg ma•M• gently.<br />
Figura 9. Spawning pans for mating selected pairs.<br />
ry it immersed in water to the hatchery. Eggs can<br />
be left in buckets in a shaded area for up to 15<br />
minutes, but no longer unless aeration is used.<br />
Eggs must be shielded from sunlight. Egg masses<br />
near hatching must be taken to the hatchery immediately<br />
because they require more oxygen than<br />
young or "green" egg masses.<br />
PEN SPAWNING. Pen spawning, a modification<br />
of the previously described methods, is used mainly<br />
for mating selected pairs. Construct pens next<br />
to the pond bank, using plastic-coated wire or<br />
other non-rusting materials. Mesh should be<br />
large enough to allow water to circulate, but not<br />
so large as to allow brood fish to escape. Mesh<br />
size from one-half to two inches is satisfactory. A<br />
pen 4 X 6 feet is adequate. Adjacent pens can<br />
have common sides, to minimize construction<br />
costs ( Figure 9) .<br />
Place a spawning container and a ready<br />
spawning pair in each pen. The fish should be<br />
about equal in size. Check pens from the bank<br />
daily for welfare of the brooders. Remove females<br />
that are being harassed or injured by the male<br />
fish. Remove the female immediately after spawning<br />
to keep her from being injured or killed by the<br />
-8-<br />
aggressive male. Do not place more than one female<br />
in the pen at a time, as this can lead to fighting<br />
and injury to the females. Eggs can be left<br />
with the male or taken to the hatchery to incubate.<br />
If spawning does not occur in 10 to 14 days,<br />
check the sexes of the pair and exchange brood<br />
fish if needed.<br />
The Hatchery<br />
In maximum-production systems, eggs are<br />
transferred to a special hatchery, and incubated<br />
and the fry started on food before they are<br />
moved into nursery ponds. The hatchery need<br />
not be elaborate. Some of the equipment can be<br />
built by the operator. The critical ingredient is<br />
a water supply of the right quality and quantity.<br />
WATER QUALITY<br />
Water temperature must be between 75°F and<br />
85°F for proper hatching. Because eggs and fry<br />
have high oxygen requirements, maintain oxygen<br />
levels at a minimum of six parts per million. Water<br />
pH must be between 6.5 and 8.0 for best results.<br />
Risk of disease is less if there are no fish in the<br />
water supply. Keep water as clean and free of organic<br />
matter such as algae and decaying leaves as<br />
possible. A water flow of about five gallons per<br />
minute is needed for one hatching trough.<br />
Well water is probably best for use in the<br />
hatchery. It is usually clean and free of disease<br />
organisms. vVell water, however, is generally too<br />
cold for optimum hatching. It can be warmed in<br />
a conventional water heater or stored and warmed<br />
in a small pond built specifically for this purpose.<br />
Well water contains very little oxygen. Splash<br />
it over a cascade or through screens to add oxygen.<br />
Storing well water in a pond before use also<br />
increases oxygen content. Well water with a high<br />
iron content should be aerated in a settling tank or<br />
reservoir pond before distribution to the hatchery.<br />
Some hatcheries receive water directly from<br />
production ponds. Pond water is usually the<br />
proper temperature for incubation, but may present<br />
other problems. Disease organisms can be<br />
introduced to the hatchery from the pond, especially<br />
if fish are present. Algae, suspended mud<br />
particles, and other materials in pond water can<br />
accumulate on eggs and smother them. The oxygen<br />
content of ponds often fluctuates, and low<br />
oxygen levels, two to three parts per million (ppm),<br />
are especially dangerous to fish eggs and fry.<br />
INCUBATION TROUGH CONSTRUCTION<br />
Eggs are commonly incubated in wooden, fiberglass<br />
or metal troughs about 8 feet long, 18 to
24 inches wide and 10 to 12 inches deep. A series<br />
of paddles attached to a shaft are suspended in<br />
the trough (Figure 10). Paddles are spaced to<br />
.allow wire-mesh baskets holding the egg masses to<br />
fit between them. The paddles should reach about<br />
halfway to the bottom of the trough and should<br />
extend below the bottoms of the baskets. Baskets<br />
are made from one-fourth inch hardware cloth<br />
Figure 10. Space paddles so that bukets holding eggs will fit be·<br />
tween them.<br />
Figure 11. Construct baskets of one-fourth inch h.,dwere cloth.<br />
(Figure 11). An electric motor with a gear reduction<br />
attachment turns the paddles at 30 rpm. This<br />
motion gently rocks the egg masses and causes<br />
oxygen-rich water to flow through them. An 8-foot<br />
trough can hold six to eight egg baskets (Figure<br />
12).<br />
Water enters one end of the trough at five gallons<br />
per minute. A standpipe fitted into a drain<br />
at the other end controls water depth. Place window<br />
screen over the standpipe to prevent fry from<br />
escaping.<br />
-9-<br />
Figure 12. An 8·foot paddlewheel trough can hold 6 to 8 baskets<br />
containing 12 to 16 egg masses, depending on water flow<br />
and egg mass size.<br />
DISEASE CONTROL<br />
Bacterial diseases and fungus infections are<br />
constant threats to eggs. The best disease control<br />
is prevention. A clean water supply and frequent<br />
scrubbing and disinfection of troughs and equipment<br />
are essential. Remove debris and egg shells<br />
regularly with a siphon.<br />
Various chemical treatments are routinely<br />
used to prevent or treat bacterial infection (Table<br />
3). Treat the eggs when they are removed from<br />
the spawning container and once or twice daily<br />
until they hatch. Distribute the proper amount<br />
of chemical evenly along the length of the hatching<br />
trough. Check the eggs for egg rot and fungus<br />
and gently shake and turn them over two to three<br />
times daily.<br />
Bacterial egg rot appears as a milky-white<br />
dead patch, usually on the underside and center<br />
of the mass. Remove the infected areas immediately<br />
and continue treating. Change the treatment<br />
every four days to prevent a resistant bacterial<br />
strain from developing.<br />
Fungus grows on infertile or dead eggs. It appears<br />
as a white or brown cotton-like growth<br />
made of many small filaments and can invade and<br />
kill healthy eggs. Fungus can be controlled by<br />
treating with 100 parts per million formalin for<br />
15 minutes. Turn the water off during treatment<br />
but leave the paddles turning. Flush completely<br />
with clean water when treatment time has<br />
elapsed. Do not use the formalin treatment when<br />
eggs are within one day of hatching.<br />
HANDLING SAC FRY<br />
Temperature controls incubation time (Table<br />
2). Sac fry emerge as the eggs hatch, swim<br />
through the screen baskets and school together in<br />
a tight cluster on the bottom of the trough.
Figure 14. Holding boxes should be aerated by spraying water from<br />
above.<br />
Figure 15. A strainer placed in a bucket can be used to collect fry by<br />
siphoning.<br />
ated cylinder containing a pre-measured quantity<br />
of water, taking care not to add any extra water<br />
with the fry (Figure 17). Record the change in<br />
water level when the fry are added. The total<br />
number of fry can be estimated by placing all of<br />
them in a graduated measuring container, recording<br />
the water level change, and then comparing<br />
the two numbers. Use this equation:<br />
Total number of fry =<br />
300 X change in water level with ALL fry<br />
change in water level with 300 fry<br />
For example, a sample you take of 300 fry<br />
raises the water level in a 100-milliliter ( ml) graduated<br />
cylinder from 50 to 62 ml. You will estimate<br />
the total number of fry using a larger, wide-<br />
Figure 16. Boxes made entirely of screen can be used to hold fry Figure 17. Count a representative sample of fry into a gradu•ted<br />
when overhead spray is not used.<br />
-11-<br />
cylinder and measure the change in volume.
Figure 18. Estimate the total number of fry by the change in water<br />
volume in a graduated wide-mouthed container.<br />
mouthed container also graduated in milliliters<br />
(Figure 18). When you add all the fry, the water<br />
level changes from 500 ml to 900 ml. Then:<br />
300 X (900- 500)<br />
Total number of fry=---..:,__----'-<br />
62 -50<br />
300 X 400<br />
or----<br />
12<br />
10,000 total number of fry<br />
FEEDING FRY<br />
Begin feeding the fry when they first swim up<br />
to the surface with their mouths opening and<br />
heads moving back and forth, obviously searching<br />
for food. "Swim-up" usually occurs about<br />
three to four days after hatching. A high protein<br />
diet ( 45 to 50 percent crude protein) with all essential<br />
nutrients should be used. Recent findings<br />
suggest that the protein should consist of about<br />
60 percent fish meal. The food must be finely<br />
ground so the fry can easily consume it. Commercial<br />
fry food is usually available. Other suitable<br />
feeds such as ground trout feed or salmon starter<br />
can be used.<br />
Several feeding techniques are practiced. The<br />
dry food can be lightly sprinkled on the surface<br />
(Figure 19). The fry will eat the portion that<br />
floats. The food can also be moistened, formed<br />
into a doughball and placed in the fry box or<br />
tank. Another technique is to make a slurry and<br />
pour it onto a plastic plate anchored to the bottom<br />
of the fry box or tank. Feeding activity of<br />
fry will keep the feed in suspension where it is<br />
easily consumed.<br />
Whatever the techniques, the fry should be<br />
fed at least six times daily. More frequent feeding<br />
is better. Be careful not to overfeed, how-<br />
-12-<br />
ever, because wasted food will accumulate, causing<br />
poor water quality and fungus growth. Waste<br />
should be siphoned out and tanks and boxes<br />
scrubbed daily. Equipment should be scrubbed<br />
and sterilized with a 1:4,000 formalin in water solution<br />
after each crop of fry.<br />
Water quality in the holding facility determines<br />
the length of time the fry can be held in<br />
the hatchery. Fry may be held for up to 10 days<br />
if good water quality is maintained. Water quality,<br />
in turn, is dependent on such factors as water<br />
flow rate, number of fry held and cleanliness<br />
maintained.<br />
Figure 19. Feed • finely ground feed to fry held in boxes. Siphon<br />
wastes from boxes and tanks daily.<br />
Fry should be eating food before they are<br />
transferred into nursery ponds. They survive<br />
much better in ponds when stocked as large,<br />
strong fry.<br />
Growing Fingerlings<br />
The pond should be prepared to receive the<br />
fry being grown in the hatchery. Pond preparation<br />
is critical for good fry survival. Certain<br />
aquatic insects and fish eat fry and must be controlled.<br />
The "puddle" method of preparing nursery<br />
ponds helps control insects and promotes the<br />
growth of fish food organisms that fry will eat.<br />
Drain and dry ponds thoroughly before stocking<br />
the fry. Fertilize with about 100 pounds per acre<br />
of old fish food, meat and bone meal or similar organic<br />
material just before filling with water. Organic<br />
fertilizer promotes growth of zooplankton,<br />
tiny aquatic animals that are excellent fry food.<br />
Stock the pond on the third or fourth day after the<br />
pond begins to fill. With this method, the fry outgrow<br />
insects and usually no special insect control
Figure 20. Insects that eat catfish fry (left to right): backswimmer,<br />
dragonfly nymph, predaceous diving beetle. Kill back·<br />
swimmers and diving beetles with an oil treatment. Drag·<br />
onfly nymphs breathe with gills and are controlled by<br />
keeping the pond dry until shortly before stocking fry.<br />
is required. However, an independent water supply<br />
such as a well or spring is needed to fill the<br />
pond.<br />
CONTROLLING INSECTS<br />
Treatment to control insects is necessary when<br />
the pond must be filled more than one week before<br />
stocking ( Figure 20) . A common practice is<br />
to spread a mixture of five to eight gallons of<br />
diesel fuel or kerosene mixed with one quart of<br />
motor oil per acre over the pond surface two days<br />
before stocking. The oil film prevents air-breathing<br />
insects from penetrating the surface to<br />
breathe. The effectiveness of this treatment depends<br />
on complete coverage of the pond surface<br />
with oil. Apply oil when there is no wind or just<br />
a light breeze. Continue this treatment for the<br />
first two weeks at four-day intervals. A disadvantage<br />
of this method is that it does not kill gillbreathing<br />
insects. It also depresses oxygen levels<br />
and inhibits zooplankton growth.<br />
STOCKING FRY<br />
Stock the fry while it is cool in early morning.<br />
Gently transfer them in buckets or similar con-<br />
Figure 21. Shelters provide areas for fry to congregate in to aid in<br />
feeding and protection.<br />
-13-<br />
tainers and slowly condition them to the pond by<br />
gradually adding small quantities of pond water<br />
to the fry container. Shelters such as milk cans<br />
or frames covered with black plastic are desirable<br />
in the ponds to improve survival and to provide<br />
areas for fry to congregate, which aids in feeding<br />
(Figure 21).<br />
Stocking density depends on the size fingerlings<br />
desired at harvest. Growth rate depends<br />
primarily on the quantity of food the fry and fingerlings<br />
consume if water temperature is optimum.<br />
With very high stocking densities, it is unsafe<br />
to feed for very long the quantity needed for<br />
maximum fish growth, because of water quality<br />
problems. Table 4 shows the expected fingerling<br />
size for a 120- to 150-day growing season at different<br />
stocking densities. V eTy good management is<br />
needed to attain these yields.<br />
Table 4. EsTIMATED FINGERLING SizE AFTER 120- TO 150-<br />
DAY GROWING SEASON AT DIFFERENT STOCKING<br />
DENSITIES.<br />
Fry stocking density<br />
(fish per acre)<br />
10,000<br />
30,000<br />
53,000<br />
73,000<br />
95,000<br />
120,000<br />
140,000<br />
200,000<br />
300,000<br />
500,000<br />
Average length<br />
(inches)<br />
7-10<br />
6-8<br />
5-7<br />
4-6<br />
3-5<br />
3-5<br />
3-4<br />
2-3<br />
1-2<br />
1<br />
FEEDING FRY AND SMALL FINGERLINGS<br />
Fry and small fingerlings have large appetites<br />
and should be fed frequently, two to three times<br />
daily for the first two weeks. Feed a finely-ground,<br />
40 percent to 45 percent protein diet the first<br />
three to four weeks. Recent studies suggest that<br />
the protein should contain at least 20 percent fish<br />
meal. Switch to small-size crumbles of more than<br />
40 percent protein from four to six weeks of age<br />
and then to a small pellet approximately 3/16<br />
inch in diameter containing 36 percent protein.<br />
Make sure that the particle size is small enough<br />
to be swallowed by the smallest fish so that the<br />
fingerlings grow uniformly. It is better to slightly<br />
overfeed in the early stages to ensure that all<br />
fry get enough food.<br />
As the fingerlings grow, they will eat less food<br />
in proportion to their body weight. Feed according<br />
to Table 5. However, feeding more than 35<br />
pounds of feed per acre per day will increase the<br />
probability of low oxygen problems.
Table 5. SuGGESTED FEEDING RATES FOR DIFFERENT SizE CATFISH AT VARIOUS WATER TEMPERATURES MEASURED AT<br />
ONE FooT DEEP.<br />
Total length in<br />
inches and average<br />
number per pound Percent of body weight to feed daily<br />
Average daily water 65° 67° 69° 7P 730 75° 770 79° 81°<br />
temp. F 0 at 1 foot" -------- - - - ----- %-----------------<br />
3" ( 100/lb) 1.5 2.4 3.6 4.8 6.0 7.2 8.4 9.6 10.8<br />
4" (50/lb) 1.5 1.8 2.7 3.6 4.5 5.4 6.3 7.2 8.1<br />
5" ( 31/lb) 1.5 1.5 2.2 2.9 3.6 4.3 5.0 5.8 6.5<br />
6" (17 /lb) 1.5 1.5 1.8 2.4 3.0 3.6 4.2 4.8 5.4<br />
7" ( 11/lb) 1.5 1.5 1.5 2.1 2.6 3.1 3.6 4.1 4.6<br />
8" (9/lb) 1.5 1.5 1.5 1.8 2.3 2.7 3.2 3.6 4.1<br />
9" (6/lb) 1.5 1.5 1.5 1.6 2.0 2.4 2.8 3.2 3.6<br />
10" (3/lb) 1.5 1.5 1.5 1.5 1.8 2.2 2.5 2.9 3.2<br />
"To obtain the average daily water temperature take temperature morning and afternoon each day and average them.<br />
Both floating and sinking feeds are available.<br />
Sinking feed is less expensive but floating feed allows<br />
observation of the fingerlings. Mixing floating<br />
feeds with the sinking type permits observation<br />
and cuts feed costs.<br />
Feeding activity slows considerably with cool<br />
weather. When water temperature is 45°F to<br />
55°F, feed five- to seven-inch fingerlings about<br />
1.5 percent of their estimated body weight three<br />
days per week. Fingerlings fed over winter (November<br />
to March) in the South will gain from 25<br />
percent to 40 percent of their initial body weight.<br />
Smaller fingerlings need more frequent feeding<br />
during winter. Feed them 1.5 percent of their<br />
estimated body weight six days per week when<br />
water temperature is between 52°F and 55°F and<br />
three days per week when water temperature is<br />
40°F to 52°F. Use Table 5 as a guide for feeding<br />
fingerlings at water temperatures above 65°F.<br />
WEED CONTROL<br />
Aquatic weeds and pond "moss" are undesirable<br />
in fingerling ponds. Harvesting fingerlings<br />
is very difficult if weeds collect in seines. Excessive<br />
aquatic weed growth also depresses oxygen<br />
levels. Stocking 50 to 100 eight-inch grass<br />
carp per acre is an effective weed control measure<br />
in states where they are allowed (Figure 22).<br />
Stock grass carp soon after the catfish fry are<br />
stocked. Many grass carp jump over seines and<br />
usually do not greatly interfere with fingerling<br />
harvest.<br />
DISEASE CONTROL<br />
Diseases can be a serious problem for fingerling<br />
producers. Good management, however, can<br />
prevent many diseases, since many disease outbreaks<br />
are related to fish stress caused by unfavor-<br />
-14-<br />
Figure 22. Grass carp effectively control most weeds in catfish ponds.<br />
able environmental conditions, poor nutrition and<br />
improper handling. When a particular disease is<br />
diagnosed, specific treatments are available.<br />
Some signs of diseases are changes from normal<br />
behavior, reduced vitality, reduced feeding<br />
activity, lazy swimming and open sores. Fish that<br />
appear diseased should be sent immediately to a<br />
laboratory for diagnosis. Laboratories providing<br />
diagnostic services are listed in Appendix 2.<br />
Select only live fish with disease signs for diagnosis.<br />
Dead fish are unusable. Place one or two<br />
of the smallest sick fish into a strong plastic bag.<br />
Put in just enough water to cover the fish. Fill the<br />
bag with pure oxygen if possible and tie securely.<br />
Place the bag in a strong, waterproof box ( styrofoam<br />
is best ) . Pack crushed ice in a separate<br />
plastic bag and place this bag in the box next to<br />
the fish (Figure 23). Ship the sample by bus or<br />
deliver it personally. Call the laboratory to advise<br />
them of the shipment and to provide needed information.
Figure 23. Ship diseased fish in a plutic bag with oxygen and water<br />
packed in a styrofoam container with ice to ensure survival.<br />
The laboratory will infonn you of the diagnosis<br />
and recommend a treatment if needed. Chemical<br />
treatments are generally a last resort and are<br />
recommended when there is no alternative. Table<br />
3 contains chemical treatment recommendations<br />
for common fish diseases. Take every precaution<br />
when applying chemicals. Fish have narrow<br />
tolerance ranges for some chemicals, so very<br />
exact calculations are needed. Determine and<br />
record the volume of all your ponds, tanks and<br />
troughs for reference. Calculating treatment<br />
rates is much faster when this information is readily<br />
available.<br />
Some characteristics of the water may affect<br />
the treatment rates. Analyze your water before<br />
you treat. Copper sulfate, for example, is toxic<br />
to catfish in very soft water. When the water has<br />
less than 20 ppm total alkalinity, do not use copper<br />
sulfate before consulting with a fisheries biologist.<br />
Use a treatment rate of 0.5 ppm when<br />
total alkalinity is between 20 and 50 ppm. Higher<br />
treatment rates are needed in more alkaline water.<br />
Use 1.0 ppm copper sulfate when alkalinity is between<br />
50 and 100 ppm and 1.5 ppm copper sulfate<br />
when alkalinity is between 100 and 150<br />
ppm. Water of 150 to 200 ppm alkalinity needs<br />
2 ppm copper sulfate. Copper sulfate is ineffective<br />
in water of alkalinity greater than 200 ppm.<br />
Potassium permanganate is commonly recommended<br />
for treating some external bacterial and<br />
parasitic diseases. It is an oxidizing agent that<br />
reacts with organic matter in pond water. The<br />
portion of chemical that reacts with organic matter<br />
is ineffective in controlling disease.<br />
As a rule of thumb, apply the recommended<br />
rate of potassium permanganate and watch for<br />
the water to change color. If the water turns<br />
-15-<br />
brown within 12 hours after treating, the full rate<br />
must be applied again.<br />
Ichthyopthirius, commonly called "Ich," is<br />
probably the biggest killer of fingerling catfish.<br />
"Ich" is a tiny parasite that burrows into the fish's<br />
skin and gills, causing white, pin-head-sized spots<br />
which can easily be seen. This disease is most<br />
common in the spring when water temperature is<br />
between 68°F and 77°F; however, it can appear<br />
at any time of year. Treat "Ich" using 25 ppm<br />
formalin ( 37 percent formaldehyde) every three<br />
days when the water temperature is between 60° F<br />
and 70°F, every seven days when the temperature<br />
is between 50°F and 60°F and every 14 to 21 days<br />
when the temperature is below 50°F.<br />
Chemicals used for treating diseases should be<br />
thoroughly mixed and evenly distributed from a<br />
boat. Always wear protective clothing and follow<br />
label instructions carefully.<br />
Potassium permanganate, formalin and copper<br />
sulfate kill algae in ponds, which may cause low<br />
oxygen problems. Be sure to have emergency<br />
aeration equipment readily available when treating<br />
with these chemicals.<br />
Channel catfish virus disease ( CCVD) is a<br />
disease that affects only fry and fingerling channel<br />
catfish when the water is warmer than 70°F. Signs<br />
of this disease are pop-eye, hemorrhaging at the<br />
base of the fins, swollen belly and pale gills. Behavior<br />
includes erratic swimming and :floating<br />
head-up. There is no cure for this disease, so prevention<br />
is essential. Isolation of infected brood<br />
stock is important because exposed adults are believed<br />
to be carriers.<br />
WATER QUALITY<br />
Good water quality is essential to producing<br />
healthy fingerlings. Low oxygen is by far the most<br />
common water quality problem. Oxygen levels<br />
should be above four ppm at all times for fingerlings<br />
to grow well. Growth can be severely slowed<br />
when oxygen remains below three ppm for long<br />
periods. Stress caused by these conditions can<br />
also lower resistance to disease.<br />
Algae, the tiny plants that give water a green<br />
color, produce oxygen during bright daylight and<br />
put it into the water. However, no oxygen is produced<br />
at night, and respiration of fish, algae and<br />
decaying wastes take oxygen from the water.<br />
When temperatures are high and fish are growing<br />
rapidly, more oxygen may be taken out at night<br />
than is being produced during the day. Also;<br />
cloudy days may reduce the amount of oxygen<br />
produced. The result can be dead fish. The probability<br />
of low oxygen levels increases with higher
Figure 24. Test equipment: a) Dissolved oxygen chemical test kit.<br />
b) Dissolved oxygen meter,<br />
feeding and stocking rates. Dissolved oxygen<br />
levels should be monitored daily at dawn and dusk<br />
during warm weather. Oxygen test kits and more<br />
expensive oxygen meters are commercially available<br />
and are a worthwhile investment for the serious<br />
producer (Figure 24). Records kept of daily<br />
oxygen readings in each pond can help producers<br />
predict low oxygen problems.<br />
Emergency aeration equipment must be<br />
readied when low oxygen is expected. Probably<br />
the most effective device, especially for ponds<br />
larger than two to three acres, is the tractor-driven<br />
paddlewheel aerator. It quickly creates a zone of<br />
oxygen-rich water where fingerlings concentrate.<br />
The electric, surface-spray aerators are effective<br />
for emergency use only in small ponds (Figure<br />
25).<br />
Some compounds found in water at relatively<br />
small concentrations are potentially harmful to<br />
fish. Copper and zinc are extremely toxic to fish.<br />
Galvanized equipment such as pipes, containers,<br />
-16-<br />
screens and tanks may give up enough zinc to be<br />
toxic. Copper from pipes and other eqmpment<br />
can also be toxic to fish. Metal toxicity can be<br />
particularly troublesome in the hatchery. Use<br />
plastic pipe, buckets and other equipment wherever<br />
possible.<br />
Catfish are very sensitive to chlorine. Water<br />
from city supplies must not be used in the hatchery,<br />
to haul fish or to fill ponds unless it is dechlorinated<br />
with sodium thiosulfate at 7 ppm for each<br />
part per million chlorine. Most municipal water<br />
supplies are chlorinated with less than 2 ppm.<br />
Pesticides from cultivated watersheds may be a<br />
problem in ponds that receive runoff. Some pesticides<br />
are much more toxic to fish than others.<br />
Prevent contamination of the water supply.<br />
Harvesting and Handling<br />
HARVESTING<br />
Harvesting fingerlings is easier in ponds that<br />
have clean, firm bottoms. Weeds and algae catch<br />
in seines and make them difficult to pull. Fingerlings<br />
also become entangled in the debris and are<br />
injured. A mud-line should be used to prevent<br />
the seine from digging into soft, mucky bottoms.<br />
The mud-line also limits muddying the water<br />
which stresses fish, especially during warm weather<br />
(Figure 26).<br />
About 75 percent of the fingerlings can be removed<br />
by trapping them while they feed. Stretch<br />
a 100- to 200-foot long seine parallel to shore at a<br />
Figure 25. Aerators: a) Electrical spray-type surface aerator.<br />
b) A paddlewheel aerator.
Table 7. LENGTH AND WEIGHT RELATIONSHIPS FOR VARIous<br />
SIZE CHANNEL CATFISH FINGERLINGS.<br />
Fish length<br />
(inches)<br />
1<br />
2<br />
3<br />
4<br />
5<br />
6<br />
7<br />
8<br />
9<br />
10<br />
Average weight<br />
of 1,000 fish (lbs)<br />
0.7<br />
3.5<br />
10<br />
20<br />
32<br />
60<br />
93<br />
112<br />
180<br />
328<br />
Number of<br />
fish per pound<br />
1500<br />
286<br />
100<br />
50<br />
31<br />
17<br />
11<br />
9<br />
5.5<br />
3.1<br />
and weighed. The weight of fish per thousand is<br />
calculated from the sample. All the fingerlings<br />
are weighed as they are loaded into the transporter<br />
and the total number is estimated from<br />
the average weight of the individual samples. For<br />
example, two samples are taken of 200 fish each.<br />
Sample weights are 10 ounces and 12 ounces. You<br />
then have 22 ounces or 1.4 pounds per 400 fish,<br />
or 3.5 pounds per 1,000 fish.<br />
The total weight of all the fingerlings divided<br />
by 3.5 pounds equals the total number in thousands<br />
of fingerlings. From Table 7, the average<br />
fingerling length is between three and four inches.<br />
Unless the fish are uniformly graded, estimating<br />
the average length from the table is unreliable.<br />
HAULING<br />
Fingerlings may be hauled long distances with<br />
proper equipment and care. Use fresh, clean<br />
water in the fish transporter. Hauling tanks<br />
should be equipped with electric agitators to oxygenate<br />
the water and to release waste gases such<br />
as carbon dioxide and ammonia. Hauling tanks<br />
should not be deeper than 30 inches when only<br />
agitators are used. An air blower or bottled oxygen<br />
is needed with deeper tanks or with exceptionally<br />
heavy fish .loads. Bottled oxygen is also<br />
a good backup in case the agitators fail (Figure<br />
29).<br />
Bottled oxygen is released into the water<br />
through porous diffusers. Small bubbles transfer<br />
more oxygen into the water than large bubbles. A<br />
combination of small bubbles from bottled oxygen<br />
and mechanical agitation achieves high oxygen<br />
transfer and good waste gas removal, respectively.<br />
The number of fingerlings that can be safely<br />
hauled depends mainly on the volume of the transporter,<br />
the efficiency of the aeration system, the<br />
water temperature, the length of haul, and size<br />
and condition of the fish. Hauling tanks should<br />
be insulated to prevent water from over-heating,<br />
particularly on long trips. Reduce the load given<br />
Figure 29. Hauling tanks should always be equipped with bottled<br />
oxygen in case other aeration systems fail.<br />
Table 8. LoADING RATES FOR TRANSPORTING VARIOus SizE CATFISH<br />
Fish size Transport time (hours)<br />
(Number per pound) 8 hrs. 12 lm. 16 hrs.<br />
- Loading rates (pounds fish/gal)<br />
1 6.3 5.6 4.8<br />
2 5.9 4.8 3.5<br />
4 5.0 4.1 3.0<br />
50 3.5 2.5 2.1<br />
125 3.0 2.2 1.8<br />
250 2.2 1.8 1.5<br />
500 1.8 1.7 1.3<br />
1000 1.3 1.0 0.7<br />
10000 0.2 0.2 0.2<br />
Rates given are for water temperature at 65°F and assume proper equipment and aeration. Reduce rates by 25 percent<br />
for each 10°F rise in temperature.<br />
-18-
Figure 23. Ship diseased fish in a plutic bag with oxygen and water<br />
packed in a styrofoam container with ice to ensure survival.<br />
The laboratory will infonn you of the diagnosis<br />
and recommend a treatment if needed. Chemical<br />
treatments are generally a last resort and are<br />
recommended when there is no alternative. Table<br />
3 contains chemical treatment recommendations<br />
for common fish diseases. Take every precaution<br />
when applying chemicals. Fish have narrow<br />
tolerance ranges for some chemicals, so very<br />
exact calculations are needed. Determine and<br />
record the volume of all your ponds, tanks and<br />
troughs for reference. Calculating treatment<br />
rates is much faster when this information is readily<br />
available.<br />
Some characteristics of the water may affect<br />
the treatment rates. Analyze your water before<br />
you treat. Copper sulfate, for example, is toxic<br />
to catfish in very soft water. When the water has<br />
less than 20 ppm total alkalinity, do not use copper<br />
sulfate before consulting with a fisheries biologist.<br />
Use a treatment rate of 0.5 ppm when<br />
total alkalinity is between 20 and 50 ppm. Higher<br />
treatment rates are needed in more alkaline water.<br />
Use 1.0 ppm copper sulfate when alkalinity is between<br />
50 and 100 ppm and 1.5 ppm copper sulfate<br />
when alkalinity is between 100 and 150<br />
ppm. Water of 150 to 200 ppm alkalinity needs<br />
2 ppm copper sulfate. Copper sulfate is ineffective<br />
in water of alkalinity greater than 200 ppm.<br />
Potassium permanganate is commonly recommended<br />
for treating some external bacterial and<br />
parasitic diseases. It is an oxidizing agent that<br />
reacts with organic matter in pond water. The<br />
portion of chemical that reacts with organic matter<br />
is ineffective in controlling disease.<br />
As a rule of thumb, apply the recommended<br />
rate of potassium permanganate and watch for<br />
the water to change color. If the water turns<br />
-15-<br />
brown within 12 hours after treating, the full rate<br />
must be applied again.<br />
Ichthyopthirius, commonly called "Ich," is<br />
probably the biggest killer of fingerling catfish.<br />
"Ich" is a tiny parasite that burrows into the fish's<br />
skin and gills, causing white, pin-head-sized spots<br />
which can easily be seen. This disease is most<br />
common in the spring when water temperature is<br />
between 68°F and 77°F; however, it can appear<br />
at any time of year. Treat "Ich" using 25 ppm<br />
formalin ( 37 percent formaldehyde) every three<br />
days when the water temperature is between 60° F<br />
and 70°F, every seven days when the temperature<br />
is between 50°F and 60°F and every 14 to 21 days<br />
when the temperature is below 50°F.<br />
Chemicals used for treating diseases should be<br />
thoroughly mixed and evenly distributed from a<br />
boat. Always wear protective clothing and follow<br />
label instructions carefully.<br />
Potassium permanganate, formalin and copper<br />
sulfate kill algae in ponds, which may cause low<br />
oxygen problems. Be sure to have emergency<br />
aeration equipment readily available when treating<br />
with these chemicals.<br />
Channel catfish virus disease ( CCVD) is a<br />
disease that affects only fry and fingerling channel<br />
catfish when the water is warmer than 70°F. Signs<br />
of this disease are pop-eye, hemorrhaging at the<br />
base of the fins, swollen belly and pale gills. Behavior<br />
includes erratic swimming and :floating<br />
head-up. There is no cure for this disease, so prevention<br />
is essential. Isolation of infected brood<br />
stock is important because exposed adults are believed<br />
to be carriers.<br />
WATER QUALITY<br />
Good water quality is essential to producing<br />
healthy fingerlings. Low oxygen is by far the most<br />
common water quality problem. Oxygen levels<br />
should be above four ppm at all times for fingerlings<br />
to grow well. Growth can be severely slowed<br />
when oxygen remains below three ppm for long<br />
periods. Stress caused by these conditions can<br />
also lower resistance to disease.<br />
Algae, the tiny plants that give water a green<br />
color, produce oxygen during bright daylight and<br />
put it into the water. However, no oxygen is produced<br />
at night, and respiration of fish, algae and<br />
decaying wastes take oxygen from the water.<br />
When temperatures are high and fish are growing<br />
rapidly, more oxygen may be taken out at night<br />
than is being produced during the day. Also;<br />
cloudy days may reduce the amount of oxygen<br />
produced. The result can be dead fish. The probability<br />
of low oxygen levels increases with higher
DISEASES<br />
Principal Diseases of Farm-Raised Catfish. J. A.<br />
Plumb, editor. 1979. Southern <strong>Cooperative</strong> Series<br />
No. 225. <strong>Alabama</strong> Agric. Exp. Sta., Auburn<br />
University, AL.<br />
Textbook of Fish Diseases. 1970. Erwin Amlacher.<br />
T.F.H. Publications, Jersey City, NJ.<br />
WATER QUALITY<br />
Water Quality in Warmwater Fish Ponds. Claude<br />
E. Boyd. 1979. <strong>Alabama</strong> Agric. Exp. Sta., Auburn<br />
University, AL.<br />
Water Quality Management in Pond Fish Culture.<br />
Claude E. Boyd and Frank Lichtkoppler. 1979.<br />
<strong>Alabama</strong> Agric. Exp. Sta., Auburn University,<br />
AL.<br />
NUTRITION<br />
Nutrition and Feeding of Channel Catfish. R. R.<br />
Stickney and R. T. Lovell, editors. 1977. Southern<br />
<strong>Cooperative</strong> Series No. 218. <strong>Alabama</strong> Agric.<br />
Exp. Sta., Auburn University, AL.<br />
BREEDING<br />
Genetics and Breeding of Channel Catfish. R. 0.<br />
Smitherman, H. M. El-Ibiary and R. E. Reagan,<br />
editors. 1978. Southern <strong>Cooperative</strong> Series No.<br />
223. <strong>Alabama</strong> Agric. Exp. Sta., Auburn University,<br />
AL.<br />
Appendix 1<br />
Selected References<br />
-21-<br />
GENERAL<br />
Costs and Returns for Producing Catfish Fingerlings.<br />
Robert E. Allain and W. R. Morrison.<br />
1978. Bull. No. 831. Arkansas Agric. Exp. Sta.,<br />
University of Arkansas, Fayetteville, AR.<br />
Commercial Catfish Farming. Jasper S. Lee. 1981.<br />
The Interstate Printers and Publishers, Danville,<br />
IL.<br />
Principles of \Varmwater Aquaculture. Robert R.<br />
Stickey. 1979. John Wiley & Sons, Inc., New<br />
York, NY.<br />
Fish Farming Handbook. E. E. Brown and John<br />
B. Gratzek. 1980. The A VI Publishing Co., Inc.,<br />
Westport, CT.<br />
Aquaculture; the Farming and Husbandry of<br />
Freshwater and Marine Organisms. J. E. Bardach,<br />
J. H. Ryther and W. 0. McLarney. 1972.<br />
Wiley Interscience, New York, NY.<br />
Fish Hatchery Management. Robert G. Piper, et.<br />
al. 1982. U.S. Department of the Interior, Fish<br />
and Wildlife Service, Washington, D.C.<br />
Aquatic and Wetland Plants of Florida. 1978. Bureau<br />
of Aquatic Plant Research and Control,<br />
Florida Department of Natural Resources, Tallahassee,<br />
FL.<br />
Identification and Control of Weeds in Southern<br />
Ponds. 1980. George W. Lewis and James F.<br />
Miller. <strong>Cooperative</strong> <strong>Extension</strong> Service, The University<br />
of Georgia, College of Agriculture,<br />
Athens, GA.
<strong>Alabama</strong> Fish Farming Center<br />
P.O. Box 487<br />
Greensboro, AL 36744<br />
( 205) 624-3651<br />
Southeastern <strong>Cooperative</strong> Fish Disease Laboratory<br />
Department of Fisheries and Allied Aquacultures<br />
Auburn University, AL 36849<br />
( 205) 826-4786<br />
John K. Beadles, Ph.D.<br />
Professor of Biology<br />
Chairman, Division of Biological Sciences,<br />
Arkansas State University, Jonesboro<br />
State University, AR 72467<br />
( 501) 972-3082<br />
Dr. Roy Grizzell<br />
Rt. 1, Box 496<br />
Monticello, AR 71655<br />
( 501) 367-8163<br />
Scott Henderson, Fishery Biologist<br />
Arkansas Game & Fish Commission<br />
P.O. Box 178<br />
Lonoke, AR 72086<br />
(501) 676-7963<br />
Andrew J. Mitchell<br />
U.S. Fish & Wildlife Service<br />
Fish Farming Experimental Station<br />
P.O. Box 860<br />
Stuttgart, AR 72160<br />
( 501) 673-8761<br />
Lanny R. Udey, Ph.D.<br />
Department of Microbiology ( R138)<br />
University of Miami School of Medicine<br />
Fish and Shellfish Pathology Lab<br />
(Exclusive of viral work)<br />
P.O. Box 016960<br />
Miami, FL 33101<br />
( 305) 547-6563<br />
University of Florida<br />
J. Hillis Miller Health Center<br />
Box J-136<br />
Gainesville, FL 32611<br />
( 904) 392-4777<br />
Appendix 2<br />
Fish Disease Diagnostic Laboratories<br />
-22-<br />
Jack L. Blue, D.V.M.<br />
North Georgia Diagnostic Assistance Lab<br />
College of Veterinary Medicine<br />
University of Georgia<br />
Athens, GA 30602<br />
( 404) 542-5568<br />
Department of Veterinary Microbiology<br />
and Parasitology<br />
School of Veterinary Medicine<br />
Baton Rouge, LA 70803<br />
( 504) 346-3306<br />
Janice S. Hughes, Fisheries Biologist<br />
Louisiana Wildlife and Fisheries Commission<br />
P.O. Box 4004<br />
Monroe, LA 71203<br />
( 318) 343-4044<br />
Tom Schwedler, Ph.D.<br />
Area <strong>Extension</strong> Wildlife & Fisheries Specialist<br />
Stoneville, MS 38776<br />
( 601) 686-9311, Ext. 269<br />
Thomas L. Wellborn, Jr., Ph.D., Leader<br />
<strong>Extension</strong> Wildlife and Fisheries<br />
P.O. Box 5405<br />
Mississippi State, MS 39762<br />
( 601) 325-3174<br />
North Carolina State University<br />
Department of Companion Animal &<br />
Special Species Medicine<br />
School of Veterinary Medicine<br />
Raleigh, NC 27611<br />
(919) 737-2910<br />
University of Tennessee<br />
College of Veterinary Medicine<br />
P.O. Box 1071<br />
Knoxville, TN 37901<br />
( 615) 546-9230
The<br />
-'.1Aiabama<br />
W7<strong>Cooperative</strong><br />
<strong>Extension</strong> Service<br />
AUBURN UNIVERSITY