781SS-871SS 97-6642 0410 - ETS Company Pressure Washers ...
781SS-871SS 97-6642 0410 - ETS Company Pressure Washers ...
781SS-871SS 97-6642 0410 - ETS Company Pressure Washers ...

Create successful ePaper yourself
Turn your PDF publications into a flip-book with our unique Google optimized e-Paper software.
INTRODUCTION<br />
Thank you for purchasing a Hotsy <strong>Pressure</strong> Washer.<br />
This manual covers the operation and maintenance of<br />
the <strong>781SS</strong>, <strong>871SS</strong> and 921SS washers. All information<br />
in this manual is based on the latest product information<br />
available at the time of printing.<br />
Hotsy, Inc. reserves the right to make changes at any<br />
time without incurring any obligation.<br />
Owner/User Responsibility:<br />
The owner and/or user must have an understanding of<br />
the manufacturer’s operating instructions and warnings<br />
before using this Hotsy pressure washer. Warning information<br />
should be emphasized and understood. If the<br />
operator is not fluent in English, the manufacturer’s instructions<br />
and warnings shall be read to and discussed<br />
with the operator in the operator’s native language by<br />
the purchaser/owner, making sure that the operator<br />
comprehends its contents.<br />
Owner and/or user must study and maintain for future<br />
reference the manufacturers’ instructions.<br />
This manual should be considered a permanent<br />
part of the machine and should remain with it if<br />
machine is resold.<br />
When ordering parts, please specify model and<br />
serial number.<br />
ASSEMBLY<br />
Unpacking<br />
Unpack carefully. Wear safety glasses or goggles while<br />
unpacking, assembling, or operating pressure washer. If<br />
there are missing components or hidden damage,<br />
immediately contact carrier concerning discrepancies.<br />
1. Cut strapping band from pressure washer and pallet.<br />
2. Remove pressure washer from pallet.<br />
Parts Included<br />
• <strong>Pressure</strong> Washer<br />
<strong>Pressure</strong> Hose<br />
Wand<br />
Operating Instructions and Parts Manual<br />
Gasoline Engine Manual<br />
Parts Bag Containing:<br />
■ <strong>Pressure</strong> Nozzles (3 Ea.)<br />
■ Quick Disconnects (2 Ea.)<br />
■ Quick Disconnect Plug<br />
■ Trigger Gun<br />
Tools Required<br />
8" Adjustable Wrench<br />
Teflon Tape<br />
Flat Blade Screwdriver<br />
Hotsy <strong>781SS</strong>, <strong>871SS</strong>, 921SS <strong>97</strong>-<strong>6642</strong> Rev. 10/04<br />
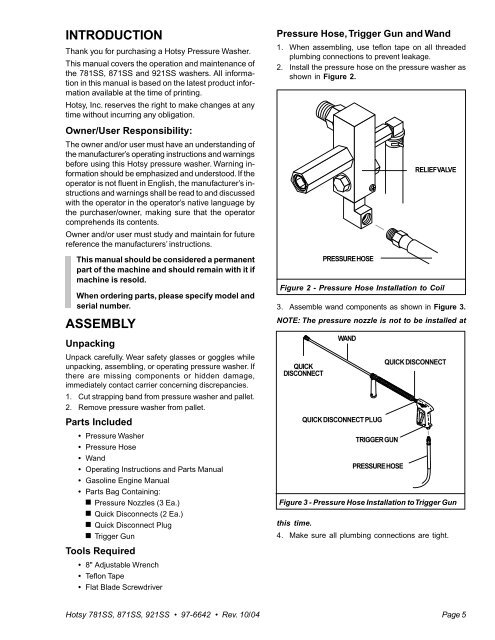
<strong>Pressure</strong> Hose, Trigger Gun and Wand<br />
1. When assembling, use teflon tape on all threaded<br />
plumbing connections to prevent leakage.<br />
2. Install the pressure hose on the pressure washer as<br />
shown in Figure 2.<br />
Figure 2 - <strong>Pressure</strong> Hose Installation to Coil<br />
3. Assemble wand components as shown in Figure 3.<br />
NOTE: The pressure nozzle is not to be installed at<br />
QUICK<br />
DISCONNECT<br />
PRESSURE HOSE<br />
WAND<br />
QUICK DISCONNECT PLUG<br />
TRIGGER GUN<br />
PRESSURE HOSE<br />
RELIEF VALVE<br />
QUICK DISCONNECT<br />
Figure 3 - <strong>Pressure</strong> Hose Installation to Trigger Gun<br />
this time.<br />
4. Make sure all plumbing connections are tight.<br />
Page 5