781SS-871SS 97-6642 0410 - ETS Company Pressure Washers ...
781SS-871SS 97-6642 0410 - ETS Company Pressure Washers ...
781SS-871SS 97-6642 0410 - ETS Company Pressure Washers ...

You also want an ePaper? Increase the reach of your titles
YUMPU automatically turns print PDFs into web optimized ePapers that Google loves.
IMPORTANT: The trigger gun provided with this pressure<br />
washer is equipped with a manual trigger lock<br />
to prevent accidental operation of the trigger gun.<br />
(Refer to Figure 5.) The manual trigger lock should be<br />
used whenever the trigger gun is not in use.<br />
To Start<br />
DANGER: DO NOT point wand or trigger gun at yourself<br />
or at any person. Bodily injury may result from<br />
water under high pressure.<br />
WARNING: Wear eye, ear, hand, foot and skin protection<br />
at all times while operating pressure washer.<br />
IMPORTANT: The water must be turned on before<br />
starting. Running the pump dry will cause damage<br />
and void warranty.<br />
IMPORTANT: DO NOT allow the machine to run with<br />
trigger of the trigger gun released for more than<br />
10 minutes at any one time or damage to pump may<br />
occur.<br />
1. Turn ON water supply.<br />
2. Hold wand firmly, release trigger of trigger gun.<br />
3. Place engine ON/OFF switch in the ON position.<br />
4. Open fuel shutoff valve (if so equipped). Move choke<br />
lever to FULL CHOKE position, (choke may not be<br />
needed on warm engine). Move throttle lever to HALF<br />
THROTTLE position.<br />
5. Pull the rope starter slowly until resistance is felt, then<br />
pull briskly. Do not allow the rope starter to snap back<br />
against the engine. Return it gently to prevent damage<br />
to the starter.<br />
6. When the engine starts, move choke lever until<br />
engine runs smoothly. When engine warms, move<br />
choke lever to NO CHOKE position. Move throttle<br />
lever to FULL THROTTLE position.<br />
IMPORTANT: To allow for proper burner operation, the<br />
throttle control must be kept in the full throttle position<br />
during operation.<br />
NOTE: If engine fails to start, refer to Troubleshooting<br />
Guide in this manual.<br />
7. Squeeze trigger of trigger gun and allow air to purge<br />
from system.<br />
8. If HOT water is desired, adjust the thermostat to the<br />
proper temperature and turn burner switch ON. The<br />
burner will light immediately with a small puff of<br />
smoke. You may need to initially adjust your burner<br />
for peak performance. See Oil Burner section under<br />
Installation. If smoke continues, contact Customer<br />
Service at 1-303-792-5200. When the trigger of the<br />
trigger gun is released or when the thermostat temperature<br />
setting is reached, the burner will automatically<br />
turn off.<br />
To Clean<br />
DANGER: DO NOT place hands or fingers in front of<br />
high pressure spray. Bodily injury may result.<br />
Hotsy <strong>781SS</strong>, <strong>871SS</strong>, 921SS <strong>97</strong>-<strong>6642</strong> Rev. 10/04<br />
The detergent injector valve operates by reducing the<br />
volume of water, thus a vacuum is achieved and<br />
detergent is drawn into the system. DO NOT reduce the<br />
water inlet flow so the pump cavitates due to water<br />
starvation. Operating a pump with insufficient water will<br />
damage the pump seals.<br />
1. Insert detergent inlet line into container of mixed<br />
detergent.<br />
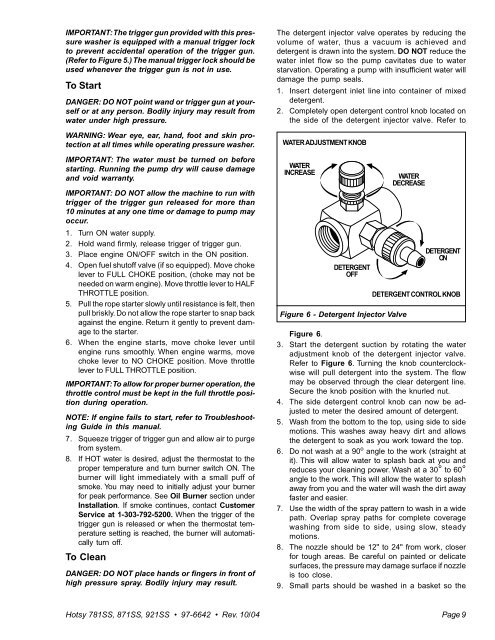
2. Completely open detergent control knob located on<br />
the side of the detergent injector valve. Refer to<br />
WATER ADJUSTMENT KNOB<br />
WATER<br />
INCREASE<br />
DETERGENT<br />
OFF<br />
Figure 6 - Detergent Injector Valve<br />
WATER<br />
DECREASE<br />
DETERGENT<br />
ON<br />
DETERGENT CONTROL KNOB<br />
Figure 6.<br />
3. Start the detergent suction by rotating the water<br />
adjustment knob of the detergent injector valve.<br />
Refer to Figure 6. Turning the knob counterclockwise<br />
will pull detergent into the system. The flow<br />
may be observed through the clear detergent line.<br />
Secure the knob position with the knurled nut.<br />
4. The side detergent control knob can now be adjusted<br />
to meter the desired amount of detergent.<br />
5. Wash from the bottom to the top, using side to side<br />
motions. This washes away heavy dirt and allows<br />
the detergent to soak as you work toward the top.<br />
6. Do not wash at a 90 o angle to the work (straight at<br />
it). This will allow water to splash back at you and<br />
reduces your cleaning power. Wash at a 30° to 60°<br />
angle to the work. This will allow the water to splash<br />
away from you and the water will wash the dirt away<br />
faster and easier.<br />
7. Use the width of the spray pattern to wash in a wide<br />
path. Overlap spray paths for complete coverage<br />
washing from side to side, using slow, steady<br />
motions.<br />
8. The nozzle should be 12" to 24" from work, closer<br />
for tough areas. Be careful on painted or delicate<br />
surfaces, the pressure may damage surface if nozzle<br />
is too close.<br />
9. Small parts should be washed in a basket so the<br />
Page 9