781SS-871SS 97-6642 0410 - ETS Company Pressure Washers ...
781SS-871SS 97-6642 0410 - ETS Company Pressure Washers ...
781SS-871SS 97-6642 0410 - ETS Company Pressure Washers ...

Create successful ePaper yourself
Turn your PDF publications into a flip-book with our unique Google optimized e-Paper software.
Pre-Operation Check<br />
❑ Pump Oil (SAE 30W non-detergent oil)<br />
❑ Cold Water Supply (3.5 gpm • 5/8" • 20 psi)<br />
❑ Hose, wand, nozzles (nozzle size per serial plate)<br />
❑ Water filter (intact, nonrestrictive)<br />
❑ Engine fuel (unleaded 86 or higher)<br />
❑ Engine oil (SAE 10W40)<br />
❑ Burner fuel (No. 1 or No.2 home heating fuel or diesel)<br />
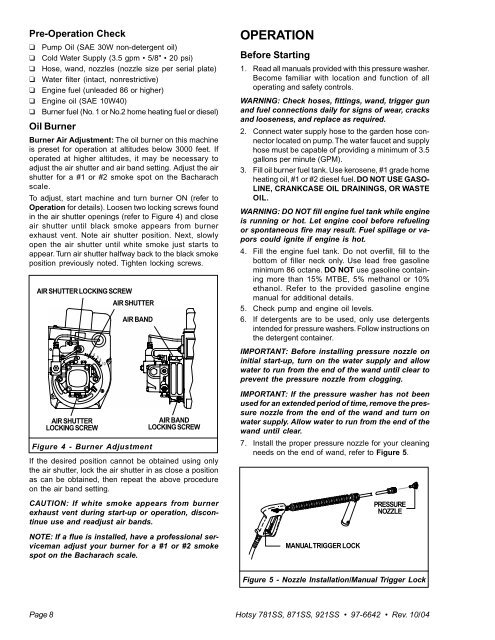
Oil Burner<br />
Burner Air Adjustment: The oil burner on this machine<br />
is preset for operation at altitudes below 3000 feet. If<br />
operated at higher altitudes, it may be necessary to<br />
adjust the air shutter and air band setting. Adjust the air<br />
shutter for a #1 or #2 smoke spot on the Bacharach<br />
scale.<br />
To adjust, start machine and turn burner ON (refer to<br />
Operation for details). Loosen two locking screws found<br />
in the air shutter openings (refer to Figure 4) and close<br />
air shutter until black smoke appears from burner<br />
exhaust vent. Note air shutter position. Next, slowly<br />
open the air shutter until white smoke just starts to<br />
appear. Turn air shutter halfway back to the black smoke<br />
position previously noted. Tighten locking screws.<br />
AIR SHUTTER LOCKING SCREW<br />
AIR SHUTTER<br />
2<br />
4<br />
6<br />
8<br />
10<br />
AIR SHUTTER<br />
LOCKING SCREW<br />
AIR BAND<br />
Figure 4 - Burner Adjustment<br />
AIR BAND<br />
LOCKING SCREW<br />
If the desired position cannot be obtained using only<br />
the air shutter, lock the air shutter in as close a position<br />
as can be obtained, then repeat the above procedure<br />
on the air band setting.<br />
CAUTION: If white smoke appears from burner<br />
exhaust vent during start-up or operation, discontinue<br />
use and readjust air bands.<br />
NOTE: If a flue is installed, have a professional serviceman<br />
adjust your burner for a #1 or #2 smoke<br />
spot on the Bacharach scale.<br />
OPERATION<br />
Before Starting<br />
1. Read all manuals provided with this pressure washer.<br />
Become familiar with location and function of all<br />
operating and safety controls.<br />
WARNING: Check hoses, fittings, wand, trigger gun<br />
and fuel connections daily for signs of wear, cracks<br />
and looseness, and replace as required.<br />
2. Connect water supply hose to the garden hose connector<br />
located on pump. The water faucet and supply<br />
hose must be capable of providing a minimum of 3.5<br />
gallons per minute (GPM).<br />
3. Fill oil burner fuel tank. Use kerosene, #1 grade home<br />
heating oil, #1 or #2 diesel fuel. DO NOT USE GASO-<br />
LINE, CRANKCASE OIL DRAININGS, OR WASTE<br />
OIL.<br />
WARNING: DO NOT fill engine fuel tank while engine<br />
is running or hot. Let engine cool before refueling<br />
or spontaneous fire may result. Fuel spillage or vapors<br />
could ignite if engine is hot.<br />
4. Fill the engine fuel tank. Do not overfill, fill to the<br />
bottom of filler neck only. Use lead free gasoline<br />
minimum 86 octane. DO NOT use gasoline containing<br />
more than 15% MTBE, 5% methanol or 10%<br />
ethanol. Refer to the provided gasoline engine<br />
manual for additional details.<br />
5. Check pump and engine oil levels.<br />
6. If detergents are to be used, only use detergents<br />
intended for pressure washers. Follow instructions on<br />
the detergent container.<br />
IMPORTANT: Before installing pressure nozzle on<br />
initial start-up, turn on the water supply and allow<br />
water to run from the end of the wand until clear to<br />
prevent the pressure nozzle from clogging.<br />
IMPORTANT: If the pressure washer has not been<br />
used for an extended period of time, remove the pressure<br />
nozzle from the end of the wand and turn on<br />
water supply. Allow water to run from the end of the<br />
wand until clear.<br />
7. Install the proper pressure nozzle for your cleaning<br />
needs on the end of wand, refer to Figure 5.<br />
MANUAL TRIGGER LOCK<br />
PRESSURE<br />
NOZZLE<br />
Figure 5 - Nozzle Installation/Manual Trigger Lock<br />
Page 8 Hotsy <strong>781SS</strong>, <strong>871SS</strong>, 921SS <strong>97</strong>-<strong>6642</strong> Rev. 10/04