Create successful ePaper yourself
Turn your PDF publications into a flip-book with our unique Google optimized e-Paper software.
<strong>Baby</strong> <strong>Collection</strong><br />
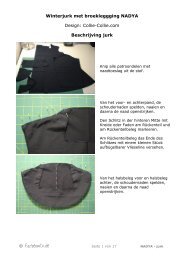
5. Gather the top edge of the lower front and back pieces.<br />
6. Stitch the right bodice side to the skirt piece wrong side. Press the seam allowance of the bodice<br />
7. upwards. Press the seam allowances of the bodice sides toward the wrong side and edgestitch. Stop these<br />
stitching lines right before the bias tape. Trim the seam allowance and trim the corners at 45º angels.<br />
8. Fold the bodice toward the right side and topstitch the seam from the right side.<br />
9. Attach the straps to the bodice at the seam allowance.<br />
10. Stitch the buttonholes and securely attach the buttons or snaps, so that baby will not be able to pull them off.<br />
11. Hem the dress.<br />
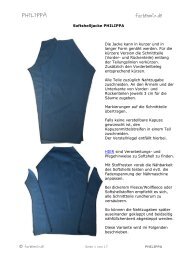
Shirt<br />
The Shirt is a basic piece with long sleeves, which can also be shortened to any length. The boat neckline can be easily pulled<br />
over the head and has a loose, comfortable fit. It looks especially cute if made of a colorful mix of remnants. A few handy<br />
shirts can be made in no<br />
time. The shirt needs to be made of stretch knit fabrics. Sew the shirt using a stretch stitch, such as a zig zag three-step zig<br />
zag, or a four-thread overedge stitch.<br />
Cutting the layout<br />
Cut all pieces according to the list, adding a seam allowance. Transfer the shoulder markings onto the fabric.<br />
1. For smaller sizes, hem the sleeve cuffs.<br />
2. Stitch the collar strip to the neckline along the neckline, slightly stretching the strip as you go for a nice fit.<br />
3. Trim any overlapping collar material. Press the collar strip over the top edge and over toward the wrong side. Stitch<br />
the neckband strip in place with a stretch stitch.<br />
4. Pin the shoulder pieces such that the shoulder markings meet and secure with a few baste stitches.<br />
5. Stitch the sleeves to the armscythe, right sides together.<br />
6. Close the sleeve and side seam in one continuous movement.<br />
7. Hem the sleeve cuffs, if not done in an earlier step.<br />
8. Hem the shirt bottom.<br />
Jacket<br />
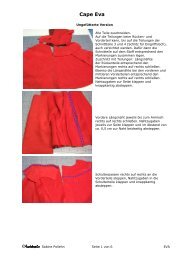
The jacket is generously cut and, since the sleeves can be rolled up, will fit for a long time. A reversible jacket is both handy<br />
and quite eye-catching, but simple fleece jackets are quick to sew and also very practical.<br />
Reversible jacket version<br />
Cutting the layout<br />
Pre-wash all fabrics to prevent uneven shrinkage of the finished jacket. Lay the pattern pieces on your fabric with respect to<br />
the grain. Cut all pieces of inner and outer fabric and include an additional seam allowance. For the reversible jacket, be sure<br />
to switch the front pieces for the reversed fabric, so that they match up correctly with the outer pieces.<br />
Sewing the jacket<br />
1. The drafted fold lines for making the button band on the pattern serve as the front edges of the reversible jacket.<br />
Cut along the front vertical fold lines, adding an additional seam allowance. Apply a thin, flexible fusible interfacing<br />
along the button band to strengthen and stabilize the button stress points as necessary.<br />
2. Stitch the shoulder seams of the outer jacket, right fabric sides together. Finish the seam, press the seam allowance<br />
toward the front and topstitch from the right side.<br />
3. With right sides together, stitch the sleeves to the armscyth.<br />
4. Pin the hood pieces right sides together and stitch along the crown seam. As a cute embellishment, you may want to<br />
add a small loop of ribbon at the point of the hood in the crown seam. If desired, you may add a strip of knit ribbing<br />
to the front edge of the hood. Cut the strip of knit material approximately three-fourths the length of the front edge<br />
of the hood. While you stitch, gently stretch the knit material, pulling slightly, so it fits the length of the hood front<br />
edge.<br />
5. Stitch the hood to the jacket around the neckline, fabric right sides together.<br />
6. With right sides together, pin outer and inner fabric of the pockets and stitch the upper edge, as well as one side<br />
edge. Grade or trim the seam allowance, turn the pocket right side out and press, topsititch the upper edge twice<br />
and pin to the front pieces of the jacket. In the process, the side and lower edge of the pockets lay flush with the<br />
corresponding edges of the front pieces.<br />
7. Stitch along the bottom and side pocket seam allowances.<br />
8. Stitch sleeve and side seam in one continuous motion. Repeat for the opposite side.<br />
9. Complete the inner jacket the same way you made the outer jacket.<br />
10. Pin both jackets right sides together and stitch all around the front, hood and bottom hem, leaving an approximate<br />
10 cm (4in.) opening at one front edge for turning.<br />
11. Trim or grade the seam allowance and trim the corners at 45 degree angles for a smooth turn.<br />
12. Turn the jacket and pull the sleeves into one another.<br />
13. Fold the seam allowances of the sleeves inside against each other, pin and topstitch the sleeve cuffs.<br />
14. Edge stitch all around the jacket bottom, front edge and hood.