
You also want an ePaper? Increase the reach of your titles
YUMPU automatically turns print PDFs into web optimized ePapers that Google loves.
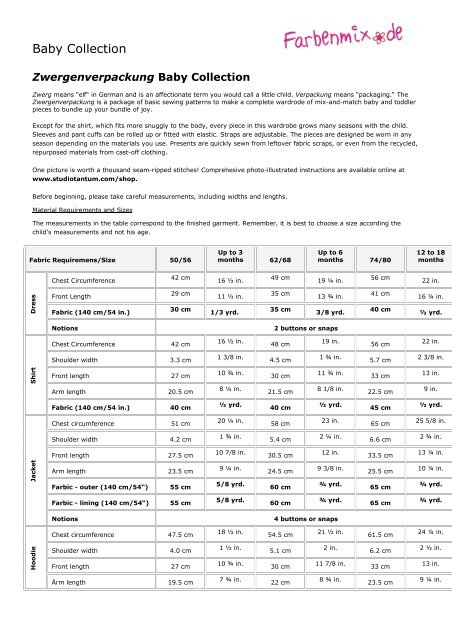
<strong>Baby</strong> <strong>Collection</strong><br />
Zwergenverpackung <strong>Baby</strong> <strong>Collection</strong><br />
Zwerg means “elf“ in German and is an affectionate term you would call a little child. Verpackung means “packaging.“ The<br />
Zwergenverpackung is a package of basic sewing patterns to make a complete wardrode of mix-and-match baby and toddler<br />
pieces to bundle up your bundle of joy.<br />
Except for the shirt, which fits more snuggly to the body, every piece in this wardrobe grows many seasons with the child.<br />
Sleeves and pant cuffs can be rolled up or fitted with elastic. Straps are adjustable. The pieces are designed be worn in any<br />
season depending on the materials you use. Presents are quickly sewn from leftover fabric scraps, or even from the recycled,<br />
repurposed materials from cast-off clothing.<br />
One picture is worth a thousand seam-ripped stitches! Comprehesive photo-illustrated instructions are available online at<br />
www.studiotantum.com/shop.<br />
Before beginning, please take careful measurements, including widths and lengths.<br />
Material Requirements and Sizes<br />
The measurements in the table correspond to the finished garment. Remember, it is best to choose a size according the<br />
child’s measurements and not his age.<br />
Fabric Requiremens/Size 50/56<br />
Dress<br />
Shirt<br />
Jacket<br />
Hoodie<br />
Chest Circumference<br />
Front Length<br />
Fabric (140 cm/54 in.)<br />
42 cm<br />
29 cm<br />
30 cm<br />
Up to 3<br />
months 62/68<br />
16 ½ in.<br />
11 ½ in.<br />
1/3 yrd.<br />
49 cm<br />
35 cm<br />
35 cm<br />
Up to 6<br />
months 74/80<br />
19 ¼ in.<br />
13 ¾ in.<br />
3/8 yrd.<br />
Notions 2 buttons or snaps<br />
Chest Circumference 42 cm<br />
Shoulder width 3.3 cm<br />
Front length 27 cm<br />
Arm length 20.5 cm<br />
Fabric (140 cm/54 in.) 40 cm<br />
Chest circumference 51 cm<br />
Shoulder width 4.2 cm<br />
Front length 27.5 cm<br />
Arm length 23.5 cm<br />
Farbic - outer (140 cm/54“) 55 cm<br />
Farbic - lining (140 cm/54“) 55 cm<br />
16 ½ in.<br />
1 3/8 in.<br />
10 ¾ in.<br />
8 ¼ in.<br />
½ yrd.<br />
20 ¼ in.<br />
1 ¾ in.<br />
10 7/8 in.<br />
9 ¼ in.<br />
5/8 yrd.<br />
5/8 yrd.<br />
48 cm<br />
4.5 cm<br />
30 cm<br />
21.5 cm<br />
40 cm<br />
58 cm<br />
5.4 cm<br />
30.5 cm<br />
24.5 cm<br />
60 cm<br />
60 cm<br />
19 in.<br />
1 ¾ in.<br />
11 ¾ in.<br />
8 1/8 in.<br />
½ yrd.<br />
23 in.<br />
2 ¼ in.<br />
12 in.<br />
9 3/8 in.<br />
¾ yrd.<br />
¾ yrd.<br />
Notions 4 buttons or snaps<br />
Chest circumference 47.5 cm<br />
Shoulder width 4.0 cm<br />
Front length 27 cm<br />
Ärm length 19.5 cm<br />
18 ½ in.<br />
1 ½ in.<br />
10 ¾ in.<br />
7 ¾ in.<br />
54.5 cm<br />
5.1 cm<br />
30 cm<br />
22 cm<br />
21 ½ in.<br />
2 in.<br />
11 7/8 in.<br />
8 ¾ in.<br />
56 cm<br />
41 cm<br />
40 cm<br />
56 cm<br />
5.7 cm<br />
33 cm<br />
22.5 cm<br />
45 cm<br />
65 cm<br />
6.6 cm<br />
33.5 cm<br />
25.5 cm<br />
65 cm<br />
65 cm<br />
61.5 cm<br />
6.2 cm<br />
33 cm<br />
23.5 cm<br />
12 to 18<br />
months<br />
22 in.<br />
16 ¼ in.<br />
½ yrd.<br />
22 in.<br />
2 3/8 in.<br />
13 in.<br />
9 in.<br />
½ yrd.<br />
25 5/8 in.<br />
2 ¾ in.<br />
13 ¼ in.<br />
10 ¼ in.<br />
¾ yrd.<br />
¾ yrd.<br />
24 ¼ in.<br />
2 ½ in.<br />
13 in.<br />
9 ¼ in.
<strong>Baby</strong> <strong>Collection</strong><br />
Comfy Pants<br />
Trousers<br />
Fabric (140 cm/54“) 55 cm<br />
Waistband 58 cm<br />
Hip circumference 58 cm<br />
Outseam<br />
(+waistband)<br />
27.5 cm<br />
Fabric (140 cm/54 in.) 40 cm<br />
Elastic 37 cm<br />
Waist circumference 48 cm<br />
Hip circumference 48 cm<br />
Outseam 28 cm<br />
Fabric (140 cm/54 in.) 40 cm<br />
Elastic for waistband 37 cm<br />
Cutting the Layout<br />
5/8 yrd.<br />
22 7/8 in.<br />
23 in.<br />
10 7/8 in.<br />
15 7/8 in.<br />
14 ¾ in.<br />
19 in.<br />
19 in.<br />
11 1/8 in.<br />
½ yrd.<br />
3/8 yrd.<br />
60 cm<br />
65 cm<br />
65 cm<br />
35.5 cm<br />
50 cm<br />
44 cm<br />
55 cm<br />
55 cm<br />
36 cm<br />
50 cm<br />
44 cm<br />
¾ yrd.<br />
25 5/8 in.<br />
25 5/8 in.<br />
14 in.<br />
19 ¾ in.<br />
17 3/8 in.<br />
21 ¾ in.<br />
21 ¾ in.<br />
14 ¼ in.<br />
5/8 yrd.<br />
½ yrd.<br />
65 cm<br />
72 cm<br />
72 cm<br />
43.5 cm<br />
55 cm<br />
51 cm<br />
62 cm<br />
62 cm<br />
44 cm<br />
55 cm<br />
51 cm<br />
Cut the pieces according to the piece list and add an additional seam allowance. The pieces drafted on the sheet do not include<br />
a seam allowance. Cut the pieces with respect to the grain. Transfer any marks from the pattern sheet to the cut pieces.<br />
Piece List<br />
Pinafore Dress/Tunic<br />
1 - Front/back piece bodice cut 2<br />
2 - Front/back piece lower cut 2 on fold<br />
3 - Straps cut 2<br />
Fabric requirements/Size<br />
Bias tape (extra wide,<br />
double fold)<br />
50/56<br />
2 x 68 cm<br />
Up to 3<br />
months<br />
2x. 27<br />
in.<br />
Shirt<br />
4 - Front piece cut 1 on fold<br />
5 - Back piece cut 1 on fold<br />
6 - Arm cut 2 on fold<br />
Fabric requirements/Size<br />
50/56<br />
Neckline strip front 6 x 26 cm<br />
Neckline strip back 6 x 21.2 cm<br />
Jacket<br />
7 - Front piece cut 2 on fold<br />
8 - Back piece cut 1 on fold<br />
9 - Arm cut 2 on fold<br />
10 - Pocket cut 2<br />
11 – Hood cut 2<br />
Hoodie<br />
62/68<br />
2 x 70 cm<br />
Up to 3<br />
months 62/68<br />
2 ½ x<br />
10 ¼ in 6 x 28 cm<br />
2 ½ x 8<br />
3/8 in 6 x 24 cm<br />
Up to 6<br />
months<br />
2 x 27 ½ in.<br />
74/80<br />
2 x 72 cm<br />
Up to 6<br />
months 74/80<br />
2 ½ x 11<br />
in. 6 x 32 cm<br />
2 ½ x 9 ½<br />
in. 6 x 27.6 cm<br />
12 to 18<br />
months<br />
2 x 28 ½ in.<br />
12 to 18<br />
months<br />
2 ½ x 12 ¾<br />
in.<br />
2 ½ x 10 7/8<br />
in.<br />
¾ yrd.<br />
28 3/8 in.<br />
28 3/8 in.<br />
17 ¼ in.<br />
21 ¾ in.<br />
20 1/8 in.<br />
24 ½ in.<br />
24 ½ in.<br />
17 3/8 in.<br />
5/8 yrd.<br />
5/8 yrd.
<strong>Baby</strong> <strong>Collection</strong><br />
12 - Front piece cut 1 on fold<br />
13 - Back piece cut 1 on fold<br />
14 - Arm cut 2 on fold<br />
15 - Pocket cut 2 on fold<br />
11 – Hood (optional) cut 2<br />
Fabric requirements/Size<br />
50/56<br />
Neckband 4 x 31 cm<br />
Up to 3<br />
months<br />
2 x 12 ¼<br />
in.<br />
Trousers<br />
16 - Pant leg front cut 2<br />
17 - Pant leg back cut 2<br />
18 - Cuff piece cut 2<br />
19 - Knee patch oval cut 2<br />
(20 - Knee patch heart cut 2)<br />
Cuddly Trousers<br />
21 - Trouser piece cut 2<br />
Dress Tunic<br />
62/68<br />
4 x 32 cm<br />
Up to 6<br />
months<br />
2 x 12 ¾ in.<br />
74/80<br />
4 x 33 cm<br />
12 to 18<br />
months<br />
2 x 13 in.<br />
This dress is quickly made, can be embellished in so many ways and be worn for several seasons over leggings or trousers.<br />
The tied straps look precious on an infant, but the buttoned straps may bet be better choice for active crawlers.<br />
Version with shoulder ties<br />
Cutting the layout<br />
Cut the required pieces. You may leave off the additional seam allowance at the armscythe of the upper and lower pieces. Cut<br />
bias tape for the tied strap (for best flexibility, cut on a true 45° bias to the grain). You may also use store-bought, preprepared<br />
extra-wide double-fold bias tape.<br />
Sewing the dress<br />
1. Finish all piece edges.<br />
2. Gather the upper edge of the front and back lower dress pieces.<br />
3. Press the upper seam allowance of the bodice inside, fold the bodice piece to the right fabric side and pin to the lower<br />
dress piece. Topstitch. Fold the bodice piece to the right side of the dress piece and topstitch.<br />
4. Stitch the front and back dress pieces along the side seams.<br />
5. Stitch the bias tape along the armscyth. Be certain to leave enough bias tape over the armscyth for tying. Unfold the<br />
bias tape and place the edge to the edge of the armscyth, right sides together, and stitch to the dress along the fold.<br />
While stitching along the curve, gently pull the bias tape for a smooth turn. Fold the bias tape over the stitching line<br />
and over the edge of the dress. Stitch the bias tape in place from the right side. Tuck the very ends of the bias tape<br />
toward the wrong side (or tie knots into the tie ends at the very end) Consider using a zig zag stitch or blanket stitch<br />
to facilitate catching the other half of the bias tape on the garment wrong side. Stitch the two halves of the bias tape<br />
tie together, continue stitching over the armscyth and up the other half of the bias tape tie.<br />
6. Hem the dress.<br />
Version with straps<br />
Cutting the layout<br />
Cut the required pieces. You may leave off the additional seam allowance at the armscythe of the upper and lower pieces. Cut<br />
pieces of bias tape approximately 12 to 14 cm (4 ½ to 5 ½ inches), depending on the dress size (for best flexibility, cut on a<br />
true 45° bias to the grain). You may also use store-bought, pre-prepared extra-wide double-fold bias tape.<br />
Sewing the dress<br />
1. Finish all piece edges.<br />
2. Press the seam allowances of the shoulder strap pieces toward the wrong side. Fold the shoulder strap pieces in half<br />
and press. Edgestitch completely around the shoulder straps.<br />
3. Stitch the side seams of the lower dress pieces right sides together.<br />
4. Stitch the bias tape along the armscyth of the lower dress. In this version of the dress, the bais tape is added to only<br />
under the arm on the lower dress piece. Unfold the bias tape and place the edge to the edge of the armscyth, right<br />
sides together, and stitch to the dress along the fold. While stitching along the curve, gently pull the bias tape for a<br />
smooth turn. Fold the bias tape over the stitching line and over the edge of the dress. Stitch the bias tape in place<br />
from the right side. Consider using a zig zag stitch or blanket stitch to facilitate catching the other half of the bias<br />
tape on the garment wrong side.
<strong>Baby</strong> <strong>Collection</strong><br />
5. Gather the top edge of the lower front and back pieces.<br />
6. Stitch the right bodice side to the skirt piece wrong side. Press the seam allowance of the bodice<br />
7. upwards. Press the seam allowances of the bodice sides toward the wrong side and edgestitch. Stop these<br />
stitching lines right before the bias tape. Trim the seam allowance and trim the corners at 45º angels.<br />
8. Fold the bodice toward the right side and topstitch the seam from the right side.<br />
9. Attach the straps to the bodice at the seam allowance.<br />
10. Stitch the buttonholes and securely attach the buttons or snaps, so that baby will not be able to pull them off.<br />
11. Hem the dress.<br />
Shirt<br />
The Shirt is a basic piece with long sleeves, which can also be shortened to any length. The boat neckline can be easily pulled<br />
over the head and has a loose, comfortable fit. It looks especially cute if made of a colorful mix of remnants. A few handy<br />
shirts can be made in no<br />
time. The shirt needs to be made of stretch knit fabrics. Sew the shirt using a stretch stitch, such as a zig zag three-step zig<br />
zag, or a four-thread overedge stitch.<br />
Cutting the layout<br />
Cut all pieces according to the list, adding a seam allowance. Transfer the shoulder markings onto the fabric.<br />
1. For smaller sizes, hem the sleeve cuffs.<br />
2. Stitch the collar strip to the neckline along the neckline, slightly stretching the strip as you go for a nice fit.<br />
3. Trim any overlapping collar material. Press the collar strip over the top edge and over toward the wrong side. Stitch<br />
the neckband strip in place with a stretch stitch.<br />
4. Pin the shoulder pieces such that the shoulder markings meet and secure with a few baste stitches.<br />
5. Stitch the sleeves to the armscythe, right sides together.<br />
6. Close the sleeve and side seam in one continuous movement.<br />
7. Hem the sleeve cuffs, if not done in an earlier step.<br />
8. Hem the shirt bottom.<br />
Jacket<br />
The jacket is generously cut and, since the sleeves can be rolled up, will fit for a long time. A reversible jacket is both handy<br />
and quite eye-catching, but simple fleece jackets are quick to sew and also very practical.<br />
Reversible jacket version<br />
Cutting the layout<br />
Pre-wash all fabrics to prevent uneven shrinkage of the finished jacket. Lay the pattern pieces on your fabric with respect to<br />
the grain. Cut all pieces of inner and outer fabric and include an additional seam allowance. For the reversible jacket, be sure<br />
to switch the front pieces for the reversed fabric, so that they match up correctly with the outer pieces.<br />
Sewing the jacket<br />
1. The drafted fold lines for making the button band on the pattern serve as the front edges of the reversible jacket.<br />
Cut along the front vertical fold lines, adding an additional seam allowance. Apply a thin, flexible fusible interfacing<br />
along the button band to strengthen and stabilize the button stress points as necessary.<br />
2. Stitch the shoulder seams of the outer jacket, right fabric sides together. Finish the seam, press the seam allowance<br />
toward the front and topstitch from the right side.<br />
3. With right sides together, stitch the sleeves to the armscyth.<br />
4. Pin the hood pieces right sides together and stitch along the crown seam. As a cute embellishment, you may want to<br />
add a small loop of ribbon at the point of the hood in the crown seam. If desired, you may add a strip of knit ribbing<br />
to the front edge of the hood. Cut the strip of knit material approximately three-fourths the length of the front edge<br />
of the hood. While you stitch, gently stretch the knit material, pulling slightly, so it fits the length of the hood front<br />
edge.<br />
5. Stitch the hood to the jacket around the neckline, fabric right sides together.<br />
6. With right sides together, pin outer and inner fabric of the pockets and stitch the upper edge, as well as one side<br />
edge. Grade or trim the seam allowance, turn the pocket right side out and press, topsititch the upper edge twice<br />
and pin to the front pieces of the jacket. In the process, the side and lower edge of the pockets lay flush with the<br />
corresponding edges of the front pieces.<br />
7. Stitch along the bottom and side pocket seam allowances.<br />
8. Stitch sleeve and side seam in one continuous motion. Repeat for the opposite side.<br />
9. Complete the inner jacket the same way you made the outer jacket.<br />
10. Pin both jackets right sides together and stitch all around the front, hood and bottom hem, leaving an approximate<br />
10 cm (4in.) opening at one front edge for turning.<br />
11. Trim or grade the seam allowance and trim the corners at 45 degree angles for a smooth turn.<br />
12. Turn the jacket and pull the sleeves into one another.<br />
13. Fold the seam allowances of the sleeves inside against each other, pin and topstitch the sleeve cuffs.<br />
14. Edge stitch all around the jacket bottom, front edge and hood.
<strong>Baby</strong> <strong>Collection</strong><br />
15. Topstitch the lower edge in a distance of approximately 1 cm (3/8 in.) from the first stitching line. Topstitch a line<br />
approx. 2 ½ cm (1 in.) frpm the edgestitched line along the jacket front to define the button band.<br />
16. Stitch the buttonholes and securely sew on the buttons or, if desired, snaps. Make sure the buttons or snaps are attached<br />
securely and cannot be pulled off by a curious baby.<br />
Simple fleece jacket<br />
Cutting the layout<br />
Cut all pieces according to the piece list with respect to the grain and including an additional seam allowance. In this version,<br />
include the button band fold and the fold on the pockets.<br />
Sewing the simple fleece jacket<br />
1. Apply a thin, flexible fusible interfacing to the button band to strengthen and stabilize the button stress points<br />
as necessary.<br />
2. Finish the upper edge of the pocket, fold outside and stitch the narrow sides.<br />
3. Trim the seam allowance and grade the edges.<br />
4. Turn the upper edge of the pocket to the right fabric side. Tuck the side edge under and pin the pocket according<br />
to the marking on the front piece. In doing so, the side and lower edge of the pocket will lay flush with the<br />
respective edges of the front piece. Topstitch the pocket. Secure the pocket to the seam allowance.<br />
5. With right sides together, stitch the hood pieces together along the crown. As a cute embellishment, you may<br />
want to add a small loop of ribbon to the point of the crown seam. If desired, you may add a strip of knit ribbing<br />
to the front edge of the hood. Cut the strip of knit material approximately three-fourths the length of the<br />
front edge of the hood. While you stitch, gently stretch the knit material, pulling slightly, so it fits the length of<br />
the hood front edge.<br />
6. Close the shoulder seams. Attach the sleeves at the armscyth. Close the sleeve and side seams in one continuous<br />
motion.<br />
7. Stitch the hood pieces together along the crown right sides together. Stitch the hood to the neckline.<br />
8. Fold the front button facing toward the right side (the outside) and tack at the lower edge.<br />
9. Trim the corners at 45 degrees and fold the facings toward the wrong side.<br />
10. Edge stitch the jacket all around the hem and hood. Topstitch along the button facings approximately 2 ½ cm<br />
(1 inch) from the edge to define the button band. Hem the sleeves.<br />
11. Work the buttonholes and securely attach the buttons or attach snaps, if desired. Make sure the buttons or<br />
snaps are very securely attached, so they cannot be pulled off by a curious baby.<br />
Pullover<br />
The sweatshirt can either be made as a cool little hoodie with a kangaroo pocket. Or leave off the hood and sew a plain neckband.<br />
Add a ruffle for a sweet touch. The pullover needs to be sewn from stretch fabrics, such as fleece, knit velour, sweatshirt<br />
material or thicker jersey. It has a comfortable fit and can be layered and worn instead of a jacket.<br />
Cutting the layout<br />
Cut all pieces of stretch fabric adding an additional seam allowance. If desired, the pocket can be made of a woven, nonstretch<br />
fabric. The front can be divided with horizontal seams for color blocking or extra detail (please use the optional dividing<br />
seam lines).<br />
Sewing the pullover<br />
Use a stretch stitch for all seams, for example a zig zag stitch, three-step zig zag stitch or a four-thread overedge stitch.<br />
1. Pin the pocket pieces right sides together and stitch all around on the seam allowance, leaving a small opening for<br />
turning. Trim or grade the seam allowance.<br />
2. For the smaller sizes, it may work better to hem the sleeves while the pieces are flat at this time.<br />
3. If you want to include the horizontal piecing and horizontal seam, pin the upper front piece to the lower front piece<br />
right sides together and stitch the horizontal seam. At this point, you also may insert a ruffle or trim along this<br />
seam.<br />
4. Close both shoulder seams, right sides together.<br />
5. With right sides together, pin and stitch the hood to the neckline. Alternatively, you can also attach a plain neckband.<br />
Depending on whether you want to have a neckband or a hood, please follow the instructions below.<br />
6. Stitch the sleeves to the armscythe.<br />
7. Close the sleeve and side seam in one continous motion.<br />
8. If not done in an earlier step, hem the sleeves. Hem the bottom edge.<br />
9. Turn the pocket, topstitch the opening, and attach to the pullover.<br />
Sweatshirt with a knit collar band: Cut a strip of ribbing or knit material across the grain approximately 4-6 cm or 2-<br />
2 ½ inches wide and slightly shorter than the circumference of the neck opening (see above). Stitch the short ends of the<br />
strip together right sides together to form a ring. Fold the ring of material in half lengthwise and press. Pin the neckband<br />
in four places equadistant around the neck opening. Stitch the neckband to the neck opening. If using a overlock machine,<br />
remove the pins before they reach the trimming knife. Gently pull the neckband while stitching so that the neckband<br />
will lay nicely. Press the neckband down and topstitch the seam with a stretch stitch, for exammple, a three-step<br />
zig zag.<br />
Hood: Stitch the hood right sides together along the crown and hem the front edge. You may also want to include some<br />
small bits of ribbon ribbons in the seam to dangle from the point for embellishment. Fold the front face seam allowance
<strong>Baby</strong> <strong>Collection</strong><br />
toward the wrong side and press. Topstitch the hood facing hem. Overlap the bottom corners of the hood approximately<br />
2 cm (3/4 inch) and baste stitch. Pin the neck edge of the hood in four places equadistant around the neck opening.<br />
Stitch the hood to the neck opening. If using a overlock machine, remove the pins before they reach the trimming knife.<br />
Gently pull the hood or shirt while stitching if necessary. Press the neckband down and topstitch the seam with a stretch<br />
stitch, for exammple, a three-step zig zag.<br />
Trousers (with optional suspenders)<br />
The trouser design is a very basic design that can be made in many variations. The trousers are cut somewhat full, a comfortable<br />
and adorable look on crawling babies. The pants are also cut nice and high around the tummy for comfort and security<br />
while playing, scooting and crawling. The trousers can be made a bit larger than you need right now and rolled at the cuffs<br />
for your little one to grow into.<br />
Elastic suspenders are handy and adorable, especially on little boys.<br />
The cuffs of the pants can either be left as is, or you may include a bit of elastic or knitted ribbing material for a nice fite<br />
around the ankle.<br />
You may sew the trousers from many different kinds of fabrics, including wovens and stretch materials. Percales, twills, corduroys<br />
and light-to-medium weight denims are all good choices. Consider using natural materials, such as cotton or linen, for<br />
comfort and ease in laundering. Using bits of wool felt or leather for the knee patches is an excellent choice for crawlers.<br />
Cutting the layout<br />
Cut all pieces according to the piece list and add an additional seam allowance. If desired make suspenders from a woven<br />
fabric or use suspender or belt elastic to make suspenders.<br />
Sewing the trousers<br />
1. Appliqué the knee patches with tight zig zag stitches to the knees.<br />
2. Pin a trouser back piece to a front piece. Stitch the pant leg outseam, press the seam allowance toward the front<br />
and topstitch. Repeat for the other pant leg.<br />
3. Stitch the inseam for both pant legs.<br />
4. Cut a strip of ribbing or knit material across the grain approximately 10 cm (4 inches) wide and slightly shorter<br />
than the circumference of the pant leg opening. Stitch the short ends of the strip together, right sides together to<br />
form a ring. Fold the ring of material in half lengthwise and press. Pin the cuff in four places equadistant around the<br />
pant leg opening. Stitch the cuff to the pantleg. If using a overlock machine, remove the pins before they reach the<br />
trimming knife. Gently pull the cuff while stitching for a nice fit.<br />
5. Alternatively, you may press the seam allowance upward and stitch around the pant cuff approximately ½ to ¾<br />
inch from the edge to form a channel. Leave a small opening and insert elastic into the casing. Cinch the elastic to<br />
the desired fit. Secure the two ends of the elastic to each other and tuck the elastic into the opening. Close the<br />
opening.<br />
6. Turn one pantleg right side out and place it into the pantleg turned inside out. Align the crotch and stitch the crotch<br />
seam.<br />
7. Turn the upper waist edge of the trousers toward the inside of the trousers, press and pin.<br />
8. Edgestitch along the top folded edge. Stitch another line approximately ½ inch below this line. Leave a small gap in<br />
the stitching line for inserting elastic. Stitch another line another ½ inch below the line just stitched and leave an<br />
opening directly below the opening in the above stitching line. Insert elastic into the resulting casings and cinch to<br />
the desired fit. Secure the ends of the pieces of the elastic to each other and tuck them into the openings. Stitch<br />
the openings closed.<br />
9. On a pair of girl’s trousers, it looks cute to insert elastic into only the bottom casing, leaving a sweet ruffle around<br />
waistband.<br />
10. Measure the length for the suspenders. As desired, stitch the suspenders to the back of the trousers. If you chose<br />
to do so, make the stitch length somewhat longer, so that the suspenders can be easily removed later.
<strong>Baby</strong> <strong>Collection</strong><br />
Snuggly reversible comfy pants<br />
These snuggly, reversible lounging pants are quick to sew and always a different look. Whether soft velour, jersey, knit terry<br />
or fleece, the trousers should be made of stretch fabric. Make a pair of perfectly practical reversible trousers or sew up a<br />
simple single-layer trouser. Together with the shirt, the snuggly pants make comfy pajama bottoms.<br />
Please make sure to pre-wash both fabrics to prevent uneven shrinkage once sewn together. Use a stretch stitch or the overlock<br />
machine for all seams.<br />
1. Cut the pattern piece twice for each the inner and outer fabric, adding a seam allowance.<br />
2. Lay one each inner and outer piece right sides together. Stitch inner and outer trouser pieces together at the<br />
leg cuffs. Unfold your work. Now fold this piece lengthwise right sides together and close the inner leg seam of<br />
both the outer and lining pantleg in one continuous motion. Repeat with the other leg pieces.<br />
3. First, pin the outer trouser right sides together and stitch the crotch seam. Then repeat this with the lining<br />
trousers.<br />
4. Insert one trouser into the other, fold the waist seam allowances inside such that they connect and pin.<br />
5. Topstitch with a stretch stitch, for example, a small zig zac stitch, along the top edge, leaving a small opening<br />
at the back middle for inserting the elastic. Stitch a second line in a distance of approx. 1.5 cm (5/8 in.) to the<br />
first line to form a casing.<br />
6. Insert elastic into the casing and close the opening.<br />
Simple comfy pants<br />
Cutting the layout<br />
Cut the pieces with respect to the grain. Be sure to add an additional seam allowance.<br />
Sewing the trousers<br />
Use a stretch stitch for all seams.<br />
1. Press the cuff allowance toward the wrong side and stitch.<br />
2. Fold the pant leg piece lengthwise and stitch the inseam.<br />
3. Turn one pant leg right side out. Place the pant leg turned right side out inside the pant leg turned inside out. Align the<br />
crotch seam and stitch.<br />
4. Turn the waistband edge toward the wrong side and press. Stitch a casing for the elastic waistband. Leave a small opening<br />
for inserting the elastic.<br />
5. Insert the elastic and cinch to the desired fit. Stitch the ends of the elastic together and tuck into the opening. Close the<br />
opening with a few stitches.<br />
Much joy and sucess in your sewing projects!