You also want an ePaper? Increase the reach of your titles
YUMPU automatically turns print PDFs into web optimized ePapers that Google loves.
<strong>Baby</strong> <strong>Collection</strong><br />
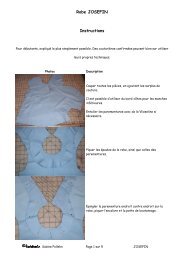
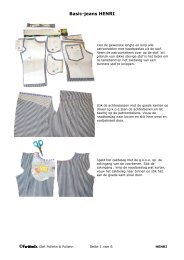
toward the wrong side and press. Topstitch the hood facing hem. Overlap the bottom corners of the hood approximately<br />
2 cm (3/4 inch) and baste stitch. Pin the neck edge of the hood in four places equadistant around the neck opening.<br />
Stitch the hood to the neck opening. If using a overlock machine, remove the pins before they reach the trimming knife.<br />
Gently pull the hood or shirt while stitching if necessary. Press the neckband down and topstitch the seam with a stretch<br />
stitch, for exammple, a three-step zig zag.<br />
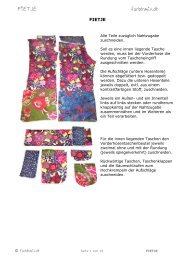
Trousers (with optional suspenders)<br />
The trouser design is a very basic design that can be made in many variations. The trousers are cut somewhat full, a comfortable<br />
and adorable look on crawling babies. The pants are also cut nice and high around the tummy for comfort and security<br />
while playing, scooting and crawling. The trousers can be made a bit larger than you need right now and rolled at the cuffs<br />
for your little one to grow into.<br />
Elastic suspenders are handy and adorable, especially on little boys.<br />
The cuffs of the pants can either be left as is, or you may include a bit of elastic or knitted ribbing material for a nice fite<br />
around the ankle.<br />
You may sew the trousers from many different kinds of fabrics, including wovens and stretch materials. Percales, twills, corduroys<br />
and light-to-medium weight denims are all good choices. Consider using natural materials, such as cotton or linen, for<br />
comfort and ease in laundering. Using bits of wool felt or leather for the knee patches is an excellent choice for crawlers.<br />
Cutting the layout<br />
Cut all pieces according to the piece list and add an additional seam allowance. If desired make suspenders from a woven<br />
fabric or use suspender or belt elastic to make suspenders.<br />
Sewing the trousers<br />
1. Appliqué the knee patches with tight zig zag stitches to the knees.<br />
2. Pin a trouser back piece to a front piece. Stitch the pant leg outseam, press the seam allowance toward the front<br />
and topstitch. Repeat for the other pant leg.<br />
3. Stitch the inseam for both pant legs.<br />
4. Cut a strip of ribbing or knit material across the grain approximately 10 cm (4 inches) wide and slightly shorter<br />
than the circumference of the pant leg opening. Stitch the short ends of the strip together, right sides together to<br />
form a ring. Fold the ring of material in half lengthwise and press. Pin the cuff in four places equadistant around the<br />
pant leg opening. Stitch the cuff to the pantleg. If using a overlock machine, remove the pins before they reach the<br />
trimming knife. Gently pull the cuff while stitching for a nice fit.<br />
5. Alternatively, you may press the seam allowance upward and stitch around the pant cuff approximately ½ to ¾<br />
inch from the edge to form a channel. Leave a small opening and insert elastic into the casing. Cinch the elastic to<br />
the desired fit. Secure the two ends of the elastic to each other and tuck the elastic into the opening. Close the<br />
opening.<br />
6. Turn one pantleg right side out and place it into the pantleg turned inside out. Align the crotch and stitch the crotch<br />
seam.<br />
7. Turn the upper waist edge of the trousers toward the inside of the trousers, press and pin.<br />
8. Edgestitch along the top folded edge. Stitch another line approximately ½ inch below this line. Leave a small gap in<br />
the stitching line for inserting elastic. Stitch another line another ½ inch below the line just stitched and leave an<br />
opening directly below the opening in the above stitching line. Insert elastic into the resulting casings and cinch to<br />
the desired fit. Secure the ends of the pieces of the elastic to each other and tuck them into the openings. Stitch<br />
the openings closed.<br />
9. On a pair of girl’s trousers, it looks cute to insert elastic into only the bottom casing, leaving a sweet ruffle around<br />
waistband.<br />
10. Measure the length for the suspenders. As desired, stitch the suspenders to the back of the trousers. If you chose<br />
to do so, make the stitch length somewhat longer, so that the suspenders can be easily removed later.