Microsoft Word Printing
Microsoft Word Printing
Microsoft Word Printing

You also want an ePaper? Increase the reach of your titles
YUMPU automatically turns print PDFs into web optimized ePapers that Google loves.
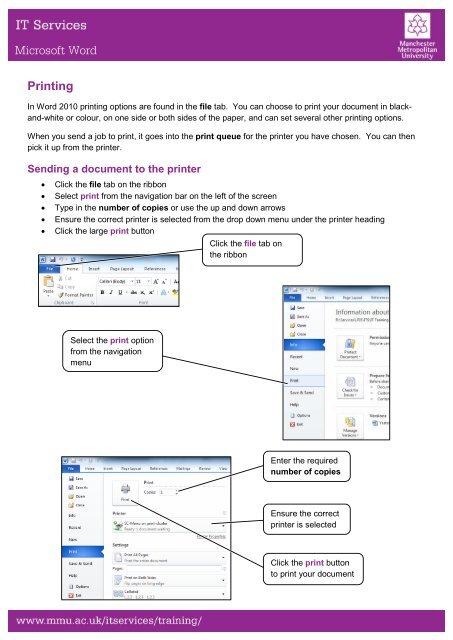
<strong>Microsoft</strong> <strong>Word</strong><br />
<strong>Printing</strong><br />
In <strong>Word</strong> 2010 printing options are found in the file tab. You can choose to print your document in blackand-white<br />
or colour, on one side or both sides of the paper, and can set several other printing options.<br />
When you send a job to print, it goes into the print queue for the printer you have chosen. You can then<br />
pick it up from the printer.<br />
Sending a document to the printer<br />
• Click the file tab on the ribbon<br />
• Select print from the navigation bar on the left of the screen<br />
• Type in the number of copies or use the up and down arrows<br />
• Ensure the correct printer is selected from the drop down menu under the printer heading<br />
• Click the large print button<br />
Click the file tab on<br />
the ribbon<br />
Select the print option<br />
from the navigation<br />
menu<br />
Enter the required<br />
number of copies<br />
Ensure the correct<br />
printer is selected<br />
Click the print button<br />
to print your document
<strong>Microsoft</strong> <strong>Word</strong><br />
Print preview<br />
The print preview in <strong>Word</strong> provides a way of seeing how your document will appear when printed. The print<br />
preview shows on the right-hand side of the screen when you select the print button on the file tab.<br />
To use print preview:<br />
Click the file tab<br />
on the ribbon<br />
• Click the file tab on the ribbon<br />
• Select print from the navigation bar on the left of the screen<br />
• The print preview is now visible on the right of the screen<br />
• If the document contains multiple pages you can change the page being previewed using the left<br />
and right arrows at the centre-bottom of the screen<br />
• You can zoom in and out of the Preview using the zoom slider at the bottom right of the screen or<br />
with the + and – buttons<br />
Any changes made in the<br />
print settings will be<br />
shown in the print preview<br />
Move through the pages of the document<br />
using the left and right arrow buttons<br />
click print on the<br />
navigation menu<br />
This is a print preview showing what the<br />
document will look like when printed<br />
Zoom in and<br />
out using the<br />
slider
<strong>Microsoft</strong> <strong>Word</strong><br />
Print settings<br />
When you go to the print options in the file tab, you can change several of the page layout and printing<br />
options. For instance, you can choose whether your document prints in colour and on both sides of the<br />
page.<br />
Changing the selected printer<br />
The default printer in MMU is the black-and-white multifunctional device. Prints sent to this queue can be<br />
picked up from any printer around the university. You may need to change the printer to print a document<br />
in colour or to use a university computer to print on your home printer.<br />
To select a different printer:<br />
• Click the file tab on the ribbon<br />
• Select print from the navigation bar on the left of the screen<br />
• Click the printer drop down menu<br />
• Choose a printer from the available list<br />
Note: the default printer will have a tick next to it, this is the printer that <strong>Word</strong> will use if you do not change<br />
the selected printer.<br />
Colour printing within MMU<br />
Click the printer drop<br />
down menu to see a<br />
list of available printers<br />
Select a printer from the available<br />
list – this is the colour print queue<br />
The default printer is the black-and-white<br />
If the printer you want<br />
to use is not listed, you<br />
can add it from here<br />
When printing within MMU you will need to ensure that you select the relevant print cluster. This means<br />
that you can then print your document off from any shared printer within the university. Select SC-Mono on<br />
print-cluster for black and white or SC-Colour on print-cluster for colour. To get colour prints, you also<br />
need to make sure you collect coloured documents from a colour printer.
<strong>Microsoft</strong> <strong>Word</strong><br />
Duplex printing<br />
Duplex printing is when your document prints out on both sides of the page. Within MMU the printers are<br />
set to automatically print double-sided, but if you need to print single-sided instead, you can set this in the<br />
printer settings. For example, some student submissions must be printed single-sided for marking.<br />
<strong>Printing</strong> single-sided documents and changing duplex settings<br />
To print a document on just one side of each page, you must change the duplex setting. To do this:<br />
• Click the file tab on the ribbon<br />
• Select print from the navigation bar on the left of the screen<br />
• Click the print on both sides option – a menu will pop out from which you can choose the setting<br />
you need<br />
• Select the relevant duplex option<br />
o print one sided<br />
o print on both sides – flip pages on long edge<br />
o print on both sides - flip pages short edge<br />
o manually print on both sides<br />
Note: most university printers default to print on both sides (flip pages on long edge).<br />
Collating documents<br />
Collation settings allow you to choose the order in which the pages of your document will come out when<br />
you print more than one copy. When printing multiple copies of long documents, collating will ensure then<br />
each document is ordered correctly. Uncollated printing will mean that multi-page documents are not<br />
printed in order – instead they are grouped by page number.<br />
Changing collation settings<br />
To adjust collation settings:<br />
• Click the file tab on the ribbon<br />
• Select print from the navigation bar on the left of the screen<br />
• Click the collation drop down menu to see all available options<br />
• Select collated or uncollated<br />
Click the duplex drop<br />
down menu to see a list<br />
of available options<br />
Click to select a duplex<br />
option
<strong>Microsoft</strong> <strong>Word</strong><br />
Page orientation<br />
From the print settings you can set documents to print in portrait or landscape orientation without having<br />
to go to page layout options. Changing the page orientation may change the layout of your document,<br />
check in the print preview before printing.<br />
Note: the page orientation can also be changed from the page layout tab<br />
To change the page orientation:<br />
• Click the file tab on the ribbon<br />
• Select print from the navigation bar on the left of the screen<br />
• Click the orientation drop down menu<br />
• Select landscape or portrait orientation<br />
Click the collation<br />
menu<br />
Select either collated<br />
or uncollated<br />
Click the orientation<br />
drop down menu<br />
Select portrait or<br />
landscape orientation
<strong>Microsoft</strong> <strong>Word</strong><br />
Page size<br />
You can change the page size from the print settings as well as in page layout options. If you change the<br />
page size, this may affect the layout of your document – check the print preview before you print.<br />
Changing the paper size<br />
To change the size of the page:<br />
• Click the file tab on the ribbon<br />
• Select print from the navigation bar on the left of the screen<br />
• Click the paper size drop down menu – it will usually say “A4” on it to begin with<br />
• Select the page size you want – remember, MMU printers will usually only take A4 and A3 paper<br />
Click the paper size<br />
drop down menu<br />
Use the scroll bar to<br />
navigate the list of<br />
available paper sizes<br />
Click a paper size to<br />
select it from the list<br />
You can see<br />
more paper<br />
sizes here
<strong>Microsoft</strong> <strong>Word</strong><br />
Changing margins in print settings<br />
Margins are normally configured from the page layout tab although they can be changed in the print<br />
settings. Any changes to margins made in the print settings are visible in the print preview to the right of the<br />
screen, so you can see how different margins will appear when printed.<br />
To set new margins from the printer settings page:<br />
• Click the file tab on the ribbon<br />
• Select print from the navigation bar on the left of the screen<br />
• Click the margins drop down menu<br />
• Select the margin type you wish to apply<br />
Click the margins<br />
drop down menu<br />
Select the desired<br />
margin type<br />
You can create your<br />
own margin settings<br />
here