CHALLENGER AC9000 SERIES - Linear
CHALLENGER AC9000 SERIES - Linear
CHALLENGER AC9000 SERIES - Linear

Create successful ePaper yourself
Turn your PDF publications into a flip-book with our unique Google optimized e-Paper software.
E: OPERATION AND ADJUSTMENT INSTRUCTIONS<br />
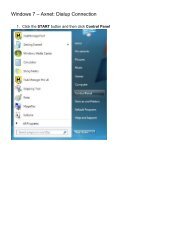
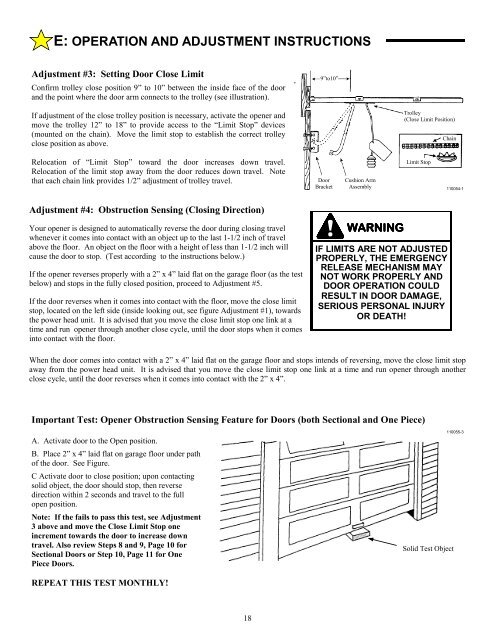
Adjustment #3: Setting Door Close Limit<br />
Confirm trolley close position 9” to 10” between the inside face of the door<br />
and the point where the door arm connects to the trolley (see illustration).<br />
If adjustment of the close trolley position is necessary, activate the opener and<br />
move the trolley 12” to 18” to provide access to the “Limit Stop” devices<br />
(mounted on the chain). Move the limit stop to establish the correct trolley<br />
close position as above.<br />
Relocation of “Limit Stop” toward the door increases down travel.<br />
Relocation of the limit stop away from the door reduces down travel. Note<br />
that each chain link provides 1/2” adjustment of trolley travel.<br />
Adjustment #4: Obstruction Sensing (Closing Direction)<br />
Your opener is designed to automatically reverse the door during closing travel<br />
whenever it comes into contact with an object up to the last 1-1/2 inch of travel<br />
above the floor. An object on the floor with a height of less than 1-1/2 inch will<br />
cause the door to stop. (Test according to the instructions below.)<br />
If the opener reverses properly with a 2” x 4” laid flat on the garage floor (as the test<br />
below) and stops in the fully closed position, proceed to Adjustment #5.<br />
If the door reverses when it comes into contact with the floor, move the close limit<br />
stop, located on the left side (inside looking out, see figure Adjustment #1), towards<br />
the power head unit. It is advised that you move the close limit stop one link at a<br />
time and run opener through another close cycle, until the door stops when it comes<br />
into contact with the floor.<br />
18<br />
9”to10”<br />
Door<br />
Bracket<br />
Cushion Arm<br />
Assembly<br />
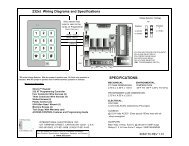
Important Test: Opener Obstruction Sensing Feature for Doors (both Sectional and One Piece)<br />
A. Activate door to the Open position.<br />
B. Place 2” x 4” laid flat on garage floor under path<br />
of the door. See Figure.<br />
C Activate door to close position; upon contacting<br />
solid object, the door should stop, then reverse<br />
direction within 2 seconds and travel to the full<br />
open position.<br />
Note: If the fails to pass this test, see Adjustment<br />
3 above and move the Close Limit Stop one<br />
increment towards the door to increase down<br />
travel. Also review Steps 8 and 9, Page 10 for<br />
Sectional Doors or Step 10, Page 11 for One<br />
Piece Doors.<br />
REPEAT THIS TEST MONTHLY!<br />
WARNING<br />
WARNING<br />
Trolley<br />
(Close Limit Position)<br />
Limit Stop<br />
IF LIMITS ARE NOT ADJUSTED<br />
PROPERLY, THE EMERGENCY<br />
RELEASE MECHANISM MAY<br />
NOT WORK PROPERLY AND<br />
DOOR OPERATION COULD<br />
RESULT IN DOOR DAMAGE,<br />
SERIOUS PERSONAL INJURY<br />
OR DEATH!<br />
When the door comes into contact with a 2” x 4” laid flat on the garage floor and stops intends of reversing, move the close limit stop<br />
away from the power head unit. It is advised that you move the close limit stop one link at a time and run opener through another<br />
close cycle, until the door reverses when it comes into contact with the 2” x 4”.<br />
Chain<br />
Solid Test Object<br />
110054-1<br />
110055-3