Beefeater BBQ 1100 Grill Montageanleitung - Gardelino
Beefeater BBQ 1100 Grill Montageanleitung - Gardelino
Beefeater BBQ 1100 Grill Montageanleitung - Gardelino

You also want an ePaper? Increase the reach of your titles
YUMPU automatically turns print PDFs into web optimized ePapers that Google loves.
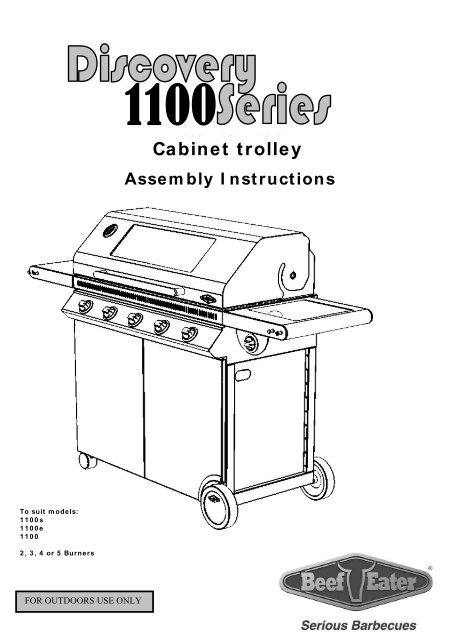
To suit m odels:<br />
1 1 0 0 s<br />
1 1 0 0 e<br />
1 1 0 0<br />
2 , 3 , 4 or 5 Burners<br />
FOR OUTDOORS USE ONLY<br />
<strong>1100</strong><br />
Cabinet trolley<br />
Assem bly I nstructions
Content:<br />
Mrk Qty description<br />
1 1 Base Panel<br />
2 1 Right Hand Side Panel<br />
3 1 Left Hand Side Panel<br />
4 1 Rear Panel<br />
5 1 Top Front Brace<br />
6 1 Left Hand Side Door<br />
7 1 Right Hand Side Door<br />
8 2 Door Handle<br />
9 1 Side Shelf<br />
10 1 Side Burner<br />
11 1 Wheels Axel<br />
12 2 Wheel<br />
13 2 Wheel Hub Cap<br />
14 2 Castor<br />
15 2+ 2 Door Hinge<br />
16 Condim ent Basket (optional)<br />
Bolt Pack Content<br />
Mrk Qty description<br />
A 2 Circlips<br />
B 29 M6 x 12 screw<br />
C 33 M6 washer<br />
D 4 M4 x 10 countersunk screw<br />
E 6 M6 Nut<br />
F 2 Rubber grom m et<br />
G 8 Fiber Washer<br />
H 8 M6 x 25 Screw<br />
I 4 Magnets<br />
J 1 Gas Hose<br />
2
<strong>1100</strong>Series Assembly Procedure<br />
Step 1<br />
2 x ‘A’<br />
Turn the Base Panel upside- down, insert the Wheel Axel through the 2 holes, and<br />
place a wheel on each side. Secure with a circlip on outside of wheel. Place Cap.<br />
insert each cast or to its place in the other 2 corners<br />
Step 2<br />
13 x ‘B’, 13 x ‘C’, 2 x ‘F’<br />
Turn the base back upright, and attach the side and back panels.<br />
I nsert grom m et in side and rear panel holes.<br />
3
Step 3<br />
4 x ‘D’<br />
Step 4<br />
4 x ‘B’, 4 x ‘C’<br />
I f required, attach the Hinge Blocks to front of side panels. Not e: the block<br />
should be on the inside, with only the sm all bends protruding out.<br />
Attach the Top Brace.<br />
Do not tighten. That will be done after fitting the doors.<br />
4
Step 5<br />
Step 6<br />
4 x ‘B’, 4 x ‘C’<br />
Hold each door at ~ 60° open angle, and insert t hrou gh opening at door internal skin over the<br />
hinge block pins. Ensure correct engagem ent in bot h bracket s sim ultaneously.<br />
Rem ove all loose parts from inside the Barbecue. Place the Barbecue<br />
over the trolley and attach with screws. Ensure the lugs in the m iddle of<br />
trolley side panels engage with corresponding slots in <strong>BBQ</strong> body.<br />
5
Step 7<br />
Adjust the Top Brace (from st ep 4) t o right position, so the doors are closing straight,<br />
and tighten the 4 screws.<br />
Step 8<br />
8 x ‘H’, 8 x ‘G’<br />
Step 9<br />
Fit the shelf and Side Burner ( or 2 shelves) t o t he side of the Barbecue.<br />
Note: screws to go from the inside of barbecue body out.<br />
Make gas connections and conduct<br />
Leak- Test.<br />
Regulator to be connected to entry ‘A’.<br />
Entry ‘B’ rem ove cap and connect Side-<br />
Burner hose, if required.<br />
Refer also t o Barbecue book P. 4<br />
for Leak- Test procedure.<br />
6
Step 1 0<br />
8 x ‘J’<br />
I f connecting Side Burner, the hose is attached to inlet ‘B’ above, and<br />
connected t o Side Burner m anifold as follows:<br />
W arranty<br />
Warranty term s and condition in <strong>BBQ</strong> I nst ructions book P. 11 apply to t his trolley as well.<br />
All parts and workm anship of this trolley are covered for a period of 1 year from dat e of purchase.<br />
Technical I nform ation<br />
Note: Do not m odify t his appliance or any of it s part s. Any deviat ion from fact ory<br />
settings could result in a safety hazard.<br />
For your records:<br />
Model Num ber:<br />
Date of Purchase:<br />
Side Burner m anifold inlet thread is 3/ 8 SAE m ale flare fitting.<br />
I nput Energy: 15Mj.<br />
Nozzle sizes: LPG – 1.05m m , NG – 1.7m m<br />
________________________________________________________________________<br />
________________________________________________________________________<br />
Place where purchased:<br />
________________________________________________________________________<br />
Serial Num ber:<br />
_________________________________________________________________________<br />
I m ages in this m a nual a re for illustrative purposes only.<br />
Due to constant im provem ent, BeefEater advises that<br />
changes t o the design, m aterial, specifications and product<br />
configuration m ay occur at any tim e w ithout notice.<br />
7
Spare Parts:<br />
W oodland Hom e Product s<br />
3-5 Birm ingham Av, Chest er-<br />
Hill, NSW, Aust ralia, 2162<br />
Phone: 1800 356 660<br />
Facsim ile: 02 9724 8899<br />
E-m ail: m ail@beefeaterbbq.com<br />
Website:<br />
www.beefeat erbbq.com<br />
<strong>1100</strong>_Trol_Inst_AU_V0<br />
8