CHAPTER Lighting Applications
CHAPTER Lighting Applications
CHAPTER Lighting Applications

You also want an ePaper? Increase the reach of your titles
YUMPU automatically turns print PDFs into web optimized ePapers that Google loves.
<strong>CHAPTER</strong><br />
<strong>Lighting</strong><br />
<strong>Applications</strong><br />
Objectives<br />
After studying this chapter, you will be able to:<br />
Recall the techniques and characteristics of both “classic” and<br />
“natural” lighting.<br />
Explain different methods and applications for lighting backgrounds.<br />
Identify effective solutions for common lighting problems.<br />
Recall effective methods to light interior and exterior night scenes.<br />
Identify effective techniques for lighting frequently encountered<br />
assignments.<br />
(Litepanels, Inc.)<br />
333
334 Video Digital Communication & Production<br />
About <strong>Lighting</strong> <strong>Applications</strong><br />
This chapter takes the lighting tools and<br />
design principles covered in the two preceding<br />
chapters and puts them to work in real-world<br />
situations. We will see how to light subjects,<br />
locations, and night scenes, how to solve<br />
common lighting problems, and how to<br />
approach several types of frequently encountered<br />
lighting assignments.<br />
There is some necessary content overlap among<br />
the three lighting chapters.<br />
<strong>Lighting</strong> on a “Clock”<br />
For convenience, the horizontal placement of<br />
lights is often described in terms of a clock face:<br />
● The subject is at the center, facing the<br />
six o’clock position.<br />
● The camcorder is at six o’clock, facing the center.<br />
● The lights are at various “hours” around the<br />
clock face.<br />
● The background, if shown, is at the<br />
twelve o’clock position.<br />
(View from above.) A four-light setup diagrammed on<br />
a clock face, with the back light at 2:30, the key light<br />
at 5:00, the camera at 6:00, the fill light at 8:00, and<br />
the rim light at 11:00.<br />
Rim light<br />
Fill<br />
light<br />
Back<br />
light<br />
Key light<br />
Although this diagram shows the key on the right<br />
and the fill on the left, their positions are just as<br />
often reversed.<br />
<strong>Lighting</strong> Subjects<br />
Most of your time, of course, will be spent<br />
lighting people. From the simplest production<br />
to the most elaborate, there are only two basic<br />
approaches to this task: classic studio lighting<br />
and soft “natural” lighting.<br />
Classic Studio <strong>Lighting</strong><br />
Classic studio lighting uses three lights<br />
on the subject and usually one or more on the<br />
background, Figure 16-1. This is often called<br />
three-point lighting, despite the frequent use<br />
of additional instruments.<br />
Key Light<br />
The key light provides the main illumination,<br />
typically mimicking an actual light source like<br />
a lamp or ceiling fi xture. It is often placed at<br />
about 4:30 and 15°–30° higher than the subject’s<br />
face, Figure 16-2.<br />
The key light is typically a spotlight, so the<br />
hard-edged beam is often softened with a sheet<br />
of spun glass clipped to the barn doors. Even<br />
so, it throws distinct shadows on the subject’s<br />
cheek, upper lip, and neck.<br />
Fill Light<br />
The fi ll light literally fi lls in the shadows<br />
created by the key light, Figure 16-3. Placed<br />
opposite the key light, the fi ll is often farther to<br />
the side and not as high as the key, which helps<br />
reduce the cheek, lip, and neck shadows.<br />
Figure 16-1 A classic lighting setup, including key,<br />
fill, rim, and background lights.
Figure 16-2 Key light placement.<br />
Horizontal placement Vertical placement<br />
Effect of the key light<br />
Figure 16-3 Fill light placement.<br />
Horizontal placement Vertical placement<br />
Effect of the fill light<br />
How completely the fi ll light moderates<br />
these shadows depends on the setting and mood<br />
of the scene. In a cheerful interior, the shadows<br />
might be slight; in an atmospheric night scene,<br />
they might be so deep as to obscure details<br />
within them. In any case, the fi ll light should<br />
not be bright enough to make the subject lose<br />
the “modeling” that creates the illusion of depth.<br />
Figure 16-4 Rim light placement.<br />
Chapter 16 <strong>Lighting</strong> <strong>Applications</strong> 335<br />
Rim (Back) Light<br />
The rim light is typically behind the subject<br />
and placed quite high, Figure 16-4. If however,<br />
its light stand appears in the shot, you can move<br />
the rim light aside until it clears the frame.<br />
Rim lights are frequently mounted overhead<br />
on clamps or on stands with lateral arms. The<br />
brightness of the rim light depends mainly on<br />
the lighting style—pronounced for pictorial<br />
realism and moderate for realism. For naturalism,<br />
Horizontal placement Vertical placement<br />
Effect of the rim light
336 Video Digital Communication & Production<br />
the rim light is just barely bright enough to<br />
visually separate the subject from the background.<br />
In some instances, it is omitted entirely.<br />
The brightness of key and fill lights is adjusted<br />
by moving the lights toward or away from the<br />
subject. Rim light, however, may be controlled by<br />
a dimmer, since the warming effect of dimming a<br />
light is usually acceptable in this application.<br />
Background Light<br />
Like the key light, the background light is<br />
usually “motivated”—that is, it mimics light<br />
that would naturally fall on the walls or other<br />
background, like a wall lamp, a window light,<br />
or spill from a room light (Figure 16-5). When<br />
working with just a few lights, you can usually<br />
achieve background lighting by directing spill<br />
from the key and/or fi ll lights.<br />
Background light intensity should be adjusted<br />
so that subject and background seem lit by the<br />
same environment, but the subject is slightly<br />
brighter. Two or more background lights may<br />
be needed to do the job.<br />
Figure 16-5 Background light placement.<br />
Background lights often produce less intense<br />
effects because the lighting instruments must be<br />
placed well away from the background to keep<br />
them out of the frame.<br />
With the four lights in place, we can build<br />
a complete lighting setup, Figure 16-6. Though<br />
developed for classic pictorial realism, this<br />
basic scheme can be used with any of the four<br />
major lighting styles, Figure 16-7.<br />
The basic lighting setup demonstrated here<br />
uses four lights and only covers a space about<br />
the size of a single action area. At large shooting<br />
locations, the lighting can involve many more<br />
instruments, but they tend to be deployed in<br />
multiples of these basic layouts.<br />
An “action area” is a spot within a location that is<br />
fully lit because important activity takes place there.<br />
“Natural” <strong>Lighting</strong><br />
Because three-point lighting can look<br />
somewhat theatrical, many situations call for<br />
Horizontal placement Vertical placement<br />
Effect of the background light<br />
Figure 16-6 Complete lighting setup.<br />
Horizontal placement Vertical placement Combined effect of the four lights
Figure 16-7 Using a basic four-instrument lighting setup.<br />
a more natural, “unlit” appearance. The key to<br />
this approach is soft light. Spots and broads can<br />
be used if heavily diffused, but large sources,<br />
such as umbrellas or softboxes, are often easier<br />
to work with.<br />
“Rugged” vs. “Glamorous” <strong>Lighting</strong><br />
How you position and diffuse your lighting<br />
instruments often depends on whether you wish to<br />
emphasize facial modeling for a so-called “rugged”<br />
look, or whether you prefer to de-emphasize it<br />
for “glamour.”<br />
Rugged lighting exaggerates the planes and<br />
angles of the face and emphasizes skin texture.<br />
To do this:<br />
● Keep the key light high for more pronounced<br />
shadows.<br />
● Reduce or omit key light diffusion. The harder<br />
the beam, the more it emphasizes skin and<br />
other textures.<br />
● Avoid over-filling to retain enough shadows<br />
for pronounced facial sculpting.<br />
Rugged lighting.<br />
One-Light Design<br />
For close shots, a single soft source can<br />
deliver satisfactory lighting—especially when<br />
paired with a refl ector for additional fi ll light.<br />
The subject should be close enough to the<br />
Glamorous lighting uses exactly the opposite<br />
approach:<br />
● Place the key light lower for moderate shadows.<br />
● Use considerable diffusion (or a softlight) to<br />
minimize skin texture.<br />
● Add fill light until the shadows are relatively<br />
faint, but avoid over-filling the neck area to<br />
downplay aging skin.<br />
● Use a generous rim light to accent hair.<br />
Glamorous lighting.<br />
Chapter 16 <strong>Lighting</strong> <strong>Applications</strong> 337<br />
Naturalism Realism Pictorial realism<br />
Expressionism<br />
The cinematographer contributes to the effect by<br />
using wide angle lens settings for rugged lighting,<br />
and telephoto lens settings for glamour.
338 Video Digital Communication & Production<br />
background so that the light spill can model it.<br />
Keep the lighting unit low to simulate window<br />
light, and place it at about 8:30 on the clock so that<br />
it “wraps around” the subject’s face (Figure 16-8).<br />
Two-Light Design<br />
A second softlight provides a more versatile<br />
fi ll source. With this design, it often helps to<br />
place key and fi ll lights at the heights you would<br />
use for three-point lighting. With two lights, you<br />
can move the fi ll around as far as three o’clock,<br />
Figure 16-9.<br />
Alternately, you may wish to continue to use the<br />
reflector for fill, and bring up the background with<br />
the second light.<br />
Three-Light Design<br />
A third light gives you better control over<br />
both fi ll and background, Figure 16-10. Studying<br />
the light plan in Figure 16-10, note that:<br />
● The subject’s distance from the background<br />
permits the two to be lit separately.<br />
Figure 16-8 One-light design.<br />
● The fi ll light is about three times as far as<br />
the key light from the subject.<br />
● The background light is far enough to the side<br />
so that the hot spot created by the near edge<br />
of its beam and the overlapping key light<br />
spill (indicated in red) is outside the frame.<br />
The natural style is very popular for lighting<br />
interviews because the lighting can match the<br />
location, and because the backgrounds are<br />
frequently close behind the subjects. Also, soft<br />
lighting is fast and easy to work with.<br />
<strong>Lighting</strong> Backgrounds<br />
If you have the room and the lighting<br />
resources, it is often best to move subjects away<br />
from backgrounds so that you can light them<br />
separately. Spots or fl oods are effective for<br />
background lighting because their longer throw<br />
allows them to be placed far enough to the sides<br />
to remain out of the frame.<br />
As noted elsewhere, a light’s throw is the distance<br />
between the instrument and the subject or<br />
background that it is lighting.<br />
Horizontal placement Vertical placement<br />
Effect of the design<br />
Figure 16-9 Two-light design.<br />
Horizontal placement Vertical placement<br />
Effect of the design
Figure 16-10 Three-light design.<br />
<strong>Lighting</strong> Backgrounds for Exposure<br />
When the background is too dark, the image<br />
loses apparent depth. So, you may want to wash<br />
some light on it to make it more visible. Be careful<br />
not to place too many highlights or to make<br />
the background too bright, to avoid distracting<br />
attention from the subject(s) in the foreground.<br />
<strong>Lighting</strong> Backgrounds for Texture<br />
You can often make dimensional surfaces<br />
(such as plaster or fabric) more interesting by<br />
bringing out their texture. For good cross lighting,<br />
place spots or broads as close to the backing as<br />
possible and rake the light across the surface.<br />
<strong>Lighting</strong> Backgrounds for Depth<br />
Sometimes, you can enhance depth by<br />
highlighting surfaces (like furniture) in front of<br />
the background, as well. Generally speaking,<br />
lights hung above the frame work effectively.<br />
Adjusting Intensity<br />
When lights are placed close to a background,<br />
the beam is much “hotter” near the light. To<br />
even out the light pattern, use a half or doublehalf<br />
screen positioned in the spotlight’s fi lter<br />
holder so as to reduce light output on the side<br />
near the wall.<br />
Outdoors, background lighting is usually created<br />
using hard-surface aluminum reflectors, Figure 16-11.<br />
<strong>Lighting</strong> Locations<br />
Few video productions are shot on sound<br />
stages (except those made for cable or broadcast),<br />
Chapter 16 <strong>Lighting</strong> <strong>Applications</strong> 339<br />
Horizontal placement Vertical placement<br />
Effect of the design<br />
so your interiors are likely to be locations. Every<br />
location presents challenges, and meeting them<br />
offers the satisfaction that comes from successful<br />
problem solving.<br />
Small Interiors<br />
Small interiors are usually diffi cult to work<br />
in, for several reasons (Figure 16-12).<br />
Cramped Quarters<br />
Lights require room, not only for the<br />
instruments and stands, but for the throws of the<br />
lights. Remember: you reduce light intensity by<br />
moving the unit away from the subject. Spots<br />
and broads are favored for cramped interiors<br />
because of their small size. Spots are especially<br />
useful in tight quarters because they can be<br />
focused to vary the light output without moving<br />
the unit. Their intensity can be further reduced<br />
by using screens.<br />
Figure 16-11 A hard aluminum reflector.<br />
(Bogen Manfrotto)
340 Video Digital Communication & Production<br />
Figure 16-12 This interior has problems with space,<br />
window light, and irregular ceilings.<br />
Power Supplies<br />
Small interiors are often located in homes or<br />
other private buildings where electrical circuits<br />
are typically only 15 amps, and an entire room<br />
may be served by just one circuit. When working<br />
with inadequate power, high-effi ciency fl uorescent<br />
lamps draw less power per unit output than<br />
halogens. Consider using the compact units<br />
with screw-base lamps, Figure 16-13.<br />
Background Spill<br />
Small interiors make it diffi cult to keep<br />
subject light from spilling onto the background.<br />
Here again, using the more controllable spots<br />
Figure 16-13 Although it delivers the light output of<br />
375 watts of halogen light, this three-lamp fluorescent<br />
is only 78 watts.<br />
(Equipment Emporium, Inc.)<br />
Calculating Power Draw<br />
The formula says that the amperage (size) of<br />
a power load (in this case, a video light) is equal<br />
to the wattage of the load divided by the voltage<br />
of the circuit, or<br />
Amps = Watts<br />
Volts<br />
It can be difficult to mentally calculate the<br />
amps used by a video light (and hence, the ability<br />
of an electrical circuit to take the load). Although<br />
North American current is nominally 110 volts, the<br />
actual voltage in a particular circuit may range<br />
from 105 to 130, and typically runs around 115–125.<br />
Without troubling to test each circuit, you cannot<br />
tell what its true voltage may be. Also, mentally<br />
dividing by a number like 117.5 volts is not easy.<br />
To solve both problems, divide by an arbitrary<br />
100 volts simply by moving the decimal. For example,<br />
a 750 watt light would draw 7.5 amps (750 watts<br />
divided by 100).<br />
This not only simplifies the head math; it also<br />
builds in an automatic safety factor, since the<br />
nominal amperage will always be lower than the<br />
actual. For example, at a true 110 volts, a 750 watt<br />
light really draws 6.8 amps, not 7.5.<br />
and broads can help minimize the problem. On<br />
the other hand, the gentle spill from umbrellas<br />
or softboxes often makes a very agreeable<br />
background light.<br />
Ceiling Bounce<br />
The low ceilings of many interiors can actually<br />
be a plus, because they make it easy to bounce<br />
fi ll light down onto subjects and background.<br />
Too much ceiling bounce, however, puts shadows<br />
under subjects’ eyes and looks like institutional<br />
grid lighting.<br />
Hiding Lights<br />
Small interiors often make it diffi cult to<br />
keep the lights out of the frame. Light stands<br />
work well in front and to the sides of the action<br />
area, where they are safely off screen.<br />
Study your monitor very carefully for cables, which<br />
have a way of creeping into the shot.
To hide lights placed deeper in the set,<br />
deploy units that can be clipped or taped to<br />
moldings, curtain rods, door frames, or the tops<br />
of open doors themselves. Fluorescent ceiling<br />
grids are also prime locations for clipping small<br />
lamps, Figure 16-14.<br />
Some lighting instruments have built-in clips, others<br />
mount on posts fitted with clips or flat surfaces<br />
for recording.<br />
Large Interiors<br />
Large interiors are more comfortable to<br />
work in, but they present problems of their<br />
own, Figure 16-15. An area, say 50 feet square,<br />
cannot be fully lit with the instruments in a<br />
typical small production kit. To solve the problem,<br />
you need to employ a two-part strategy:<br />
● Light the subjects, not the space (as discussed<br />
in Chapter 14).<br />
● Break the action into parts, then light and<br />
shoot each part separately.<br />
Without the key light, the doorway is dark. The key light spills onto the walls beside the door.<br />
The left barn door masks the light beam to match the<br />
left edge of the doorway.<br />
Chapter 16 <strong>Lighting</strong> <strong>Applications</strong> 341<br />
Managing Barn Doors<br />
The edges of light beams look more realistic when they conform to natural features of the<br />
background. In this example, the spotlight is set to light a subject who will appear in the open doorway.<br />
The barn doors are set so that the beam edges are hidden by the sides and top of the door.<br />
The remaining barn doors cut the beam edges at the<br />
bottom, top, and right edge of the doorway.
342 Video Digital Communication & Production<br />
Figure 16-14 Small lights can be gaffer-taped to walls, or supported almost anywhere. Larger lights can be<br />
clamped to walls and doors.<br />
Small light taped to a wall Large light clamped to a partial wall Small light clamped to a chair<br />
Figure 16-15 Too large to be lit with a small lighting<br />
kit, this room is lit only by its ceiling fluorescent<br />
fixtures—with unsatisfactory results.<br />
Here is how to implement this strategy. In<br />
this example, we will use four spotlights and<br />
three broads, Figure 16-16.<br />
● A single broad lights the background—the<br />
door area will be covered by a key light.<br />
● A key light is positioned for each action<br />
area. The key farthest from the camera is<br />
hung overhead to keep it out of frame. A<br />
rim light for the closest action area is also<br />
added overhead.<br />
● Two broads are placed to provide overall<br />
fi ll light.<br />
(Lowel Light Inc.)<br />
Start with the Wide Shots<br />
When the camera will see most of the area,<br />
use your lights as follows:<br />
● Light the background fully. Since the walls or<br />
other backings will fi ll much of the frame,<br />
ensure that they are fully lit. Add lights to<br />
bring up furnishings or other contents of<br />
the area.<br />
● Light the action areas to be included in wide<br />
shots. Choose important places within the<br />
area for additional key lights. The closest<br />
action area also gets a rim light.<br />
● Add general fi ll light. This will bring up the<br />
overall light level. Ceiling bounce light works<br />
well, although direct fi ll from broads (as<br />
in Figure 16-16) is easier to control. Check<br />
fl oor areas carefully to make sure they get<br />
enough light.<br />
The idea is to plan camera setups so that each<br />
major action area will also be covered in closer<br />
angles.<br />
Light the Close Shots<br />
After the wide shots have been recorded,<br />
you will re-light for each action area in turn:<br />
● Light the subject(s). Typically, this means<br />
fi ne-tuning the key and fi ll lights and adding<br />
some rim light for separation.<br />
● Light the background. You can take some<br />
instruments away from the background<br />
lighting by lighting only the parts that will<br />
appear in the close shots.<br />
Take care that the key, fill, and background lights<br />
match the appearance of the wide shot lighting.
Figure 16-16 <strong>Lighting</strong> a large area with the instruments in a typical small production kit.<br />
A broad lights the background<br />
Key lights positioned for each action area<br />
<strong>Lighting</strong> Moving Subjects<br />
If there is subject movement from one<br />
action area to another, you will need to light all<br />
of them. Typically, the setup used for the wide<br />
shots will work well (Figure 16-17).<br />
Exteriors<br />
Two broads provide overall fill light<br />
Chapters 13 and 14 cover, in passing, many outdoor<br />
lighting procedures. Following are some additional<br />
suggestions for professional looking results.<br />
If the sky is overcast or you are shooting<br />
entirely in the shade, you cannot do much in the<br />
way of lighting, Figure 16-18. In sunny weather,<br />
however, you can use your outdoor resources.<br />
Chapter 16 <strong>Lighting</strong> <strong>Applications</strong> 343<br />
Completed lighting plan<br />
Figure 16-17 To fully light each acting area, one fill<br />
light (1) is moved closer, an extra fill light (2) provides<br />
all-over fill, and two rim lights (3 and 4) accent the first<br />
two acting areas.
344 Video Digital Communication & Production<br />
Figure 16-18 Reflectors, screens, and silks are<br />
ineffective on sunless days.<br />
(Sue Stinson)<br />
Choosing Refl ectors<br />
Except for rim lighting, a rule of thumb for<br />
refl ectors is “the softer the better,” for evenness<br />
of coverage and subject comfort.<br />
Choose aluminum refl ectors when a long<br />
throw is needed, for backgrounds or wide shots.<br />
Avoid using them for key lights (except when<br />
placed well back) to keep them out of subject’s eyes.<br />
White refl ectors are excellent for fi ll. In<br />
closeups, subjects can even hold them themselves<br />
below the frame line.<br />
Matching Wide and Close Shots<br />
<strong>Lighting</strong> wide shots is easier outdoors<br />
because subjects do not need as much modeling,<br />
and because aluminum refl ectors can throw<br />
effective fi ll light up to 50′ or more, Figure 16-19.<br />
A B<br />
C<br />
Changing Light and Weather<br />
Refl ectors must be tended constantly,<br />
especially aluminum units that throw narrow<br />
beams. Between the time when a setup is begun<br />
and the moment when the shot is recorded,<br />
the sun can shift enough to misdirect the<br />
refl ector light.<br />
Refl ectors vs. Screening<br />
Sometimes, you may prefer a screen or<br />
even a silk to a refl ector. On the one hand,<br />
framed screens or silks cannot be used in wide<br />
shots, so matching the close shot lighting is<br />
more diffi cult. On the other hand, screens<br />
preserve the natural light patterns better than<br />
refl ectors, and silks can also replace white<br />
refl ectors when used vertically (Figure 16-20).<br />
Figure 16-20 A silk on the left side and a reflector<br />
on the right.<br />
(Photoflex)<br />
Figure 16-19 Matching lighting for wide and close shots. A—The wide shot is filled with a reflector at the<br />
eight o’clock position, placed 25′ away. B—The closeup lighting matches the wide shot lighting. C—The reflector<br />
is 25′ away.
<strong>Lighting</strong> Moving Subjects Outdoors<br />
The technique for lighting outdoor movement<br />
is the same as for interiors, except that your lighting<br />
instruments are reflectors. Hard aluminum surfaces<br />
work well because they throw light a long distance.<br />
Multiple reflectors fill a moving shot.<br />
<strong>Lighting</strong> Problems<br />
All lighting situations have problems, but<br />
some are especially common. One of these is<br />
subjects who are hard to light pleasingly; another<br />
involves specialized light sources.<br />
Subject Problems<br />
Unless you are lighting characters in story<br />
videos, you generally want to make your subjects<br />
look as good as possible. The following are fi ve<br />
of the most common subject problems, with<br />
suggestions for solving them.<br />
Heavy Faces<br />
You can use lighting to make heavy faces<br />
look slimmer. The trick is to highlight the center<br />
of the face and leave the sides in semi-shadow,<br />
Figure 16-21. To do this, key the lighting with a<br />
spotlight and use vertical barn doors (or fl ags,<br />
if necessary) to restrict the light to the center of<br />
the face. The light should be placed at or near<br />
the six o’clock position. To complete the setup,<br />
place soft fi ll lights at both the three o’clock and<br />
nine o’clock positions, moving them away from<br />
the subject until they deliver just enough light<br />
to reveal details in the shadows.<br />
Chapter 16 <strong>Lighting</strong> <strong>Applications</strong> 345<br />
Also, after traveling 50′ or so, the light beam<br />
pattern is broad enough to cover a larger area<br />
and is reduced to a more manageable intensity.<br />
The longer reflector throw provides a wider, less<br />
intense beam.<br />
Thin Faces<br />
The technique for lighting thin faces is just<br />
the opposite. Use soft key lights at or near the<br />
six o’clock and nine o’clock positions. Often,<br />
you may be able to omit the key light entirely,<br />
as in Figure 16-22.<br />
For easier comparison, Figure 16-21 and<br />
Figure 16-22 use wide and narrow renderings of<br />
the same face.<br />
Figure 16-21 A heavy face appears narrower when<br />
its sides are darker than its center.
346 Video Digital Communication & Production<br />
Figure 16-22 A thin face appears broader when its<br />
sides are brighter than its center.<br />
Darker Complexions<br />
Darker facial tones are beautiful when well lit,<br />
but they can offer contrast problems—especially<br />
in wedding cinematography, when the bride’s<br />
skin tones are contrasted with a brilliant white<br />
wedding dress. The trick here is to get more<br />
light on the face than the dress, Figure 16-23.<br />
Many on-camera lights can be fi tted with<br />
barn doors that partially block light from the<br />
white wedding dress. With stand-mounted<br />
lights, half screens can be added to the barn<br />
doors to further moderate the lower part of the<br />
light beam.<br />
If your camera light will accept filters, you can buy<br />
or make a half screen to reduce the bottom part of<br />
the light beam.<br />
Bald Subjects<br />
Balding heads are best handled by the<br />
makeup department—a little neutral powder<br />
will kill refl ections and be quite invisible to the<br />
camera. If the subject refuses powder (as men<br />
sometimes do) try moving the lights up and<br />
then, if necessary, farther to one side to reduce<br />
the refl ections.<br />
Subjects Wearing Glasses<br />
For refl ections on eyeglasses, the solution is<br />
similar. In general, small-source spotlights are<br />
easier to move out of the incidence/refl ection<br />
path (as explained in the sidebar). However,<br />
refl ections from the softlights often used for<br />
interviews can be tolerable, because viewers<br />
know that the subject has been lit for video.<br />
For brief shots, it is often enough for the subject to<br />
lift the earpieces of the eyeglasses slightly off the<br />
ears, tilting the lenses downward, and deflecting<br />
the reflection. When not overdone, this adjustment<br />
is generally invisible to the camera.<br />
Specialized Light Sources<br />
Practicals (such as table lamps) and<br />
environmental light sources (streetlights, signs,<br />
Figure 16-23 White clothing against darker complexions creates contrast problems. Reducing the light to the<br />
lower part of the frame improves contrast.<br />
Contrast problem <strong>Lighting</strong> adjusted
Incidence Equals Reflection<br />
In dealing with bald heads, spectacles, and<br />
other reflection problems, remember that light<br />
bounces off surfaces at the same angle, but in<br />
the opposite direction. So, if a reflection is hitting<br />
the camcorder lens, the light is probably too close<br />
to the camera position, whether horizontally,<br />
vertically, or both. That is why raising a light or<br />
moving it sideways will often remove or at least<br />
lessen a reflection.<br />
To minimize reflections, place lights at angles of 45°<br />
or greater.<br />
and shop windows) create problems because<br />
they are rarely in the right place and/or<br />
operating at the right intensity. To solve these<br />
problems, it is usually necessary to establish<br />
the light source by showing it on camera, and<br />
then replace it with a more controllable light.<br />
Practicals<br />
How you handle the lights that appear in<br />
the video frame depends on the lighting style<br />
you have chosen.<br />
Naturalistic or Expressionistic<br />
Oddly, the opposite extremes in lighting<br />
styles can use the same technique: replace bulbs<br />
in practicals with screw-base halogen lamps and<br />
use them for actual video lighting. The resulting<br />
light will be contrasty, but excess contrast is<br />
acceptable in these styles (Figure 16-24).<br />
Chapter 16 <strong>Lighting</strong> <strong>Applications</strong> 347<br />
Figure 16-24 You can light with practicals if the result<br />
fits the lighting style you are using.<br />
Realism or Pictorial Realism<br />
With these more common styles, you may<br />
want to establish the practicals and then use<br />
camera setups that exclude them, while simulating<br />
their light with video lights.<br />
Adjusting Intensity<br />
To balance visible light sources with the rest<br />
of your lighting, try fi tting larger or smaller lamp<br />
bulbs, as needed. Halogen replacement lamps<br />
can be dimmed somewhat to reduce intensity,<br />
but ordinary lights are already too orange to<br />
permit much further color shift through dimming.<br />
On the other hand, if you light a scene entirely<br />
with household bulbs, you can simply set the<br />
camera’s white balance manually to match their<br />
2700K–2800K color temperature.<br />
Moving Light Sources<br />
Subjects often carry light sources, such as<br />
fl ashlights or lanterns. When the practical light<br />
is not on-screen, you can simulate its light for<br />
better control.<br />
● Flashlight. A small spotlight with a handle<br />
makes a good simulated fl ashlight. Focus<br />
the beam in the spot position to create a<br />
hard edge, Figure 16-25.<br />
● Lantern. To make a convincing “lantern,”<br />
clip sheets of diffusion and orange fi lter<br />
material (for “candlelight”) to a broad.
348 Video Digital Communication & Production<br />
Figure 16-25 The practical flashlight is established by showing it on screen. But, the light from the flashlight is<br />
provided off-screen by a hand-held spot.<br />
Flashlight beam<br />
● Candle. For a candle effect, omit the<br />
diffusion for a harder light. Wearing a<br />
leather glove, wave your hand and move<br />
your fi ngers slowly in front of the light to<br />
create a fl ickering effect.<br />
Firelight<br />
Simulated fi relight is created in somewhat<br />
the same way as moving light sources.<br />
1. Place a broad very low, where a fi replace or<br />
campfi re would be.<br />
2. Gel the broad with an orange fi lter sheet.<br />
3. Staple a square of heavy cloth to a stick<br />
(denim works well), and slit the cloth at<br />
1″ intervals to create a “grass skirt” effect,<br />
Figure 16-26.<br />
4. Wave this device slowly in front of the<br />
“fi re” light source to add a convincing<br />
fl icker effect.<br />
As with most such effects, you can enhance the<br />
realism with sound effects—in this case, a crackling<br />
wood fire.<br />
Signs<br />
In some night interiors, colored signs and<br />
other neon sources tint parts of the subject. If<br />
the sign is steady, simply gel a light with an<br />
appropriate color. If the sign turns on and off,<br />
have an assistant move a fl ag rhythmically in<br />
and out of the light path.<br />
Hand-held spot<br />
(Lowel Light Inc.)<br />
Electronics<br />
Radar screens, computer monitors, and<br />
scientifi c instruments often bathe the faces of the<br />
subjects looking at them with light. With some<br />
units, the actual screen light may be bright enough,<br />
especially if the rest of the lighting is low key.<br />
If you cannot show the screens, however (say,<br />
because they are supposedly futuristic displays<br />
in a spaceship control cabin), place small lights<br />
low (at “screen” height) and gel them pale blue<br />
or green.<br />
Small LED arrays are often used to simulate<br />
electronic screens because their built-in dimmers<br />
simplify adjusting brightness.<br />
Figure 16-26 A “grass skirt” cookie can simulate the<br />
flickering of a fire.
<strong>Lighting</strong> Night Scenes<br />
<strong>Lighting</strong> scenes shot at night is challenging<br />
because there is little available light to help out.<br />
This section suggests some ways to create<br />
nighttime designs with relatively few instruments.<br />
Interior Scenes<br />
You can light indoor night scenes by using<br />
a few standard techniques.<br />
Use low-key mode. Create a low-key look<br />
in which dark and medium values dominate<br />
in the background, with brighter accents and a<br />
well-lit subject.<br />
Establish practicals. Since room lights are<br />
lit at night, establish practicals in the frame, and<br />
then mimic their light with video lights.<br />
Control window light. If you can hang<br />
heavy screen or neutral density material inside<br />
or outside a window, you may be able to reduce<br />
its light to a “nighttime” level (the bluish color<br />
temperature will look like moonlight). If you do<br />
not have the resources to do this, exclude windows<br />
and their light from the frame.<br />
Light for the highlights. In low-key lighting,<br />
you naturally use less fi ll light, so that shadows<br />
are deeper and show less detail.<br />
Fake the Darkness<br />
It is common to show a subject in bed,<br />
turning off the bedside light and going to sleep.<br />
Practical<br />
Fluorescent<br />
pan<br />
Fluorescent<br />
pan<br />
Crew<br />
member<br />
A B<br />
Fill<br />
Shot in actual light, the scene would be very<br />
contrasty, and then would go black when the<br />
light went out. Here is a procedure for lighting<br />
this scene more effectively.<br />
1. Establish the light level. Fit a halogen lamp<br />
in the bedside light and use it to key the<br />
scene. Use soft fi ll from the other side, with<br />
a crew member at the light. At this point,<br />
set and lock the camcorder exposure setting.<br />
2. Establish “night”. Next, turn off the key and<br />
fi ll lights and set up a very general overall<br />
fi ll, possibly with a pair of fl uorescent light<br />
banks or large LED arrays. Without changing<br />
the camera aperture, adjust this fi ll light until<br />
the subject and bed are visible, though dark.<br />
As an alternative, gel a spot or broad pale blue and<br />
place it at room-window height for a moonlight look.<br />
A window-frame cookie in front of the light will<br />
enhance the effect.<br />
3. Synchronize the scene lights. Rehearse<br />
the shot until the crew member at the fi ll<br />
light switch can turn the light off exactly<br />
when the subject turns off the bed light, so<br />
that the two light sources look like a single<br />
light, Figure 16-27.<br />
Although the remaining light (from the<br />
fl uorescent or LED fi ll) will be somewhat too<br />
bright for perfect realism, viewers generally<br />
accept it as “darkness.”<br />
Practical<br />
Fluorescent<br />
pan<br />
Chapter 16 <strong>Lighting</strong> <strong>Applications</strong> 349<br />
Figure 16-27 Faking darkness. A—The scene, as fully lit with practical, fill, and pan fill lights. B—After the<br />
subject and crew member have simultaneously switched off the practical and fill lights, the pan fill lights provide<br />
a very low level of light the viewer will accept as “darkness.”<br />
Fluorescent<br />
pan<br />
Fill<br />
Crew<br />
member
350 Video Digital Communication & Production<br />
Exterior Scenes<br />
It is impossible to light the whole outdoors<br />
for night scenes, but a few tricks will yield very<br />
satisfying results. First, light only the important<br />
action areas, as described previously. Then, try<br />
these suggestions.<br />
Use Back-Cross <strong>Lighting</strong><br />
Except where the action must be seen clearly,<br />
place lights to the side and behind subjects (in<br />
the nine o’clock to three o’clock arc) to edge<br />
them with rims of light that will separate them<br />
from the background, Figure 16-28.<br />
Rake the Background<br />
Night scenes are supposed to be dark. So,<br />
use just a few lights to pick out features of the<br />
background. As usual with background lighting,<br />
place the lights to hit the background at oblique<br />
angles. See Figure 16-29.<br />
Look for Motivation<br />
Outside of urban centers, there is often little<br />
actual light. To motivate video lighting, simulate<br />
car headlights and house or shop windows with<br />
lights placed low and shooting horizontally.<br />
For streetlights, move rim lighting directly over<br />
subjects to create eye socket shadows.<br />
Do not worry if some of your lights do not<br />
have enough motivation. This lighting problem<br />
is so common, even in big-budget productions,<br />
Figure 16-28 Lights placed high and close to the<br />
building provide back lighting.<br />
Back-cross lighting<br />
Figure 16-29 This large castle background is lit by<br />
just three lights.<br />
Rake the background<br />
that viewers have come to accept night exteriors<br />
full of unexplained light sources.<br />
Atmosphere<br />
Outside night scenes in movies are often wet<br />
because rain or fog (real or fake) picks up and<br />
scatters light rays, Figure 16-30.<br />
Day-for-Night <strong>Lighting</strong><br />
Although you can use a camcorder in very<br />
low light levels, there are good reasons for<br />
shooting exterior night scenes during the day<br />
using day-for-night lighting (Figure 16-31):<br />
● Daytime shooting is more convenient for<br />
everyone.<br />
Figure 16-30 Rain provides effective atmosphere.<br />
(Sue Stinson)
<strong>Lighting</strong> at “Magic Hour”<br />
Magic hour is the brief period before sundown.<br />
On a sunny day, magic hour provides light qualities<br />
that look especially attractive on screen. Shadows<br />
from the low sun are long, which models objects<br />
and enhances the impression of depth. The<br />
moisture in the air is often low, so everything<br />
appears exceptionally sharp and clear. The color<br />
temperature is warmer, lending a golden tone<br />
until near sundown, and then a distinctive sunsetorange<br />
tint.<br />
McKinley at magic hour.<br />
<strong>Lighting</strong> for magic hour is simple because the<br />
low sun makes reflector placement easy. The problem<br />
lies in capturing all the footage required in the<br />
relatively brief time before the sun actually sets. For<br />
this reason, you may wish to preset and rehearse<br />
several different camera setups, so that you can<br />
move quickly from one to the next as you shoot.<br />
● Daytime light levels are high enough for<br />
optimal imaging.<br />
● Fewer lighting instruments and accessories<br />
are required.<br />
● Though electrical power is helpful, in some<br />
cases you can shoot without it.<br />
In video, making daytime shots look like<br />
night is easy if you follow a few simple guidelines<br />
(the lighting setup is diagramed in Figure 16-32).<br />
Set white balance for incandescent. Using<br />
an indoor white balance setting outdoors<br />
(Figure 16-33) will lend an overall “moonlight”<br />
bluish cast to the footage, while rendering any<br />
Chapter 16 <strong>Lighting</strong> <strong>Applications</strong> 351<br />
Another problem with magic hour is white<br />
balance, because the color temperature drops<br />
continuously as the sun goes down. One way to<br />
solve the problem is by compensating for the color<br />
shift while shooting. To do this, manually reset the<br />
white balance frequently. That way, you will capture<br />
the long shadows and clear light of magic hour,<br />
but all your original camera footage will have the<br />
same neutral color balance.<br />
After you have edited a magic hour sequence,<br />
you can apply sunset tint to taste or even warm<br />
the images up progressively as the sequence<br />
unfolds to simulate an actual sunset. Be aware,<br />
however, that a digitally applied sunset color can<br />
have a mechanical, too-uniform quality. If you<br />
have the skill to capture it, there is no substitute<br />
for real “magic hour” light.<br />
The characteristic long shadows and warm light of<br />
“magic hour.”<br />
incandescent lights as true white. You may also<br />
want to set exposure so that the natural shadows<br />
fi ll in as deep black.<br />
If you will edit digitally (and no<br />
incandescent lighting is used) you can create<br />
the color, exposure, and contrast of “night” in<br />
postproduction. In this situation, it is often<br />
safer to get conventionally balanced and exposed<br />
footage and then alter it later.<br />
Use back-cross lighting. Instead of directing<br />
the main light source at subjects from the front<br />
or part-way to one side, position your subjects<br />
and refl ectors as needed to splash the brightest
352 Video Digital Communication & Production<br />
Figure 16-31 Day-for-night lighting.<br />
Exterior shot recorded normally. Completed day-for-night version.<br />
Figure 16-32 The setup for the shot.<br />
Figure 16-33 White balance set for incandescent<br />
(indoor) light.<br />
light from the rear (onto hair and shoulders),<br />
while the faces remain somewhat darker,<br />
Figure 16-34.<br />
Frame off the sky. Unless you can darken<br />
the sky with a polarizing fi lter, use neutral or<br />
high angles to aim the camcorder away from<br />
the sky, which will appear much too light for a<br />
convincing night effect (Figure 16-35).<br />
In some lighting conditions, a polarizing filter on<br />
the camcorder can turn a blue sky dark enough<br />
to pass for night, if it is not allowed to remain on<br />
screen too long.<br />
Include incandescent light. Try to include<br />
some incandescent or halogen lighting in the<br />
shot, such as headlights, a street light, or light<br />
Figure 16-34 Back-cross lighting from the sun<br />
creates a rim light of “moonlight.”
Figure 16-35 Including the daytime sky reveals the<br />
trick.<br />
streaming out of a window or open door. Since<br />
the indoor white balance setting will render<br />
this light as “white” it will contrast convincingly<br />
with the “moonlight” cast of the overall scene,<br />
Figure 16-36.<br />
<strong>Lighting</strong> Assignments<br />
In addition to the general lighting situations<br />
covered so far, there are a few specifi c assignments<br />
that come up frequently enough to deserve<br />
special attention. These include interviews,<br />
“stand-up” reports, compositing, very small<br />
areas, and graphic materials.<br />
Figure 16-36 Incandescent light completes the illusion.<br />
Chapter 16 <strong>Lighting</strong> <strong>Applications</strong> 353<br />
Interviews<br />
Interviews are among the most common<br />
lighting assignments. Typically, they involve two<br />
subjects and a moderate amount of background.<br />
One-Person Interviews<br />
The current style of video interview has the<br />
subject on-screen all the time. The interviewer’s<br />
questions are posed as topics to be responded<br />
to, so that they can be omitted in editing. In the<br />
fi nished interview, the subject appears to be<br />
discussing the subject spontaneously.<br />
Softlights are frequently used because they<br />
look natural, they generally light the background<br />
as well as the subject, and they are quick and<br />
easy to use.<br />
Since interview subjects are rarely media<br />
professionals, lighting should be moderate and<br />
be kept out of their eyes. Because interviews<br />
rarely use angles wider than medium (waist)<br />
shots, a refl ector can be used opposite the soft<br />
key for fi ll. Even with “natural” lighting, a small<br />
spot rigged as a rim light can add modeling<br />
and separate the subject from the background,<br />
Figure 16-37.<br />
Two-Person Interviews<br />
If your interviewer will appear on screen,<br />
you must light her or him as well, Figure 16-38.<br />
In establishing shots, the back view of the<br />
narrator in the foreground can often be lit by<br />
the lights on the interview subject. The same<br />
lights provide rim light to separate the subject<br />
and interviewer from the background.<br />
For single shots of the interviewer asking<br />
questions or listening to answers, you have two<br />
different options: light for real-time recording<br />
or re-light for a re-shoot. To light the interviewer<br />
separately for real-time recording with a second<br />
camera, position the reporter’s camera to shoot<br />
over the interviewee’s shoulder, so that both<br />
people are included in wider shots. Place the<br />
lights for both people so that they are outside the<br />
frame in both setups. If you are using only one<br />
camera or if some of the reporter’s questions and<br />
reactions need to be re-shot, you can re-light and<br />
reset the camera after the main interview to pick<br />
up this material for later editing into the sequence.
354 Video Digital Communication & Production<br />
Figure 16-37 <strong>Lighting</strong> a one-person interview.<br />
Two-light setup Closeup of the subject<br />
Figure 16-38 <strong>Lighting</strong> a two-person interview.<br />
Three-light setup<br />
Subject<br />
If you shoot the interviewer separately, you can<br />
place him or her in front of whatever background<br />
looks best—even in another location, if necessary.<br />
The shift will be invisible to the viewer, Figure 16-39.<br />
Stand-Up Reports<br />
Segments presented by reporters standing<br />
at the scene of news, sports, or entertainment<br />
events are called “stand-ups.” Even at the<br />
broadcast TV level, reporters often go into the<br />
fi eld with a single technician who must function<br />
as cinematographer, lighting director, and sound<br />
recordist (Figure 16-40).<br />
Shot over the<br />
interviewer’s shoulder<br />
Reverse setup<br />
features the interviewer<br />
Daytime Reports<br />
To simplify lighting, a one-person crew will<br />
often work with just two tools: an on-camera light<br />
and a stand-mounted refl ector, Figure 16-41. The<br />
camera-mounted light is typically variable in<br />
light output and powered by its own substantial<br />
battery. Even in daylight, a front fi ll light can<br />
highlight the reporter’s face just enough to<br />
emphasize it against the background.<br />
News camcorders are often fitted with batteries<br />
big enough to power a light as well.<br />
In Figure 16-41, the supplementary light is<br />
a stand-mounted refl ector. Because the camera<br />
person must leave the refl ector unattended while<br />
shooting, it needs to be heavy and relatively<br />
small to resist the wind.
When Cheating Is Legal<br />
Cheating is the common practice of moving<br />
a subject between camera setups, usually to<br />
increase working room, separate subject and<br />
background, or find a better-looking background<br />
altogether.<br />
Careful cheating is invisible to viewers,<br />
because the lack of true depth in video makes<br />
subject-to-background distances hard to judge,<br />
and the background “behind” a subject may not<br />
appear in earlier shots.<br />
A master two-shot of subject and interviewer, avoiding<br />
the windows.<br />
Two-shot<br />
In this example, a subject and an interviewer<br />
are placed in the upper-left corner of a room, to<br />
keep back and side windows out of the frame for<br />
the master shot.<br />
Because there is no room behind the subject<br />
to add a rim light for his closeup, the entire setup<br />
is “cheated” three feet out from the left wall.<br />
From the camera’s new position, the move is<br />
undetectable.<br />
Nighttime Reports<br />
Night shooting requires a different<br />
deployment of lighting tools, Figure 16-42. The<br />
on-camera light continues to provide much of<br />
the illumination. A second, battery-powered<br />
light on a stand can fulfi ll the same function as<br />
a refl ector, providing more modeling on the<br />
Chapter 16 <strong>Lighting</strong> <strong>Applications</strong> 355<br />
Lights, camera, and performers are all cheated to<br />
the right.<br />
Interviewer’s<br />
closeup<br />
Subject’s closeup<br />
Cheating a subject to light the background separately.<br />
When it is time for the interviewer’s closeup,<br />
she is cheated back and to the right (to avoid the<br />
right-wall window), and completely re-lit.<br />
Because viewers do not see the right wall in<br />
the other shots, this cheat, too, is undetectable.<br />
reporter’s face. Backgrounds at night are generally<br />
dark, but look for lighted walls or windows to<br />
include in the shot, so that the image behind<br />
the reporter has some design to it.<br />
LED lighting units are especially useful for field<br />
work because of their very low power consumption.
356 Video Digital Communication & Production<br />
Figure 16-39 Moving the interviewer farther away from the interviewee allows a better camera position for her<br />
closeup.<br />
Subjects are close together<br />
in the two-shot<br />
Figure 16-40 Two-person news teams are typical.<br />
Interviewer is moved farther away<br />
Closeup of interviewer with<br />
different background<br />
<strong>Lighting</strong> for Compositing<br />
With the power of today’s postproduction<br />
software, compositing is used increasingly.<br />
Compositing is the process of video recording<br />
subjects against flat, single-color backgrounds,<br />
and then digitally replacing the background with<br />
other visuals during postproduction.<br />
The more even the background color,<br />
the more perfectly it can be replaced. So, the<br />
challenge is to keep the background lighting<br />
absolutely uniform. To do this, you try to light<br />
background and subjects separately, Figure 16-43.<br />
<strong>Lighting</strong> the Background<br />
You can achieve very even background<br />
lighting with a pair of softlights (or spots with<br />
Figure 16-41 In this setup for a daytime report, the sun provides the rim light and a reflector fills from the left. An<br />
on-camera key light can be used to better highlight the reporter’s face.<br />
Sunlight and reflector On-camera key light
Figure 16-42 <strong>Lighting</strong> for nighttime reports.<br />
One-light setup<br />
Figure 16-43 <strong>Lighting</strong> for compositing.<br />
Spotlights with diffusion evenly<br />
wash the background<br />
heavy diffusion), placed one at each side.<br />
Experiment with light positions and throws to<br />
create a near-perfect wash of light.<br />
<strong>Lighting</strong> the Foreground<br />
Place the subjects as far forward of the<br />
background as possible. Classic spotlight<br />
lighting is easiest to use because the light paths<br />
are controllable. To keep foreground light off<br />
the background screen, position the lights<br />
relatively high and to the side (as far as 8:00 or<br />
8:30) to keep hot spots and shadows below and<br />
to the sides of the frame.<br />
Be sure to look at the background footage<br />
to determine the quality and direction of its<br />
own lighting. If your setup allows, key this<br />
footage into the image in place of the composite<br />
screen. Adjust subject lighting until it matches<br />
the composited background.<br />
Two-light setup<br />
Subject is as far in front of the<br />
background as practical<br />
Chapter 16 <strong>Lighting</strong> <strong>Applications</strong> 357<br />
Offset the camera light<br />
for better modeling<br />
Softlighting on both subject and<br />
background eliminates shadows<br />
(Bogen Manfrotto)<br />
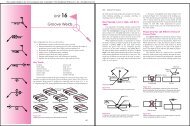
Small Objects and Areas<br />
<strong>Lighting</strong> small objects can be diffi cult because<br />
most professional lights are scaled to illuminate<br />
larger subjects. To overcome this problem, several<br />
techniques are available.<br />
Tabletop<br />
Tabletop cinematography involves shooting<br />
small objects and/or activities on a table, counter,<br />
or special photo stand (Figure 16-44). It is a<br />
common procedure for science experiments,<br />
product demonstrations, and how-to training<br />
sequences.<br />
In shooting small subjects, camera and<br />
lighting problems generally arise from two causes:<br />
● The short camera-to-subject distances<br />
(and/or telephoto lens settings) create very<br />
shallow depth of fi eld. This makes small<br />
objects diffi cult to keep in sharp focus.
358 Video Digital Communication & Production<br />
Figure 16-44 A tabletop shot.<br />
● The hands, arms, and head of the<br />
demonstrator tend to get into the picture.<br />
To help solve these questions, you need lights<br />
that are both very bright (to force smaller lens<br />
openings and thereby increase depth of fi eld)<br />
and very soft (to eliminate or at least minimize<br />
shadows in the picture).<br />
Permanent Compositing Studios<br />
Green screen backgrounds that include floors<br />
permit the use of “virtual” sets—complete digital<br />
environments into which subjects can be composited.<br />
A permanent compositing setup.<br />
(Photoflex)<br />
(Litepanels, Inc.)<br />
Every situation has unique lighting requirements,<br />
of course, but Figure 16-45 illustrates a solution<br />
for a typical tabletop setup. The subject and<br />
tabletop are bracketed by very large, bright<br />
fl uorescent softlights. These instruments are<br />
excellent for this application because:<br />
● Their 4′ square shape provides an extremely<br />
large source to reduce shadows.<br />
● Their multiple 40-watt tubes provide a bright<br />
light, permitting smaller f-stops to create<br />
greater depth of fi eld.<br />
● Their power requirements are low enough<br />
for use in most locations.<br />
● Their output is cool enough for subject comfort<br />
and for delicate applications, such as food<br />
demonstrations and biology experiments.<br />
LED arrays are even cooler and consume<br />
less power. Because their light is not as soft,<br />
however, they may need added diffusion for<br />
truly shadowless lighting.<br />
Tenting<br />
Where you want completely shadowless<br />
lighting (and do not require great depth of<br />
fi eld), you can use tent lighting. By hanging a<br />
In this studio setup, more than 20 one-foot LED<br />
arrays on overhead pipes are used to light the<br />
upper part of the background. Large arrays, like<br />
the 16-panel floor unit pictured on the right of the<br />
studio setup figure, cover the lower walls and floor.<br />
Smaller units, like the single and four-panel arrays<br />
stored on the left of the studio setup figure, are<br />
moved into position to light subjects in the foreground.<br />
LED arrays are very useful in compositing<br />
applications where large numbers of lights are<br />
required for uniform coverage because they emit<br />
almost no heat, they can be balanced by adjustable,<br />
remote controlled dimmers, and they consume so<br />
little power. When this studio uses 50 panels, all<br />
of the panels together draw 2,000 watts.<br />
To achieve a comparable light output with<br />
halogen lights would demand over ten times as<br />
much power—not counting the wattage of the air<br />
conditioning needed to counteract their heat.
Figure 16-45 Tabletop setups use very large, soft<br />
lights.<br />
Paper<br />
backing<br />
curves<br />
from<br />
horizontal<br />
to vertical<br />
Large-source lights<br />
white sheet over and around your subject and<br />
aiming lights through it, you can create the<br />
softest possible lighting effects. Tenting works<br />
very well outdoors, with a sheet hung over a<br />
pair of clothesline ropes, Figure 16-46. Tenting<br />
techniques are also useful for lighting products<br />
in commercials, Figure 16-47.<br />
Ring Lights<br />
Where other lighting techniques are not<br />
practical, ring lights can often achieve comparable<br />
effects (Figure 16-48). Because they surround<br />
the lens completely, these lights throw only one<br />
soft shadow, which is typically masked by the<br />
subject in front of it.<br />
Figure 16-46 A simple tent setup outdoors, using a<br />
bed sheet and clotheslines.<br />
Chapter 16 <strong>Lighting</strong> <strong>Applications</strong> 359<br />
Figure 16-47 A professional tent for small object<br />
cinematography.<br />
(Photoflex)<br />
Due to their unique shape and mounting position,<br />
ring lights require diffusion and filters that are<br />
specifically designed for them.<br />
Graphic Materials<br />
Many programs include two-dimensional<br />
subjects—photos, paintings, graphics, letters,<br />
book pages—in place of moving subjects. With<br />
today’s quality equipment, it is often easiest to<br />
record subjects with fl atbed scanners and import<br />
them into video programs during postproduction.<br />
If the fl at material is larger than about 8″ × 10″,<br />
however, scanning is often impractical. You<br />
will need to video record these larger subjects<br />
directly using a special lighting setup.<br />
Figure 16-48 Ring lights are available in LED arrays.<br />
(Litepanels, Inc.)
360 Video Digital Communication & Production<br />
Organizing a Setup<br />
Most often, you will work with the graphic<br />
material on a fl at surface and the tripod-mounted<br />
camcorder is aimed down at it. A sheet of glass<br />
will help hold the material fl at, but may create<br />
refl ection problems. The lighting is simple: one<br />
unit on each side of the artwork (Figure 16-49).<br />
Clamp work lights with halogen lamps are easy<br />
to position and adjust.<br />
For materials up to about 9″ × 12″, scanning is now<br />
more common than copying.<br />
Dealing with Refl ections<br />
With or without a glass cover plate, light<br />
refl ections are often a problem. To solve them,<br />
make sure that the lights are aimed at a 45° angle.<br />
Working Vertically<br />
In many cases, posters, paintings, charts, and<br />
other large subjects are best handled vertically.<br />
Make sure that the camcorder is centered<br />
horizontally and vertically, at a true 90° angle<br />
to the artwork. Position the lights far enough<br />
back to wash the subject evenly, and keep them at<br />
a 45° or less angle from the wall (Figure 16-50).<br />
Placing the camcorder far back with a telephoto lens<br />
setting will improve the quality of the image recorded.<br />
Figure 16-49 A professional copy stand with light<br />
diffusion for larger graphics.<br />
(Bogen Manfrotto)<br />
Figure 16-50 A vertical lighting setup for copying.<br />
To avoid reflections, place lights at an angle of 45° or<br />
less to the wall.<br />
45° 45°<br />
Video Snapshots<br />
When you capture passing events<br />
spontaneously (especially with a mobile phone,<br />
a personal media device, or a still camera), you<br />
have to use whatever light is available. Though<br />
you cannot control the lighting, you can make<br />
the most of whatever you fi nd. To do this,<br />
● Make sure you have enough light. If the<br />
image on your screen looks too dark or lacks<br />
detail, see if there is any more light you can<br />
turn on. If your recorder’s sensitivity can be<br />
adjusted, increase it to handle the low-light<br />
situation—many still cameras with video<br />
capability will do this automatically. A grainy<br />
image is better than almost none at all.
● Avoid bright backgrounds and excessive<br />
backlighting. If you can change your position,<br />
move around until windows and other light<br />
sources are out of your frame.<br />
● Look for good lighting. If you have the chance,<br />
use the most expressive lights available and,<br />
if possible, move your subject into them<br />
(Figure 16-51).<br />
Figure 16-51 Use the most expressive lights<br />
available. A—In this candid video, the down lights over<br />
the sink were turned on and the subject was moved<br />
to take advantage of them. B—In very dark, contrasty<br />
environments, you can sometimes position yourself<br />
between your subjects and the available light sources.<br />
A<br />
B<br />
Chapter 16 <strong>Lighting</strong> <strong>Applications</strong> 361<br />
● As always with video intended for e-mail<br />
or the Internet, avoid excessive panning,<br />
which can cause visible light sources to<br />
smear as they move across the screen.<br />
Since the charm of video snapshots lies in<br />
their spontaneity, elaborate lighting defeats their<br />
purpose. Nevertheless, you can often improve<br />
the lighting without making the scene appear “lit.”<br />
Internet <strong>Lighting</strong><br />
In addition to video snapshots posted to<br />
websites, many carefully produced videos are<br />
published on the Internet. These programs<br />
should be as fully lit as programs destined<br />
for other delivery systems. Although many<br />
sites now accept high-defi nition programs,<br />
streaming videos can have limitations because<br />
they are often intended for less than the full<br />
screen area. Here are some tips for lighting<br />
Internet videos:<br />
● Use classic four-source lighting (key, fi ll, rim,<br />
and background lights) to model subjects<br />
and enhance their apparent depth.<br />
● Pay special attention to rim (back) lighting<br />
to separate subjects sharply from their<br />
backgrounds.<br />
● Aim for high (or at least “medium”) key<br />
lighting to deliver bright images. Streaming<br />
video, especially when lower quality, can<br />
turn dark areas muddy and lacking in detail.<br />
● Keep background lighting simple to avoid<br />
shadow patterns and excessive modeling<br />
that can compete with foreground subjects.<br />
Backgrounds should be just dark enough<br />
so that well-lit foreground subjects stand<br />
out, Figure 16-52.
362 Video Digital Communication & Production<br />
Figure 16-52 The background should not compete<br />
with foreground subjects.<br />
Though this music video was<br />
exposed for the subject…<br />
…the very light background may cause too much<br />
contrast when the program is streamed.<br />
Other <strong>Lighting</strong> <strong>Applications</strong><br />
The representative lighting solutions in<br />
this chapter cannot cover all the situations that<br />
you may encounter, but they do demonstrate<br />
how to use the basic ideas behind all lighting<br />
designs to analyze each situation and create<br />
video lighting with style.
Summary<br />
Chapter 16 <strong>Lighting</strong> <strong>Applications</strong> 363<br />
◆ Classic Cl i studio di li lighting h i uses three h li lights h on a subject bj and d usually ll one or more on<br />
the background.<br />
◆ The key to “natural” lighting is soft light.<br />
◆ Background light intensity should be adjusted so that subject and background seem<br />
lit by the same environment, but the subject is slightly brighter.<br />
◆ <strong>Lighting</strong> locations presents unique challenges, such as lighting small interiors, having<br />
suffi cient power supply, adequately lighting a large interior, changing light and<br />
weather conditions outdoors.<br />
◆ In general, lighting should make your subjects look as good as possible.<br />
◆ Specialized light sources should be established by showing it on camera, and then<br />
replaced with a more controllable light.<br />
◆ Techniques for lighting indoor night scenes include: use low-key mode, establish<br />
practicals, control window light, and light for the highlights.<br />
◆ Tried-and-true techniques are regularly used for common lighting assignments.<br />
Technical Terms<br />
Amp (amperage): In lighting, the amount of electrical current drawn by a lighting<br />
instrument.<br />
Day-for-night lighting: A method of shooting daylight footage so that it appears to have<br />
been taken at night.<br />
Glamorous lighting: <strong>Lighting</strong> that emphasizes a subject’s attractive aspects and<br />
de-emphasizes defects.<br />
Magic hour: The period of time, up to two hours before sunset, characterized by long<br />
shadows, clear air, and warm light.<br />
Rugged lighting: <strong>Lighting</strong> technique that emphasizes three-dimensional qualities and<br />
surface characteristics of a subject.<br />
Tabletop: Cinematography of small subjects and activities on a table or counter.<br />
Tent lighting: A lighting arrangement in which white fabric is draped all around a<br />
subject to diffuse lighting completely for a completely shadowless effect.<br />
Three-point lighting: Classic subject lighting technique that consists of key, fi ll, rim, and<br />
background lights.<br />
Voltage: The electrical potential or “pressure” in a system—typically 110 or 220 volts in<br />
North America.<br />
Wattage: In lighting, the power rating of a lighting instrument. 500, 750, and 1,000 watt<br />
lamps are common.<br />
Review Questions<br />
Answer the following questions on a separate piece of paper. Do not write in this book.<br />
1. Classic three-point lighting uses key, _____, and rim lights on the subject, plus a<br />
background light.
364 Video Digital Communication & Production<br />
2. True or False? Glamorous lighting exaggerates the planes and angles of the face and<br />
emphasizes skin texture.<br />
3. Why are spots and fl oods effective instruments for lighting backgrounds?<br />
4. A light’s _____ is the distance between the instrument and the subject or background<br />
that it is lighting.<br />
5. Explain why spots are especially useful in tight quarters?<br />
6. What is the simplifi ed formula for calculating power draw? What are the benefi ts of<br />
using this simple calculation?<br />
7. True or False? Refl ectors that produce softer light provide even coverage.<br />
8. When a long throw is needed, choose a(n) _____ refl ector.<br />
9. How can a heavy face be lit to look slimmer?<br />
10. What are the standard techniques that can be used to light an indoor night scene?<br />
11. What i s magic hour? What are the qualities of available light during magic hour?<br />
12. Using an indoor white balance setting outdoors will create a(n) _____ cast to the footage.<br />
13. True or False? The main goal when lighting for compositing is to keep the background<br />
lighting absolutely uniform.<br />
14. What i s tent lighting?<br />
15. Explain the setup for recording a vertically-positioned, two-dimensional graphic.<br />
STEM and Academic Activities STEM<br />
1. Science. What is Ohm’s Law? How does Ohm’s Law apply to electrical circuits and<br />
power supply?<br />
2. Technology. Identify some lighting tools or pieces of equipment that have emerged<br />
in the last 20 years. What impact have these items had on the task of lighting a scene<br />
or location?<br />
3. Engineering. Make a sketch of a single subject on an interior set. On the sketch,<br />
draw the position of each lighting instrument for a three-point lighting arrangement.<br />
Label each instrument on the sketch.