OM, Gardena, String Trimmer 350 / 350 L / 530 Duo L, Art 02545-20 ...
OM, Gardena, String Trimmer 350 / 350 L / 530 Duo L, Art 02545-20 ...
OM, Gardena, String Trimmer 350 / 350 L / 530 Duo L, Art 02545-20 ...

You also want an ePaper? Increase the reach of your titles
YUMPU automatically turns print PDFs into web optimized ePapers that Google loves.
GARDENA®<br />
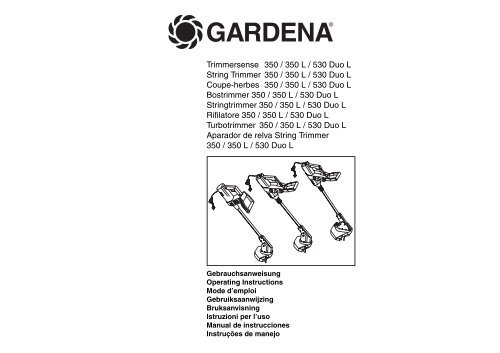
<strong>Trimmer</strong>sense <strong>350</strong> / <strong>350</strong> L / <strong>530</strong> <strong>Duo</strong> L<br />
<strong>String</strong> <strong>Trimmer</strong> <strong>350</strong> / <strong>350</strong> L / <strong>530</strong> <strong>Duo</strong> L<br />
Coupe-herbes <strong>350</strong> / <strong>350</strong> L / <strong>530</strong> <strong>Duo</strong> L<br />
Bostrimmer <strong>350</strong> / <strong>350</strong> L / <strong>530</strong> <strong>Duo</strong> L<br />
<strong>String</strong>trimmer <strong>350</strong> / <strong>350</strong> L / <strong>530</strong> <strong>Duo</strong> L<br />
Rifilatore <strong>350</strong> / <strong>350</strong> L / <strong>530</strong> <strong>Duo</strong> L<br />
Turbotrimmer <strong>350</strong> / <strong>350</strong> L / <strong>530</strong> <strong>Duo</strong> L<br />
Aparador de relva <strong>String</strong> <strong>Trimmer</strong><br />
<strong>350</strong> / <strong>350</strong> L / <strong>530</strong> <strong>Duo</strong> L<br />
Gebrauchsanweisung<br />
Operating Instructions<br />
Mode d’emploi<br />
Gebruiksaanwijzing<br />
Bruksanvisning<br />
Istruzioni per l’uso<br />
Manual de instrucciones<br />
Instruções de manejo
Beachten Sie die Sicherheitshinweise auf dem Gerät:<br />
Please adhere to the following safety instructions on the unit:<br />
Veuillez observer les instructions de sécurité figurant sur l’appareil :<br />
Houdt u zich aan de veiligheidsvoorschriften op het apparaat:<br />
Följ bruksanvisningen noga:<br />
Attenzione ai simboli di sicurezza sull’attrezzo:<br />
Observen las indicaciones de seguridad en el aparato:<br />
Por favor siga atentamente as instruções de segurança fornecidas no aparelho:<br />
Achtung! Vor Inbetriebnahme<br />
Gebrauchsanweisung lesen!<br />
Warning! Read instruction handbook!<br />
Merci de lire attentivement le mode<br />
d’emploi avant d’utiliser cet appareil !<br />
Let op! Voor ingebruikname de gebruiksaanwijzing<br />
lezen!<br />
Vor Regen und Nässe schützen!<br />
Do not use in rain or wet conditions!<br />
Protégez l’appareil de la pluie et de<br />
l’humidité !<br />
Niet aan vocht blootstellen!<br />
Dritte aus dem Gefahrenbereich<br />
fernhalten!<br />
Keep bystanders away!<br />
Maintenez tout tiers hors de la zone<br />
de travail !<br />
Houdt omstanders uit de buurt!<br />
Werkzeug läuft nach!<br />
Tool goes behind!<br />
Attention ! Après avoir lâché l’interrupteur,<br />
le système de coupe continue<br />
de tourner quelques instants.<br />
Machine loopt na!<br />
Augenschutz tragen!<br />
Wear eye protection!<br />
Portez des lunettes de protection !<br />
Draag oogbescherming!<br />
OBS! Läs igenom bruksanvisningen noga<br />
före användning!<br />
Attenzione! Prima di mettere in funzione<br />
l’attrezzo, leggere le istruzioni per l’uso!<br />
¡Atención! Antes de la puesta en marcha,<br />
lea el manual de instrucciones.<br />
Atenção! Leia o Manual de instruções antes<br />
da utilização!<br />
Använd inte maskinen i regn eller fuktig<br />
miljö!<br />
Proteggere l’attrezzo dall’umidità o dalla<br />
pioggia!<br />
¡Proteja el aparato de la lluvia y la humedad!<br />
Proteja o aparelho da chuva e da humidade!<br />
Tillse att inga obehöriga vistas i området!<br />
Tenere lontano i terzi dalla zona di lavoro!<br />
¡Mantener alejados a terceros del área de<br />
trabajo!<br />
Mantenha terceiros fora da área de perigo!<br />
Varning! Skärverktyget fortsätter att rotera<br />
ett tag efter motorn stängts av!<br />
Attenzione! Appena spento, l’attrezzo gira<br />
ancora alcuni istanti per inerzia!<br />
¡Atención! Funcionamiento por inercia.<br />
Atenção! Após desligar o interruptor o fio<br />
de corte ainda continua em movimento<br />
durante alguns instantes.<br />
Använd skyddsglasögon!<br />
Indossare gli occhiali di protezione!<br />
¡Use gafas de protección!<br />
Use protecção nos seus olhos!<br />
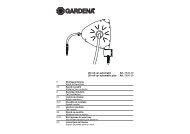
Kennzeichnung von Stellteilen (nur <strong>Trimmer</strong>sense TS <strong>530</strong> <strong>Duo</strong> L, <strong>Art</strong>.-Nr. 2548)<br />
Identification of controls (<strong>String</strong> <strong>Trimmer</strong> TS <strong>530</strong> <strong>Duo</strong> L, art. no. 2548, only)<br />
Identification des parties réglables seulement Coupe-herbes TS <strong>530</strong> <strong>Duo</strong> L, réf. 2548)<br />
Aanduiding van diverse functies (alleen Bostrimmer TS <strong>530</strong> <strong>Duo</strong> L, art.nr. 2548)<br />
Kontrollidentifiering (endast <strong>String</strong>trimmer TS <strong>530</strong> <strong>Duo</strong> L, artikelnr. 2548)<br />
Identificazione dei comandi (solo Rifilatore TS <strong>530</strong> <strong>Duo</strong> L, art. 2548)<br />
Descripción de controles (sólo Turbotrimmer TS <strong>530</strong> <strong>Duo</strong> L, <strong>Art</strong>. Nº 2548)<br />
Identificação de comandos (apenas Aparador de relva <strong>String</strong> <strong>Trimmer</strong> TS <strong>530</strong> <strong>Duo</strong> L, art.nº 2548)<br />
Fadenverlängerung Verstellung des Zusatzhandgriffes<br />
Cord lengthening Adjusting the additional handle<br />
Avance du fil de coupe Réglage de la poignee supplementaire<br />
Draadverlenging Verstellen van de extra handgreep<br />
Trådmatning Extrahandtagets inställning<br />
Allungamento del filo di taglio Regolazione dell’impugnatura supplementare<br />
Alargamiento del hilo Reajuste de la empuñadura adicional<br />
Prolongamento do fio Ajuste do manípulo adicional
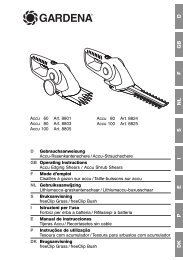
GARDENA <strong>String</strong> <strong>Trimmer</strong> TS <strong>350</strong> / TS <strong>350</strong> L / TS <strong>530</strong> <strong>Duo</strong> L<br />
1. Technical data<br />
TS <strong>350</strong> TS <strong>350</strong> L TS <strong>530</strong> <strong>Duo</strong> L<br />
Motor output W <strong>350</strong> <strong>350</strong> <strong>530</strong><br />
Supply voltage V 230 230 230<br />
Frequency Hz 50/60 50/60 50/60<br />
<strong>String</strong> strength mm 1.6 1.6 1.6<br />
Cutting width mm 250 250 300<br />
<strong>String</strong> supply m 6 6 2 x 5<br />
Weight kg approx. 2.8 3.0 3.4<br />
Rpm of string cartridge<br />
Working area related emission<br />
rpm 12,000 12,000 12,000<br />
characteristic value L 1)<br />
pA dB(A) 86 85 91<br />
Noise level L 2)<br />
WA dB(A) 96 96 96<br />
Vibrations a 1)<br />
vhw ms -2 < 2.5 3.5 < 2.5<br />
Measuring method 1) according to EN 786 2) according to 84/538/EC<br />
2. Information regarding the operating instructions<br />
Please read and follow these<br />
operating instructions carefully.<br />
Familiarise yourself with the unit’s<br />
features, the controls, its proper<br />
use and the safety instructions<br />
included.<br />
3. Product use<br />
The GARDENA <strong>String</strong> <strong>Trimmer</strong>s<br />
TS <strong>350</strong> / TS <strong>350</strong> L / TS <strong>530</strong> <strong>Duo</strong> L<br />
are designed for trimming/cutting<br />
lawn areas in private house and<br />
hobby gardens.<br />
These trimmers are for private<br />
use only and are not designed<br />
4. Assembly (ill. A1)<br />
Before beginning work, insert<br />
the enclosed safety cover (14)<br />
into the groove of the cutting head<br />
support (15) to the end stop and<br />
push firmly onto both locks (24).<br />
Listen for audible snap-in.<br />
A<br />
For safety reasons children<br />
under the age of 16<br />
or people who are not familiar<br />
with these operating instructions<br />
should not use this<br />
<strong>String</strong> <strong>Trimmer</strong>.<br />
for use in public facilities, parks,<br />
sporting grounds, on roads, in<br />
agriculture or forestry.<br />
It is essential to observe the<br />
manufacturer’s operating instructions<br />
to ensure the unit’s proper<br />
functioning. These instructions<br />
Note:<br />
Check whether the cover is<br />
properly seated by pulling in<br />
the opposite direction. If properly<br />
mounted, the safety cover is<br />
undetachable from the cutting<br />
head support.<br />
Please keep these operating<br />
instructions in a safe place.<br />
G<br />
also contain advice for service,<br />
maintenance and repair.<br />
A<br />
Attention! For safety<br />
reasons the unit must not<br />
be used for hedge trimming<br />
or for chopping up for composting.<br />
11
5. Using the product (ill. A-H)<br />
5.1 How to connect the<br />
<strong>String</strong> <strong>Trimmer</strong> – cable lock /<br />
extension cable (ill. A/B)<br />
Loop the extension cable (1) and<br />
insert it into the cable lock (2).<br />
This prevents unintentional disconnection<br />
of the electrical plug.<br />
Then plug into the mains cable.<br />
To switch on, depress the pushbutton<br />
(3) on the handle (4).<br />
The <strong>String</strong> <strong>Trimmer</strong> will switch<br />
off as soon as the push-button<br />
is released.<br />
A<br />
The safety devices installed<br />
by the manufacturer<br />
must not be removed<br />
or by-passed, e.g. by binding<br />
the on/off switch to the handle.<br />
This will prevent the trimmer<br />
switching off automatically,<br />
and may cause serious injury.<br />
Attention! The trimming string<br />
will take a while to stop running<br />
after the unit is switched off.<br />
5.2 Working position (ill. C)<br />
Ensure that you have a secure<br />
foothold when working. Hold your<br />
<strong>String</strong> <strong>Trimmer</strong> with one hand<br />
on the handle (4), with the other<br />
on the guide handle (5).<br />
5.3 Trimming along lawn edges<br />
and in awkward places (ill. D)<br />
(<strong>String</strong> <strong>Trimmer</strong> TS <strong>350</strong> L /<br />
TS <strong>530</strong> <strong>Duo</strong> L)<br />
Guide your <strong>String</strong> <strong>Trimmer</strong> using<br />
the handle (4) and the guide<br />
handle (5).<br />
For vertical cutting, e. g. for<br />
trimming lawn edges, turn the<br />
cutting unit as described under<br />
5.6 below.<br />
5.4 Trimming along the base<br />
of walls, fences and around<br />
trees (ill. E)<br />
Guide your <strong>String</strong> <strong>Trimmer</strong> with<br />
the left side of the cover at a<br />
short distance from hard objects<br />
and surfaces.<br />
12<br />
5.5 Removing dirt from joints<br />
between pavers (ill. C/D)<br />
Hold the <strong>String</strong> <strong>Trimmer</strong> in such<br />
a way that the cutting string (6)<br />
runs slightly inclined just above<br />
the pavers.<br />
5.6 Turning and swivelling<br />
the cutting tool, telescopic<br />
adjustment (ill. D/F)<br />
Turning<br />
(for trimming lawn edges)<br />
(<strong>String</strong> <strong>Trimmer</strong> TS <strong>350</strong> L /<br />
TS <strong>530</strong> <strong>Duo</strong> L)<br />
Loosen the tightening nut (7)<br />
on the motor casing. The connecting<br />
tube with the cutting tool<br />
can then be turned by up to 180°.<br />
Secure the cutting tool in the<br />
desired position by tightening<br />
the nut.<br />
Telescopic adjustment<br />
(to suit the operators height)<br />
(<strong>String</strong> <strong>Trimmer</strong> TS <strong>350</strong> L /<br />
TS <strong>530</strong> <strong>Duo</strong> L)<br />
Loosen the tightening nut (7)<br />
on the motor casing. The length<br />
of the connecting tube with the<br />
cutting tool can then be adjusted<br />
by up to 100 mm.<br />
Swivelling<br />
(for mowing on slopes, under<br />
bushes and garden furniture)<br />
(<strong>String</strong> <strong>Trimmer</strong> TS <strong>530</strong> <strong>Duo</strong> L)<br />
By depressing the switch (8),<br />
you can swivel or incline the<br />
handle into two other angles<br />
of 15° allowing three different<br />
working positions (ill. F).<br />
5.7 Adjusting the guide<br />
handle (ill. F) (<strong>String</strong> <strong>Trimmer</strong><br />
TS <strong>350</strong> L / TS <strong>530</strong> <strong>Duo</strong> L)<br />
By releasing the adjustment<br />
element (9) you can adjust the<br />
guide handle to the desired<br />
working position.<br />
Adjust the position of the guide<br />
handle to suit your body height<br />
so that the <strong>String</strong> <strong>Trimmer</strong> can<br />
be guided just above the ground<br />
with an ideal weight balance.<br />
5.8 Automatic string lengthening<br />
procedure with the motor<br />
running (ill. G) (<strong>String</strong> <strong>Trimmer</strong><br />
TS <strong>350</strong> / TS <strong>350</strong> L)<br />
A clean cut will only be achieved<br />
with the maximum cord length.<br />
Tap your trimmer sharply on<br />
the ground. Avoid sustained depression.<br />
Ensure that the cutting<br />
head is parallel to ground. The<br />
cord will automatically lengthen.<br />
Listen for audible switching action.<br />
If the string is too long, it will be<br />
automatically adjusted to the<br />
correct length by the string limiter<br />
blade (10).<br />
5.9 Automatic string lengthening<br />
procedure with the motor<br />
running<br />
(<strong>String</strong> <strong>Trimmer</strong> TS <strong>530</strong> <strong>Duo</strong> L)<br />
A clean cut will only be achieved<br />
with the maximum cord length.<br />
Briefly press and release the<br />
switch (11) to start/stop the<br />
motor. This causes automatic<br />
lengthening of the string. Listen<br />
for audible switching action. If the<br />
string is too long it will be automatically<br />
adjusted to the correct<br />
length by the string limiter blade<br />
(10).<br />
5.10 Manual string lengthening<br />
(ill. H)<br />
1. Disconnect the mains plug!<br />
2. Depress the release (12)<br />
and manually pull out string<br />
or strings until it stops.<br />
If necessary, repeat this procedure<br />
until the string just projects<br />
over the edge of the<br />
cover.<br />
While the <strong>String</strong> <strong>Trimmer</strong> is<br />
being operated, the string length<br />
is adjusted automatically as described<br />
under “Automatic string<br />
lengthening”.<br />
A<br />
Be careful with the cutting<br />
blade/string limiter<br />
(10) whilst lengthening the<br />
string by hand. Risk of injury!<br />
G G<br />
6. Maintenance, service, storage<br />
The GARDENA <strong>String</strong> <strong>Trimmer</strong>s<br />
require mimimal maintenance.<br />
Make sure that the cooling air<br />
inlets (13) never become obstructed<br />
by dirt.<br />
Remove grass clippings and dirt<br />
with a dry cloth or brush. Remove<br />
grass clippings and dirt from the<br />
safety cover (14) after every use.<br />
Repairs may only be carried<br />
out by GARDENA Service<br />
Centres or dealers authorised<br />
by GARDENA.<br />
A<br />
Attention! Always disconnect<br />
the mains plug<br />
before working on the <strong>String</strong><br />
<strong>Trimmer</strong> (checking, cleaning,<br />
maintenance). Risk of injury!<br />
To avoid injury to persons and<br />
product damage: Never clean<br />
the <strong>String</strong> <strong>Trimmer</strong> with running<br />
water or with a water jet, in<br />
particular a high pressure<br />
water jet.<br />
Store the <strong>String</strong> <strong>Trimmer</strong> in a<br />
dry place where it is protected<br />
from frost.<br />
We recommend hanging<br />
storage to avoid unnecessary<br />
stress on the cutting head.<br />
The <strong>String</strong> <strong>Trimmer</strong> should<br />
be stored out of the reach of<br />
children.<br />
Follow the manufacturer’s<br />
instructions when replacing<br />
the string cartridge.<br />
6.1 How to replace the string<br />
Please use only the original<br />
GARDENA <strong>String</strong> Cartridges.<br />
<strong>Art</strong>. No. 5371<br />
for <strong>String</strong> <strong>Trimmer</strong> TS <strong>350</strong> /<br />
TS <strong>350</strong> L<br />
<strong>Art</strong>. No. 5372<br />
for <strong>String</strong> <strong>Trimmer</strong> TS <strong>530</strong> <strong>Duo</strong> L<br />
You can order these string<br />
cartridges from your GARDENA<br />
dealer or directly from the<br />
GARDENA customer service.<br />
Never use metallic cutting<br />
cartridges or spare parts and<br />
accessories which have not<br />
been defined by the manufacturer!<br />
<strong>String</strong> <strong>Trimmer</strong> TS <strong>350</strong> /<br />
TS <strong>350</strong> L (ill. I/K)<br />
Disassembly (ill. I)<br />
1. Disconnect the mains plug!<br />
2. Keep the reel holder (16) in a<br />
fixed position. Unlock the cover<br />
(17) by turning it to the left.<br />
Remove the reel.<br />
Assembly (ill. I/K)<br />
1. Make sure the bayonet lock<br />
(18) of the reel holder (16) is<br />
free of dirt.<br />
2. Introduce the string in the<br />
filament guide of the cover<br />
(17), then insert the reel.<br />
3. Keep the reel holder (16) in<br />
a fixed position.<br />
4. Insert the cover with the reel<br />
(17), press down and turn to<br />
the right until the end stop.<br />
Ensure that the marks on the<br />
reel holder (16) and on the<br />
cover (17) perfectly match<br />
(ill. I1).<br />
Ensure correct working<br />
position before switching on<br />
the <strong>String</strong> <strong>Trimmer</strong>.<br />
<strong>String</strong> <strong>Trimmer</strong> TS <strong>530</strong> <strong>Duo</strong> L<br />
(ill. L/M)<br />
Disassembly (ill. L)<br />
1. Disconnect the mains plug!<br />
2. Keep the reel holder (19) in a<br />
fixed position. Unlock the cover<br />
(<strong>20</strong>) by turning it to the left.<br />
Remove the reel.<br />
Assembly (ill. L/M)<br />
1. Introduce first the lower string<br />
(21), then the upper string (22)<br />
in the string guides (23) of<br />
the reel holder (19), then insert<br />
the reel completely in the reel<br />
holder (19).<br />
2. Keep the reel holder (19) in a<br />
fixed position, insert the cover<br />
(<strong>20</strong>), press down and secure<br />
by turning to the right until<br />
it stops.<br />
3. Ensure that the arrows on<br />
the reel holder (19) and on the<br />
cover (<strong>20</strong>) match perfectly<br />
(ill. L1).<br />
Ensure correct working<br />
position before switching on<br />
the <strong>String</strong> <strong>Trimmer</strong>.<br />
If you have any problem with your<br />
<strong>String</strong> <strong>Trimmer</strong>, please contact<br />
our Customer Service or return<br />
the defective unit together with<br />
a short description of the problem<br />
and, if covered under guarantee,<br />
with the warranty card duly<br />
completed and signed, directly<br />
to one of the GARDENA Service<br />
Centres listed on the back of<br />
this leaflet.<br />
We expressly point out that,<br />
in accordance with the product<br />
liability law, we are not liable<br />
for any damage caused by our<br />
units if it is due to improper<br />
repair or if parts exchanged are<br />
not original GARDENA parts<br />
or parts approved by us, and,<br />
if the repairs were not carried<br />
out by a GARDENA Service<br />
Centre or an authorised specialist.<br />
The same applies to<br />
spare parts and accessories.<br />
13
7. Advice for proper use, safety instructions<br />
A<br />
Inspect the unit<br />
before each use<br />
Do not use the <strong>String</strong> <strong>Trimmer</strong>,<br />
if safety devices (push button,<br />
safety cover) and/or the string<br />
cartridge are damaged or worn.<br />
Never by-pass safety devices.<br />
Inspect the area to be cut before<br />
and during work. Remove<br />
any foreign objects such as<br />
stones.<br />
If, in spite of care, you come<br />
into contact with an obstruction<br />
whilst cutting, turn off<br />
the trimmer and remove it.<br />
Check the unit for possible<br />
damage and have it repaired,<br />
if necessary.<br />
A Use/Responsibility<br />
This <strong>String</strong> <strong>Trimmer</strong> can cause<br />
serious injuries!<br />
Use the unit only for purposes<br />
specified in these operating<br />
instructions.<br />
You are responsible for the<br />
safety in the working area.<br />
Make sure that there are no<br />
other people (especially children)<br />
or animals within or near<br />
the working area.<br />
14<br />
Never use the <strong>String</strong> <strong>Trimmer</strong><br />
if safety devices are damaged<br />
or defective!<br />
Disconnect the mains plug.<br />
Check the <strong>String</strong> <strong>Trimmer</strong>,<br />
especially the string cartridge<br />
regularly and replace it, if<br />
necessary.<br />
Wear an eye shield or goggles!<br />
Wear sturdy shoes and long<br />
trousers to protect your legs.<br />
Keep fingers and feet away<br />
from the cutting string – above<br />
all when starting work.<br />
Ensure that you have secure<br />
foothold whilst working. The<br />
electrical cable should always<br />
be kept away from the cutting<br />
area.<br />
Attention! Take extra care<br />
when walking backwards.<br />
You may stumble.<br />
Only work when visibility is<br />
good.<br />
A Interrupting work<br />
Never leave the <strong>String</strong> <strong>Trimmer</strong><br />
unattended in the working<br />
place. If you stop work, store<br />
the trimmer in a safe place.<br />
Disconnect the mains plug!<br />
Should you stop work in order<br />
to get to another working place,<br />
always switch off the <strong>Trimmer</strong>,<br />
wait until the tool stops and<br />
disconnect the mains plug!<br />
A Work place safety<br />
Make yourself familiar with the<br />
surroundings and look out for<br />
dangers which you may not<br />
detect due to machinery noise.<br />
Never use the unit when it<br />
rains or in damp/wet areas.<br />
Do not operate the <strong>String</strong><br />
<strong>Trimmer</strong> in or near swimming<br />
pools and garden ponds.<br />
A Electrical safety<br />
Check the power cable regularly<br />
for damage and signs<br />
of wear and tear.<br />
The <strong>String</strong> <strong>Trimmer</strong> must<br />
only be operated with an undamaged<br />
electric cable. If<br />
the mains- or extension cable<br />
is damaged, disconnect the<br />
mains plug immediately.<br />
The socket of an extension<br />
cable should be waterproof.<br />
Only use permitted extension<br />
cables. Ask your electrician.<br />
For portable units which are<br />
used outdoors, we recommend<br />
to use a fault circuit breaker.<br />
In Switzerland use of a fault<br />
circuit breaker is obligatory.<br />
G G<br />
Certificate of Conformity<br />
The undersigned<br />
GARDENA Kress + Kastner GmbH · Hans-Lorenser-Str. 40 · D-89079 Ulm<br />
hereby certifies that the <strong>String</strong> <strong>Trimmer</strong>s<br />
Design Electric motor Electric motor<br />
Manufacturer GARDENA GARDENA<br />
Type TS <strong>350</strong> / TS <strong>350</strong> L TS <strong>530</strong> <strong>Duo</strong> L<br />
Motor Manufacturer GARDENA GARDENA<br />
Type universal motor universal motor<br />
Rotational speed 12,000 r.p.m. 12,000 r.p.m.<br />
are in accordance with the 84/538/EEC guideline.<br />
Guaranteed max. noise level 96 dB(A) 96 dB(A)<br />
Cutting width 250 mm 300 mm<br />
Type if cutting device nylon string nylon string<br />
Ulm, 30.06.1997 Kress + Kastner GmbH<br />
ppa. J. Katzer<br />
Technical Dept. Manager<br />
EU Certificate of Conformity<br />
The undersigned<br />
GARDENA Kress + Kastner GmbH · Hans-Lorenser-Str. 40 · D-89079 Ulm<br />
hereby certifies that, when leaving our factory, the units indicated below are in accordance with the<br />
harmonised EU guidelines, EU standards of safety and product specific standards.<br />
This certificate becomes void if the units are modified without our approval.<br />
Description of the units:<br />
<strong>String</strong> <strong>Trimmer</strong><br />
Types:<br />
TS <strong>350</strong> / TS <strong>350</strong> L / TS <strong>530</strong> <strong>Duo</strong> L<br />
<strong>Art</strong>. No.:<br />
2545 / 2546 / 2548<br />
EU directives:<br />
Machinery Directive 89/392/EC<br />
mod. 91/368/EC<br />
Electromagnetic Compatibility<br />
89/336/EC<br />
Low Voltage Directive 73/23/EC<br />
Directive 93/68/EC<br />
®<br />
GARDENA<br />
Harmonised<br />
European standard:<br />
EN 292-1<br />
EN 292-2<br />
EN 786<br />
EN 60335-1<br />
National standards:<br />
DIN VDE 0730 part 1<br />
DIN VDE 0730 part 2ZP<br />
Year of CE marking:<br />
1996 (TS <strong>350</strong> L / TS <strong>530</strong> <strong>Duo</strong> L)<br />
1997 (TS <strong>350</strong>)<br />
Ulm, 30.06.1997<br />
J. Katzer<br />
Technical Dept. Manager<br />
15
D<br />
Garantie<br />
GARDENA gewährt für dieses<br />
Produkt 1 Jahr Garantie (ab Kaufdatum).<br />
Diese Garantieleistung<br />
bezieht sich auf alle wesentlichen<br />
Mängel des Gerätes, die nachweislich<br />
auf Material- oder<br />
Fabrikationsfehler zurückzuführen<br />
sind. Sie erfolgt durch die Ersatzlieferung<br />
eines einwandfreien<br />
Gerätes oder durch die kostenlose<br />
Reparatur des eingesandten<br />
Gerätes nach unserer Wahl,<br />
wenn folgende Voraussetzungen<br />
gewährleistet sind:<br />
.Das Gerät wurde sachgemäß<br />
und laut den Empfehlungen<br />
in der Gebrauchsanweisung<br />
behandelt. Es wurde weder<br />
vom Käufer noch von einem<br />
Dritten versucht, das Gerät zu<br />
reparieren.<br />
.Das Gerät wurde ausreichend<br />
frankiert direkt an eine der<br />
GARDENA Servicestellen<br />
gesandt, unter Beifügung<br />
der vollständig ausgefüllten<br />
Garantiekarte bzw. des<br />
Rechnungsbeleges.<br />
Diese Hersteller-Garantie berührt<br />
die gegenüber dem Händler/<br />
Verkäufer bestehenden Gewährleistungsansprüche<br />
nicht.<br />
Verschleißteile (z.B. Faden,<br />
Schneidkopf-Deckel) sind von<br />
der Garantie ausgeschlossen.<br />
G<br />
Guarantee<br />
GARDENA guarantees this product<br />
for 1 year (from date of<br />
purchase). This guarantee covers<br />
all serious defects of the unit<br />
that can be proved to be material<br />
or manufacturing faults. Under<br />
guarantee we will either replace<br />
the unit or repair it free of charge<br />
if following conditions apply:<br />
.The unit must have been<br />
handled properly and in keep-<br />
ing with the requirements of<br />
the operating instructions.<br />
In addition, no attempt at repair<br />
by the customer or a nonauthorised<br />
third party is permitted.<br />
.The unit is returned directly<br />
postage paid to a GARDENA<br />
Service Centre together with<br />
the warranty card duly completed<br />
and signed.<br />
This manufacturer’s guarantee<br />
does not affect the user’s<br />
existing warranty claims against<br />
the dealer/seller.<br />
Parts subject to wear (e.g.<br />
string, cutting head cover) are<br />
excluded from this guarantee.<br />
F<br />
Garantie<br />
Pour mieux vous servir,<br />
GARDENA accorde une garantie<br />
contractuelle de 1 an à compter<br />
du jour de l’achat. Elle est assurée<br />
sur décision de GARDENA<br />
par le remplacement gratuit des<br />
pièces défectueuses ou de l’appareil.<br />
En tout état de cause s’applique<br />
la garantie légale couvrant toutes<br />
les conséquences des défauts<br />
ou vices cachés. (article 1641 et<br />
suivants du Code Civil).<br />
Pour que ces garanties soient<br />
valables, les conditions suivantes<br />
doivent être remplies :<br />
.L’appareil a été manipulé de<br />
manière adéquate, suivant les<br />
instructions du mode d’emploi.<br />
.Il n’y a eu aucun essai de<br />
réparation, ni par le client, ni<br />
par un tiers.<br />
.L’appareil et la carte de<br />
garantie dûment remplie ont<br />
été retournés en port payé<br />
au Service Après-Vente de<br />
GARDENA France.<br />
Une intervention sous garantie<br />
ne prolonge pas la durée initiale<br />
de la garantie contractuelle.<br />
Toutes les revendications dépassant<br />
le contenu de ce texte<br />
ne sont pas couvertes par la<br />
garantie, quel que soit le motif<br />
de droit.<br />
Pendant la période de garantie,<br />
le Service Après-Vente effectuera,<br />
à titre payant, les réparations<br />
nécessaires par suite de<br />
manipulations erronées.<br />
La garantie ne s’étend pas<br />
aux pièces d’usure normale<br />
(ex : fil de coupe, couvercle de<br />
la tête de coupe).<br />
N<br />
Garantie<br />
GARDENA geeft op dit product<br />
1 jaar garantie (vanaf de aankoopdatum).<br />
Deze garantie heeft<br />
betrekking op alle wezenlijke<br />
defecten aan het toestel, die aanwijsbaar<br />
op materiaal- of fabricagefouten<br />
berusten. Garantie<br />
vindt plaats door de levering van<br />
een vervangend apparaat of door<br />
de gratis reparatie van het ingestuurde<br />
apparaat, naar onze<br />
keuze, indien aan de volgende<br />
voorwaarden is voldaan:<br />
.Het apparaat werd vakkundig<br />
en volgens de adviezen in<br />
de gebruiksaanwijzing behandeld.<br />
Noch de koper, noch een<br />
derde persoon heeft getracht<br />
het apparaat te repareren.<br />
.Het apparaat werd voldoende<br />
gefrankeerd aan de GARDENA<br />
technische dienst gestuurd,<br />
met toevoeging van een volledig<br />
ingevulde garantiekaart<br />
resp. kopie van de rekening.<br />
Deze garantie van de producent<br />
heeft geen betrekking op de ten<br />
aanzien van de handelaar/ verkoper<br />
bestaande aansprakelijkheid.<br />
Slijtagegevoelige onderdelen<br />
(bijv. draden, snijkopdeksel)<br />
vallen niet onder de garantie.<br />
47
Garantiekarte<br />
Warranty Card<br />
Carte de garantie<br />
Garantiekaart<br />
Garantikort<br />
Certificato di garanzia<br />
Tarjeta de garantía<br />
Cartão de garantia<br />
GARDENA <strong>Trimmer</strong>sense TS <strong>350</strong> ❑ <strong>Art</strong>.-Nr. 2545<br />
GARDENA <strong>String</strong> <strong>Trimmer</strong><br />
Coupe-herbes GARDENA TS <strong>350</strong> L ❑ <strong>Art</strong>.-Nr. 2546<br />
GARDENA bostrimmer<br />
GARDENA <strong>String</strong>trimmer TS <strong>530</strong> <strong>Duo</strong> L ❑ <strong>Art</strong>.-Nr. 2548<br />
GARDENA Rifilatore<br />
GARDENA Turbotrimmer<br />
GARDENA Aparador de relva <strong>String</strong> <strong>Trimmer</strong><br />
Wurde gekauft am:<br />
Was purchased on:<br />
Acheté le (date et lieu d’achat) :<br />
Werd gekocht op:<br />
Försäljningsdatum:<br />
Data di acquisto:<br />
Se vendió el:<br />
Comprado em:<br />
50<br />
Händlerstempel:<br />
Dealer’s stamp /Receipt:<br />
Cachet du revendeur :<br />
Stempel van de handelaar:<br />
Återförsäljarens stämpel:<br />
Timbro del rivenditore:<br />
Sello del comerciante:<br />
Carimbo do vendedor:<br />
Beanstandung:<br />
Reasons for complaint:<br />
Défaut constaté :<br />
Klacht:<br />
Reklamation:<br />
Reclamo:<br />
Reclamación:<br />
Motivo de reclamação:<br />
✃
Deutschland<br />
GARDENA<br />
Kress + Kastner GmbH<br />
GARDENA Service<br />
Hans-Lorenser-Straße 40<br />
D-89079 Ulm<br />
Produktfragen: (07 31) 490-123<br />
Reparaturen: (07 31) 490-290<br />
Argentina<br />
Unitán s.a.i.c.a.<br />
Paseo Colón 221 – P. 10°<br />
1399 Buenos Aires<br />
Australia<br />
NYLEX Corporation Ltd.<br />
25-29 Nepean Highway<br />
P.O. Box 68<br />
Mentone, Victoria 3194<br />
Austria<br />
GARDENA Österreich<br />
Gesellschaft m.b.H.<br />
Stettnerweg 11-15<br />
2100 Korneuburg<br />
Belgium<br />
MARKT (Belgium) NV/SA<br />
Sterrebeekstraat 163<br />
1930 Zaventem<br />
Canada<br />
Continental Industries<br />
100, Summerlea Road<br />
Brampton, Ontario<br />
Canada L6T 4X3<br />
Chile<br />
Comercial Maquinex<br />
Nueva Panamericana Sur,<br />
Nº 1050<br />
San Bernardo<br />
Santiago de Chile<br />
Cyprus<br />
FARMOKIPIKI LTD<br />
P.O. Box 7098<br />
74, Digeni Akrita Ave.<br />
1641 Nicosia<br />
Czech Republic<br />
GARDENA spol. s.r.o.<br />
Brn`énská 634<br />
66442 Brno-Mod`´rice<br />
Denmark<br />
GARDENA Danmark A/S<br />
Bejlerholm 10<br />
9400 Nørresundby<br />
Finland<br />
Habitec Oy<br />
Martinkyläntie 52<br />
017<strong>20</strong> Vantaa<br />
France<br />
GARDENA France<br />
Service Après-Vente<br />
BP 50080<br />
95948 ROISSY CDG Cedex<br />
Great Britain<br />
GARDENA UK Ltd.<br />
27-28 Brenkley Way<br />
Blezard Business Park<br />
Seaton Burn<br />
Newcastle upon Tyne<br />
NE13 6DS<br />
Greece<br />
Agrokip<br />
G. Psomadopoulos & Co.<br />
<strong>20</strong>, Lykourgou str.<br />
Kallithea<br />
Athens<br />
Hungary<br />
GARDENA Magyarország Kft.<br />
Késmárk utca 22<br />
1158 Budapest<br />
Iceland<br />
Heimilistaeki hf<br />
Saetun 8<br />
P.O. Box 5340<br />
125 Reykjavik<br />
Italy<br />
GARDENA Italia S.r.l.<br />
Via Donizetti 22<br />
<strong>20</strong>0<strong>20</strong> Lainate (Mi)<br />
Japan<br />
KAKUDAI Mfg. Co. Ltd.<br />
1-4-4, Itachibori Nishi-ku<br />
Osaka 550<br />
Luxembourg<br />
Magasins Jules Neuberg<br />
Grand Rue 30<br />
Case Postale No. 12<br />
Luxembourg <strong>20</strong>10<br />
Netherlands<br />
MARKT (Holland) BV<br />
Postbus 219<br />
1380 AE Weesp<br />
New Zealand<br />
NYLEX<br />
New Zealand Limited<br />
Head Office<br />
22, Ormiston Road<br />
Private Bag<br />
South Auckland Mail Centre<br />
Auckland<br />
Norway<br />
GARDENA Norge A/S<br />
Postboks 214<br />
<strong>20</strong>13 Skjetten<br />
Poland<br />
GARDENA Polska Sp. z o.o.<br />
Orzeszyn 35a<br />
k/Piaseczna<br />
05-532 Baniocha<br />
Portugal<br />
MARKT (Portugal), Lda.<br />
Recta da Granja do Marquês<br />
Algueirão<br />
2725 Mem Martins<br />
Russia / Россия<br />
АО АМИДА<br />
ул. Моcфилмовcкая 66<br />
117330 Моcква<br />
Singapore<br />
Variware<br />
Holland Road Shopping Centre<br />
227-A 1st Fl., Unit 29<br />
Holland Avenue<br />
Singapore 1027<br />
Slowenia<br />
Silk d.o.o. Trgovina<br />
Brodiљиe 15<br />
1236 Trzin<br />
South Africa<br />
GARDENA<br />
South Africa (Pty.) Ltd.<br />
P.O. Box 11534<br />
Vorna Valley 1686<br />
Spain<br />
ANMI Andreu y Miriam S.A.<br />
Calle Pere IV, 111<br />
08018 Barcelona<br />
Sweden<br />
GARDENA Svenska AB<br />
Box 9003<br />
<strong>20</strong>039 Malmö<br />
Switzerland<br />
GARDENA Kress + Kastner AG<br />
Bitziberg 1<br />
8184 Bachenbülach<br />
Turkey<br />
Bahçe Tarim ve Sulama<br />
Araçlari Ticaret A.Þ.<br />
Soðanlik Yolu, Yalniz<br />
Selvi Sok. No: 21<br />
81440 Kartal-Ýstanbul<br />
USA<br />
GARDENA<br />
3085 Shawnee Drive<br />
Winchester, VA 22604<br />
2546-<strong>20</strong>.960.05/0992<br />
GARDENA Kress + Kastner GmbH<br />
Postfach 27 47, D-89070 Ulm<br />
http://www.gardena.de