
You also want an ePaper? Increase the reach of your titles
YUMPU automatically turns print PDFs into web optimized ePapers that Google loves.
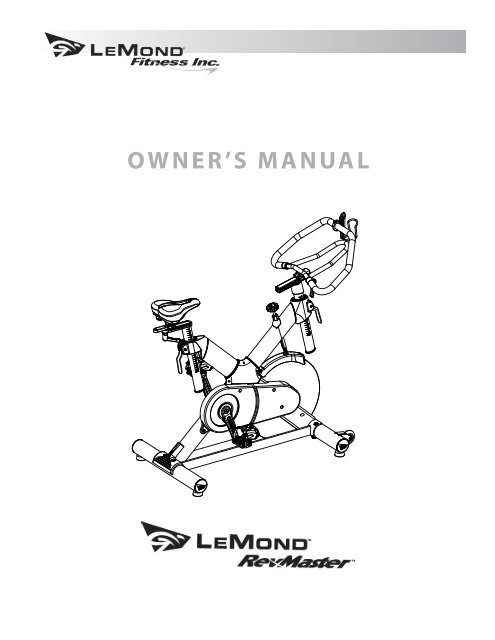
OWNER’S <strong>MANUAL</strong>
2<br />
<strong>LeMond</strong>® RevMaster<br />
Visit our website at<br />
www.<strong>LeMond</strong>fitness.com<br />
<strong>LeMond</strong> <strong>Fitness</strong> Inc.<br />
15540 Woodinville-Redmond Road<br />
Suite A100<br />
Woodinville, WA 98072 USA<br />
Telephone (+1) 425.482.6773<br />
Fax: (+1) 425.482.6724<br />
© 2007 <strong>LeMond</strong> <strong>Fitness</strong> Inc. <strong>LeMond</strong> and RevMaster are registered trademarks.
CONGRATULATIONS<br />
CONGRATULATIONS!<br />
You have just become a valued <strong>LeMond</strong> fitness customer. Our team is committed to making your cycling<br />
experience fun and rewarding — offering you detailed product information, expert fitness advice, and<br />
direct customer support you can depend on. I want to thank-you for purchasing an exciting <strong>LeMond</strong><br />
RevMaster indoor group cycle.<br />
This RevMaster Owner’s Manual will help you get the most enjoyment from your new indoor group<br />
cycle. It not only explains all the important features and safety considerations of the RevMaster, it<br />
also includes great workout tips and exercise principles. If at any time you have questions about this<br />
information, please call us at (425) 482-6773 and we will be happy to help you. To help us answer your<br />
questions quickly, we recommend that you have the serial number of your bike ready when you call us.<br />
The serial number of your bike is located on the back side of the belt cover.<br />
The RevMaster has been tested by some of America’s most famous cyclists. Our company founder,<br />
Greg <strong>LeMond</strong>, is the force behind the inspiration and design of this remarkable indoor bike. Greg’s story<br />
is one of courage and heroic accomplishment. In 1986, Greg became the first American to win the<br />
longest and most physically demanding event in the world — the Tour de France. Only nine months<br />
later in April of 1987, he narrowly escaped death when he was accidentally shot in a hunting accident.<br />
During a long and painful rehabilitation, he set a goal that many considered inconceivable: to once<br />
again win the Tour de France. In 1989, he achieved that goal, and then proved it was no mere stroke of<br />
luck by winning the Tour a third time in 1990.<br />
A legendary athlete, Greg introduced many cycling innovations during his racing career. Just as aero<br />
bars are now commonplace, the RevMaster is the new standard in indoor group cycles. The<br />
RevMaster combines Greg’s passion for cycling with exceptional product innovation. Built to deliver<br />
an incredible workout, every component of the RevMaster has been designed to be more innovative,<br />
more user friendly and more comfortable than any other indoor group cycle you have ridden. Whether<br />
you are a beginning fitness enthusiast or a highly conditioned athlete, you will immediately feel the difference.<br />
Greater Comfort<br />
•<br />
•<br />
•<br />
4-way handlebar & seat adjustability allows you to properly fit your bike ranging from the upright<br />
position to a low, stretched out setup ideal for triathletes.<br />
Narrower crank design replicates the geometry of a road bike for greater comfort.<br />
Interchangeable seat options allow you to tailor the seat to your personal preference.<br />
Finally, its attractiveness and small footprint allows you to position the RevMaster anywhere in your<br />
home for maximum enjoyment; and you’ll also enjoy how quiet a RevMaster workout is. All together,<br />
you will quickly discover that the RevMaster gives you a better cycling experience than any other<br />
indoor group cycle.<br />
3
FEATURES<br />
4<br />
•<br />
•<br />
•<br />
•<br />
•<br />
•<br />
•<br />
•<br />
•<br />
Next generation X frame design — Excellent stability, and 350 lb. user load<br />
New bottom bracket cartridge — Fast, simple assembly and service<br />
FEATURES<br />
New fender with integrated brake assembly — Keeps sweat off the flywheel and is easy to<br />
remove for service<br />
Increased adjustment range — Better fit for improved comfort<br />
Improved corrosion resistance — New electroless nickel plating is stronger and more durable<br />
than other finishes<br />
New post clamps — Quicker and easier vertical adjustment of the seat and handlebar<br />
Standard pedal thread — Accepts most standard cycling pedals<br />
Faster assembly — Most components are pre-assembled<br />
No calibration required — Just hop on & ride<br />
Exclusive Features<br />
•<br />
4-way micro adjustability for both seat & handlebars put you in the “sweet zone” for muscular<br />
participation; allowing you to involve more muscles for better workouts.<br />
• The RevMaster is so smooth and comfortable you can work out much longer than you ever<br />
imagined.<br />
Please review the rest of this Owner’s Manual carefully before you start using your new RevMaster.<br />
The information enclosed here will help you get the most enjoyment out of your workout and includes<br />
valuable operating, service, safety, and trouble-shooting information, as well as guidelines for an effective<br />
exercise program.<br />
We are confident that you will love your new RevMaster. From Greg and the whole <strong>LeMond</strong> <strong>Fitness</strong><br />
team, we wish you a lifetime of good rides and great workouts.
TABLE OF CONTENTS<br />
WARRANTY . ................................................................. 6<br />
SAFETY GUIDELINES ......................................................... 7<br />
ASSEMBLY AND INSTALLATION INSTRUCTIONS .............................. 9<br />
GUIDELINES FOR SAFE OPERATION ......................................... 13<br />
OPERATING INSTRUCTIONS . ................................................ 14<br />
GENERAL EXERCISE GUIDELINES ............................................. 16<br />
MAINTENANCE INSTRUCTIONS ............................................. 18<br />
TROUBLESHOOTING ....................................................... 20<br />
SPECIFICATIONS ........................................................... 22<br />
EXERCISE LOGS ........................................................... 24<br />
5
Warranty<br />
6<br />
WARRANTY<br />
This is to certify that the <strong>LeMond</strong>® RevMaster exercise bike is warranted by <strong>LeMond</strong> <strong>Fitness</strong> Inc. to be<br />
free of all defects in materials and workmanship. This warranty does not apply to any defect caused by<br />
negligence, misuse, accident, alteration, improper maintenance, or an “act of God.”<br />
The <strong>LeMond</strong> RevMaster Product Warranty assumes that the recommended service guidelines have<br />
been followed by the customer, and covers the following:<br />
Parts:<br />
• Frame - 5 years<br />
•<br />
•<br />
•<br />
•<br />
Cranks, flywheel, handlebar, handlebar post, seat post - 3 years<br />
Bottom bracket cartridge assembly, pillow block bearings, tension assembly -2 years<br />
Pedals - 1 year<br />
Seat, grip, handles, pedal straps, and brake pad - 90 days<br />
Labor: - 90 days following customer installation<br />
Contact our Customer Service Department to report any problems. When calling, please be prepared<br />
to provide the customer service representative with the following information:<br />
•<br />
•<br />
•<br />
•<br />
Your name, customer number, shipping address, and telephone number<br />
The serial number(s) of the inoperable bike(s)<br />
The date(s) of purchase for the inoperable bike(s)<br />
Your billing address<br />
This information will ensure that you are the only one ordering parts under your warranty protection.<br />
If warranty replacement parts are shipped to you, you may be required to return the inoperable part.<br />
To facilitate this process, the following policy has been established:<br />
•<br />
•<br />
•<br />
•<br />
Please call our Customer Service Department (425-452-6773) to receive a return goods authorization<br />
prior to shipment.<br />
<strong>LeMond</strong> <strong>Fitness</strong> will incur all ground freight charges for warranty parts ordered for a machine<br />
that is less than 90 days old.<br />
You are responsible for freight charges on warranty parts for machines that are more than 90<br />
days old. (You will not be responsible for the freight charges for any returned inoperable parts.)<br />
If an inoperable warranty parts must be returned to our Customer Service Department, we will<br />
pay the shipping cost and provide detailed return shipping instructions. These instructions will<br />
be sent along with your warranty replacement part.<br />
<strong>LeMond</strong> <strong>Fitness</strong> Inc. neither makes, assumes nor authorizes any representative or other person to<br />
make or assume for us, any other warranty whatsoever, whether expressed or implied, in connection<br />
with the sale, service, or shipment of our products. We reserve the right to make changes and improvements<br />
in our products without incurring any obligation to similarly alter products previously purchased.<br />
In order to maintain your product warranty and to ensure the safe and efficient operation of<br />
your machine, only authorized replacement parts can be used. This warranty is void if parts other than<br />
those provided by <strong>LeMond</strong> <strong>Fitness</strong> are used.
This symbol appearing throughout this manual means:<br />
Attention! Be Alert! Your saftey is involved.<br />
SAFETY GUIDELINES<br />
The following definition applies to the word “WARNING” found throughout this manual:<br />
WARNING<br />
Used to call attention to POTENTIAL hazards that could result in personal injury or loss of life.<br />
READ ALL INSTRUCTIONS BEFORE USING THIS EXERCISE EQUIPMENT.<br />
1.<br />
2.<br />
3.<br />
4.<br />
5.<br />
6.<br />
7.<br />
8.<br />
9.<br />
10.<br />
!<br />
IMPORTANT SAFETY INSTRUCTIONS<br />
The RevMaster indoor group cycle is intended for cardiovascular fitness training and may be used<br />
in group or individual settings. Use this equipment only for its intended use as described in this<br />
manual. Do not attempt to ride this bike at high pedal speeds or in a standing position until you<br />
have practiced and are comfortable riding at slower pedal speeds.<br />
This unit is NOT equipped with a freewheel system. If the flywheel is in motion, the pedals will be in<br />
motion. Do not attempt to stop the unit by applying reverse pressure to the pedals as knee injury<br />
may occur. Do not attempt to remove your feet from the pedals while they are in motion as serious<br />
injury may occur from the spinning pedals.<br />
Wait for the flywheel to coast to a stop. If you want to quickly stop the flywheel, apply firm downward<br />
pressure to the brake knob. Do not attempt to dismount the RevMaster unless the pedals and<br />
the flywheel are at a complete stop.<br />
Injury or death may occur from improper use or over-training. Consult a medical doctor or qualified<br />
fitness instructor to determine an exercise program appropriate to your level of fitness.<br />
Never attempt to turn the pedal crank arms by hand. Do not expose your hands or your arms to the<br />
drive mechanism as possible injury could occur.<br />
In commercial settings, the RevMaster should always be used in a supervised environment with<br />
qualified instructors.<br />
In a home setting, keep unsupervised children away from the unit when not in use. Keep children<br />
and pets away from the unit while in use.<br />
Do not perform push-up type movements on the handlebars.<br />
Never drop or insert any object into any opening on the exercise equipment.<br />
Only use the unit on a stable, level floor.<br />
7
11.<br />
12.<br />
8<br />
SAFETY GUIDELINES<br />
Follow the instructions for safe use of the equipment including proper seat position, handlebar<br />
position, and use of the foot positioning system of the pedals. Never adjust the handlebars past the<br />
minimum safe insertion depth marked with the word “STOP”.<br />
For safe operation, allow for at least 1foot (30cm) of free space to either side of the unit and 2 feet<br />
(60cm) of free space to the rear of the unit.<br />
The safety level given by the design of this equipment can only be maintained when the equipment is<br />
regularly examined for damage and wear. Inoperable components should be replaced immediately or<br />
the equipment should not be used until it is repaired.<br />
Failure to follow all guidelines may compromise the effectiveness of the exercise experience, expose<br />
yourself (and possibly others) to injury, and reduce the longevity of the equipment.<br />
Your Serial Number:<br />
Your <strong>LeMond</strong> <strong>Fitness</strong>:<br />
SAVE THESE INSTRUCTIONS<br />
____________________________________________________________________________________<br />
Dealer: _____________________________________________________________________________<br />
Phone: _____________________________________________________________________________<br />
Your comments and suggestions are welcome.<br />
Congratulations, and thank you for buying the RevMaster.
Seat<br />
Assembly<br />
Adjustment<br />
Lever<br />
Stretch Pad<br />
Cam Clamp<br />
Rear<br />
Stabilizer<br />
Seat Post<br />
ASSEMBLY AND INSTALLATION<br />
Handlebars<br />
Brake Knob /<br />
Resistance Adjustment<br />
Crank<br />
<strong>LeMond</strong> RevMaster<br />
Pedal<br />
ASSEMBLY INSTRUCTIONS<br />
Bottle Holder<br />
Cam Clamp<br />
Handlebar<br />
Post<br />
Fender<br />
Flywheel<br />
Drive Belt<br />
(under cover)<br />
Front<br />
Stabilizer<br />
Transport<br />
Wheels<br />
Before leaving the manufacturing facility, your <strong>LeMond</strong>® RevMaster® exercise bike was thoroughly<br />
inspected and tested for proper operation. To minimize shipping damage, careful attention was given to<br />
making your bike ready for shipment.<br />
9
DELIVERY<br />
Your <strong>LeMond</strong> RevMaster will arrive packed in 1 carton. Upon arrival fully inspect the carton for damage.<br />
Point out any damage to the delivery person and have the delivery person record the damage on the<br />
delivery paperwork. Contact the Customer Service Department at (425) 482-6773 to report any damage.<br />
Please follow these detailed instructions and you will find that your bike can be unpacked and assembled<br />
with ease.<br />
10<br />
M4 x 10 (2)<br />
M5 x 10 (1)<br />
M8 x 15 (10)<br />
Star Washer (4)<br />
Curved Washer (4)<br />
Brass Washer (1)<br />
Handlebar Assy. (1)<br />
Seat Assy. (1)<br />
Assembly Parts<br />
ASSEMBLY INSTRUCTIONS<br />
Adjustment Lever (1)<br />
Water Bottle Holder (1)<br />
Rear Stabilizer (1)<br />
Front Stabilizer (1)<br />
Stretch Pad (1)<br />
Pedal, left (1)<br />
Pedal, right (1)<br />
Track Cap (1)<br />
[not to scale]
REMOVE ThE BIkE AND COMpONENTS FROM ThE ShIppING CARTON<br />
1.<br />
2.<br />
3.<br />
4.<br />
ASSEMBLY INSTRUCTIONS<br />
Move the box to the desired location. Ensure that the carton is standing upright and remove the<br />
strapping material.<br />
Pull the cardboard edge out along the bottom of the box to remove the staples. Lift the top of the<br />
box up and set aside.<br />
Remove the two smaller boxes from the main frame of the bike.<br />
Open both boxes and verify that you have all of the hardware and parts necessary to assemble your<br />
bike; you should have this owner’s manual, all the illustrated assembly parts, and all the necessary<br />
tools.<br />
ASSEMBLY<br />
Note: It is not necessary to remove the bike from the foam shipping cradle before assembly.<br />
1.<br />
2.<br />
3.<br />
4.<br />
5.<br />
Align the front stabilizer (the one with the<br />
transport wheels) with the holes in the main<br />
frame, below the flywheel.<br />
Attach the stabilizer with two (2) M8 x 15<br />
mm screws and two (2) star washers above,<br />
and two (2) M8 x 15 mm screws and two (2)<br />
curved washers below. Tighten them with a<br />
hex key<br />
Align the rear stabilizer with the holes in the<br />
main frame below the seat post<br />
Attach the rear stabilizer with two (2) M8x15<br />
mm screws and two (2) star washers above,<br />
and two (2) M8 x 15 mm screws and two (2)<br />
curved washers below. Tighten them with a<br />
hex key.<br />
Place the stretch pad on the rear stabilizer<br />
and back post of the frame. Attach with two<br />
(2) M8 X 15 mm bolts and tighten them with<br />
a hex key.<br />
M8 + star washer<br />
M8 + curved washer<br />
M8 + curved washer<br />
M8 x 15<br />
M8 + star washer<br />
11
6.<br />
12<br />
Position the seat assembly atop the seat track on the seat post. Lightly grease the end of the<br />
threads on an adjustment lever. Loosely thread the adjustment lever through the brass washer,<br />
through the hole in the seat track, and into the seat assembly. Slide the seat to the desired position<br />
and tighten the adjustment lever.<br />
Note: The handle on the adjustment lever has a<br />
ratchet function. Once you have tightened<br />
a lever, pull out on the handle and rotate it<br />
so it does not stick out. Release the handle<br />
to lock it into place.<br />
7.<br />
Loosen the adjustment lever on the<br />
Brass<br />
Washer<br />
Adjustment<br />
Lever<br />
Pull Out and Rotate<br />
handlebar assembly. Slide the assembly<br />
onto the track on the handlebar post and tighten the adjustment lever. (Use the adjustment lever’s<br />
ratchet function as necessary.)<br />
Adjustment<br />
Lever<br />
M4 X 10 (2)<br />
Track Cap<br />
Pressure Pad<br />
Note: There is a pressure pad at the end of the adjustment lever that is held in place by shipping foam. The<br />
foam is pushed out of the way when you slide the assembly onto the track. If the pad should come<br />
loose, replace it before sliding the assembly onto the track.<br />
8.<br />
9.<br />
Install the handlebar track cap onto the end of the track with two (2) M4 X 10 mm screws.<br />
The pedals are marked as if you are seated on the bike, “R” for right, and “L” for left. Carefully thread<br />
the right pedal into the crank arm with your fingers - do not cross thread the pedal in the crank arm!<br />
Use the 15 mm wrench tool to tighten the pedal. Repeat this step for the left pedal.<br />
Note: The left pedal is reverse-threaded.<br />
10.<br />
ASSEMBLY INSTRUCTIONS<br />
To install the bottle holder, align the bottle holder to the mounting bracket on the handlebar and<br />
attach with one (1) M 5 X 10 mm countersunk screw. Tighten with a hex key.
GUIDELINES FOR SAFE OpERATION<br />
1.<br />
2.<br />
3.<br />
4.<br />
5.<br />
!<br />
WARNING<br />
GUIDELINES FOR SAFE OpERATION<br />
THESE GUIDELINES ARE DIRECTED TO YOU, AS THE OWNER OF THIS EXERCISE EQUIPMENT.<br />
YOU SHOULD INSIST THAT ALL USERS FOLLOW THE SAME GUIDELINES. YOU SHOULD MAKE<br />
THIS <strong>MANUAL</strong> AVAILABLE TO ALL USERS.<br />
Obtain a complete physical examination from your medical doctor and enlist a health/fitness professional’s<br />
aid in developing an exercise program suitable for your current health status.<br />
When working out for the first time, start out slowly for a minimum of five minutes. After your<br />
muscles are warmed up, gradually increase the pedaling rate and/or resistance to a speed that<br />
allows you to attain your target heart rate zone.<br />
The speed and duration of your exercise program should always be subject to how you feel. Never<br />
permit peer pressure to exceed your personal judgment while exercising.<br />
Overweight or severely deconditioned individuals should be particularly cautious when using the<br />
equipment for the first time. Even though such individuals may not have histories of serious physical<br />
problems, they may perceive the exercise to be far less intense than it really is, resulting in the<br />
possibility of overexertion or injury.<br />
Although all equipment manufactured by <strong>LeMond</strong>® <strong>Fitness</strong>, Inc. has been thoroughly inspected<br />
by the manufacturing facility prior to shipment, proper installation and regular maintenance are<br />
required to ensure safety. Maintenance is the sole responsibility of the owner.<br />
13
INSTRUCTIONS FOR FIRST-TIME USERS<br />
Your First Workout On The <strong>LeMond</strong>® RevMaster<br />
Adjusting the fit<br />
Take a moment to learn how to properly fit your RevMaster to your body; it will make your workouts a<br />
more pleasant and safer experience. The RevMaster provides more seat and handlebar adjustability than<br />
any other indoor group cycle, and each adjustment is numbered so you can quickly return the adjustments<br />
to your specific settings. Making full use of these features will give you the most comfortable ride<br />
possible and allow you to exercise efficiently. Using the bike when it is incorrectly adjusted can result in<br />
unnecessary discomfort and increase your risk of injury.<br />
Seat Adjustment:<br />
1.<br />
2.<br />
3.<br />
4.<br />
5.<br />
6.<br />
7.<br />
8.<br />
9.<br />
10.<br />
14<br />
Adjusting the Seat’s height<br />
Stand next to the seat post and adjust the seat to hip height.<br />
Rotate the crank so that the pedals are in the vertical, 12 and 6 o’clock,<br />
position.<br />
Place your foot in the toe cage of the pedal closest to the floor and<br />
mount the bike. Ensure that the ball of your foot is over the center of<br />
the pedal. Your leg should be slightly bent at the knee (155 ° extension),<br />
as shown in the picture to the right.<br />
If your leg is too straight or your foot cannot touch the pedal you will<br />
need to lower the seat. If your leg is bent too much you will need to<br />
raise the seat.<br />
Dismount the bike and pull up on the seat post cam clamp lever. Once loosened, slide the seat post<br />
up or down as necessary.<br />
When the seat is in the desired position, push the cam clamp lever down to the locked position to<br />
secure the seat post.<br />
Note the final position mark on the seat post for future reference.<br />
Adjusting the Seat’s Forward/Aft position<br />
Sit on your bike with the cranks in the 3 and 9 o’clock positions. A<br />
proper forward/aft position of the seat is achieved when the small<br />
bump at the top of the shin of your forward leg, directly below the<br />
knee cap (tibial tuberosity), is above the pedal axle.<br />
Dismount to adjust the seat forward or aft for a better fit. Loosen<br />
the seat adjustment lever and slide the seat forward or backward as<br />
desired; then tighten.<br />
Note the final position mark under the seat for future reference. (Repeat<br />
steps 2 through 7 if necessary.)<br />
OpERATING INSTRUCTIONS
OpERATING INSTRUCTIONS<br />
Note: There are two threaded holes on the seat assembly slider, to allow a greater range of forward/aft adjustment.<br />
The seat adjustment lever can be attached to either. Taller users may want to use the front<br />
hole; shorter users may want to use the back hole.<br />
handlebar Adjustment:<br />
1.<br />
2.<br />
3.<br />
4.<br />
Adjusting the handlebar height<br />
Handlebar height is a matter of preference. Start with the handle bars<br />
at the same height as the seat. Adjusting the handlebars higher will<br />
give the rider a more upright position; lowering them will result in a<br />
more prone position.<br />
Raise or lower the handlebars by pulling up on the handlebar post cam<br />
clamp lever and sliding the handlebar post up or down as desired. Push<br />
the cam clamp lever down to the locked position to secure the handlebar<br />
post. Note the final position mark on the handlebar post for future<br />
reference.<br />
Adjusting the handlebar’s Forward/Aft position<br />
Loosen the handlebar forward/aft adjustment lever and slide the handlebars either forward of<br />
backward as desired. The forward/aft position should be set to allow the rider to comfortably grasp<br />
the handles with a slight bend at the elbow.<br />
Tighten the adjustment lever clockwise to secure the handlebar assembly. (Remember to use the<br />
ratchet feature of the adjustment lever as necessary.) Note the final position mark for future reference.<br />
pedal strap adjustment:<br />
1.<br />
2.<br />
3.<br />
4.<br />
5.<br />
6.<br />
Place the ball of each foot on the pedal and in the toe cage such that the ball of the foot is centered<br />
over the pedal spindle and under the strap.<br />
Rotate the cranks until one foot is in a position closest to you.<br />
To tighten the strap, pull up on the end of the strap until it fits snugly over your shoe. Make sure<br />
that the strap is secure, but not overly tight or pressing uncomfortably on your foot.<br />
Repeat for the other foot.<br />
To loosen he pedal strap, press down on the clip that holds the strap secure, and pull slightly<br />
outward.<br />
Release the clip to lock the strap into place.<br />
15
BAsic OPeRAtiOn<br />
Now that you have established a riding position, take a few minutes to ride the bike and determine that<br />
your position is comfortable. Start pedaling at a slow pace with your toes and knees pointed directly<br />
forward. Hold the grips lightly and in a position that allows your shoulders and upper body to relax.<br />
Pedal easily, at a low resistance, until you feel confident that you could ride in that position for the duration<br />
of your workout.<br />
1.<br />
2.<br />
3.<br />
4.<br />
16<br />
!<br />
WARNING<br />
IF AT ANY TIME DURING YOUR WORKOUT, YOU FEEL CHEST PAIN, EXPERIENCE SEVER MUS-<br />
CULAR DISCOMFORT, FEEL FAINT, OR ARE SHORT OF BREATH, STOP EXERCISING IMME-<br />
DIATELY. IF THE CONDITION PERSISTS, YOU SHOULD CONSULT YOUR MEDICAL DOCTOR<br />
IMMEDIATELY.<br />
Pedaling resistance is controlled by the tension knob located beneath the handlebar, on the main<br />
“X” part of the frame. Resistance may be changed at any time by turning the tension knob; clockwise<br />
for more resistance, or counterclockwise for less resistance.<br />
To apply the brake, press down on the tension knob.<br />
Before dismounting, apply the break to stop the flywheel, or increase the resistance and let the<br />
flywheel come to a stop.<br />
To dismount the bike, first loosen each toe cage strap and remove your feet from the pedals, then<br />
step off the bike.<br />
GENERAL EXERCISE GUIDELINES<br />
setting A gOAL<br />
GENERAL EXERCISE GUIDELINES<br />
The first step to a successful exercise program is to set realistic goals and objectives. Do you want an<br />
exercise program that is geared to build muscle, maintain muscle tone, increase aerobic capacity, or<br />
lose weight? In order to ensure that you fully receive all the benefits of a sound exercise program, you<br />
need to first identify the existence (if any) of risk factors that may influence the design of your exercise<br />
program. Based upon a comprehensive analysis of your personal exercise needs and interests, you<br />
should then develop (or have developed for you by a competent or trained professional) an individualized<br />
program of exercise that is enjoyable, easy, and yet challenging. Your greatest health benefit will<br />
come from a lifestyle change that encourages a lifetime of physical activity.<br />
One way to guarantee success in reaching your goal is to eat correctly. A well-rounded diet provides the<br />
proteins, carbohydrates, fats, vitamins, minerals, and water necessary for good health. If you are unsure<br />
of your dietary needs, seek the advise of your physician, an exercise professional, or visit your local bookstore<br />
for more information on nutrition.
fLeXiBiLitY tRAining*<br />
Achieving and maintaining an adequate range of motion should always be objectives of a comprehensive<br />
exercise program. The warm-up phase of your exercise session should include some type of light<br />
warm-up activity to increase both your heart rate and your body temperature, which is then followed by<br />
flexibility exercises that are specifically designed to stretch the musculature around your body’s major<br />
skeletal joints. Attempting to stretch a cold muscle can be dangerous to the soft tissues surrounding the<br />
muscle. No matter how controlled the movement, forcing a muscle through a full range of motion (and<br />
beyond) without appropriately warming up is both unsafe and counterproductive.<br />
A general exercise program for achieving and maintaining flexibility should adhere to the following<br />
guidelines:<br />
•<br />
•<br />
•<br />
•<br />
•<br />
Frequency Daily<br />
Intensity To a position of mild discomfort<br />
Duration 10-30 seconds for each stretch<br />
Repetitions 2-6 for each stretch<br />
Type Static, with a major emphasis on the low back and hamstrings area<br />
because of the high prevalence of low-back pain syndrome in our<br />
society.<br />
eXeRcise PRinciPLes *<br />
The American College of Sports Medicine has developed a position paper concerning exercise programs<br />
for healthy adults and the need for guidelines. The following recommendations concern the quantity<br />
and quality of (exercise) training for developing and maintaining cardiorespiratory fitness in a healthy<br />
adult:<br />
•<br />
•<br />
•<br />
•<br />
•<br />
Frequency 3 to 5 days per week<br />
Intensity 50% - 85% of maximum oxygen uptake (VO2 max)<br />
Duration 20 to 60 minutes of continuous aerobic activity<br />
GENERAL EXERCISE GUIDELINES<br />
Mode of Activity Any activity that uses the large muscle groups, that can be maintained<br />
continuously, and is rhythmical and aerobic in nature.<br />
Rate of Progression Initial Conditioning: - 4 to 6 weeks; low end intensity (40% - 60% VO2<br />
max); low end duration (15 to 20 minutes).<br />
Improvement Stage: - 6 weeks to 6 months; moderate intensity; moderate<br />
duration.<br />
Maintenance Stage: - 6 months plus; moderate to high intensity; moderate<br />
to high duration.<br />
*Note: Some of the material contained in this section is adapted from The StairMaster® <strong>Fitness</strong><br />
Handbook 2nd Ed., James A Peterson, and Cedric X. Bryant (editors), Sagamore Publishing,<br />
1995.<br />
17
MAINTENANCE INSTRUCTIONS<br />
heLPfuL hints<br />
The safety level given by the design of this equipment can only be maintained when the equipment is<br />
regularly examined for damage and wear. Inoperable components should be replaced immediately or<br />
the equipment should be put out of use until it is repaired. Read all maintenance instructions thoroughly<br />
before beginning work.<br />
All references to the right or left side and to the front or back are made as if you were on the exercise<br />
equipment ready to exercise. For example, the belt is on the right side of the bike.<br />
tOOL List<br />
The following tools are needed to perform service and maintenance:<br />
•<br />
•<br />
•<br />
•<br />
•<br />
•<br />
•<br />
18<br />
15mm Pedal Wrench or Open End Wrench<br />
Metric Hex Key Set (up to 8mm)<br />
#2 Phillips Screwdriver<br />
Bottom Bracket Tool (Park BBT-2 or comparable 20-Tooth Tool)<br />
Crank Puller (Park CCP-2 or comparable Puller for Square, Tapered Spindles)<br />
Loctite 242 Medium Strength threadlocker<br />
Brake Pad Oil or 3-In-One Oil<br />
initiAL seRVice<br />
MAINTENANCE<br />
Upon receiving your equipment, use a soft clean cloth to wipe off the dust that may have accumulated<br />
during shipping. Your equipment will need minor assembly. Refer to the “Assembly Instructions” section<br />
of this manual for details.
MAintenAnce scheduLe<br />
MAINTENANCE<br />
PARt RecOMMended ActiOn fReQuencY cLeAneR LuBRicAnt<br />
1 Pedals Ensure that the pedals are tight<br />
in crank arms; that all screws on<br />
pedals are tight; and that the<br />
pedal straps are not frayed<br />
Before each use N/A N/A<br />
Frame Wipe down Daily Soap & water; or, diluted<br />
non-abrasive<br />
cleaning solution<br />
N/A<br />
Flywheel Wipe down Weekly WD-40® spray.<br />
Spray on rag &<br />
apply light coat to<br />
sides of flywheel.<br />
N/A<br />
Crank Bolts Inspect for looseness Weekly N/A If loose, remove bolt,<br />
apply Loctite® 242<br />
on bolt threads and<br />
reinstall. Tighten to 48<br />
ft-lbs or 575 in-lbs<br />
Brake Pad Inspect for excessive wear or a Weekly N/A<br />
2 Use 3-IN-One® oil or<br />
dry leather brake pad<br />
10W oil *Do not use<br />
silicone-based lubricants<br />
Belt Inspect for correct tension;<br />
replace cracked, frayed, or otherwise<br />
non-uniform belt<br />
Monthly N/A N/A<br />
Bottom Inspect for side-to-side play in Monthly N/A N/A<br />
Bracket spindle, and a grinding feeling<br />
in crank area when pedaling.<br />
If necessary, replace bottom<br />
bracket.<br />
1. We do not recommend you attempt to service the internal parts of the pedals. If they are found to be<br />
worn internally, we recommend replacing the pedal.<br />
2. Use of lubricants or cleaning solutions other than those so specified will result in diminished performance<br />
and a shorter life span for that part.<br />
19
TROUBLEShOOTING<br />
SYMpTOM: Seat or handlebar post move after locked into position.<br />
1.<br />
2.<br />
3.<br />
4.<br />
20<br />
Locate smaller 3mm hex bolt at pivot point of cam handle and loosen 1 turn.<br />
Disengage 6mm hex bolt on other side from indicator plate and rotate one notch towards (+) sign.<br />
Tighten smaller 3mm hex bolt.<br />
Test post and repeat process if needed until post no longer moves.<br />
SYMpTOM: Clicking noise with each pedal revolution.<br />
1.<br />
2.<br />
3.<br />
Check shoelaces to make sure the aglet is not tapping the bike as the pedals turn.<br />
Assure pedal straps are tight and that no excess strap on inner part of pedal is catching on the crank<br />
arm as it turns.<br />
Assure that pedals are tight on crank arms.<br />
SYMpTOM: Clicking noise when flywheel rotates.<br />
1.<br />
2.<br />
3.<br />
4.<br />
Check edge of flywheel that brake pad rubs against for small burrs.<br />
If burr is present gently remove while being careful not to damage flywheel surface.<br />
If symptom persists check for noisy flywheel bearings.<br />
If flywheel bearings are noisy or rough have authorized service technician replace flywheel hub assembly.<br />
SYMpTOM: Drive belt is slipping.<br />
1.<br />
2.<br />
3.<br />
4.<br />
5.<br />
Remove belt cover.<br />
Note: Use caution around belt when cover is removed.<br />
Loosen idler with 8mm hex and tighten tensioner bolt 2-3 turns with 5mm hex wrench.<br />
Tighten idler and test belt.<br />
If belt still slips repeat process until belt no longer slips.<br />
Reinstall belt cover.<br />
SYMpTOM: knocking noise or play felt in pedals/cranks.<br />
1.<br />
2.<br />
3.<br />
4.<br />
Make sure pedals are tight on crank arms.<br />
Note: Left pedal is reverse threaded.<br />
TROUBLEShOOTING<br />
Make sure crank bolts are tight. If loose, apply blue Loctite 242 to threads and tighten crank bolts<br />
with 8mm hex wrench.<br />
If problem persists check the bottom bracket bearing cups for looseness. Tighten if necessary with<br />
a bottom bracket tool and use blue Loctite 242 on threads.<br />
If knocking noise still persists contact authorized service technician for replacement of bottom<br />
bracket bearings.
SYMpTOM: Inconsistent resistance or noisy brake pad.<br />
1.<br />
2.<br />
3.<br />
4.<br />
Remove fender assembly and make sure brake pad is clean.<br />
Apply brake pad oil (or 3-In-One oil) to surface of brake pad.<br />
Let oil soak into pad and reapply if needed until brake pad is thoroughly saturated.<br />
Reinstall fender assembly.<br />
SYMpTOM: Rocking or movement from RevMaster while in use.<br />
1.<br />
2.<br />
TROUBLEShOOTING<br />
Using a 5mm hex wrench, check the attachment bolts on the front and rear stabilizers and make<br />
sure they are tight (4 bolts on each stabilizer).<br />
Note: You will have to remove the stretch pad to check the rear stabilizer mounting bolts.<br />
Assure the bike is level by checking the leveling feet on the bottom of the front and rear stabilizers.<br />
21
22<br />
42.0 in.<br />
PhYsicAL diMensiOns:<br />
•<br />
•<br />
•<br />
Length: 42 in (106.7 cm)<br />
Height: 46 in (116.8 cm)<br />
Width: 23 in (58.4 cm)<br />
• Weight: 143 lbs (65 kg)<br />
46.0 in. (min)<br />
SpECIFICATIONS<br />
23.0 in.<br />
shipping carton dimensions:<br />
•<br />
•<br />
•<br />
Length: 39.5 in (100.3 cm)<br />
Height: 37 in (94.0 cm)<br />
Width: 8 in (20.3 cm)<br />
• Weight: 161 lbs (73 kg)
fRAMe:<br />
•<br />
•<br />
•<br />
fLYWheeL:<br />
•<br />
•<br />
Welded X Style frame with 4-way bolted<br />
stabilizers<br />
ED and powder coated finish<br />
22 inch wide base with large diameter adjustable<br />
levelers<br />
47-pound precision-machined flywheel<br />
Forged steel axel with Electroless-Nickel<br />
finish<br />
BRAking And ResistAnce MechAnisM:<br />
•<br />
•<br />
Turn-knob design for tension; push down<br />
for braking<br />
Leather resistance pad on top of flywheel<br />
for consistent resistance<br />
cRAnk set:<br />
•<br />
•<br />
•<br />
Forged cranks with Electroless-Nickel finish<br />
(170 mm)<br />
Oversized and hardened Cr-Moly bracket<br />
spindle (23.0 mm x 124.5 mm)<br />
Two piece cartridge style ball bearing assy.<br />
with 2 bearing per side.<br />
hAndLeBARs:<br />
•<br />
•<br />
•<br />
•<br />
•<br />
•<br />
•<br />
Biomechanically correct with anatomical<br />
bend<br />
Adjustable up/down and fore/aft<br />
Over molded rubber grip for greater<br />
comfort<br />
Unique cam post clamp design for quick<br />
and easy adjustments<br />
Adjustment marks for up/down and fore/aft<br />
adjustments<br />
Steel tube with Electroless-Nickel finish<br />
Easy to access horizontal adjustment<br />
stRetch PAd:<br />
•<br />
seAt:<br />
•<br />
•<br />
•<br />
Foot-pad at base of rear stabilizer for<br />
stretching<br />
Dual position seat slider for extended fore/<br />
aft adjustment<br />
Unique cam post clamp for easy adjustment<br />
& enhanced stability<br />
Adjustment marks for up/down and fore/<br />
aft<br />
tRAnsPORt WheeLs<br />
•<br />
Extra large in-line skate wheels<br />
dRiVe tRAin<br />
•<br />
•<br />
•<br />
Reinforced Poly-V drive belt<br />
Precision drive pulleys<br />
SpECIFICATIONS<br />
No adjustment required for belt tensioner<br />
23
Daily and Monthly Exercise Logs<br />
Week # Weekly Goals<br />
1.<br />
2.<br />
3.<br />
Day Date Distance Calories Time Comments<br />
Mon<br />
Tue<br />
Wed<br />
Thu<br />
Fri<br />
Sat<br />
Sun<br />
Weekly Totals<br />
Week # Weekly Goals<br />
1.<br />
2.<br />
3.<br />
Day Date Distance Calories Time Comments<br />
Mon<br />
Tue<br />
Wed<br />
Thu<br />
Fri<br />
Sat<br />
Sun<br />
Weekly Totals<br />
Week # Weekly Goals<br />
1.<br />
2.<br />
3.<br />
Day Date Distance Calories Time Comments<br />
Mon<br />
Tue<br />
Wed<br />
Thu<br />
Fri<br />
Sat<br />
Sun<br />
Weekly Totals
MONTH Monthly Goals<br />
1.<br />
2.<br />
3.<br />
Week Distance Calories Time<br />
Monthly Totals<br />
MONTH Monthly Goals<br />
1.<br />
2.<br />
3.<br />
Week Distance Calories Time<br />
Monthly Totals<br />
MONTH Monthly Goals<br />
1.<br />
2.<br />
3.<br />
Week Distance Calories Time<br />
Monthly Totals
15540 Woodinville-Redmond Road<br />
Suite A100<br />
Woodinville, WA 98072 USA<br />
www.<strong>LeMond</strong>fitness.com<br />
Telephone (+1) 425.482.6773<br />
Fax: (+1) 425.482.6724<br />
Document #300207, Rev -