Click Ball - Goodheart-Willcox
Click Ball - Goodheart-Willcox
Click Ball - Goodheart-Willcox

Create successful ePaper yourself
Turn your PDF publications into a flip-book with our unique Google optimized e-Paper software.
Save the<br />
Game<br />
Create an<br />
Object<br />
24. <strong>Click</strong> the OK button in the Sprite Properties dialog box to finish creating the sprite. The<br />
sprite is added to the resource tree in the Sprites branch (folder).<br />
25. Using similar steps, create a wall sprite named SPR_Wall using the wall_block.png image<br />
file located in the Maze-Platform folder.<br />
26. Save your game build before continuing (File>Save or the Save the Game button on<br />
the toolbar).<br />
Adding and Naming Objects<br />
You now have two sprites. They are listed in the resource tree in the Sprites branch.<br />
However, sprites cannot be placed in the room, only objects. You now need to create objects,<br />
have these objects “wear” the sprites, and then place the objects in the room (scene).<br />
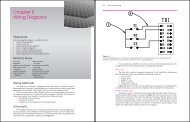
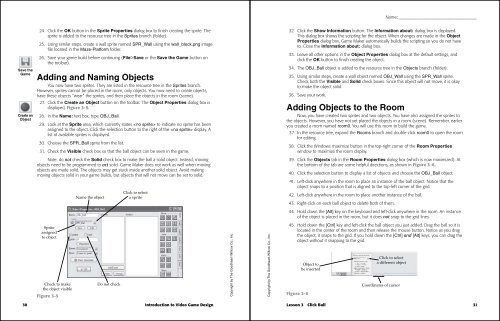
27. <strong>Click</strong> the Create an Object button on the toolbar. The Object Properties dialog box is<br />
displayed, Figure 3-5.<br />
28. In the Name: text box, type OBJ_<strong>Ball</strong>.<br />
29. Look at the Sprite area, which currently states to indicate no sprite has been<br />
assigned to the object. <strong>Click</strong> the selection button to the right of the display. A<br />
list of available sprites is displayed.<br />
30. Choose the SPR_<strong>Ball</strong> sprite from the list.<br />
31. Check the Visible check box so that the ball object can be seen in the game.<br />
Note: do not check the Solid check box to make the ball a solid object. Instead, moving<br />
objects need to be programmed to act solid. Game Maker does not work as well when moving<br />
objects are made solid. The objects may get stuck inside another solid object. Avoid making<br />
moving objects solid in your game builds, but objects that will not move can be set to solid.<br />
Sprite<br />
assigned<br />
to object<br />
Check to make<br />
the object visible<br />
Figure 3-5<br />
Name the object<br />
Do not check<br />
<strong>Click</strong> to select<br />
a sprite<br />
30 Introduction to Video Game Design<br />
Copyright by The <strong>Goodheart</strong>-<strong>Willcox</strong> Co., Inc.<br />
Copyright by The <strong>Goodheart</strong>-<strong>Willcox</strong> Co., Inc.<br />
Name: __________________________________________<br />
32. <strong>Click</strong> the Show Information button. The Information about: dialog box is displayed.<br />
This dialog box shows the scripting for the object. When changes are made in the Object<br />
Properties dialog box, Game Maker automatically builds the scripting so you do not have<br />
to. Close the Information about: dialog box.<br />
33. Leave all other options in the Object Properties dialog box at the default settings, and<br />
click the OK button to finish creating the object.<br />
34. The OBJ_<strong>Ball</strong> object is added to the resource tree in the Objects branch (folder).<br />
35. Using similar steps, create a wall object named OBJ_Wall using the SPR_Wall sprite.<br />
Check both the Visible and Solid check boxes. Since this object will not move, it is okay<br />
to make the object solid.<br />
36. Save your work.<br />
Adding Objects to the Room<br />
Now, you have created two sprites and two objects. You have also assigned the sprites to<br />
the objects. However, you have not yet placed the objects in a room (scene). Remember, earlier<br />
you created a room named room0. You will use this room to build the game.<br />
37. In the resource tree, expand the Rooms branch and double-click room0 to open the room<br />
for editing.<br />
38. <strong>Click</strong> the Windows maximize button in the top-right corner of the Room Properties<br />
window to maximize the room display.<br />
39. <strong>Click</strong> the Objects tab in the Room Properties dialog box (which is now maximized). At<br />
the bottom of the tab are some helpful directions, as shown in Figure 3-6.<br />
40. <strong>Click</strong> the selection button to display a list of objects and choose the OBJ_<strong>Ball</strong> object.<br />
41. Left-click anywhere in the room to place an instance of the ball object. Notice that the<br />
object snaps to a position that is aligned to the top-left corner of the grid.<br />
42. Left-click anywhere in the room to place another instance of the ball.<br />
43. Right-click on each ball object to delete both of them.<br />
44. Hold down the [Alt] key on the keyboard and left-click anywhere in the room. An instance<br />
of the object is placed in the room, but it does not snap to the grid lines.<br />
45. Hold down the [Ctrl] key and left-click the ball object you just added. Drag the ball so it is<br />
located in the center of the room and then release the mouse button. Notice as you drag<br />
the object, it snaps to the grid. If you hold down the [Ctrl] and [Alt] keys, you can drag the<br />
object without it snapping to the grid.<br />
Figure 3-6<br />
Object to<br />
be inserted<br />
<strong>Click</strong> to select<br />
a different object<br />
Coordinates of cursor<br />
Lesson 3 <strong>Click</strong> <strong>Ball</strong> 31