CT70-B Click Wheel Controlled Thaw Cabinet
CT70-B Click Wheel Controlled Thaw Cabinet
CT70-B Click Wheel Controlled Thaw Cabinet

You also want an ePaper? Increase the reach of your titles
YUMPU automatically turns print PDFs into web optimized ePapers that Google loves.
Important:<br />
To the installer: Installation of these units should be carried out by a competent person and the appropriate codes of<br />
practice adhered to, thus ensuring safe installation.<br />
Pass to the user: do not discard this document: it contains important guidelines on Operation, Loading,<br />
Cleaning and Maintenance and should be kept for reference.<br />
Disposal Requirements<br />
If not disposed of properly all refrigerators have components that can be harmful to the environment. All old<br />
refrigerators must be disposed of by appropriately registered and licensed waste contractors, and in<br />
accordance with National laws and regulations.<br />
Important: Ensure a minimum clearance of 150mm above the unit and adequate ventilation for efficient operation.<br />
Where possible, ensure the unit is away from a heat source.<br />
Unpacking: The unit is delivered on a pallet and shrink-wrapped. Documentation is inserted into a clear pocket inside<br />
the unit. Carefully remove the protective plastic film and cardboard from the unit exterior and from the door opening<br />
surround making sure that any sharp instrument used does not cause damage, plus remove any quality labels.<br />
<strong>Cabinet</strong> removal from the pallet: Remove the shelf holding the package containing the castors. Remove the retaining<br />
bolts which secure the unit to the pallet. Move the unit over the front of the pallet fit the lockable castors in the<br />
mounting holes. To fit the rear castors, lock the front castors, tilt the unit forwards, remove the pallet and fit the castors<br />
in the mounting holes. Ensure that all are tightened firmly into position.<br />
Ensure during installation the unit is level if not the door may not close correctly.<br />
Adjust castors by inserting spacers, supplied separately, under the appropriate castor and the base of the unit until<br />
level.<br />
Shelving<br />
The cabinet has fixed positions for the shelving incorporated in the side air ducts.<br />
Start Up & Operation<br />
If the cabinet has been laid on its back at any time DO NOT switch on immediately but leave in the upright position for<br />
at least 60 minutes.<br />
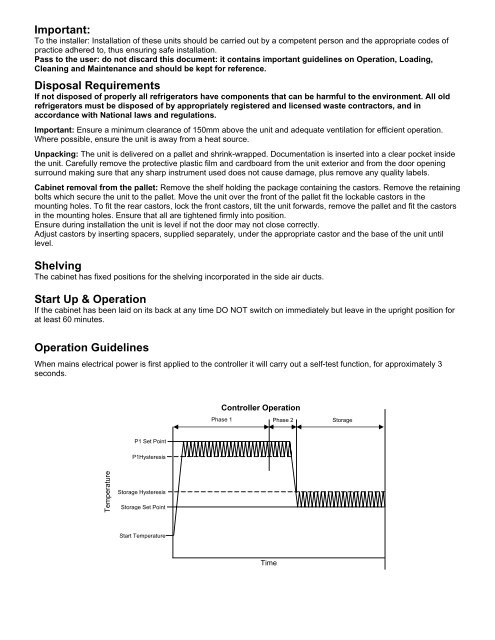
Operation Guidelines<br />
When mains electrical power is first applied to the controller it will carry out a self-test function, for approximately 3<br />
seconds.<br />
Temperature<br />
P1 Set Point<br />
P1Hysteresis<br />
Storage Hysteresis<br />
Storage Set Point<br />
Start Temperature<br />
Controller Operation<br />
Phase 1 Phase 2 Storage<br />
Time