FOSTER FMIF120 FLAKER OCT04
FOSTER FMIF120 FLAKER OCT04
FOSTER FMIF120 FLAKER OCT04
Create successful ePaper yourself
Turn your PDF publications into a flip-book with our unique Google optimized e-Paper software.
GB<br />
preface<br />
english<br />
1 This publication is intended<br />
to acquaint you with<br />
the correct use of this ice<br />
machine and with the care<br />
that is required for trouble<br />
free operation and optimum<br />
performance. It is important<br />
to adhere to the instructions<br />
indicated. We suggest that<br />
you thoroughly read this<br />
manual, paying close<br />
attention to the warnings<br />
and advice that are given. Whenever<br />
communicating with the manufacturer about<br />
your machine, always indicate the model and<br />
serial number.<br />
General Information<br />
at Delivery<br />
Important:<br />
Carefully read this user manual before installing<br />
the machine.<br />
2<br />
Please note the<br />
following guidelines:<br />
●That the packing does<br />
not show any sign of<br />
damage.<br />
●That the unit<br />
corresponds to what is<br />
specified on the<br />
purchase order.<br />
●That the machine is<br />
not damaged externally and no parts are missing.<br />
●That during transport certain integral parts have<br />
not been damaged.<br />
In case of severe damage or parts missing, report<br />
immediately to the delivering carrier and your<br />
distributor.<br />
The illustrations shown in this manual are generic<br />
and can differ in some details from the delivered<br />
machine.<br />
Any illustration, schematic or documents supplied<br />
with the machine belong to the manufacturer who<br />
reserve copyright and expressly forbids any<br />
reproduction of them without written permission.<br />
The Manufacturer's policy is one of continuous<br />
improvement and reserves the right to make<br />
changes at any time without prior notice or<br />
incurring any obligation whatsoever.<br />
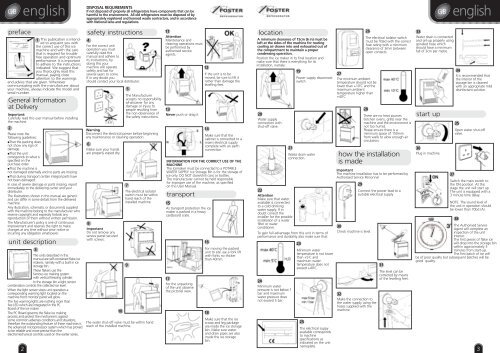
unit description<br />
2<br />
3<br />
The units described in this<br />
manual are self-contained flake ice<br />
makers, namely with a built in ice<br />
storage bin.<br />
These flakers use the<br />
famous ice making system<br />
with vertical freezing cylinder.<br />
In the storage bin a light sensor<br />
combination controls the collected ice level.<br />
When the light sensor stops unit operation a<br />
corresponding warning light located on the<br />
machine front monitor panel will glow.<br />
The five warning lights are nothing more than<br />
five LED which are integrated in the PC<br />
Board of the ice maker.<br />
The PC Board governs the flake ice making<br />
process and protect the mechanisms against<br />
some common adverses conditions and situations,<br />
therefore the outstanding feature of these machines is<br />
the advanced microprocessor system which has proved<br />
to be reliable and more precise than the<br />
electromechanical controls used on the earlier series.<br />
DISPOSAL REQUIREMENTS<br />
If not disposed of properly all refrigerators have components that can be<br />
harmful to the environment. All old refrigerators must be disposed of by<br />
appropriately registered and licensed waste contractors, and in accordance<br />
with National laws and regulations.<br />
safety instructions<br />
4<br />
For the correct unit<br />
operation you must<br />
carefully read this<br />
manual and adhere to<br />
its instructions, by<br />
doing this your<br />
machine will operate<br />
safetly and last for<br />
several years to come.<br />
If in any doubt you<br />
should contact your local distributor.<br />
The Manufacturer<br />
accepts no responsibility<br />
whatsoever for any<br />
damage or injury to<br />
people resulting from<br />
the non-observance of<br />
the safety instructions.<br />
Warning<br />
Disconnect the electrical power before beginning<br />
any maintenance or cleaning operation.<br />
6<br />
Make sure your hands<br />
are properly wiped dry.<br />
8<br />
Important<br />
Do not remove any<br />
service panel secured<br />
with screws.<br />
10<br />
The electrical isolator<br />
switch must be within<br />
hand reach of the<br />
installed machine.<br />
The water shut-off valve must be within hand<br />
reach of the installed machine.<br />
5<br />
7<br />
9<br />
11<br />
Attention<br />
Maintenance and<br />
cleaning operations must<br />
be performed by<br />
authorised service<br />
agents.<br />
13<br />
Never push or drag it.<br />
12<br />
If the unit is to be<br />
moved, be sure to lift it<br />
rather than damage the<br />
levelling feet.<br />
14<br />
Make sure that the<br />
cabinet is connected to a<br />
mains electrical supply<br />
complete with an earth<br />
connection.<br />
INFORMATION FOR THE CORRECT USE OF THE<br />
MACHINE<br />
The Icemaker must be connected to a POTABLE<br />
WATER SUPPLY. Ice Storage Bin is for the storage of<br />
ice only. DO NOT store/chill cans or bottles.<br />
The manufacturer cannot be held responsible<br />
for improper use of the machine, as specified<br />
on this User Manual.<br />
transport<br />
15<br />
As transport protection the ice<br />
maker is packed in a heavy<br />
cardboard crate.<br />
17<br />
For the unpacking<br />
of the unit observe<br />
the pictorial view.<br />
16<br />
For moving the packed<br />
unit to site use a fork lift<br />
with forks no thicker<br />
than 40mm.<br />
18<br />
Make sure that the ice<br />
scoop and leg package<br />
are inside the ice storage<br />
bin. Make sure water<br />
and drain pipes are also<br />
inside the ice storage<br />
bin.<br />
location<br />
A minimum clearance of 15cm (6 in) must be<br />
left at the sides of the machine for routing<br />
cooling air drawn into and exhausted out of<br />
the compartment to maintain a proper<br />
condensing operation.<br />
Position the ice maker in its final location and<br />
make sure that there is everything for its<br />
installation, namely:<br />
20<br />
Water supply<br />
connection with<br />
shut-off valve.<br />
21<br />
22<br />
Attention<br />
Make sure that water<br />
available is connected<br />
to a cold drinking<br />
water supply. If in<br />
doubt consult the<br />
installer for the possible<br />
installation of a water<br />
filter or water<br />
conditioner.<br />
19<br />
Power supply disconnect<br />
switch<br />
Waste drain water<br />
connection.<br />
To gain full advantage from this unit in terms of<br />
performance and durability also make sure that:<br />
24<br />
Minimum water<br />
pressure is not below 1<br />
bar and maximum<br />
water pressure does<br />
not exceed 5 bar.<br />
23<br />
Minimum water<br />
temperature is not lower<br />
than +5˚C and<br />
maximum water<br />
temperature does not<br />
exceed +40˚C.<br />
25<br />
The electrical suppy<br />
available corresponds<br />
to machine<br />
specifications as<br />
indicated on the unit<br />
nameplate.<br />
26<br />
27<br />
The minimum ambient<br />
temperature should not be<br />
lower than +10˚C and the<br />
maximum ambient<br />
temperature higher than<br />
+40˚C<br />
The electrical isolator switch<br />
must be fitted with the correct<br />
fuse rating with a minimum<br />
clearance of 3mm between<br />
open contacts.<br />
28<br />
There are no heat sources<br />
(kitchen ovens, grills) near the<br />
machine and the environment is<br />
not too humid.<br />
Please ensure there is a<br />
minimum space of 150mm<br />
from walls to alow enough air<br />
circulation.<br />
how the installation<br />
is made<br />
Important<br />
The machine installation has to be performed by<br />
Authorised Service Personnel<br />
29<br />
30<br />
Check machine is level.<br />
32<br />
Make the connection to<br />
the water supply using the<br />
hoses supplied with the<br />
machine.<br />
Connect the power lead to a<br />
suitable electrical supply<br />
31<br />
The level can be<br />
corrected by means<br />
of the levelling feet.<br />
GB<br />
33<br />
Water drain is connected<br />
and set-up properly using<br />
spiralled hose which<br />
should have a minimum<br />
fall of 3cm per metre.<br />
start up<br />
36<br />
Plug in machine.<br />
37<br />
english<br />
34<br />
It is recommended that<br />
the interior of the<br />
storage bin is cleaned<br />
with an appropriate mild<br />
disinfectant solution.<br />
35<br />
Open water shut-off<br />
valve.<br />
Switch the main switch to<br />
the ON position. At this<br />
stage the unit will start up.<br />
The unit is equipped with a<br />
3 minute time delay.<br />
NOTE: The sound level of<br />
the unit in operation should<br />
be lower than 70bd (A).<br />
38<br />
The Authorised Service<br />
Agent will complete an<br />
inspection of the unit<br />
interior.<br />
The first pieces of flake ice<br />
will drop into the storage bin<br />
within approximately 3<br />
minutes from start-up.<br />
The first batch of ice will<br />
be of poor quality but subsequent batches will be<br />
good quality.<br />
3


