
You also want an ePaper? Increase the reach of your titles
YUMPU automatically turns print PDFs into web optimized ePapers that Google loves.
FEATURE<br />
IP<strong>TV</strong> Hecho por uno mismo<br />
■<br />
This is how our test<br />
centre looked like for<br />
this report.<br />
<strong>TV</strong> <strong>desde</strong><br />
<strong>la</strong> <strong>red</strong><br />
Parte 4<br />
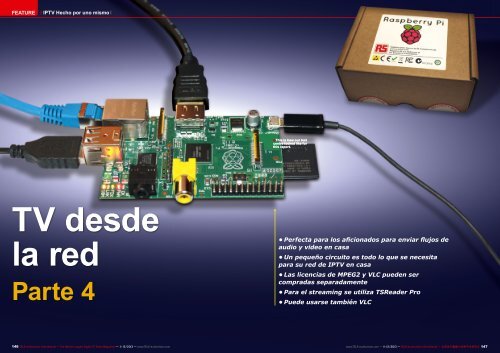
• Perfecta para los aficionados para enviar flujos de<br />
audio y video en casa<br />
• Un pequeño circuito es todo lo que se necesita<br />
para su <strong>red</strong> de IP<strong>TV</strong> en casa<br />
• Las licencias de MPEG2 y VLC pueden ser<br />
compradas separadamente<br />
• Para el streaming se utiliza TSReader Pro<br />
• Puede usarse también VLC<br />
146 TELE-audiovision International — The World‘s Largest Digital <strong>TV</strong> Trade Magazine — 11-12/2013 — www.TELE-audiovision.com<br />
www.TELE-audiovision.com — 11-12/2013 — TELE-audiovision International — 全 球 发 行 量 最 大 的 数 字 电 视 杂 志 147
FEATURE<br />
Selfmade IP<strong>TV</strong><br />
Vitor Martins Augusto<br />
In the first three parts we focused<br />
more on the theory of IP<strong>TV</strong>. In Part<br />
4 we now want to implement an<br />
IP<strong>TV</strong> system. And you don’t need<br />
all that much: a PC with a digital<br />
<strong>TV</strong> receiver (DVB, ATSC or ISDB)<br />
and TSReader Pro would be used as<br />
the server. A Raspberry Pi would be<br />
used as the IP<strong>TV</strong> receiver.<br />
The biggest problem with implementing<br />
IP<strong>TV</strong> at home is how do you receive<br />
and disp<strong>la</strong>y IP<strong>TV</strong> on your <strong>TV</strong>? Of course,<br />
you could set up a PC next to each <strong>TV</strong><br />
but even so-called “cheap” computers<br />
still cost some money and let’s not<br />
forget the cost of the electricity to run<br />
these PCs. So, with all of that in mind,<br />
we looked around for some kind of device<br />
to use as an IP<strong>TV</strong> receiver that<br />
matched our criteria: cheap, small,<br />
easy-to-use and fully featu<strong>red</strong>. After<br />
looking at a number of different candidates<br />
(from game consoles all the way<br />
to a modified Apple<strong>TV</strong>) we decided on<br />
the Raspberry Pi.<br />
The Raspberry Pi is a very small computer;<br />
the circuit board is not much bigger<br />
than a c<strong>red</strong>it card (85.6mm x 56mm<br />
x 21mm). Despite its small size, it is a<br />
fully complete computer with an ARM<br />
processor. It features:<br />
- SoC („System on Chip“): Broadcom<br />
1<br />
2<br />
BCM2835 with an ARM1176JZFS Kernel<br />
that runs at 700MHZ and includes a Videocore<br />
4 GPU graphics section capable<br />
of decoding H.264 at up to 40MBits/sec.<br />
OpenGL ES2.0 and OpenVG libraries are<br />
also supported.<br />
- “B” models come with 512MB RAM;<br />
currently 1GB RAM versions are also being<br />
shipped for the same price.<br />
Connections:<br />
o SD-Card: used to load the operating<br />
system<br />
o 2x USB: used to connect a keyboard,<br />
mouse, USB sticks, etc.<br />
o LAN: RJ-45 with 100MBit/s<br />
o Audio: analog stereo output<br />
1. The Raspberry Pi is a small computer<br />
with the footprint of a c<strong>red</strong>it card. Still, it<br />
features all conceivable connections:<br />
- HDMI<br />
- Composite Video<br />
- Analog Stereo Audio<br />
- 2x USB<br />
- 1x Micro-USB for power supply<br />
- RJ-45 Network<br />
- SD card reader<br />
On the PCB there are furthermore<br />
connectors for digital and analog inputs/<br />
outputs<br />
2. The Raspberry Pi will convert any <strong>TV</strong> or<br />
monitor into a full blown media center when<br />
using XBMC. Because the Raspberry Pi is<br />
so small, it will snug away behind the <strong>TV</strong>.<br />
If you then use a wireless keyboard with<br />
integrated trackball or touch pad, you won’t<br />
even see any loose cables.<br />
148 TELE-audiovision International — The World‘s Largest Digital <strong>TV</strong> Trade Magazine — 11-12/2013 — www.TELE-audiovision.com
3<br />
7<br />
4<br />
3. The webpage “openelec.thestateofme.com” features all<br />
published versions of OpenELEC for Raspberry Pi, including<br />
Windows-friendly *.img version, which can be easily f<strong>la</strong>shed using<br />
Image Writer, whose Windows version is called Win32 Disk Imager.<br />
4. Just download the <strong>la</strong>test rXXXXX.img.zip File and extract it with<br />
your favourite compressing tool.<br />
5. Use Win32 Disk Imager to write the image file onto the SD card.<br />
We recommend the use of 8GB SD cards with 6x speed or better.<br />
The card is written with 10MB/s which is not that bad. F<strong>la</strong>shing<br />
should take less than a minute.<br />
6. When the f<strong>la</strong>shing is finished, a message box appears. Don’t<br />
remove the card yet, because we need to write the license keys for<br />
the MPEG2 decoder.<br />
7. On the root of the freshly written SD card you will find a file<br />
called “config.txt”. Open it with a text editor (we prefer to use the<br />
free Notepad++) and scroll down to the license keys section. Copy<br />
& paste the license file you<br />
received from the Raspberry<br />
Pi store. After completing the<br />
purchase our keys arrived<br />
about 2 hours <strong>la</strong>ter, but the site<br />
mentions that it could take up to<br />
72 hours.<br />
5 6<br />
o RCA Video: analog composite<br />
video output<br />
o HDMI: for digital audio<br />
and video output<br />
o Micro-USB: for connection<br />
of a power supply<br />
The most interesting part<br />
about the Pi is its price: officially<br />
the Raspberry Pi Model<br />
B costs about US$ 35 plus<br />
shipping and any applicable<br />
taxes. In Europe you can get<br />
the Pi for about 35 Euros.<br />
Why such a low price? It’s because<br />
this mini computer was<br />
developed by the Raspberry<br />
Pi Foundation; their goal is<br />
to make a very inexpensive<br />
computer avai<strong>la</strong>ble to every<br />
child in an effort to get kids<br />
at their young age interested<br />
in programming just like it<br />
was back in the days of 8-bit<br />
computers like the Spectrum<br />
and the Commodore 64. For<br />
everyone else it’s just fun to<br />
be as creative as you want to<br />
be with this little circuit board<br />
and develop applications that<br />
would previously have been<br />
unrealistic because of the<br />
costs that would have been<br />
involved.<br />
The Raspberry Pi is manufactu<strong>red</strong><br />
in cooperation with<br />
Farnell and RS Electronics.<br />
The little circuit board<br />
is powe<strong>red</strong> by a Micro USB<br />
power supply, the same kind<br />
that is used with today’s<br />
modern Smartphones. You<br />
would also need an SD card.<br />
We recommend an 8GB card.<br />
A suitable housing can now<br />
also be purchased for around<br />
6 Euros and this is probably<br />
not a bad idea as it would<br />
help prevent any accidental<br />
short circuits and also help<br />
protect it against any static<br />
discharge. We used the Pi<br />
for weeks without any housing,<br />
repeatedly touching and<br />
handling it, and nothing happened<br />
to it.<br />
Since the circuit board is<br />
so small, it can easily be hidden<br />
behind any <strong>TV</strong>. For the<br />
keyboard and mouse, a wireless<br />
version with both integrated<br />
into one unit would<br />
be the best option. It would<br />
be easy to find a keyboard<br />
<strong>la</strong>beled “Multimedia” or “<strong>TV</strong>’<br />
that would have an integrated<br />
trackball or a touchpad as<br />
the mouse.<br />
Very important: in order to<br />
keep the price of the Raspberry<br />
Pi low, the necessary<br />
license to p<strong>la</strong>y back MPEG2<br />
content is missing from the Pi<br />
even though the hardware is<br />
avai<strong>la</strong>ble to do just that. But<br />
this is necessary to disp<strong>la</strong>y<br />
IP<strong>TV</strong> since most of the channels<br />
that are transmitted in<br />
SD are encoded in MPEG2.<br />
In the Raspberry Pi Foundation’s<br />
webshop you can buy<br />
an MPEG2 license for 3.00 Euros.<br />
You’ll get a key e-mailed<br />
to you that will activate this<br />
function. This key must be<br />
p<strong>la</strong>ced in the right spot in the<br />
config.txt file on the SD card.<br />
From this point on, MEG2 encoded<br />
content with hardware<br />
150 TELE-audiovision International — The World‘s Largest Digital <strong>TV</strong> Trade Magazine — 11-12/2013 — www.TELE-audiovision.com
8 12<br />
supported decoding can now<br />
also be viewed. In the same<br />
way a VC-1 license can be<br />
purchased for 1.50 Euros so<br />
that the corresponding content<br />
can also be viewed.<br />
The Raspberry Pi works<br />
primarily with a customized<br />
Linux Distribution although<br />
in the meantime you can get<br />
a hold of ready-made firmware<br />
files (called Images)<br />
with XBMC. The name of this<br />
media software stems from<br />
the abbreviation for “Xbox<br />
Media Center”: this software<br />
was originally developed for<br />
the first version of the Xbox.<br />
Since then this software has<br />
been ported over to every<br />
conceivable system including<br />
Windows, Linux, MacOS<br />
as well as Android and iOS.<br />
There’s no doubt: with XBMC<br />
you’re talking about one of<br />
the best multimedia programs.<br />
Nearly every possible<br />
format can be p<strong>la</strong>yed back<br />
(audio, video and pictures),<br />
there are what seems to be<br />
an unlimited number of plugins<br />
and using it is easy as<br />
pie. If you’re not yet familiar<br />
with XBMC, you should load it<br />
on Windows, MacOS or Linux<br />
and take it for a spin.<br />
Just like with Linux, there<br />
are a variety of different versions<br />
of XBMC for the Raspberry<br />
Pi: OpenELEC, Raspbmc,<br />
XBian, etc. We achieved<br />
the best results with OpenELEC.<br />
To use the Raspberry Pi<br />
with XBMC the following<br />
steps have to be carried out:<br />
1) The file with the XBMC<br />
image must be downloaded<br />
from the XBMC website (see<br />
the table of links).<br />
2) Unzip the archive with,<br />
for example, WinRAR.<br />
3) Next the *.img file<br />
should be f<strong>la</strong>shed onto the<br />
SD card using the Win32DiskImager.<br />
Make sure that the<br />
Win32DiskImager has identified<br />
the correct drive for the<br />
SD card so that you don’t accidentally<br />
format the wrong<br />
drive.<br />
4) Now the “config.txt”<br />
file needs to be edited: the<br />
MPEG2 license key must be<br />
added in the correct spot.<br />
Now the Raspberry Pi can<br />
be started and after a few<br />
seconds the XBMC interface<br />
appears that is very self-exp<strong>la</strong>natory.<br />
Important note:<br />
when the Pi is started for the<br />
first time after the SD card<br />
was written to, it is quite<br />
normal for the operating sys-<br />
9<br />
10<br />
11<br />
tem to automatically restart.<br />
When you start it a second<br />
time, XBMC will be loaded.<br />
The first pass serves to configure<br />
the operating system.<br />
Therefore, instead of doing it<br />
like we did, just wait a little<br />
bit: we thought at first that<br />
something had gone wrong<br />
and promptly reprogrammed<br />
the SD card…<br />
With TSReader Pro it is<br />
possible to take the received<br />
stream and insert it directly<br />
into the network via UDP.<br />
The transport stream can<br />
either be transfer<strong>red</strong> 1:1<br />
into the network or the integrated<br />
Demuxer function can<br />
be used. With this function<br />
each individual channel in<br />
the transport stream can be<br />
streamed separately into the<br />
network. Since most multimedia<br />
devices typically don’t<br />
come with a Demuxer function,<br />
you would not be able<br />
to view a transport stream<br />
or only one channel in the<br />
stream could be disp<strong>la</strong>yed<br />
without the ability to select<br />
any other channel. The same<br />
thing happens with XBMC:<br />
you try to receive the entire<br />
transport stream, but only<br />
one channel can be viewed<br />
and it’s not possible to switch<br />
to any other channel.<br />
That’s why we use the Demuxer<br />
function in TSReader<br />
Pro so that the desi<strong>red</strong> channels<br />
can be streamed into the<br />
network via Multicast whereby<br />
though for each channel<br />
an individual port number is<br />
used.<br />
In order for XBMC to be<br />
able to receive these streams<br />
on different ports, we need<br />
to create a P<strong>la</strong>ylist in *.m3u<br />
format. In this way a list of all<br />
the complete channel names<br />
appear in a list in XBMC;<br />
channel surfing is now fun!<br />
The great thing is that you<br />
can start multiple instances<br />
of TSReader Pro, each with<br />
a different tuner (it doesn’t<br />
matter if it’s one PC or multiple<br />
PCs – don’t forget, we’re<br />
using Multicast), so you can<br />
8. Start TSReader Pro and tune<br />
to the desi<strong>red</strong> transponder as<br />
usual.<br />
9. Open the “Forward” menu<br />
and select “Forward to UDP…”.<br />
On the list in the upper part<br />
of the window select each<br />
channel you want to stream<br />
and configure the respective IP<br />
address and port number. You<br />
can use the same IP address for<br />
all channels, but then you need<br />
to use individual port numbers.<br />
Remember that the multicast<br />
addresses start at 224.1.1.1 and<br />
go up to 239.255.255.255.<br />
13<br />
14 15<br />
10. Using a text editor like<br />
Notepad++, you need to<br />
configure the p<strong>la</strong>y list for XBMC,<br />
introducing each streamed<br />
channel with the respective IP<br />
and port.<br />
11. In our first experiment, we<br />
streamed four channels and<br />
configu<strong>red</strong> the IP<strong>TV</strong>.m3u file<br />
accordingly. Naturally you can<br />
name the file as you desire,<br />
as long as you keep the *.m3u<br />
extension.<br />
12. Not too soon, we wanted<br />
to try to increase our IP<strong>TV</strong><br />
bouquet and added a second<br />
TSReader session, this time<br />
using a DVB-T tuner.<br />
13. With this TSReader<br />
session we were receiving the<br />
Portuguese digital terrestrial<br />
television, which contains only<br />
4 channels.<br />
14. Each channel was assigned<br />
an IP address and an individual<br />
port number.<br />
15. Streaming has started.<br />
TSReader tracks on how much<br />
data has been sent and how<br />
many errors occur<strong>red</strong>.<br />
152 TELE-audiovision International — The World‘s Largest Digital <strong>TV</strong> Trade Magazine — 11-12/2013 — www.TELE-audiovision.com<br />
www.TELE-audiovision.com — 11-12/2013 — TELE-audiovision International — 全 球 发 行 量 最 大 的 数 字 电 视 杂 志 153
16 6<br />
17<br />
16. Boot screen of the OpenELEC<br />
distribution of XBMC for the<br />
Raspberry Pi<br />
17. Main menu of XBMC. You can<br />
access all functions from here,<br />
using the keyboard, the mouse<br />
or any other device you connect,<br />
including a wide range of remote<br />
controllers.<br />
18. The video menu. You can add<br />
new folders containing video using<br />
the “Add Videos…” entry. These<br />
can be folders on the Raspberry<br />
Pi or sha<strong>red</strong> folders within the<br />
network.<br />
19. P<strong>la</strong>ying a <strong>TV</strong> channel received<br />
over the network – IP<strong>TV</strong> at its best<br />
20. XBMC includes a wide range of<br />
configurations for audio and video,<br />
21<br />
including the disp<strong>la</strong>y of subtitles<br />
21. Zapping can be done using the<br />
|>| buttons or by going<br />
back to the p<strong>la</strong>ylist.<br />
22. P<strong>la</strong>ying a streamed channel<br />
from HOTBIRD 13.0E.<br />
23. This is a different p<strong>la</strong>ylist,<br />
showing the channels we are<br />
streaming from our DVB-S/S2 card.<br />
You can have as many p<strong>la</strong>ylists as<br />
you wish.<br />
24. Zapping between the different<br />
channels within the p<strong>la</strong>ylist is easy,<br />
but naturally you have to expect 2-3<br />
seconds to see the next picture.<br />
The reason is the buffering that<br />
is requi<strong>red</strong>, to ensure that sudden<br />
de<strong>la</strong>ys within the network traffic<br />
don’t stop the reproduction.<br />
18<br />
22<br />
19<br />
23<br />
20<br />
24<br />
154 TELE-audiovision International — The World‘s Largest Digital <strong>TV</strong> Trade Magazine — 11-12/2013 — www.TELE-audiovision.com
25 6<br />
26<br />
27<br />
put together an impressive<br />
bouquet of channels. For<br />
example,we combined several<br />
channels from a HOT-<br />
BIRD (13.0E) transponder<br />
that carries Portuguese digital<br />
terrestrial <strong>TV</strong>. These eight<br />
channels were now avai<strong>la</strong>ble<br />
throughout the entire house<br />
via the network and could be<br />
received with the Raspberry<br />
Pi as well as other devices<br />
(PCs, Tablets, Consoles, etc.)<br />
as long as they could work<br />
UDP streams. It would, of<br />
course, be especially easy if<br />
these devices had XBMC installed<br />
on them.<br />
The *.m3u P<strong>la</strong>ylist format<br />
is quite simple and looks like<br />
this:<br />
#EXTM3U<br />
#EXTINF:0,RTP-1<br />
#EX<strong>TV</strong>LCOPT:networkcaching=1000<br />
udp://@224.2.2.2:1001<br />
#EXTINF:0,RTP-2<br />
#EX<strong>TV</strong>LCOPT:networkcaching=1000<br />
udp://@224.2.2.2:1002<br />
#EXTINF:0,SIC<br />
#EX<strong>TV</strong>LCOPT:networkcaching=1000<br />
udp://@224.2.2.2:1003<br />
#EXTINF:0,<strong>TV</strong>I<br />
#EX<strong>TV</strong>LCOPT:networkcaching=1000<br />
udp://@224.2.2.2:1004<br />
The first line identifies the<br />
file as an EXTM3U P<strong>la</strong>ylist<br />
and must be avai<strong>la</strong>ble exactly<br />
like that. Next there are<br />
three lines for each channel:<br />
#EXTINF offers “Extended<br />
Info” so that XBMC shows<br />
the name of the channel<br />
rather than the file name and<br />
IP address. After the “0” can<br />
be any text you want, in our<br />
case we used the channel<br />
name. The next line sets up<br />
a buffer to prevent the video<br />
from being interrupted from<br />
brief network hang-ups. With<br />
<strong>la</strong>rger values channel surfing<br />
would take longer. We used<br />
values between 100 and<br />
1000. The third line identifies<br />
the protocol (udp://@) and<br />
the corresponding IP address<br />
with port number.) Naturally,<br />
these values have to match<br />
the IP addresses and port<br />
numbers in TSReader Pro.<br />
These three lines are repeated<br />
for each individual<br />
channel. To create and/or<br />
edit this file, any prefer<strong>red</strong><br />
text editor can be used since<br />
this is nothing more than a<br />
normal *.txt file whereby the<br />
file suffix is simply changed<br />
to *.m3u. We suggest Notepad++;<br />
it’s an excellent<br />
Open Source editor with<br />
many functions and Plugins<br />
that can also be used as a<br />
Hex editor with the proper<br />
Plugin.<br />
The completed *.m3u file<br />
can then be saved to a USB<br />
stick and simply plugged in<br />
to the Raspberry Pi. You can<br />
do this while the Pi is running;<br />
XBMC will recognize<br />
the USB stick automatically.<br />
If you now go to video you<br />
can click on the P<strong>la</strong>ylist and<br />
then select a desi<strong>red</strong> channel.<br />
You can also quickly<br />
surf to the previous channel<br />
or next channel. The only<br />
thing you can‘t do is select a<br />
channel directly by number.<br />
You can also choose if you<br />
want channels from different<br />
transponders - that are being<br />
streamed from different<br />
instances of TSReader Pro<br />
- integrated into one *.m3u<br />
p<strong>la</strong>ylist or if you‘d prefer different<br />
p<strong>la</strong>ylists for different<br />
transponders.<br />
The configuration described<br />
here can also be<br />
setup with VLC as the server.<br />
This would actually save you<br />
some money since VLC has<br />
to do with an Open Source<br />
Project but it also would involve<br />
investing more time<br />
compa<strong>red</strong> with TSReader Pro<br />
because configuration of VLC<br />
servers is not so easy. For<br />
example, we were able to<br />
stream a DVB-T transponder<br />
via VLC but it didn‘t work at<br />
all with a DVB-S transponder<br />
probably because the current<br />
version might have a<br />
problem with DVB-S tuners.<br />
If an older version of VLC<br />
were to be installed, then<br />
DVB-S reception would work<br />
but streaming would no longer<br />
function.<br />
Our conclusion: In general,<br />
IP<strong>TV</strong> is not really all that<br />
complicated. We achieved<br />
completely usable results<br />
and with a 1000Mbit/s network<br />
you won‘t be aggravated<br />
by an overloaded network.<br />
Through Multicasting<br />
you can connect as many receivers<br />
as you want and with<br />
XBMC you can easily access<br />
music and movies all at the<br />
same time that are avai<strong>la</strong>ble<br />
either on a local USB stick or<br />
from the network.<br />
In the meantime the Raspberry<br />
Fan community have<br />
already gotten a number of<br />
USB tuners to work which, of<br />
course, means that we will<br />
also see if we can construct<br />
our own „Linux Receiver“<br />
based on the Raspberry Pi.<br />
Without a doubt, the Raspberry<br />
Pi is an interesting<br />
device to build things with<br />
and if you work with audio<br />
and video you‘d have a usable<br />
p<strong>la</strong>tform for very little<br />
money.<br />
www.raspberrypi.org<br />
The Raspberry Pi Foundation website. Here you‘ll find the most<br />
important operating system images for download, a Wiki, a forum<br />
and documentation. You‘ll also find new projects introduced<br />
here on a daily basis.<br />
www.raspbmc.com<br />
One of many XBMC distributors for the Raspberry Pi. This one<br />
we found to be particu<strong>la</strong>rly beginner-friendly.<br />
wiki.openelec.tv/index.php?title=Installing_<br />
OpenELEC_on_Raspberry_Pi<br />
OpenELEC XBMC Distribution Wiki page for the Raspberry Pi.<br />
This one seems to be very sophisticated and offers the widest<br />
range of features.<br />
sources.openelec.tv/tmp/image<br />
On this official web page the OpenELEC XBMC Image for a variety<br />
of p<strong>la</strong>tforms, including the Raspberry Pi, can be downloaded.<br />
This image can only be loaded via Linux.<br />
openelec.thestateofme.com<br />
On this website OpenELEC XBMC Images for the Raspberry Pi<br />
are also made avai<strong>la</strong>ble in Windows compatible format. These<br />
can be f<strong>la</strong>shed to an SD card using Image Writer. At the end of<br />
the list choose the newest Zip file (rXXXXX.img.zip).<br />
https://<strong>la</strong>unchpad.net/win32-image-writer/+download<br />
Website for the Image Writer for Windows. This tool writes the<br />
firmware image to the SD card.<br />
www.tsreader.com/tsreader<br />
TSReader‘s website. The professional version is needed for the<br />
streaming function. There is a cost involved.<br />
www.video<strong>la</strong>n.org/vlc<br />
If you prefer to use free solutions, you should try VideoLAN‘s<br />
VLC. With this software it‘s also possible to demux a transport<br />
stream and then stream the channels it contains individually<br />
via separate IP addresses and/or ports. The configuration is far<br />
more complicated though.<br />
28<br />
30<br />
32<br />
29<br />
31<br />
33<br />
25. Here you can see both p<strong>la</strong>ylists: one for the Portuguese TDT<br />
transponder and one for the HOTBIRD 13.0E satellite transponder<br />
26. If you prefer, you can merge the channels of different p<strong>la</strong>ylists<br />
into a single p<strong>la</strong>ylist. Here we see all streamed channels in one<br />
single p<strong>la</strong>ylist, despite the fact that these channels come originally<br />
from different tuners.<br />
27. Naturally, XBMC has many more capabilities. Why not watch<br />
a movie? Almost all formats are recognized and supported,<br />
including subtitles and multiple audio channels.<br />
28. Time for a break: watching the c<strong>la</strong>ssic Metropolis. Did you<br />
know that this masterpiece can be downloaded for free, because<br />
the copyright expi<strong>red</strong> long time ago?<br />
29. Here a different movie, encoded and encapsu<strong>la</strong>ted differently<br />
(*.mp4): a recreation of the Space Odyssey, but using Lego<br />
actors…<br />
30. XBMC can be adjusted to your preferences and needs. Just go<br />
to the settings menu.<br />
31. Here you can setup every detail, including the weather settings.<br />
32. We specified the location of our test centre.<br />
33. There are many options to setup audio and video. The<br />
Raspberry Pi features a full HDMI connector and is capable of<br />
resolutions up to full HD at 1920x1080<br />
156 TELE-audiovision International — The World‘s Largest Digital <strong>TV</strong> Trade Magazine — 11-12/2013 — www.TELE-audiovision.com<br />
www.TELE-audiovision.com — 11-12/2013 — TELE-audiovision International — 全 球 发 行 量 最 大 的 数 字 电 视 杂 志 157