

Nano Fighter Gyro - RC-Toy
Nano Fighter Gyro - RC-Toy
Nano Fighter Gyro - RC-Toy

You also want an ePaper? Increase the reach of your titles
YUMPU automatically turns print PDFs into web optimized ePapers that Google loves.
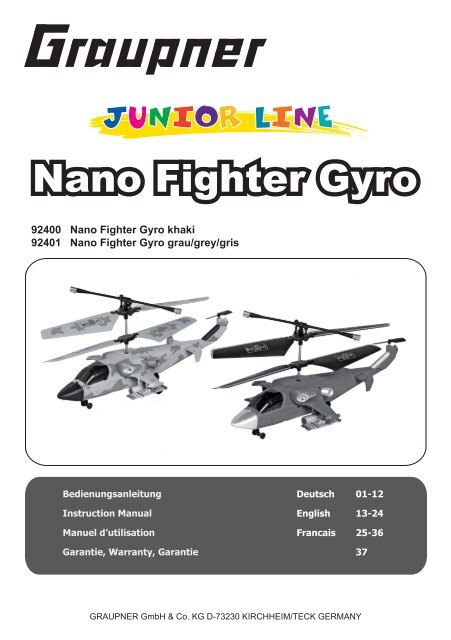
<strong>Nano</strong> <strong>Fighter</strong> <strong>Gyro</strong><br />
92400 <strong>Nano</strong> <strong>Fighter</strong> <strong>Gyro</strong> khaki<br />
92401 <strong>Nano</strong> <strong>Fighter</strong> <strong>Gyro</strong> grau/grey/gris<br />
Bedienungsanleitung<br />
Instruction Manual<br />
Manuel d’utilisation<br />
Garantie, Warranty, Garantie<br />
Deutsch 01-12<br />
English 13-24<br />
Francais 25-36<br />
37<br />
GRAUPNER GmbH & Co. KG D-73230 KI<strong>RC</strong>HHEIM/TECK GERMANY
Bedienungsanleitung<br />
<strong>Nano</strong> <strong>Fighter</strong> <strong>Gyro</strong><br />
Miniatur-Fun-Hubschrauber<br />
Vorwort<br />
Der GRAUPNER <strong>RC</strong>-Heli <strong>Nano</strong> <strong>Fighter</strong> <strong>Gyro</strong> ist ein Indoorfl ugmodell. Der Heli ist fertig gebaut,<br />
incl. Motoren, Drehzahlstellern und Li-Po-Akku. Der Flugakku befi ndet sich im Rumpf.<br />
Im Sender (IR) ist ein Ladegerät integriert. Es müssen nur Batterien in den Sender eingelegt<br />
werden, Flugakku laden und der Flugspass kann los gehen.<br />
Beim Modell <strong>Nano</strong> <strong>Fighter</strong> <strong>Gyro</strong> handelt es sich um ein kleines Elektro-<strong>RC</strong>-Hubschraubermodell<br />
für Jugendliche über 14 Jahren, bei Jugendlichen unter 14 Jahren muss der Betrieb des<br />
Modells von einem Erwachsenen beaufsichtigt werden.<br />
SICHERHEITSVORSCHRIFTEN<br />
Wichtige Sicherheitshinweise<br />
Sie haben ein Modell mit Infrarot- Fernsteuerung erworben. Die Einhaltung der Betriebsanleitung<br />
im Zusammenhang mit dem Modell sowie die Installation, der Betrieb, die Verwendung<br />
und Wartung der mit dem Modell zusammenhängenden Komponenten können von GRAUP-<br />
NER nicht überwacht werden. Daher übernimmt GRAUPNER keinerlei Haftung für Verluste,<br />
Schäden oder Kosten, die sich aus dem fehlerhaften Betrieb, aus fehlerhaftem Verhalten bzw.<br />
in irgendeiner Weise mit dem Vorgenannten zusammenhängend ergeben. Soweit vom Gesetzgeber<br />
nicht zwingend vorgeschrieben, ist die Verpfl ichtung der Firma GRAUPNER zur Leistung<br />
von Schadensersatz, aus welchem Grund auch immer ausgeschlossen (inkl. Personenschäden,<br />
Tod, Beschädigung von Gebäuden sowie auch Schäden durch Umsatz- oder Geschäftsverlust,<br />
durch Geschäftsunterbrechung oder andere indirekte oder direkte Folgeschäden), die<br />
von dem Einsatz des Modells herrühren.<br />
Die Gesamthaftung ist unter allen Umständen und in jedem Fall beschränkt auf den Betrag,<br />
den Sie tatsächlich für dieses Modell gezahlt haben.<br />
Die Inbetriebnahme und der Betrieb des Modells erfolgt einzig und allein auf Gefahr des Betreibers.<br />
Nur ein vorsichtiger und überlegter Umgang beim Betrieb schützt vor Personen- und<br />
Sachschäden.<br />
Nach der neuen Regelung des §103 Abs. 3 LuftVZO müssen alle Flugmodelle, egal ob Slowfl y-<br />
er, Parkfl yer, Segelfl ugzeuge, Flugmodelle mit Antrieben jeglicher Art vor Aufnahme des Flugbetriebs<br />
versichert sein. Schließen Sie daher eine spezielle <strong>RC</strong>-Modell-Haftpfl ichtversicherung<br />
ab. Fragen hierzu, werden Ihnen vom Fachhandel gerne beantwortet.<br />
Diese Sicherheitshinweise müssen unbedingt aufbewahrt und bei einem Weiterverkauf des<br />
Modells an den Käufer weitergegeben werden.<br />
• Vor Inbetriebnahme alle Warn- und Sicherheitshinweise in dieser Anleitung und auf der<br />
Verpackung lesen und beachten.<br />
• Der Verbraucher ist verantwortlich, körperliche Verletzungen bzw. Sachschäden durch die<br />
Verwendung des Hubschraubers zu vermeiden.<br />
• Der Hubschrauber muss gemäß der Anleitung behandelt werden. Um Verletzungen zu ver-<br />
01 Bedienungsanleitung <strong>Nano</strong> <strong>Fighter</strong> <strong>Gyro</strong>
meiden, sind Finger, Kopf bzw. Körper vor den sich drehenden Bauteilen wegzuhalten.<br />
• Der Verbraucher ist verantwortlich, mit dem Hubschrauber sicher umzugehen. Der Hersteller<br />
bzw. der Vertreiber haftet nicht, wenn Verluste bzw. Schäden durch unsachgemäße Anwendung<br />
verursacht werden.<br />
• Dieses Produkt eignet sich für Jugendliche ab 14 Jahren und mehr. Jüngere Personen dürfen<br />
nur unter der Aufsicht von Erwachsenen damit spielen.<br />
• Sie allein sind für einen gefahrlosen Betrieb verantwortlich!<br />
Warnhinweise<br />
1. Der Satz enthält kleine Teile, die beim Verschlucken gesundheitliche Schäden verursachen<br />
können; sie müssen daher von Kindern unter 3 Jahren ferngehalten werden.<br />
2. Nicht in Betrieb setzen, wenn schon ein anderes ferngesteuertes Modell auf demselben<br />
Kanal betrieben wird (der Kanal (A-B) wird am Sender eingestellt).<br />
3. Das Modell nicht im Freien betreiben. Stets in einem Bereich ohne Hindernisse fl iegen.<br />
4. Stets sicherstellen, dass nur frische bzw. voll aufgeladene Stromquellen verwendet werden.<br />
5. Keine der gelieferten Teile auseinandernehmen oder verändern, das gilt besonders für Sender<br />
und Flugakku.<br />
6. Keine Feuchtigkeit in die Komponenten eindringen lassen, andernfalls kann die Elektronik<br />
beschädigt werden.<br />
7. Darauf achten, dass weder Finger, noch Haare oder lose Kleidung in die Rotoren gerät.<br />
8. Das Modell bei Nichtgebrauch stets ausschalten.<br />
9. Flugakku nicht ausbauen, großer Hitze aussetzen oder ins Feuer werfen.<br />
10. Nur den mitgelieferten Sender mit integriertem Ladegerät verwenden.<br />
11. Oder laden über USB – Ladekabel am PC<br />
12. Aufsicht durch Erwachsene wird empfohlen, Kinder müssen auf mögliche Gefahren beim<br />
Umgang mit dem Modell hingewiesen werden<br />
Sicherheitshinweise für Stromquellen<br />
• Es darf nicht versucht werden, nichtwiederaufl adbare Batterien aufzuladen.<br />
• Wiederaufl adbare Batterien sind zum Laden aus dem Gerät zu entnehmen, sofern in der<br />
Anleitung nicht ausdrücklich etwas anderes bestimmt wird.<br />
• Wiederaufl adbare Batterien dürfen nur unter Aufsicht Erwachsener aufgeladen werden.<br />
• Weder unterschiedliche Batterietypen, noch neue und gebrauchte Batterien gemeinsam<br />
miteinander verwenden.<br />
• Nur Batterien verwenden, die dem empfohlenen Typ entsprechen oder gleichwertig sind.<br />
• Batterien nur mit der korrekten Polarität einsetzen.<br />
• Verbrauchte Batterien sofort aus den Geräten entnehmen.<br />
• Anschlüsse nicht kurzschließen.<br />
• Verwenden Sie niemals defekte, beschädigte Zellen oder Batterien mit unterschiedlichen<br />
Zellentypen.<br />
Sicherheitshinweise<br />
1. Die Steuerung des Modells erfolgt über Infrarot (Licht). Daher muss bei direkter Sonneneinstrahlung,<br />
ebenso wie beim Flug unter starken Leuchtstoffl ampen, mit einer Beeinträchtigung<br />
der Steuerung und Störungen gerechnet werden.<br />
2. Aufgrund seines geringen Gewichts reagiert das Modelle empfi ndlich auf Wind; daher nur<br />
in geschlossenen Räumen fl iegen, ohne den Einfl uss von Wind. Auch die Luftströmungen<br />
von Klimaanlagen können sich negativ auf das Flugverhalten auswirken.<br />
Bedienungsanleitung <strong>Nano</strong> <strong>Fighter</strong> <strong>Gyro</strong> 02
3. Der ins Modell integrierte Lithium-Polymer-Akku enthält gesundheitsschädliche Chemikalien;<br />
er darf daher weder ausgebaut, noch geöffnet werden.<br />
4. Der Ladevorgang sollte unter Aufsicht von Erwachsenen durchgeführt werden, wobei Kinder<br />
möglichst fern zu halten sind.<br />
5. Falls die Rotoren beschädigt oder gebrochen sind, nicht versuchen, das Modell weiter zu<br />
betreiben, um ein Verletzungsrisiko auszuschließen.<br />
6. Nicht versuchen, das Modell zu öffnen oder die Konstruktion zu verändern.<br />
7. Der Flugbetrieb erfordert einen freien Raum von ca. 4 x 4 x 2,5 m ohne Hindernisse. Modell<br />
nicht dicht an Menschen, Tiere, Möbeln oder anderen Hindernissen fl iegen.<br />
8. Der Betreiber muss im Besitz seiner vollen körperlichen und geistigen Fähigkeiten sein. Wie<br />
beim Autofahren, ist der Betrieb des Flugmodells unter Alkohol oder Drogeneinwirkung nicht<br />
erlaubt.<br />
Fernsteuerung für <strong>Nano</strong> <strong>Fighter</strong> <strong>Gyro</strong><br />
1. Infrarot-Fernsteuerung im Baukasten enthalten<br />
2. Senderbatterie 6 x 1,5V Mignon (AA) im Baukasten enthalten (Ersatzbatterien Typ AA)<br />
3. Hubschrauberakku 3,7 V 180 mAh LiPo Akku<br />
4. Antriebsakku wird durch das Ladekabel im Sender geladen<br />
5. oder durch das USB-Ladekabel<br />
Senderbatterien<br />
1. Sender einschalten. Neue Batterien sind notwendig, wenn die LED- Anzeige pulsiert.<br />
2. Sicherstellen, dass die Batterien polungsrichtig eingesetzt werden<br />
3. Niemals neue mit alten Batterien mischen.<br />
4. Niemals verschiedene Batteriefabrikate einsetzen.<br />
Batteriefachabdeckung<br />
03 Bedienungsanleitung <strong>Nano</strong> <strong>Fighter</strong> <strong>Gyro</strong>
Akku laden<br />
1. Hubschrauber zuerst ausschalten<br />
2. Ladekabel des Senders (seitlich im Sender) in die Ladebuchse des Hubschraubers einstecken.<br />
Sender einschalten: Anzeige leuchtet grün.<br />
3. Die Anzeige erlöscht, sobald der Akku vollgeladen ist, dann Stecker abziehen.<br />
4. Ladevorgang dauert ca. 60 Minuten<br />
• Hubschrauberakku niemals auf bzw. neben einen heißen Gegenstand bringen (offene<br />
Flammen, Heizkörper), um der Explosionsgefahr vorzubeugen.<br />
• Hubschrauberakku trocken lagern.<br />
• Hubschrauberakku niemals mit einem harten Gegenstand schlagen, um Schäden zu vermeiden.<br />
• Akku nicht zerlegen.<br />
• Der Akku darf niemals unbeaufsichtigt geladen werden.<br />
Während des Ladevorgangs muss der Schalter des Hubschraubers auf OFF (AUS) stehen.<br />
Schalter<br />
EIN<br />
AUS<br />
Bedienungsanleitung <strong>Nano</strong> <strong>Fighter</strong> <strong>Gyro</strong> 04
5. Der Akku kann auch über des mitgelieferte USB – Ladekabel über den PC geladen werden.<br />
Ladekabel in PC USB – Buchse stecken. Die rote LED im Stecker geht an. Das Gegenstück<br />
in die Hubschrauber- Ladebuchse stecken, die LED erlischt. Die LED im USB-Stecker geht<br />
wieder an, wenn der Akku voll geladen ist (nach ca. 30 Minuten). Stecken Sie den Hubschrauber<br />
nun ab. Beim Laden immer Schalter am Heli auf AUS (OFF) stellen.<br />
<strong>RC</strong>-Funktionen<br />
Steigen<br />
Wenn der linke Knüppel (Gasknüppel)<br />
langsam nach vorne geschoben wird,<br />
beschleunigen die Hauptrotorblätter, der<br />
Hubschrauber fängt an zu steigen.<br />
Sinken<br />
Wenn der linke Knüppel (Gasknüppel)<br />
nach hinten gezogen wird, verlangsamen<br />
sich die Hauptrotorblätter, der Hubschrauber<br />
fängt an zu sinken.<br />
Nase nach links<br />
Wenn der rechte Knüppel<br />
(Seitenruderknüppel) nach links bewegt<br />
wird, dreht die Nase des Hubschraubers<br />
nach links.<br />
Nase nach rechts<br />
Wenn der rechte Knüppel<br />
(Seitenruderknüppel) nach rechts bewegt<br />
wird, dreht die Nase des Hubschraubers<br />
nach rechts.<br />
Vorwärts<br />
Wenn der rechte Knüppel nach vorne<br />
geschoben wird, fl iegt der Hubschrauber<br />
vorwärts.<br />
Rückwärts<br />
Wenn der rechte Knüppel nach hinten<br />
gezogen wird, fl iegt der Hubschrauber<br />
rückwärts.<br />
05 Bedienungsanleitung <strong>Nano</strong> <strong>Fighter</strong> <strong>Gyro</strong>
Sonderhinweise<br />
1. Wenn sich der Hubschrauber beim Schweben dreht, Trimmung gegen die Drehrichtung<br />
drehen bis der Heli steht.<br />
2. Wenn die Batterien des Senders beinahe erschöpft sind, fängt die LED- Anzeige an rot zu<br />
blinken, jetzt Batterien wechseln<br />
3. Der Heli kann auf 3 verschiedenen Kanälen (A,B,C) gefl ogen werden. Kanal auswählen,<br />
Sender einschalten, Heli einschalten, nach ca. 5 Sekunden kann gefl ogen werden.<br />
Hauptrotorblatt<br />
Stabilisierungsstange<br />
Heckrotorblatt<br />
Hauptrotorblatt<br />
Ladebuchse<br />
Kanalwahl<br />
LED Sender an (rot)<br />
Laden (grün)<br />
Ein/Aus-Schalter<br />
Ein/Aus-<br />
Schalter<br />
Abdeckung<br />
öffnen<br />
Ladekabel<br />
Gasknüppel Trimmung Seitenruderknüppel<br />
Fliegen<br />
1. Kanalwahlschalter am Sender auf entsprechenden Kanal A, B oder C einstellen.<br />
2. Sender einschalten, LED am Sender leuchtet rot.<br />
3. Hubschrauber einschalten (ON), der Heli ist nach ca. 5 Sekunden fl ugbereit.<br />
4. Sender (blaue Kappe) immer Richtung Heli richten<br />
5. Hubschrauber auf ebenen Boden stellen, noch einmal prüfen ob sich Menschen, Tiere oder<br />
andere Hindernisse in der Nähe befi nden.<br />
6. Gasknüppel langsam vorwärts schieben: der Hubschrauber steigt.<br />
7. Mit dem Trimmregler Heli austrimmen und mit den Steuerknüppeln Modell entsprechend<br />
steuern.<br />
Bedienungsanleitung <strong>Nano</strong> <strong>Fighter</strong> <strong>Gyro</strong> 06
Schalter<br />
EIN<br />
AUS<br />
Steuerung von Steig-, Sink- und Schwebeflug<br />
Der <strong>Nano</strong> <strong>Fighter</strong> <strong>Gyro</strong> bringt den größten Flugspass, wenn er in einen stabilen, ruhigen Schwebefl<br />
ug gebracht wird. Nach entsprechender Übung kann das Modell ähnlich einem Modellhubschrauber<br />
über die Mehrkanalsteuerung bewegt werden:<br />
Nach Erreichen der gewünschten Flughöhe muss der linke Steuerknüppel (Steigen/Sinken)<br />
möglichst ruhig in der Position gehalten werden, in der das Modell weder steigt noch sinkt.<br />
Mit der Trimmung wird jede unerwünschte Drehung des Modells entgegengesteuert, so dass<br />
ein stabiler Schwebefl ug erreicht wird. Wenn es erreicht ist, dass der <strong>Nano</strong> <strong>Fighter</strong> <strong>Gyro</strong> in<br />
der gewünschten Höhe schwebt, ohne sich zu drehen, kann mit der Richtungssteuerung die<br />
Ausrichtung des Rumpfes (und damit die mögliche Flugrichtung) bewusst gesteuert werden.<br />
Mit der Vorwärts/Rückwärts-Steuerung kann dann in diese Richtung beschleunigt oder abgebremst<br />
und auch langsam rückwärts gefl ogen werden. Mit der Kombination aller Steuerfunktionen<br />
kann das Modell also ähnlich einem richtigen Hubschrauber gefl ogen werden.<br />
Landung und Beenden des Flugbetriebs<br />
Das Landen des <strong>Nano</strong> <strong>Fighter</strong> <strong>Gyro</strong> erfolgt einfach durch vorsichtiges Zurückziehen des linken<br />
Steuerknüppels. Nach der Landung zuerst den Hauptschalter am Modell in die „OFF“- Position<br />
bringen, danach den Sender ausschalten.<br />
Hinweis: Gegen Ende des Fluges wird das Flugverhalten aufgrund der nachlassenden Akkuspannung<br />
instabil. In diesem Fall muss gelandet und der Akku aufgeladen werden.<br />
Beheben von Störungen<br />
• Nach der ersten Ladung besitzt der Flugakku u.U. noch nicht die volle Kapazität, was zu<br />
einer verringerten Flugzeit führt. Die volle Leistung erreicht der Akku nach einigen Ladeund<br />
Entladezyklen.<br />
Nach dem Flugbetrieb<br />
• Nach Beenden des Flugbetriebes sollte das Modell wieder in seine Originalverpackung<br />
eingesetzt werden, um ein Verbiegen oder Verziehen der Rotoren zu vermeiden.<br />
• Wenn das Modell längere Zeit nicht benutzt werden soll muss sichergestellt werden, dass<br />
das Modell ausgeschaltet ist und die Batterien aus dem Sender entnommen sind.<br />
Wir wünschen Ihnen viel Spaß und Freude beim Fliegen mit Ihrem <strong>Nano</strong> <strong>Fighter</strong> <strong>Gyro</strong>!<br />
07 Bedienungsanleitung <strong>Nano</strong> <strong>Fighter</strong> <strong>Gyro</strong>
Pflege und Wartung<br />
• Säubern Sie das Modell nach jedem Gebrauch.<br />
• Säubern Sie das Modell und die <strong>RC</strong>-Komponenten nur mit geeigneten Reinigungsmitteln.<br />
Informieren Sie sich hierzu bei Ihrem Fachhändler.<br />
Die Montage und (Reparaturanleitung)<br />
Sorgen Sie bei Klebstoffen mit Lösungsmitteln für einen gut belüfteten Raum. Geben Sie Klebstoff-<br />
und Farbreste bei Sondermüllsammelstellen ab. Eine großzügig bemessene freie Arbeitsfl<br />
äche ist bei allen Bastelarbeiten von besonderem Vorteil.<br />
Nicht im Freien fl iegen!<br />
Überprüfung vor dem Start<br />
Sind mehrere Helis im Einsatz, vergewissern Sie sich vorher davon, dass Sie als einziger auf<br />
Ihrem Kanal senden, ehe Sie Ihren eigenen Sender einschalten. Die Doppelbelegung eines<br />
Frequenzkanals verursacht Störungen oder kann andere Modelle zum Absturz bringen.<br />
Vor jedem Start kontrollieren, dass alle Teile einwandfrei montiert sind.<br />
Der Heli muss immer so gehalten werden, dass die Rotoren sich frei drehen können,<br />
denn diese können zu Verletzungen führen.<br />
Immer zuerst Sender einschalten, dann erst Empfänger einschalten.<br />
Immer zuerst Empfänger ausschalten, dann erst Sender ausschalten.<br />
Wenn diese Reihenfolge nicht eingehalten wird, also der Empfänger eingeschaltet ist,<br />
der dazugehörige Sender jedoch auf „AUS“, so kann der Empfänger durch andere Sender,<br />
Störungen usw. zum Ansprechen gebracht werden. Der Motor könnte anlaufen.<br />
Vor jedem Einsatz korrekte Funktion und Reichweite (ca. 15 m) überprüfen. Dazu aus entsprechendem<br />
Abstand vom Modell kontrollieren, ob alle Funktionen einwandfrei sind.<br />
Warnung: niemals das Modell in einer klimatisierten Halle mit Luftgebläse fl iegen; das gleicht<br />
einem starken Wind, der das Flugmodell außerhalb der Reichweite bzw. außer Kontrolle geraten<br />
lässt.<br />
Flugzeit: bei vollgeladenem Akku fl iegt der Hubschrauber bei windlosen Bedingungen ungefähr<br />
5 bis 6 Minuten.<br />
Wenn das Modell nur ungern startet bzw. steigt, sollte der Flugakku aufgeladen werden.<br />
Die Motoren erwärmen sich während<br />
bzw. nach dem Flug stark. Motoren<br />
erst berühren, wenn sie wieder auf<br />
Zimmertemperatur abgekühlt sind.<br />
Motor zu heiß!<br />
Bedienungsanleitung <strong>Nano</strong> <strong>Fighter</strong> <strong>Gyro</strong> 08
Entsorgung<br />
Flugakku leer fl iegen oder Rotor solange laufenlassen bis er sich nicht mehr dreht. Cockpit-Verglasung<br />
abclipsen und entfernen. Kabel am Akku einzeln durchtrennen (Kurzschlussgefahr),<br />
einzeln isolieren, Akku entnehmen und fachgerecht entsorgen.<br />
LiPo-Akku<br />
Kabel einzeln durchtrennen<br />
Wichtiger Entsorgungshinweis zu Batterien und Akkus:<br />
Jeder Verbraucher ist nach der deutschen Batterieverordnung gesetzlich zur Rückgabe aller<br />
gebrauchten und verbrauchten Batterien bzw. Akkus verpfl ichtet.<br />
Eine Entsorgung über den Hausmüll ist verboten. Alte Batterien und Akkus können unentgeltlich<br />
bei den öffentlichen Sammelstellen der Gemeinde, in unseren Verkaufsstellen und überall<br />
dort abgegeben werden, wo Batterien und Akkus der betreffenden Art verkauft werden.<br />
Sie können die von uns gelieferten Batterien ausreichend frankiert auch nach Gebrauch an<br />
folgende Adresse zurücksenden:<br />
Graupner GmbH & Co. KG<br />
Service: Gebrauchte Batterien<br />
Henriettenstr. 94-96<br />
73230 Kirchheim unter Teck<br />
Deutschland<br />
Sie leisten damit einen wesentlichen Beitrag zum Umweltschutz!<br />
Schadstoffhaltige Batterien bzw. Akkus sind mit den folgenden Symbolen gekennzeichnet, um<br />
auf das Hausmüll-Entsorgungsverbot hinzuweisen.<br />
Unter dem Zeichen ist das chemische Symbol für das Metall angegeben:<br />
Cd Hg Pb<br />
Li-Po<br />
Batterie enthält:<br />
1) Cd: Cadmium<br />
2) Hg: Quecksilber<br />
3) Pb: Blei<br />
4) Li-Po: Lithium-Polymer<br />
09 Bedienungsanleitung <strong>Nano</strong> <strong>Fighter</strong> <strong>Gyro</strong>
Hinweise zum Umweltschutz<br />
Das Symbol auf dem Produkt, der Gebrauchsanleitung oder der Verpackung weist<br />
darauf hin, dass dieses Produkt am Ende seiner Lebensdauer nicht über den normalen<br />
Haushaltsabfall entsorgt werden darf. Es muss an einem Sammelpunkt für<br />
das Recycling von elektrischen und elektronischen Geräten abgegeben werden.<br />
Die Werkstoffe sind gemäß ihrer Kennzeichnung wiederverwertbar. Mit der Wiederverwendung,<br />
der stoffl ichen Verwertung oder anderen Formen der Verwertung<br />
von Altgeräten leisten Sie einen wichtigen Beitrag zum Umweltschutz.<br />
Batterien und Akkus müssen aus dem Gerät entfernt werden und bei einer entsprechenden<br />
Sammelstelle getrennt entsorgt werden.<br />
Bitte erkundigen Sie sich bei der Gemeindeverwaltung die zuständige Entsorgungsstelle.<br />
Bedienungsanleitung <strong>Nano</strong> <strong>Fighter</strong> <strong>Gyro</strong> 10
Herstellererklärung Fa. GRAUPNER GmbH & Co. KG, Henriettenstr. 94-96, D-73230<br />
Kirchheim/Teck<br />
Inhalt der Herstellererklärung:<br />
Sollten sich Mängel an Material oder Verarbeitung an einem von uns in der Bundesrepublik<br />
Deutschland vertriebenen, durch einen Verbraucher (§ 13 BGB) erworbenen Gegenstand zeigen,<br />
übernehmen wir, die Fa. GRAUPNER GmbH & Co. KG, Kirchheim/Teck im nachstehenden<br />
Umfang die Mängelbeseitigung für den Gegenstand.<br />
Rechte aus dieser Herstellererklärung kann der Verbraucher nicht geltend machen, wenn die<br />
Beeinträchtigung der Brauchbarkeit des Gegenstandes auf natürlicher Abnutzung, Einsatz unter<br />
Wettbewerbsbedingungen, unsachgemäßer Verwendung (einschließlich Einbau) oder Einwirkung<br />
von außen beruht.<br />
Umfang der Garantieleistung<br />
Im Garantiefall leisten wir nach unserer Wahl Reparatur oder Ersatz der mangelbehafteten<br />
Ware. Weitergehende Ansprüche, insbesondere Ansprüche auf Erstattung von Kosten im Zusammenhang<br />
mit dem Mangel (z.B. Ein-/Ausbaukosten) und der Ersatz von Folgeschäden sind<br />
– soweit gesetzlich zugelassen – ausgeschlossen. Ansprüche aus gesetzlichen Regelungen,<br />
insbesondere nach dem Produkthaftungsgesetz, werden hierdurch nicht berührt.<br />
Voraussetzung der Garantieleistung<br />
Der Käufer hat den Garantieanspruch schriftlich unter Beifügung des Originals des Kaufbelegs<br />
(z.B. Rechnung, Quittung, Lieferschein) und dieser Garantiekarte geltend zu machen. Er hat<br />
zudem die defekte Ware auf seine Kosten an die folgende Adresse einzusenden:<br />
Fa. Graupner GmbH & CO KG, Serviceabteilung,<br />
Henriettenstr.94 -96, D 73230 Kirchheim/Teck<br />
Der Käufer soll dabei den Material- oder Verarbeitungsfehler oder die Symptome des Fehlers<br />
so konkret benennen, dass eine Überprüfung unserer Garantiepfl icht möglich wird.<br />
Der Transport des Gegenstandes vom Verbraucher zu uns als auch der Rücktransport erfolgen<br />
auf Gefahr des Verbrauchers.<br />
Gültigkeitsdauer<br />
Diese Erklärung ist nur für während der Anspruchsfrist bei uns geltend gemachten Ansprüche<br />
aus dieser Erklärung gültig. Die Anspruchsfrist beträgt 24 Monate ab Kauf des Gerätes<br />
durch den Verbraucher bei einem Händler in der Bundesrepublik Deutschland (Kaufdatum).<br />
Werden Mängel nach Ablauf der Anspruchsfrist angezeigt oder die zur Geltendmachung von<br />
Mängeln nach dieser Erklärung geforderten Nachweise oder Dokumente erst nach Ablauf der<br />
Anspruchsfrist vorgelegt, so stehen dem Käufer keine Rechte oder Ansprüche aus dieser Erklärung<br />
zu.<br />
Verjährung<br />
Soweit wir einen innerhalb der Anspruchsfrist ordnungsgemäß geltend gemachten Anspruch<br />
aus dieser Erklärung nicht anerkenne, verjähren sämtliche Ansprüche aus dieser Erklärung in<br />
11 Bedienungsanleitung <strong>Nano</strong> <strong>Fighter</strong> <strong>Gyro</strong>
6 Monaten vom Zeitpunkt der Geltendmachung an, jedoch nicht vor Ende der Anspruchsfrist.<br />
Anwendbares Recht<br />
Auf diese Erklärung und die sich daraus ergebenden Ansprüche, Rechte und Pfl ichten fi ndet<br />
ausschließlich das materielle deutsche Recht ohne die Normen des Internationalen Privatrechts<br />
sowie unter Ausschluss des UN-Kaufrechts Anwendung.<br />
WARNUNG!<br />
Das Spielzeug enthält Kleinteile, die verschluckt werden können und ist daher für Kinder unter<br />
3 Jahren nicht geeignet.<br />
Nicht geeignet für Kinder unter<br />
3 Jahren – Erstickungsgefahr!<br />
Das Produkt entspricht den CE-Richtlinien.<br />
Bitte alle Informationen zum Produkt für künftigen Gebrauch aufbewahren.<br />
Bedienungsanleitung <strong>Nano</strong> <strong>Fighter</strong> <strong>Gyro</strong> 12
Operating instructions<br />
<strong>Nano</strong> <strong>Fighter</strong> <strong>Gyro</strong><br />
Miniature Fun Helicopter<br />
Foreword<br />
The GRAUPNER <strong>RC</strong>-Helicopter <strong>Nano</strong> <strong>Fighter</strong> <strong>Gyro</strong> is a remote-controlled indoor model helicopter.<br />
The model is supplied factory-assembled, including motors, speed controllers and LiPo<br />
battery; the fl ight battery is already installed in the fuselage. All you have to do is fi t dry cells in<br />
the (IR) transmitter and charge the fl ight battery, and the fl ying fun can commence.<br />
The <strong>Nano</strong> <strong>Fighter</strong> <strong>Gyro</strong> is a small electric-powered remote-controlled model helicopter intended<br />
for youngsters of fourteen years and over. If young persons under fourteen years wish to fl y the<br />
model, an adult must supervise the activity.<br />
IMPORTANT SAFETY NOTES<br />
You have acquired a model helicopter with an infra-red remote control system. However, we as<br />
manufacturers have no control over the way you build and operate your <strong>RC</strong> model aircraft, nor<br />
how you install, operate and maintain the associated components, and for this reason we are<br />
obliged to deny all liability for loss, damage or costs which are incurred due to the incorrect use<br />
of our products or due to incompetent behaviour on the part of the user, or which are connected<br />
with such operation in any way. Unless otherwise prescribed by binding law, the obligation of<br />
the GRAUPNER company to pay compensation, regardless of the legal argument employed,<br />
is excluded. This includes personal injury, death, damage to buildings, damages due to loss<br />
of business or turnover, interruption of business or other direct or indirect consequent damage<br />
whose root cause was the operation of the model.<br />
The total liability in all cases and under all circumstances is limited to the amount of money<br />
which you actually paid for the model.<br />
This model is operated at the sole and express responsibility of the operator. The only way to<br />
avoid injury to persons and damage to property is to handle and operate the model with the<br />
greatest care and consideration at all times.<br />
According to the new regulation of §103 Paragraph 3 of the LuftVZO (German Aviation Approvals<br />
Offi ce), all model aircraft - whether slow-fl yer, park-fl yer, glider, or model aircraft propelled<br />
by any form of power plant - must be insured before the model is operated. If you are not sure<br />
about this, please ask at your local model shop where the staff will be glad to advise you.<br />
These safety notes must be kept in a safe place. If you ever dispose of the model, be sure to<br />
pass them on to the new owner.<br />
• Please read through and observe all the warnings and safety notes in these instructions and<br />
on the packaging.<br />
• The operator is responsible for any personal injury and property damage caused by the<br />
model helicopter.<br />
• The helicopter must be handled exactly as described in these instructions. Keep your fi n-<br />
gers, head and body well away from the rotating components, as they are capable of infl icting<br />
injury.<br />
• It is the owner’s responsibility to operate the helicopter safely. The manufacturer and distributor<br />
accept no liability if incompetent or inappropriate use of the model results in loss or<br />
13 Operating Instructions <strong>Nano</strong> <strong>Fighter</strong> <strong>Gyro</strong>
damage.<br />
• This product is suitable for young persons of fourteen years and over. Younger children may<br />
only play with it under the constant supervision of an adult.<br />
• You alone are responsible for the safe operation of this model!<br />
Warning notes<br />
1. The set contains small parts which could cause injury if swallowed; for this reason it must<br />
be kept out of the reach of children under three years of age.<br />
2. Do not operate the helicopter if there is already another remote-controlled model in use on<br />
the same channel (the channel A - B is set on the transmitter).<br />
3. Do not attempt to fl y the model outdoors. The helicopter should only be fl own in an open<br />
indoor space devoid of obstacles.<br />
4. Always ensure that the batteries are new or fully charged.<br />
5. Do not dismantle or modify any of the parts supplied in the set; this applies in particular to<br />
the transmitter and the fl ight battery.<br />
6. Do not allow moisture or damp to penetrate the components, as water may damage the<br />
electronics.<br />
7. Take care to avoid the rotors coming into contact with fi ngers, hair or loose clothing.<br />
8. Remember to switch the model off when you are not using it.<br />
9. Do not remove the fl ight battery, subject it to heat or incinerate it.<br />
10. Use only the transmitter and integral battery charger supplied in the set.<br />
11. Alternatively charge the helicopter from a PC using the USB charge lead supplied.<br />
12. We recommend adult supervision when young people fl y the model. Children must be advised<br />
of the potential hazards involved in handling the model.<br />
Safety notes regarding power sources<br />
• Never attempt to charge any battery which is not specifi cally stated to be rechargeable.<br />
• Unless the instructions expressly state otherwise, always remove rechargeable batteries<br />
from the device before charging them.<br />
• Rechargeable batteries must only be charged under the supervision of an adult.<br />
• If you are using dry cells, never use different cell types, nor a mixture of new and used<br />
cells.<br />
• Use only batteries of the recommended type, or their exact equivalent.<br />
• Always take care to insert battery cells with correct polarity.<br />
• When dry cells are exhausted, remove them from the device immediately.<br />
• Take care not to short-circuit battery terminals.<br />
• Never use defective or damaged rechargeable or dry batteries, or packs consisting of different<br />
cell types.<br />
Safety notes<br />
1. The helicopter is controlled by an infra-red guidance system (i.e. light). This means that you<br />
can expect interference and problems with the control system if you try to fl y the model in<br />
direct sunshine or under powerful fl uorescent lamps.<br />
2. As the model is so light, it is inevitably sensitive to wind. For this reason the helicopter<br />
should only be fl own indoors, where there is no air movement of any kind. Even the airfl ow<br />
from an air-conditioning unit can have an adverse effect on the machine’s fl ying characteristics.<br />
3. The helicopter’s integral Lithium-Polymer battery contains potentially harmful chemicals; it<br />
must not be removed from the model, nor opened.<br />
4. The LiPo battery should only be charged under the supervision of an adult. Keep children<br />
well clear during this procedure.<br />
Operating Instructions <strong>Nano</strong> <strong>Fighter</strong> <strong>Gyro</strong> 14
5. If the rotors are damaged or broken, do not attempt to fl y the model again, as it will be uncontrollable<br />
and could injure you.<br />
6. Never try to open the model or modify its construction.<br />
7. Flying the helicopter requires an open indoor space around 4 x 4 x 2.5 m in size, devoid of<br />
obstacles. Do not fl y the model close to people, animals, furniture or other obstacles.<br />
8. The operator of the model must be in full possession of his or her bodily and mental faculties.<br />
As with car driving, operating a model aircraft under the infl uence of alcohol or drugs is<br />
not permissible under any circumstances.<br />
<strong>Nano</strong> <strong>Fighter</strong> <strong>Gyro</strong> remote control system<br />
1. The infra-red remote control system is included in the set.<br />
2. 6 x 1.5 V AA-sized dry cells are included in the kit (replacement Order No. 3426)<br />
3. Helicopter battery: 3.7 V / 180 mAh LiPo<br />
4. The helicopter battery is recharged via the transmitter<br />
5. or via the USB lead<br />
Transmitter batteries<br />
1. Switch the transmitter on. If the red LED fl ashes, new cells are required.<br />
2. Insert the cells in the transmitter compartment with correct polarity.<br />
3. Ensure that the battery cells are fi tted with correct polarity.<br />
4. Never mix new and old cells.<br />
5. Never fi t different makes of battery cell.<br />
Battery compartment<br />
15 Operating Instructions <strong>Nano</strong> <strong>Fighter</strong> <strong>Gyro</strong>
Charging the battery<br />
1. First switch the helicopter off.<br />
2. Locate the charge lead in the side panel of the transmitter, and insert the charge connector<br />
into the helicopter socket. Switch the transmitter on, and the LED will light up green.<br />
3. The LED expires when the battery is fully charged. Disconnect the charge lead at this<br />
point.<br />
4. This method of charging takes about 60 minutes.<br />
• Never allow the helicopter battery to touch or come close to any hot object (open fl a-<br />
me, heating radiator), otherwise there is a risk of explosion.<br />
• Store the helicopter battery in dry indoor conditions.<br />
• Never strike the battery with a hard object, as this could damage the cell.<br />
• Do not dismantle the LiPo battery.<br />
• The battery should never be left on charge unsupervised.<br />
During the charge process the switch on the helicopter must be left at the OFF position.<br />
Switch<br />
ON<br />
OFF<br />
Operating Instructions <strong>Nano</strong> <strong>Fighter</strong> <strong>Gyro</strong> 16
5. The battery can also be recharged from a PC using the USB charge lead supplied in the<br />
set: connect the charge lead to the USB socket of a PC, and the red LED in the plug will<br />
glow red. Insert the other end of the lead in the helicopter charge socket, and the LED will<br />
go out. After about 30 minutes, when the battery is fully charged, the LED in the plug will<br />
light up, and the charge lead must be disconnected. During the charge process the switch<br />
on the helicopter must be left at the OFF position.<br />
Remote control functions<br />
Climb<br />
If you slowly move the left-hand stick<br />
(throttle stick) forward (away from you),<br />
the main rotor blades will start to rotate<br />
and accelerate steadily; the helicopter<br />
takes off and climbs.<br />
Descent<br />
If you move the left-hand stick (throttle<br />
stick) back (towards you), the main rotor<br />
blades slow down; the helicopter starts<br />
to descend.<br />
Nose left<br />
If you move the right-hand stick (rudder<br />
stick) to the left, the helicopter’s nose<br />
moves to the left.<br />
Nose right<br />
If you move the right-hand stick (rudder<br />
stick) to the right, the helicopter’s nose<br />
moves to the right.<br />
Forward<br />
If you move the right-hand stick forward<br />
(away from you), the helicopter fl ies forward.<br />
Back<br />
If you move the right-hand stick back<br />
(towards you), the helicopter fl ies backwards.<br />
17 Operating Instructions <strong>Nano</strong> <strong>Fighter</strong> <strong>Gyro</strong>
Special notes<br />
1. If you fi nd that the model’s nose constantly turns in one direction, turn the trim knob in the<br />
opposite direction until the rotation ceases.<br />
2. When the transmitter cells are almost exhausted, the LED starts fl ashing red. This is the time to<br />
change the batteries.<br />
3. The helicopter can be operated on three different channels (A, B or C). Select the channel,<br />
switch the transmitter on, then switch the helicopter on; if the LED on the circuit board in the<br />
fuselage lights up, you can start fl ying<br />
l<br />
Flying the model<br />
1. Set the channel select switch on the transmitter to channel A, B or C as required.<br />
2. Switch the transmitter on: the LED lights up green.<br />
3. Switch the helicopter on (ON): after approx. 5 seconds the helicopter is ready to fl y.<br />
4. Keep the blue dome of the transmitter pointing at the helicopter at all times.<br />
5. Place the model on a fl at fl oor, and check once more that there are no people, animals or<br />
other obstacles close by.<br />
6. Slowly move the throttle stick forward: the helicopter lifts off and climbs.<br />
7. If necessary, turn the trim knob to trim the helicopter, then use the sticks to control the model.<br />
Operating Instructions <strong>Nano</strong> <strong>Fighter</strong> <strong>Gyro</strong> 18
Switch<br />
ON<br />
OFF<br />
Controlling climb, descent and hovering<br />
The fi rst step in getting maximum fun out of the <strong>Nano</strong> <strong>Fighter</strong> <strong>Gyro</strong> Helicopter is to establish a<br />
stable, smooth hover. After a little practice the multi-channel control system can be used to fl y<br />
the model in a similar manner to a “proper” model helicopter:<br />
When the machine reaches the desired altitude, hold the left-hand stick (climb / descent) as still<br />
as possible in the position where the helicopter neither climbs nor descends. If the model starts<br />
turning in either direction, use the right-hand stick to counteract the movement; in this way you<br />
will soon achieve a steady hover. Once you have learned the skill of keeping the <strong>Nano</strong> <strong>Fighter</strong><br />
<strong>Gyro</strong> hovering at a particular height, without rotating, you can deliberately alter the orientation<br />
of the fuselage (and therefore the possible direction of fl ight) using the direction control (right<br />
stick). The forward / back control (right stick again) is used to accelerate or brake the model in<br />
this direction; the helicopter is even capable of fl ying slowly backwards. By combining all the<br />
stick functions the model can be controlled in a similar manner to a ‘real’ helicopter.<br />
Landing, terminating flight operations<br />
The <strong>Nano</strong> <strong>Fighter</strong> <strong>Gyro</strong> can be landed simply by gradually moving the left-hand stick back<br />
towards you. After the landing the main switch on the model must fi rst be moved to the “OFF”<br />
position, and only then the transmitter can be switched off.<br />
Note: towards the end of a fl ight the model will become increasingly unstable due to the declining<br />
battery voltage. When this happens you must land the model and recharge the battery.<br />
Fault-fi nding<br />
• After the initial charge you may fi nd that the fl ight battery does not give its full capacity, resulting<br />
in reduced fl ight times. The LiPo pack only reaches its full performance after a few<br />
charge / discharge cycles.<br />
After a fl ying session<br />
• At the end of a fl ying session the model should be replaced in its original packaging to avoid<br />
the danger of accidentally bending or distorting the rotors.<br />
• If you know you will not be fl ying the helicopter for a long period, ensure that the model is<br />
switched off, and remove the dry cells from the transmitter.<br />
We wish you loads of fun and pleasure flying your <strong>Nano</strong> <strong>Fighter</strong> <strong>Gyro</strong>!<br />
19 Operating Instructions <strong>Nano</strong> <strong>Fighter</strong> <strong>Gyro</strong>
Care and maintenance<br />
• Clean the model carefully after every fl ying session.<br />
• The model and the remote control system components should only be cleaned using suitable<br />
materials.<br />
Please ask your local model shop for advice on this.<br />
Assembly (and repair instructions)<br />
If you have to use solvent-based adhesives, use them only in a well-ventilated room. Take waste<br />
adhesives and paints to your nearest toxic waste collection point. An unobstructed work area<br />
of generous size is very helpful for all types of modelling activity.<br />
Do not fl y the model outdoors if there is any wind.<br />
Pre-flight checking<br />
If there are several helicopters at the fl ying site, check beforehand that your model is the only<br />
one on “your” channel before you switch the transmitter on. Two transmitters on the same channel<br />
causes interference, and may result in other models crashing.<br />
Before fl ying the model check that all parts are in place and fi rmly secured.<br />
The helicopter must always be held in such a way that the rotors are free to spin, otherwise<br />
they may cause injury when they start turning.<br />
Always switch the transmitter on first, and only then the receiver.<br />
Always switch the receiver off first, and only then the transmitter.<br />
If you do not adhere to this sequence, i.e. if the receiver is switched on at any time when<br />
the associated transmitter is “OFF”, then the receiver may respond to other transmitters,<br />
interference signals etc., and the motors could burst into life.<br />
Before every fl ight check that the model’s controls operate correctly, and at range (approx. 15<br />
m). This simply means walking that distance from the model and checking that all the controls<br />
work properly.<br />
Warning: never fl y the model in a hall with fan-assisted air-conditioning; this has the same effect<br />
as quite a strong wind, and could easily push the model out of transmitter range and allow<br />
it to go out of control.<br />
Flight time: with a fully charged battery and fl at calm (indoor) conditions the helicopter will fl y for<br />
between fi ve and six minutes.<br />
As soon as you notice that the model is unwilling to take off and climb, it is time to recharge the<br />
fl ight battery.<br />
The motors become quite hot during a<br />
fl ight, and remain so afterwards. Don’t<br />
touch the motors until they have had<br />
a chance to cool down to room temperature.<br />
Motor too hot!<br />
Operating Instructions <strong>Nano</strong> <strong>Fighter</strong> <strong>Gyro</strong> 20
Disposal<br />
Fly until the helicopter battery is completely fl at, or allow the rotors to spin until they come to a<br />
halt. Remove the cockpit window and take the LiPo battery out. Cut through each wire of the<br />
battery seperately (to avoid short-circuits), insulate the cutted ends separately, and remove the<br />
battery. Dispose of the exhausted battery in the appropriate manner.<br />
LiPo battery<br />
Environmental Protection Notes<br />
Important information regarding the disposal of dry and rechargeable batteries:<br />
In Germany the Battery Regulation places a legal requirement on all consumers to return all<br />
used and exhausted dry and rechargeable batteries. It is prohibited to discard these items<br />
through the domestic refuse system. Old dry and rechargeable batteries can be handed in at<br />
no charge at your local community collection point, at our dealers, and at any other retail outlet<br />
where dry and rechargeable batteries of the same type are sold.<br />
An alternative method of disposal for any exhausted battery which we originally supplied is to<br />
send it to us, with pre-paid postage, at the following address.<br />
Graupner GmbH & Co. KG<br />
Service: Gebrauchte Batterien<br />
Henriettenstr. 94-96<br />
73230 Kirchheim unter Teck<br />
Deutschland<br />
connecting wire<br />
You can make an important contribution to the protection of our shared environment in this<br />
way.<br />
Dry and rechargeable batteries which contain harmful materials are marked with the following<br />
symbols, in order to draw attention to the fact that they must not be discarded through the<br />
household refuse system.<br />
Under each symbol is stated the chemical symbol for the toxic metal concerned.<br />
Cd Hg Pb<br />
Battery contains:<br />
1) Cd: cadmium<br />
2) Hg: mercury<br />
3) Pb: lead<br />
4) Li-Po: Lithium-Polymer<br />
Li-Po<br />
21 Operating Instructions <strong>Nano</strong> <strong>Fighter</strong> <strong>Gyro</strong>
Environnemental Protection Notes<br />
When this product comes to the end of its useful life, you must not dispose of it in<br />
the ordinary domestic waste. The correct method of disposal is to take it to your<br />
local collection point for recycling electrical and electronic equipment. The symbol<br />
shown here, which may be found on the product itself, in the operating instructions<br />
or on the packaging, indicates that this is the case.<br />
Individual markings indicate which materials can be recycled and re-used. You<br />
can make an important contribution to the protection of our common environment<br />
by re-using the product, recycling the basic materials or recycling redundant equipment in other<br />
ways.<br />
Operating Instructions <strong>Nano</strong> <strong>Fighter</strong> <strong>Gyro</strong> 22
Manufacturer’s declaration declaration by GRAUPNER GmbH & Co. KG, Henriettenstr.<br />
94 - 96, D-73230 Kirchheim/Teck, Germany<br />
Content of the manufacturer’s declaration:<br />
If material defects or manufacturing faults should arise in a product distributed by us in the<br />
Federal Republic of Germany and purchased by a consumer (§ 13 BGB), we, GRAUPNER<br />
GmbH & Co. KG, Kirchheim/Teck, acknowledge the obligation to correct those defects within<br />
the limitations described below.<br />
The consumer is not entitled to exploit this manufacturer’s declaration if the failure in the usability<br />
of the product is due to natural wear, use under competition conditions, incompetent or<br />
improper use (including incorrect installation) or external infl uences.<br />
This manufacturer’s declaration does not affect the consumer’s legal or contractual rights regarding<br />
defects arising from the purchase contract between the consumer and the vendor<br />
(dealer).<br />
Extent of the guarantee<br />
If a claim is made under guarantee, we undertake at our discretion to repair or replace the<br />
defective goods. We will not consider supplementary claims, especially for reimbursement of<br />
costs relating to the defect (e.g. installation / removal costs) and compensation for consequent<br />
damages unless they are allowed by statute. This does not affect claims based on legal regulations,<br />
especially according to product liability law.<br />
Guarantee requirements<br />
The purchaser is required to make the guarantee claim in writing, and must enclose original<br />
proof of purchase (e.g. invoice, receipt, delivery note) and this guarantee card. He must send<br />
the defective goods to us at his own cost, using the following address:<br />
Service Department, GRAUPNER GmbH & Co. KG,<br />
Henriettenstr. 94 - 96, D-73230 Kirchheim/Teck, Germany<br />
The purchaser should state the material defect or manufacturing fault, or the symptoms of the<br />
fault, in as accurate a manner as possible, so that we can check if our guarantee obligation is<br />
applicable.<br />
The goods are transported from the consumer to us and from us to the consumer at the risk of<br />
the consumer.<br />
Duration of validity<br />
This declaration only applies to claims made to us during the claim period as stated in this<br />
declaration. The claim period is 24 months from the date of purchase of the product by the<br />
consumer from a dealer in the Federal Republic of Germany (date of purchase). If a defect<br />
arises after the end of the claim period, or if the evidence or documents required according to<br />
this declaration in order to make the claim valid are not presented until after this period, then<br />
the consumer forfeits any rights or claims from this declaration.<br />
Limitation by lapse of time<br />
If we do not acknowledge the validity of a claim based on this declaration within the claim period,<br />
23 Operating Instructions <strong>Nano</strong> <strong>Fighter</strong> <strong>Gyro</strong>
all claims based on this declaration are barred by the statute of limitations after six months from<br />
the time of implementation; however, this cannot occur before the end of the claim period.<br />
Applicable law<br />
This declaration, and the claims, rights and obligations arising from it, are based exclusively<br />
on the pertinent German Law, without the norms of international private law, and excluding UN<br />
retail law.<br />
WARNING!<br />
As this toy contains small parts that could be swallowed, it is unsuitable for children under the<br />
age of 3 years.<br />
Not suitable for children under the<br />
age of 3 years – risk of choking.<br />
The product complies with CE regulations.<br />
Please keep all information about the product for future reference.<br />
Operating Instructions <strong>Nano</strong> <strong>Fighter</strong> <strong>Gyro</strong> 24
Mode d‘emploi<br />
<strong>Nano</strong> <strong>Fighter</strong> <strong>Gyro</strong><br />
Mini Hélicoptère Fun<br />
Français<br />
Introduction<br />
L’hélicoptère radiocommandé GRAUPNER <strong>Nano</strong> <strong>Fighter</strong> <strong>Gyro</strong> est un modèle Indoor. Cet hélicoptère<br />
est livré entièrement monté, avec les moteurs, les variateurs et un accu LiPo. L’accu<br />
de vol est dans le fuselage. Le chargeur est intégré dans l’émetteur (IR). Il suffi t simplement<br />
de mettre des piles dans l’émetteur et de charger l’accu de vol pour savourer le plaisir du pilotage.<br />
Le <strong>Nano</strong> <strong>Fighter</strong> <strong>Gyro</strong> est un petit modèle d’hélicoptère électrique <strong>RC</strong> destiné aux jeunes de<br />
plus de 14 ans, en dessous de 14 ans, l’utilisation du modèle ne peut se faire que sous la surveillance<br />
d’une personne adulte.<br />
Consignes de sécurité importantes<br />
Vous venez d’acquérir un modèle à commande infra-rouge. Le respect de la notice, l’installation,<br />
l’utilisation et l’entretien du modèle ainsi que de ses différents composants ne peuvent pas être<br />
suivis par GRAUPNER. C’est pourquoi, GRAUPNER décline toute responsabilité en cas de<br />
pertes, dégâts ou toutes autres conséquences, résultant d’une utilisation ou d’un comportement<br />
non conformes. Si ce n’est pas explicitement précisé par le législateur, le responsabilté de<br />
GRAUPNER ne pourra en aucun cas être engagée, même en cas de blessures, mort, détérioration,<br />
dégâts ou perte de chiffre d’affaires due à une interruption de l’activité, liée directement<br />
ou indirectement à l’utilisation du modèle.<br />
Quoiqu’il en soit et dans tous les cas, les dédommagements éventuels ne pourront dépasser le<br />
montant initial versé pour l’acquisition de ce modèle.<br />
La mise en route et l’utilisation du modèle se font sous l’entière et totale responsabilité de<br />
l’utilisateur. Seule une utilisation responsable et refl échie vous protégerons d’eventuelles blessures<br />
et dégâts matériels..<br />
Conformément à la nouvelle règlementation du §103 Art. 3 LuftVZO , tous les modèles, que<br />
ce soient des Slowfl yers, des Parkfl yers, ou tous autres modèles volants motorisés doivent<br />
être assurés. A ce sujet, vous trouverez toutes les réponses à vos questions auprès de votre<br />
détaillant.<br />
Conservez précieusement ces consignes de sécurité, qui devront être transmises au nouvel<br />
acquéreur, en cas de revente du modèle à un tiers.<br />
• Avant utilisation du modèle, lisez attentivement et respectez toutes les recommandations et<br />
consignes de sécurité de cette notice, et de celles qui fi gurent sur sur l’emballage.<br />
• L’utilisateur est entièrement responsable des éventuels dégâts ou blessures que pourraient<br />
provoquer une utilisation non conforme du modèle.<br />
• L’hélicoptère doit être utilisé, conformément à la notice. Pour éviter toutes blessures, ne jamais<br />
mettre les doigts, la tête ou toute autre partie du corps dans les éléments en mouvement,<br />
en rotation.<br />
• La manière d’évoluer avec l’hélicoptère se fait sous l’entière responsabilité de l’utilisateur.<br />
Le fabricant ou le distributeur ne pourra en aucun cas être tenu pour responsable en cas<br />
de blessures ou dégâts suite à une utilisation non conforme du modèle.<br />
25 Mode d‘emploi <strong>Nano</strong> <strong>Fighter</strong> <strong>Gyro</strong>
• Ce produits est destiné à de jeunes pilotes de 14 ans et plus. Des enfants plus jeunes ne<br />
pourront s’en servir que sous la surveillance d’une personne adulte.<br />
• Vous seuls, êtes entièrement responsable, pour que tout se passe bien!<br />
Attention<br />
1. Cet ensemble est composé de petites pièces qui pourraient s’avérer dangereuses en les<br />
avalant; c’est pourquoi, mettez-le hors de portée des enfants de moins de 3 ans.<br />
2. Ne jamais mettre le modèle en vol lorsque un autre modèle radiocommandé, sur la même<br />
fréquence, est déjà en vol (la fréquence A ou B est sélectionnée sur l’émetteur.<br />
3. N’évoluez pas avec ce modèle à l’extérieur. Volez toujours dans un endroit sans le moindre<br />
obstacle.<br />
4. Assurez-vous toujours que les sources d’alimentation (piles, accus) sont neuves ou chargées<br />
correctement.<br />
5. Ne démontez ou ne modifi ez aucune des pièces livrées, notamment en ce qui concerne<br />
l’émetteur et l’accu.<br />
6. Protégez les différents composant contre l’humidité, humidité qui pourrait nuire au bon fonctionnement<br />
de l’électronique..<br />
7. Evitez de mettre les doigts, cheveux ou habits fl ottants dans les pales des rotors en mouvement.<br />
8. Toujours couper l’alimentation du modèle lorsqu’il n’est pas utilisé.<br />
9. Ne jamais démonter l’accu, ne pas le mettre à proximité d’une source de chaleur et ne jamais<br />
le jeter dans un feu.<br />
10. N’utiliser que l’émetteur fourni, avec le chargeur intégré.<br />
11. Ou recharger l’accu avec le cordon de charge USB, via un PC.<br />
12. La présence d’une personne adulte est conseillée, il faut que les enfants soient rendus<br />
attentifs aux éventuels dangers que pourraient provoquer une utilisation non conforme du<br />
modèle.<br />
Français<br />
Consignes de sécurité pour les alimentations<br />
• Il ne faut pas essayer de recharger des piles non rechargeables.<br />
• Pour la recharge, les piles rechargeables doivent être retirées de l’appareil, dans la mesure<br />
ou il n’est pas fait mention d’une contre indication dans la notice.<br />
• Les piles rechargeables ne peuvent être rechargées que sous la surveillance d’une personne<br />
adulte.<br />
• Ne jamais utiliser des accus ou piles de marques différentes et ne jamais mélanger<br />
d’anciennes piles (ou accus) avec des nouvelles piles.<br />
• N’utiliser que des piles qui correspondent au modèle préconisé ou qui sont similaires.<br />
• Respectez les polarités des différents éléments en les montant.<br />
• Retirez immédiatement les piles usagées de l’appareil.<br />
• Ne court-circuitez pas les branchements.<br />
• N’utilisez jamais des éléments défectueux ou des éléments de type différent.<br />
Consignes de sécurité<br />
1. La commande du modèle est basée sur des infra-rouges (rayons lumineux). De ce fait, en<br />
cas de rayonnement solaire important ou sous un puissant éclairage, il faut s’attendre à des<br />
perturbations au niveau des commandes.<br />
2. Du fait de son poids très faible, ce modèle est extrêmement sensible au vent; c’est pourquoi,<br />
ne volez que dans des endroits protégés et clos, sans le moindre vent. Même des aérations,<br />
climatisations, courants d’air, peuvent intervenir de manière négative sur le comportement<br />
en vol du modèle.<br />
Mode d‘emploi <strong>Nano</strong> <strong>Fighter</strong> <strong>Gyro</strong> 26
Français<br />
3. L’accu Lithium-Polymère intégré dans le modèle contient des éléments chimiques nocifs.<br />
C’est pourquoi il ne doit pas être démonté ni ouvert.<br />
4. La charge ne doit se faire que sous la surveillance d’une personne adulte, et les enfants<br />
doivent être tenus à l’écart.<br />
5. Pour éviter tous risques de blessures lorsque des pales du rotor sont endommagées<br />
n’essayez pas de poursuivre les vols.<br />
6. N’essayez pas d’ouvrir le modèle ou de modifi ez sa conception.<br />
7. Son utilisation nécessite un espace de 4 x 4 x 2,5 m environ, sans aucun obstacle. Ne volez<br />
pas à proximité des gens, des animaux, des meubles ou de tout autre obstacle.<br />
8. L’utilsateur, le pilote, doit être en pleine possession de tous ses facultés. Comme pour la<br />
conduite automobile, le pilotage de ce modèle, sous l’emprise de l’alcool ou de drogue est<br />
formellement interdite.<br />
Radiocommande du <strong>Nano</strong> <strong>Fighter</strong> <strong>Gyro</strong><br />
1. Radiocommande à infra-rouges fournie<br />
2. Piles pour l’alimentation de l’émetteur 6 x 1,5V Mignon (AA) fournies (Piles de rechange<br />
Réf.Cde. 3426)<br />
3. Accu de vol LiPo 3,7 V 180 mAh<br />
4. L’accu de propulsion est chargé à l’aide du cordon de charge de l’émetteur<br />
5. ou à l’aide du cordon de charge USB<br />
Piles de l’émetteur<br />
5. Allumez l’émetteur. Il faut remplacer les piles lorsque la LED clignote.<br />
6. Assurez-vous que les piles soient bien montées, sans inversion de polarité<br />
7. Ne jamais panacher d’anciennes piles avec des nouvelles.<br />
8. N’utilisez que des piles de même marque.<br />
compartement à piles<br />
27 Mode d‘emploi <strong>Nano</strong> <strong>Fighter</strong> <strong>Gyro</strong>
Charge de l’accu de propulsion<br />
1. Coupez d’abord l’alimentation de l’hélicoptère<br />
2. Branchez le cordon de charge (en côté de l’émetteur) dans la prise de charge de l’hélicoptère.<br />
Allumez l’émetteur: La LED est au vert.<br />
3. La LED s‘éteindre, dès que l’accu est chargé, débranchez alors le cordon de charge.<br />
4. Le temps de charge varie entre 60 minutes environ.<br />
• Ne jamais placer l’accu de l’hélicoptère sur ou à coté d’une source de chaleur (fl ammes,<br />
radiateurs), pour éviter tous risques d’explosion.<br />
• Stockez l’accu de l’hélicoptère toujours au sec.<br />
• Pour éviter d’endommager l’accu, ne jamais taper dessus avec outil ou autre ustensil.<br />
• Ne jamais tenter „d’ouvrir“ l’accu.<br />
• Ne jamais laisser l’accu en charge sans surveillance.<br />
Français<br />
Pendant la charge, l’interrupteur de l’hélicoptère doit être en position OFF (Arrêt).<br />
Interrupteur<br />
marché<br />
arrêt<br />
Mode d‘emploi <strong>Nano</strong> <strong>Fighter</strong> <strong>Gyro</strong> 28
Français<br />
5. L’accu peut également être rechargé par un PC, à l’aide du cordon de charge USB livré<br />
avec le modèle. Branchez le cordon de charge sur une prise USB du PC, sur la prise, la LED<br />
rouge s’allume. Branchez l’autre extrémité du cordon dans la prise de chrage de l’hélicoptère,<br />
la LED s’éteint lorsque l’accu est chargé, la LED reste allumée environ 30 minutes, et en fi n<br />
de charge, il faut débrancher le cordon. En charge, l’interrupteur de l’hélicoptère doit toujours<br />
être en position OFF (Arrêt).<br />
Fonctions <strong>RC</strong><br />
Montée<br />
Lorsque le manche gauche (commande<br />
des gaz) est déplacé progressivement<br />
vers l’avant,la vitesse de rotation des pales<br />
augmente, et l’hélicoptère décolle.<br />
Descente<br />
Lorsque le manche gauche (commande<br />
des gaz) est déplacé vers l’arrière, la<br />
vitesse de rotation des pales diminue, et<br />
l’hélicoptère commence se descente.<br />
Virage à gauche<br />
Lorsque le manche droit (commande de<br />
direction) est déplacé vers la gauche, le<br />
nez de l’hélicoptère se dirige vers la gauche.<br />
Virage à droite<br />
Lorsque le manche droit (commande<br />
de direction) est déplacé vers la droite,<br />
le nez de l’hélicoptère se dirige vers la<br />
droite.<br />
Marche avant<br />
Lorsque le manche de droite est déplacé<br />
vers l’avant, l’hélicoptère avance.<br />
Marche arrière<br />
Lorsque l’on tire sur le manche droit (vers<br />
l’arrière) l’hélicoptère recule<br />
29 Mode d‘emploi <strong>Nano</strong> <strong>Fighter</strong> <strong>Gyro</strong>
Autres conseils<br />
1. Lorsque, en vol stationnaire, l’hélicoptère tourne sur lui-même autour de l’axe du rotor, déplacer<br />
le trim dans le sens opposé jusqu’à ce que l’hélicoptère se stabilise.<br />
2. Lorsque les piles de l’émetteur arrivent en fi n de charge, la LED se met à clignoter rouge, il est<br />
maintenant grand temps de changer les piles<br />
3. L’hélicoptère peut être piloté sur trois fréquences différentes (A, B ou C). Sélectionnez la fréquence,<br />
allumez l’émetteur, lorsque la LED située sur la platine dans le fuselage s’allume,<br />
vous pouvez décoller.<br />
Français<br />
Pale de rotor<br />
Barre stabilisatrice<br />
Pale de rotor arrière<br />
Pale de rotor<br />
Prise de charge<br />
Choix de la<br />
fréquence<br />
LED transmitteur activé (rouge)<br />
Chargé (vert)<br />
Interrupteur Marche/Ârret<br />
Interrupteur<br />
Marche/Ârret<br />
Ouvrez le<br />
capot<br />
Cordon de<br />
charge<br />
Manche de<br />
commande des gaz<br />
Trim<br />
Manche de commande<br />
de direction<br />
Le vol<br />
1. Sur l’émetteur, sélectionnez la fréquence, A, B ou C.<br />
2. Allumez l’émetteur, la LED de l’émetteur s’allume, elle est verte.<br />
3. Allumez l’hélicoptère (ON), après environ 5 secondes, l‘hélicoptère est fi n prê.<br />
4. Visez toujours le modèle avec l’émetteur (capuchon bleu)<br />
5. Placez l’hélicoptère sur une surface plane et vérifi ez s’il n’y a personne à proximité, y compris<br />
animaux aux autres obstacles.<br />
6. Deplacez lentement, progressivement la manche de commande des gaz vers l’avant:<br />
l’hélicoptère décolle.<br />
7. Réglez l’hélicoptère avec le trim et pilotez le modèle avec les manches de commande.<br />
Mode d‘emploi <strong>Nano</strong> <strong>Fighter</strong> <strong>Gyro</strong> 30
Interrupteur<br />
Français<br />
marché<br />
arrêt<br />
Commande de la montée, de la descente et du vol stationnaire<br />
Le <strong>Nano</strong> <strong>Fighter</strong> <strong>Gyro</strong> Hélicoptère offre le plus grand plaisir lorsqu’il est mis en vol stationnaire<br />
stable. Après quelques entrainements, ce modèle pourra être piloté, de manière similaire à tout<br />
autre modèle d’hélicoptère, grâce à la commande à plusieurs voies:<br />
Après avoir atteint l’altitude de vol souhaitée, il faut essayer de maintenir le manche de commande<br />
gauche (Montée/Descente) en position, position dans laquelle le modèle maintient son<br />
altitude. Avec le trim, on contre la rotation du modèle autour de l’axe du rotor en le déplacant<br />
en sens inverse, jusqu’à obtenir un vol stationnaire stable. Si cela est atteint, c’est-à-dire si le<br />
<strong>Nano</strong> <strong>Fighter</strong> <strong>Gyro</strong> se maintient à la hauteur souhaitée, sans tourner sur lui-même, on peut<br />
commencer le pilotage proprement dit, changement de cap, de direction. Avec la commande<br />
de la marche avant/arrière, cette translation peut être accélérée, freinée, ou permet même des<br />
marches arrières lentes. En mélangeant toutes ces commandes, ce modèle peut être piloté de<br />
manière similaire à un véritable hélicoptère.<br />
Atterrissage et fin de vol<br />
L’atterrissage du <strong>Nano</strong> <strong>Fighter</strong> <strong>Gyro</strong> est très simple, il suffi t d’abaisser progressivement le manche<br />
de commande gauche. Après l’atterrissage, mettez d’abord l’interrupteur principal du modèle<br />
en position „OFF“, puis après seulement coupez l’émetteur.<br />
Remarque: En fi n de vol, compte tenu de la baisse de la charge de l’accu, le comportement en<br />
vol du modèle devient instable. Dans ce cas, il faut se poser et recharger l’accu.<br />
Résolution des problèmes<br />
• Après la première charge, l’accu n’a pas encore emmagasiner toute sa capacité, ce qui<br />
conduit à des temps de vol plus courts. Ce n’est qu’au bout de plusieurs cycles de charge/<br />
décharge qu’il atteindra son rendement optimal.<br />
Après le vol<br />
• Après le vol, il est conseillé de remettre me modèle dans son emballage d’origine, cela évite<br />
une déformation des pales des rotors.<br />
• Lorsque le modèle est remisé, stocké, pour un certain temps, il faut s’assurer que le modèle<br />
est bien coupé, et il faut retirer les piles de l’émetteur.<br />
Nous vous souhaitons beaucoup de plaisir, et bons vols avec votre <strong>Nano</strong> <strong>Fighter</strong> <strong>Gyro</strong>!<br />
Entretien<br />
• Après chaque utilisation, nettoyez toujours votre modèle.<br />
• Ne nettoyer le modèle et les composants <strong>RC</strong> qu’avec des produits appropriés. A ce sujet,<br />
vous pouvez vous renseigner auprès de votre détaillant.<br />
31 Mode d‘emploi <strong>Nano</strong> <strong>Fighter</strong> <strong>Gyro</strong>
Notice de montage (et de réparation)<br />
Lorsque vous utilisez des colles avec des solvants, toujours dans un endroit bien aéré. Déposez<br />
vos restes de colles et de peinture dans une collecte appropriée. Pour tous les travaux, un<br />
plan de travail suffi samment grand et propre est un avantage certain.<br />
Ne volez jamais à l’extérieur!<br />
Vérifications avant décollage<br />
Si plusieurs hélicoptères sont en vol, assurez-vous que vous êtes le seul sur votre fréquence,<br />
avant d’allumer votre émetteur. A deux sur une même fréquence, cela peut produire des interférences<br />
et des perturbations, et peut même être la cause du crash des autres modèles.<br />
Vérifi ez, avant chaque décollage, si toutes les pièces sont correctement en place.<br />
Français<br />
L’hélicoptère doit toujours être maintenu de telle sorte que les pales des rotors puissent<br />
tourner librement faute de quoi, celles-ci pourraient provoquer des blessures.<br />
Allumer d’abord l’émetteur, ensuite seulement le récepteur.<br />
Couper d’abord le récepteur et ensuite seulement l’émetteur.<br />
Si cette chronologie n’est pas respectée, c’est-à-dire que si le récepteur est allumé alors<br />
que l’émetteur est déjà coupé, en position „AUS“, le récepteur peut éventuellement recevoir<br />
des signaux d’autres émetteurs, et les moteurs pourraient se mettre en route.<br />
Avant chaque utilisation vérifi ez le bon fonctionnement de toutes les voies et faites un essai de<br />
portée (env. 15 m). Pour cela, à distance correspondante du modèle, vérifi ez si toutes les voies<br />
répondent corectement.<br />
Attention: ne jamais voler dans une salle dans laquelle la climatisation est branchée; cela<br />
équivaut à un vent fort qui vous pousse le modèle à la limite de portée, et vous en perdez le<br />
contrôle.<br />
Temps de vol: lorsque l’accu est bien chargé, et sans le moindre vent, le temps de vol se situe<br />
entre 5 et 6 minutes..<br />
Lorsque le modèle a du mal à décoller et à prendre de la hauteur, il faut recharger l’accu.<br />
Pendant le vol, et donc après le vol,<br />
les moteurs sont chauds. Ne touchez<br />
les moteurs que s’ils sont revenus à<br />
température ambiante.<br />
Moteur trop chaud!<br />
Mode d‘emploi <strong>Nano</strong> <strong>Fighter</strong> <strong>Gyro</strong> 32
Recyclage<br />
Voler jusqu’au bout de l’accu, ou laisser tourner le rotor jusqu’à ce qu’il s’arrête. Enlever la verrière,<br />
puis la retirer. Couper les cordons de l’accu l’un après l’autre (attention, risque de court<br />
circuit), les isoler séparément, retirer l’accu et le remettre à une collecte adéquate.<br />
Français<br />
LiPo accu<br />
cordons de l‘accu<br />
Protection de la nature - Environnement<br />
Remarque importante pour le recyclage des piles et accus:<br />
Conformément à la législation allemande en vigueur, chaque utilisateur est tenu de rendre les<br />
piles et accus usagés. Il est formellement interdit de les jeter dans les ordures ménagères.<br />
Les accus et piles usagées peuvent être déposés dans n’importe quel centre de tri de votre<br />
commune, dans n’importe lequel de nos point de vente, partout où l’on commercialise des piles<br />
et accus.<br />
Vous pouvez également nous retourner les piles que nous vous avons fournies, après usage,<br />
à l’adresse ci-dessous, suffi samment affranchies:<br />
Graupner GmbH & Co. KG<br />
Service: Gebrauchte Batterien<br />
Henriettenstr. 94-96<br />
73230 Kirchheim unter Teck /Allemagne<br />
Vous participez ainsi, de manière signifi cative, à la protection de l’environnement!<br />
Les piles ou accus contenant des produits dangereux sont marqués des symboles ci-dessous<br />
pour attirer l’attention sur l’interdiction formelle de les jeter aux ordures. Sous le sigle, fi gure le<br />
symbole chimique des métaux:<br />
Cd Hg Pb<br />
Li-Po<br />
La pile contient:<br />
1) Cd: Cadmium<br />
2) Hg: Mercure<br />
3) Pb: Plomb<br />
4) Li-Po: Lithium-Polymère<br />
33 Mode d‘emploi <strong>Nano</strong> <strong>Fighter</strong> <strong>Gyro</strong>
Indications quant à la protection de l‘environnement<br />
Ce produit à la fi n de sa durée de vie ne doit pas être mis à la poubelle, mais être<br />
remis à une collecte pour le recycle ment d‘appareils électriques et électroniques.<br />
Le symbole inscrit sur le produit, dans la notice d‘instructions et sur son emballage<br />
l‘indique.<br />
Les matériaux selon leurs reconnaissances sont réutilisables. Avec le recyclage<br />
de matériaux et autres formes d‘appareils, vous contribuez à la protection de<br />
l‘environnement.<br />
Les batteries et accus doivent être retirés de l‘appareil et doivent être remis à un dépôt homologué<br />
pour ce type de produits.<br />
Veuillez s.v.p. demander auprès de votre mairie l‘adresse exacte du point de récupération le<br />
plus proche de chez vous.<br />
Français<br />
Mode d‘emploi <strong>Nano</strong> <strong>Fighter</strong> <strong>Gyro</strong> 34
Déclaration de conformité du produit de la Société GRAUPNER GmbH & Co KG, Henriettenstr.<br />
94 -96, D 73230 Kirchheim/Teck<br />
Français<br />
Contenu de cette décaration fabricant:<br />
Si une pièce, que nous avons mise sur le marché allemand, devait présenter un défaut ou un<br />
vice caché (conformément au § 13 BGB ), nous, Sté GRAUPNER GmbH, Kirchheim/Teck & Co<br />
K G Corporation nous nous engageons à la remplacer dans le cadre ci-dessous.<br />
Le consommateur (client) ne peut faire valoir les droits de cette déclaration, si la pièce en question<br />
a fait l’objet d’une usure normale, si elle a été utilisée dans des conditions météoroliques<br />
anormales, si son utilsation n’est pas conforme (y compris le montage) ou si elle a été sujette<br />
à des infl uences extérieures.<br />
Cette déclaration ne change en rien les droits du consommateur (client) vis à vis de son détaillant<br />
(revendeur)<br />
Etendue de la garantie<br />
Dans le cas d’une prise en charge au titre de la garantie, nous nous réservons le droit, soit de<br />
remplacer la pièce en question, soit de la réparer. D’autres revendications, en particulier, les<br />
coûts (de montage ou de démontage) liés de la pièce défectueuse et un dédommagement des<br />
dégâts engendrés par cette pièce sont exclus du cadre légal. Les droits issus des différentes<br />
législations, en particulier, les régles de responsabiltés au niveau du produit, ne sont pas remises<br />
en cause<br />
Conditions de la garantie<br />
L’acheteur peut faire valoir la garantie, par écrit, sur présentation de la preuve d’achat (par ex.<br />
facture, quittance, reçu, bon de livraison). Mais les frais d’envoi, à l’adresse ci-dessous, restent<br />
à sa charge:<br />
Fa. GRAUPNER GmbH & CO KG, Serviceabteilung,<br />
Henriettenstr.94 -96, D 73230 Kirchheim/Teck<br />
Par ailleurs, l’acheteur est prié de décrire le défaut ou dysfonctionnement constaté de la manière<br />
la plus explicite et la plus concrètre posssible, de sorte que nous puissions vérifi er si la<br />
prise en charge est possible.<br />
Les marchandises voyagent toujours aux risques et périls du client, qu’il s’agisse de l’expédition<br />
du client vers nos services ou l’inverse. .<br />
Durée de la garantie<br />
La durée de la garantie est de 24 mois, à partir de la date d’achat, et achat effectué sur le territoire<br />
allemand. Si des dysfonctionnements ou dommages devaient être constatés au delà de<br />
cette durée, ou si des déclarations de non conformités devaient nous parvenir au delà de cette<br />
date, même avec les preuves d’achat demandées, le client perd tout droit à la garantie, malgré<br />
la déclaration de conformité ci-dessus<br />
Prescription<br />
Tant que nous n’avons pas reconnu le bien fondé d’une réclamation, il y a prescription au bout<br />
35 Mode d‘emploi <strong>Nano</strong> <strong>Fighter</strong> <strong>Gyro</strong>
de 6 mois, à partir de la date de la réclamation, néanmoins, pas avant la date d’expiration de<br />
la garantie.<br />
Pendant toute sa durée de service, le marteau combiné en modèle réduit <strong>Nano</strong> <strong>Fighter</strong> <strong>Gyro</strong><br />
ne nécessite aucun entretien.<br />
Droit applicable<br />
Tous les droits et devoirs issus de la présente déclaration sont exclusivement basés sur la<br />
législation matérielle en vigueur en Allemagne, à l’exclusion de l’application du droit privé international<br />
et des droits des consommateurs<br />
Français<br />
AVERTISSEMENT !<br />
Comme ce modèle réduit contient de petits composants qui peuvent être mis en bouche et<br />
avalés, il ne convient pas pour des enfants de moins de 3 ans.<br />
Ne convient pas pour des enfants<br />
de moins de 3 ans – Risque<br />
d’étouffement !<br />
Le produit est conforme aux normes CE.<br />
Veuillez conserver toutes les informations relatives à ce produit pour les utilisations ultérieures.<br />
Mode d‘emploi <strong>Nano</strong> <strong>Fighter</strong> <strong>Gyro</strong> 36
GRAUPNER GRAUPNER GRAUPNER GRAUPNER GRAUPNER<br />
Wir gewähren auf dieses Erzeugnis eine<br />
This product is<br />
Nous accordons une<br />
Su questo pro prodotto, diamo una<br />
Nuestra Sociedad concende una<br />
GARANT IE WARRANTIED GARANTIE<br />
GARANZIA<br />
GARANTÍA<br />
von 24 MON ATEN for 24 MONTHS de 24 MOIS di 24 MESI de 24 MESES<br />
Graupner GmbH & Co. KG, Henriettenstraße<br />
La société Graupner GmbH & Co. KG,<br />
La Ditta Graupner GmbH & Co. KG,<br />
La firma Graupner GmbH & Co. KG,<br />
Die Firma Graupner GmbH & Co. KG,<br />
H enriettenstraße 94-96, D-73230K irchheim/Tec k<br />
94-96, D-73230 Kirchheim/Teck, Germany<br />
Henriettenstraße 94-96, D-73230 Kirchheim/<br />
Henriettenstraße 94-96, D-73230 Kirchheim/<br />
Henriettenstraße 94-96, D-73230 Kirchheim/Teck,<br />
gewährt ab dem Kaufdatum auf dieses Produkt<br />
guarantees this product for a period of 24 months<br />
Teck, Allemagne, accorde sur ce produit une ga -<br />
Teck, Germania, a partire dalla data di acquisto,<br />
concede sobre este producto una garantiá de 24<br />
eine Garantie von 24 Monaten.<br />
from date of purchase.<br />
rantie de 24 mois à partir de la date d‘achat.<br />
concede su questo prodotto una Garanzia di 24<br />
meses desde la fecha de compra.<br />
Die Garantie gilt nur für die bereits beim Kauf des<br />
The guarantee applies only to such material or<br />
La garantie prend effet uniquement sur les vices<br />
mesi.<br />
La garantiá vale solo para el material de los produc -<br />
Produktes vorhandenen Material- oder Funkti -<br />
operational defects which are present at the time<br />
de fonctionnement et de matériel du produit<br />
La garanzia è valida solo per i diffetti di materi -<br />
tos comprados especificados - o bién funcio na -<br />
onsmängel. Schäden die auf Abnützung, Über -<br />
of purchase of the product.<br />
acheté. Les dommages dûs à de l‘usure, à de<br />
ale e di funzionamento esistenti già al momento<br />
mientos - defectuosos. Las averías producidas por<br />
lastung, falsches Zubehör oder unsachgemäße<br />
Damage due to wear, overloading, incompetent<br />
la surcharge, à de mauvais accessoires ou à<br />
dell’acquisto del prodotto. Danni dovuti a logo -<br />
desgaste, sobrecarga, accesorios equivocados o<br />
Behandlung zurückzuführen sind, sind von der<br />
handling or the use of incorrect accessories is<br />
d‘une application inadaptée, sont exclus de la<br />
rio, sovraccarico, accesssori sbagliati o ricondu -<br />
usos inadecuados están excluidos de la garantía.<br />
Garantie ausgeschlossen.<br />
not covered by the guarantee.<br />
garantie.<br />
cibili ad uso personale improprio, sono esclusi<br />
El derecho legal y el cumplimiento de la garantía<br />
Die gesetzlichen Rechte und Gewährleistungsan -<br />
The user‘s legal rights and claims under garan -<br />
Cette garantie ne remet pas en cause les droits<br />
dalla garanzia.<br />
para el consumidor se conseguirá a través de esta<br />
sprüche des Verbrauchers werden durch diese<br />
tee are not affected by this guarantee.<br />
et prétentions légaux du consommateur.<br />
I diritti legali e le pretese assicurative dell’utente<br />
garantía sin modificaciones.<br />
Garantie nicht berührt.<br />
Please check the product carefully for defects<br />
Avant toute réclamation et tout retour du produit,<br />
non trovano riscontro nella presente garanzia.<br />
Por favor, antes de hacer una reclamación o en -<br />
Bitte überprüfen Sie vor einer Reklamation oder<br />
before you make a claim or send the item to us,<br />
veuillez s.v.p. contrôler et noter exactement les<br />
Vi preghiamo di controllare i difetti dell’articolo<br />
viar una devolución comprobar minuciosamente el<br />
Rücksendung das Produkt genau auf Mängel,<br />
since we are obliged to make a charge for our<br />
défauts ou vices du produit, car tout autre frais<br />
prima di inoltrare un reclamo o di restituirlo per -<br />
defecto del producto, puesto que si está correcto<br />
da wir Ihnen bei Mängelfreiheit die entstandenen<br />
cost if the product is found to be free of faults.<br />
relatif au produit vous sera facturé.<br />
ché, in assenza di difetti, saremo costretti a con -<br />
tendremos que cobrarle en la factura el importe de<br />
Unkosten in Rechnung stellen müssen.<br />
teggiare le spese.<br />
la revisión.<br />
Poskytujeme na tento výrobek<br />
ZÁRUKU<br />
v délce trvání<br />
24 mesícu Deutschland / Österreich Service-Hotline:<br />
Graupner GmbH & Co. KG<br />
Firma Graupner GmbH & Co. KG,<br />
Henriettenstraße 94-96, 73230 Kirchheim/Teck<br />
poskytuje na tento produkt záruku v délce trvání<br />
24 mesícu od data prodeje.<br />
Záruka platí pouze na práve pri koupi existující<br />
vady materiálu a na vady funkce. Škody, které<br />
vznikly pretízením, prirozeným opotrebením,<br />
nevhodnzm pouzitím príslušenství nebo neod -<br />
borným zacházením, jsou ze záruky vylouceny.<br />
Právní a zárucní nároky spotrebitele nebudou<br />
touto zárukou dotceny.<br />
Prosíme zkontrolujte pred uplatnením reklamace<br />
a pred zasláním produktu zpet presne vadu,<br />
abychom Vám nemuseli v prípade bezzávad -<br />
nosti vystavit úcet za vzniklé náklady<br />
Servicestellen<br />
Service<br />
Service après-vente<br />
Henriettenstrasse 94-96<br />
73230 Kirchheim Teck<br />
Belgien / Niederlande<br />
Jan van Mouwerik<br />
Slot de Houvelaan 30<br />
NL 3155 Maasland VT<br />
Tel.: (+31) 10 59 13 59 4<br />
Fax: (+31) 31 10 59 13 59 4<br />
Ceská Republika/<br />
Slovenská Republika<br />
<strong>RC</strong> Service Z. Hnizdil<br />
Letecka 666/22<br />
CZ 16100 Praha 6 – Ruzyne<br />
Tel.: (+42) 23 33 13 09 5<br />
Fax: (+42) 23 33 13 09 5<br />
Montag - Freitag<br />
9 30 - 11 30 h und 13 00 - 15 00 h<br />
Tel.: (+49) 18 05 / 47 28 76<br />
Espana<br />
FA-Sol S.A.<br />
C. Avinyo 4 (Pujada Roja)<br />
E 8240 Manresa<br />
Tel.: (+34) 93 87 34 23 4<br />
Fax: (+34) 93 87 41 55 4<br />
France<br />
Graupner Service France<br />
Gérald Altmayer<br />
86, rue St. Antoine<br />
F 57601 Forbach-Oeting<br />
Tel.: (+33) 38 78 56 21 2<br />
Fax: (+33) 38 78 50 00 8<br />
Italia<br />
GiMax<br />
Via Manzoni, no. 8<br />
25064 Gussago<br />
Tel.: (+39) 30 25 22 73 2<br />
Fax: (+39) 30 25 22 71 1<br />
Luxembourg<br />
Kit Flammang<br />
129, Route d’Arlon<br />
L 8009 Strassen<br />
Tel.: (+35) 23 12 23 2<br />
Fax: (+35) 23 13 04 9<br />
Schweiz<br />
Graupner Service Schweiz<br />
Wehntalerstrasse 37<br />
CH 8181 HÖRI / ZH<br />
Tel.: (+41) 43 26 66 58 3<br />
Fax: (+41) 43 26 66 58 3<br />
Sverige<br />
Baltechno Electronics<br />
P.O. Box 5307<br />
S 40227 Göteborg<br />
Tel.: (+46) 31 70 73 00 0<br />
Fax: (+46) 31 70 73 00 0<br />
United Kingdom<br />
Gliders<br />
Brunel Drive<br />
GB Newark,<br />
Nottinghamshire NG242EG<br />
Tel.: (+44) 16 36 61 05 39<br />
Fax: (+44) 16 36 60 52 55<br />
Best.-Nr.<br />
Order No.<br />
N° de l’article<br />
Name des Käufers, Straße, Wohnort<br />
Owner‘s name, complete adress<br />
Nom de l‘acheteur, Domicie et rue<br />
Übergabedatum<br />
Date of purchase/delivery<br />
Date de remise<br />
Firmenstempel und Unterschrift des Einzelhändlers<br />
Stamp and signature of dealer<br />
Cachet de la firme et signature du detailant<br />
Muss an einem Sammelpunkt für elektronische<br />
Geräte abgegeben werden. Darf nicht über den<br />
normalen Hausmüll entsorgt werden.<br />
Graupner GmbH & Co. KG<br />
D-73230 Kirchheim/Teck, Henriettenstraße 94-96, Germany<br />
GRAUPNER GRAUPNER GRAUPNER<br />
GARANTIE<br />
URKUNDE<br />
Warranty certificate<br />
Certificat de garantie<br />
Certificato di garanzia<br />
Certificado de garantía<br />
Zarucní list<br />
GRAUPNER GRAUPNER GRAUPNER GRAUPNER GRAUPNER<br />
92400, 92401<br />
GRAUPNER GRAUPNER GRAUPNER<br />
37
______________________________________________________________<br />
______________________________________________________________<br />
______________________________________________________________<br />
______________________________________________________________<br />
______________________________________________________________<br />
______________________________________________________________<br />
______________________________________________________________<br />
______________________________________________________________<br />
______________________________________________________________<br />
______________________________________________________________<br />
______________________________________________________________<br />
______________________________________________________________<br />
______________________________________________________________<br />
______________________________________________________________<br />
______________________________________________________________<br />
______________________________________________________________<br />
______________________________________________________________<br />
______________________________________________________________<br />
38
Graupner GmbH & Co. KG<br />
Henriettenstraße 94 – 96<br />
D-73230 Kirchheim/Teck<br />
Germany<br />
www.graupner.de<br />
Änderungen sowie Liefermöglichkeiten vorbehalten. Lieferung durch den Fachhandel.<br />
Bezugsquellen werden nachgewiesen. Für Druckfehler kann keine Haftung übernommen<br />
werden.<br />
Specifi cations and availability subject to change. Supplied through specialist model shops<br />
only. We will gladly inform you of your nearest supplier. We accept no liability for printing<br />
errors.<br />
Sous réserve de modifi cations et de possibilité de livraison. Livraison uniquement au<br />
travers de magasins spécialisés en modélisme. Nous pourrons vous communiquer<br />
l’adresse de votre revendeur le plus proche. Nous ne sommes pas responsables<br />
d’éventuelles erreurs d’impression.<br />
92400-92401 / December 2010 - V1.0


