1. Quilted zippered mattress cover 2. Vinyl waterbed ... - InnoMax
1. Quilted zippered mattress cover 2. Vinyl waterbed ... - InnoMax
1. Quilted zippered mattress cover 2. Vinyl waterbed ... - InnoMax

You also want an ePaper? Increase the reach of your titles
YUMPU automatically turns print PDFs into web optimized ePapers that Google loves.
FLUID SUPPORT ASSEMBLY INSTRUCTIONS<br />
1<br />
6<br />
3<br />
2<br />
4<br />
5<br />
7<br />
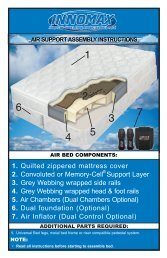
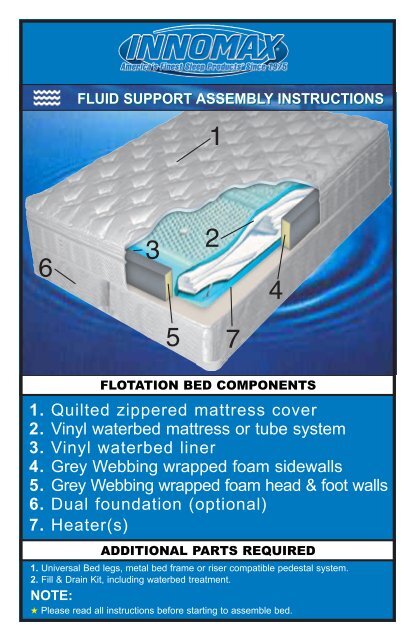
FLOTATION BED COMPONENTS<br />
<strong>1.</strong> <strong>Quilted</strong> <strong>zippered</strong> <strong>mattress</strong> <strong>cover</strong><br />
<strong>2.</strong> <strong>Vinyl</strong> <strong>waterbed</strong> <strong>mattress</strong> or tube system<br />
3. <strong>Vinyl</strong> <strong>waterbed</strong> liner<br />
4. Grey Webbing wrapped foam sidewalls<br />
5. Grey Webbing wrapped foam head & foot walls<br />
6. Dual foundation (optional)<br />
7. Heater(s)<br />
ADDITIONAL PARTS REQUIRED<br />
<strong>1.</strong> Universal Bed legs, metal bed frame or riser compatible pedestal system.<br />
<strong>2.</strong> Fill & Drain Kit, including <strong>waterbed</strong> treatment.<br />
NOTE:<br />
★ Please read all instructions before starting to assemble bed.
FLUID SUPPORT ASSEMBLY INSTRUCTIONS<br />
Setting Up Your Flotation Bed:<br />
<strong>1.</strong> Unpack the Box<br />
Take all of the components out of the box. You should have the following items:<br />
• Power Edge Support Rail System including<br />
attached head/foot rails and the attached<br />
side rail assembly. The head rail is marked<br />
and has exit slits for the power cords.<br />
• Fluid Support Chamber(s) or Tubes<br />
• Low Watt (120 Watts or less) Waterbed<br />
Temperature Control System(s).<br />
DO NOT USE A STANDARD FULL WATT HEATER WITH A SOFT SIDED MATTRESS. THIS CAN<br />
RESULT IN SEVERE DAMAGE TO YOUR SLEEP SYSTEM AND VOID ALL WARRANTIES.<br />
• <strong>Vinyl</strong> Safety Liner<br />
• Mattress Cover/Pillow Top enclosure<br />
• K or Q Split or Single T/F Foundation (Optional)<br />
• 9 point center support metal bed frame (Optional purchase, but<br />
it’s required to have center support system that is adequately<br />
designed for flotation sleep. Please consult your dealer.<br />
<strong>2.</strong> Your entire Fluid Support System can be easily assembled.<br />
First step, determine where your bed will be positioned. If you are<br />
using a headboard, make sure you have enough room between<br />
the wall and the frame before you begin to fill your <strong>mattress</strong>.<br />
Assemble the support base you intend to use. This can be a<br />
center support metal bed frame or a modern platform pedestal<br />
with drawers. Once this is complete, place your box foundation<br />
in the frame with the open side down. Many platform pedestals<br />
do not require the use of a foundation. You may skip this step and<br />
move to number three.<br />
3. Unfold the <strong>mattress</strong> enclosure and completely unzip the <strong>cover</strong>. Insert the head and foot<br />
rail inside the <strong>cover</strong>. The head of the bed should<br />
be stamped and will have two slits in<br />
the grey webbing material.This is<br />
for the exit of your temperature<br />
control sensor and heater pad<br />
power cord. The side rails are<br />
inserted in between the head<br />
and foot rails with the webbing<br />
as smooth as possible. The rails<br />
are correctly installed when the<br />
webbing material is completely<br />
unrolled and is at the bottom of the rail<br />
(SEE DIAGRAM B2). The rail should be<br />
approximately 6” in height and 4” in width.<br />
Exception: The Platinum and/or Perfections<br />
Sponge Bed are full depth flotation type systems<br />
and are designed with the “M Rail System” which -<br />
1
-requires the side rails to be inserted into the <strong>cover</strong> first, followed by the head and foot rail<br />
(SEE DIAGRAM A2). The grey webbing is also to be at the bottom of the rail (SEE DIAGRAM B2).<br />
A1<br />
A2<br />
Perfections & Platinum<br />
Bolsters Top View<br />
Grey Webbing Running Under<br />
Bolster<br />
B1<br />
Perfections & Platinum<br />
Bolsters Front View<br />
Grey Webbing Running<br />
Straight Out From Bolster<br />
B2<br />
INCORRECT<br />
CORRECT<br />
4. Install the heater pad(s) directly on the grey<br />
webbing material in a head to toe position.<br />
Ensure that the entire pad is on a solid<br />
surface and not over the crack between<br />
foundation halves or plywood pieces in a<br />
platform. It is best to place the pad as far<br />
down the bed as possible to avoid constant<br />
pressure of sitting on the pad. Push the<br />
pad power cord through the slits in the grey<br />
webbing and <strong>cover</strong>. On some models, the<br />
<strong>cover</strong> may need to have a small slit cut into<br />
the fabric by the end user. The temperature<br />
sensor on the control can be pulled through<br />
from the outside. Make sure the sensor is<br />
a minimum of 12” away from the pad and<br />
is not tucked under any portion of the<br />
Power Edge Rail System to ensure proper<br />
temperature readings.<br />
DO NOT PLUG IN THE HEATER UNTIL THE<br />
FLOTATION MATTRESS IS COMPLETELY<br />
FILLED WITH WATER! 2
5. Place the vinyl safety liner over the heater<br />
pad(s) and tuck around the Power Edge Rail<br />
System. Making sure the corners of the fitted<br />
liner are matching the corners of the rail system.<br />
Smooth the vinyl away from the center of the<br />
<strong>mattress</strong> area and toward the edge rails.<br />
6. Unfold the fluid support chamber(s) and place<br />
on top of the vinyl safety liner.<br />
The valves on the <strong>mattress</strong> should be located at<br />
the foot of the bed. Open both valves to allow the<br />
vacuum sealed water <strong>mattress</strong> to begin to<br />
expand. Square the corners of the <strong>mattress</strong> with<br />
the corners of the Power Edge Support System.<br />
This is CRITICAL and must be done before filling<br />
the <strong>mattress</strong>(es) with fluid. To assist in this<br />
process, you may fill the chambers with air using<br />
a shop vac or a hair dryer with a cool setting.<br />
Inflate the <strong>mattress</strong> until it is approximate 18”-24”<br />
above the foam rails. Place the caps back into<br />
the valves and push down on the center of the<br />
<strong>mattress</strong>. This will pop the corners out so they<br />
can be easily adjusted to align with the corners of<br />
the rail system. Once the <strong>mattress</strong> is centered,<br />
open the valves to release air. The shop vac can<br />
be used to expedite this process.<br />
7. Begin filling the <strong>mattress</strong> with lukewarm water,<br />
using the white faucet adaptor included with the<br />
fill and drain kit. The faucet adaptor will allow you<br />
to attach the garden hose to a kitchen or<br />
bathroom sink and adjust the flow and<br />
temperature of the water. When you run out of<br />
warm water, shut down the filling process and<br />
allow the water heater to replenish. While this<br />
method may require a longer filling time, the end<br />
result is a more comfortable sleeping environment<br />
from the first night on. If the <strong>mattress</strong> is filled with<br />
cold water, the <strong>waterbed</strong> heater will need 4-7<br />
days to bring the bed up to your desired temperature.<br />
The normal operation of the heater will raise the<br />
bed temperature approximately 1/2 - 1 degree<br />
per hour. A cold fill <strong>mattress</strong> will require time to<br />
heat, and is not indicative of a faulty heater.<br />
3
8. Proper fill depth is approximately 1/2” to 1”<br />
below the top edge of the support rail. For a<br />
firmer feel, lower the water level slightly. For a<br />
softer feel, add a small amount of water. Never<br />
fill the <strong>mattress</strong> so that it is above the side rail.<br />
After filling to the desired level, remove all air<br />
from the <strong>mattress</strong> with the use of an air extractor<br />
or by pushing the air toward the valve. For<br />
<strong>mattress</strong>es with a greater degree of motion<br />
control and support, this process will need to be<br />
repeated several times during the first month of<br />
use. Add one 8 ounce bottle of Fiber Conditioner.<br />
This should be repeated every twelve months.<br />
Use vinyl conditioner on the outside of the vinyl<br />
chamber every 2-3 months.<br />
9. Plug the heater pad into the heater control.<br />
Plug the control into a 120 volt wall outlet and then<br />
set temperature to desired level. It is recommended<br />
to be set between 80-85 degrees depending<br />
upon your personal comfort level. If you have a<br />
heater for each side of the bed, repeat this<br />
process on the other side.<br />
10. Zip up the <strong>cover</strong>/pillow top. Install new<br />
<strong>mattress</strong> pad and sheets. Enjoy a great<br />
night’s rest.<br />
DRAINING INSTRUCTIONS<br />
UNPLUG THE WATERBED HEATER BEFORE DRAINING THE MATTRESS<br />
It is strongly recommended that an electric drain pump be utilized to prevent damage to the<br />
internal support structure of your <strong>mattress</strong>. Contact your dealer for rental information or to<br />
purchase the Drain Hero maintenance kit.<br />
A typical electric pump will remove nearly all<br />
of the water in a king sized <strong>mattress</strong> in 45<br />
minutes or less. If no electric pump is<br />
available, the use of a standard fill and drain<br />
kit will assist in removing the water from the<br />
<strong>mattress</strong>. Attach the faucet adaptor to the<br />
sink, taking care not to cross thread the<br />
adaptor. Screw the siphon pump to the<br />
adaptor and attach the hose to the siphon.<br />
Using the hose adaptor, attach the opposite<br />
end of the hose to the valve on the <strong>mattress</strong>.<br />
To start the siphon action, turn on the faucet<br />
to a moderate level. If your siphon is self<br />
priming, the pump will soon begin to remove<br />
4<br />
water. If it is not self priming, turn the bottom
of the pump to the “fill” setting and allow<br />
water to go into the <strong>mattress</strong>. Once the hose<br />
is free of air, twist the bottom of the pump to<br />
the “drain” setting to create a siphon to<br />
remove water. Continue this until the<br />
<strong>mattress</strong> is completely vacuum sealed and<br />
is free from water. Firmly grab the top, internal<br />
fiber, and the bottom to prevent shifting<br />
when folding the <strong>mattress</strong>. Once the<br />
process is complete, remove the hose<br />
adaptor and quickly insert the cap and seal<br />
to maintain a vacuum inside the <strong>mattress</strong>.<br />
This will hold all of the internal components<br />
of the <strong>mattress</strong> in their desired location. When moving the <strong>mattress</strong>, do not drag it across<br />
the floor as this can cause a friction burn in the vinyl. If the <strong>mattress</strong> is to be stored for more<br />
than 7 days before reinstalling, it is recommended that a bottle of Fiber Bed Conditioner<br />
be placed inside to prevent odor and bacterial growth. Do not store the <strong>mattress</strong> in<br />
conditions below 32 degrees Fahrenheit, as this can cause the vinyl to crack. If it is<br />
stored in cold temperatures, gently place <strong>mattress</strong> in a warm room for up to 24 hours<br />
prior to unfolding and filling with water to minimize the possibility of a cold crack.<br />
ELECTRIC PUMP USAGE/DRAINING INSTRUCTIONS:<br />
★<br />
If interested in using a pump - please ask your sleep consultant for more information.<br />
<strong>1.</strong> Unplug heater before draining <strong>mattress</strong>.<br />
<strong>2.</strong> Remove all of the air from your water <strong>mattress</strong>.<br />
3. Attach the “perfect union” connector on the end of the clear hose on the pump to the<br />
valve in your water <strong>mattress</strong>. Make sure the connection is tight to maintain proper suction.<br />
4. Connect your exit hose to the discharge port on the pump. Ensure the exit hose is in the<br />
desired location. The force of the water can actually cause the hose to flop about and come<br />
out of a normal bathtub. Do not leave the hose unattended while indoors. Place the<br />
pump on a towel or cardboard to prevent possible damage to the floor or other surface.<br />
5. Plug the pump into a grounded electrical outlet. Note: There is no on/off switch and the<br />
pump will begin to operate immediately.<br />
6. Allow the pump to run until the water slows to a trickle. The pump will remove nearly all<br />
of the water and the <strong>mattress</strong> will become vacuum-sealed to ensure all internal<br />
support features remain in their proper location. Do not lift the head of the <strong>mattress</strong> until<br />
the <strong>mattress</strong> is vacuum packed, as this could damage the <strong>mattress</strong>.<br />
7. Immediately unplug the pump. DO NOT RUN THE PUMP WITHOUT WATER FOR AN<br />
EXTENDED PERIOD OF TIME as this can severely damage the pump.<br />
8. Disconnect the perfect union connector from the <strong>mattress</strong> and immediately attach<br />
5 the cap and seal to ensure the <strong>mattress</strong> remains vacuum packed.
<strong>InnoMax</strong> ® CUSTOMER REFERRAL PROGRAM<br />
Be a part of our exciting new Customer Referral Program! If you are a current <strong>InnoMax</strong>® customer, just<br />
fill out a referral card and give it to someone you know, have them give it to a<br />
sleep consultant when visiting either the Denver Warehouse Superstore<br />
or the Ft. Collins Factory Showroom and we’ll send you a $25 gift<br />
certificate. NO LIMIT!<br />
For more details or if you should have any questions ask your<br />
<strong>InnoMax</strong>® Sleep Consultant or call:<br />
Denver Warehouse Superstore<br />
303-298-0230<br />
Ft. Collins Factory Showroom<br />
970-416-0668<br />
OUR POLICY ON REFUNDS and EXCHANGES:<br />
• No refunds on any products.<br />
• Exchanges or credits cheerfully given within five (5) business days on purchases returned unused, in<br />
new condition, with the original sales slip and, where applicable, in the original carton with all hang<br />
tags, warranty cards and instruction books intact.<br />
• For the protection of all our customers, we cannot accept returns on items of a personal or intimate<br />
nature, special order or custom merchandise, or “final sales items.”<br />
• If any item we sell is found to be defective at purchase and is immediately returned, we will replace it<br />
with the exact item in new condition. If we are unable to immediately exchange or replace it – we will<br />
issue a refund. Published by THE BETTER BUSINESS BUREAU<br />
6