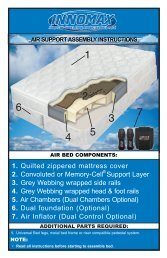
1. Quilted zippered mattress cover 2. Vinyl waterbed ... - InnoMax
1. Quilted zippered mattress cover 2. Vinyl waterbed ... - InnoMax
1. Quilted zippered mattress cover 2. Vinyl waterbed ... - InnoMax

You also want an ePaper? Increase the reach of your titles
YUMPU automatically turns print PDFs into web optimized ePapers that Google loves.
FLUID SUPPORT ASSEMBLY INSTRUCTIONS<br />
Setting Up Your Flotation Bed:<br />
<strong>1.</strong> Unpack the Box<br />
Take all of the components out of the box. You should have the following items:<br />
• Power Edge Support Rail System including<br />
attached head/foot rails and the attached<br />
side rail assembly. The head rail is marked<br />
and has exit slits for the power cords.<br />
• Fluid Support Chamber(s) or Tubes<br />
• Low Watt (120 Watts or less) Waterbed<br />
Temperature Control System(s).<br />
DO NOT USE A STANDARD FULL WATT HEATER WITH A SOFT SIDED MATTRESS. THIS CAN<br />
RESULT IN SEVERE DAMAGE TO YOUR SLEEP SYSTEM AND VOID ALL WARRANTIES.<br />
• <strong>Vinyl</strong> Safety Liner<br />
• Mattress Cover/Pillow Top enclosure<br />
• K or Q Split or Single T/F Foundation (Optional)<br />
• 9 point center support metal bed frame (Optional purchase, but<br />
it’s required to have center support system that is adequately<br />
designed for flotation sleep. Please consult your dealer.<br />
<strong>2.</strong> Your entire Fluid Support System can be easily assembled.<br />
First step, determine where your bed will be positioned. If you are<br />
using a headboard, make sure you have enough room between<br />
the wall and the frame before you begin to fill your <strong>mattress</strong>.<br />
Assemble the support base you intend to use. This can be a<br />
center support metal bed frame or a modern platform pedestal<br />
with drawers. Once this is complete, place your box foundation<br />
in the frame with the open side down. Many platform pedestals<br />
do not require the use of a foundation. You may skip this step and<br />
move to number three.<br />
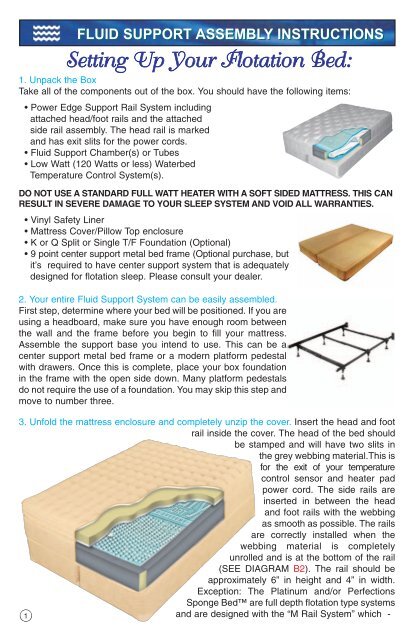
3. Unfold the <strong>mattress</strong> enclosure and completely unzip the <strong>cover</strong>. Insert the head and foot<br />
rail inside the <strong>cover</strong>. The head of the bed should<br />
be stamped and will have two slits in<br />
the grey webbing material.This is<br />
for the exit of your temperature<br />
control sensor and heater pad<br />
power cord. The side rails are<br />
inserted in between the head<br />
and foot rails with the webbing<br />
as smooth as possible. The rails<br />
are correctly installed when the<br />
webbing material is completely<br />
unrolled and is at the bottom of the rail<br />
(SEE DIAGRAM B2). The rail should be<br />
approximately 6” in height and 4” in width.<br />
Exception: The Platinum and/or Perfections<br />
Sponge Bed are full depth flotation type systems<br />
and are designed with the “M Rail System” which -<br />
1