BIOLOGY IN FOCUS
BIOLOGY IN FOCUS
BIOLOGY IN FOCUS

Create successful ePaper yourself
Turn your PDF publications into a flip-book with our unique Google optimized e-Paper software.
PATTERNS <strong>IN</strong> NATURE<br />
SAMPLE CHAPTER ONLY
TIMEL<strong>IN</strong>E: a short history of biology<br />
MICROSCOPE BEG<strong>IN</strong>N<strong>IN</strong>GS<br />
1590 Hans and Zacharias Jansen made the first compound microscope by placing two convex lenses<br />
in a tube.<br />
1663 Robert Hooke introduced the term ‘cell’ while observing cork under a light microscope. He also<br />
worked at improving a number of scientific devices, including the microscope, telescope and<br />
barometer.<br />
1668 Francesco Redi conducted an experiment to challenge the theory of ‘spontaneous generation’.<br />
1674–1683 Anton Van Leeuwenhoek, a Dutch lens maker:<br />
■ produced lenses of higher quality, which allowed for greater magnification<br />
(up to 200 times).<br />
■ described ‘animacules’ (unicells)<br />
■ discovered bacteria.<br />
1758 John and Peter Dollard (father and son), spectacle makers, produced the first achromatic<br />
(colour-free) lenses, making microscopes superior to hand lenses.<br />
1796 Edward Jenner used cowpox in the first successful vaccine against the disease smallpox.<br />
1801 Robert Brown a botanist and naturalist, first described the cell nucleus while observing plant cells<br />
in an orchid. He also noticed the random movement of pollen grains (Brownian motion).<br />
the cell theory<br />
1836 Charles Darwin arrived in Sydney Harbour aboard HMS Beagle.<br />
1838 Matthias Schleiden, a botanist, stated that parts of plants are made of cells (not visible to the<br />
unaided eye).<br />
1839 Theodor Schwann, a zoologist, stated that parts of animals are made of cells; agreed with<br />
Schleiden and they published the cell theory in a book, stating that the cell is the basis of the<br />
structure of all living things.<br />
THE SCIENTIFIC REVOLUTION<br />
64<br />
evolution<br />
germ theory of disease<br />
1843 Robert Koch studied the cause of the disease anthrax.<br />
1855 Rudolph Virchow introduced the idea that cells reproduce by dividing, stating that all living cells<br />
can only arise from other living cells, further challenging the theory of ‘spontaneous generation’.<br />
1856–1858 Gregor Mendel began a series of controlled experiments with garden peas, to carry out<br />
a statistical study of heredity.<br />
1858 Charles Darwin and Alfred Wallace presented a paper ‘A Theory of Evolution by Natural<br />
Selection’.<br />
1859 Charles Darwin’s book, On the Origin of Species, is published.<br />
1860 The Huxley–Wilberforce debate takes place.<br />
1861 Louis Pasteur published his experiments showing that fermentation was caused by something<br />
in the air, finally disproving ‘spontaneous generation’.<br />
1862 Louis Pasteur‘s experiments with bacteria showed that infectious diseases are caused by<br />
micro-organisms, leading to the germ theory of disease.<br />
1863 Louis Pasteur introduced pasteurisation, a practical application of what he had learnt through<br />
his fermentation experiments.<br />
1866 Gregor Mendel published his work on studying plant hybrids.<br />
1867 Joseph Lister made the connection between Pasteur’s work on infection and introduced antiseptic<br />
surgery (published paper).<br />
1880 Charles Louis Alphonse Laveran first identified cause of malaria: a microscopic organism.<br />
1881 Pasteur developed a vaccine against anthrax.<br />
SAMPLE CHAPTER ONLY
1882 Walther Flemming discovered nuclear material—termed ‘chromatin material’.<br />
1882–1893 Koch proposed postulates: ‘rules of engagement’ for bacteriologists.<br />
disease<br />
1885 Pasteur used a vaccine against rabies on humans for the first time, saving the life of a young boy<br />
who had been bitten by a dog.<br />
1891 Robert Koch concluded that malaria was transmitted by mosquitoes.<br />
1897 Ronald Ross demonstrated that female Anopheles mosquitoes were the vectors (carriers) of<br />
malaria, by showing that these mosquitoes carried malarial oocysts in their gut tissue.<br />
1900 Significance of Mendel ’s experiments in terms of heredity is noticed after three other scientists<br />
get similar results.<br />
CLASSICAL SCIENCE<br />
genetics<br />
microscope advances, microbes<br />
and antibiotics<br />
1902 Walter Sutton and Theodore Boveri independently proposed and demonstrated a connection<br />
between chromosomes and inheritance. Sutton studied meiosis in grasshoppers. Boveri studied<br />
chromosome behaviour and inheritance in sea urchins.<br />
1911 Thomas Hunt Morgan studied sex-linked inheritance (Nobel Prize in 1933 for life’s work).<br />
1909 Wilhelm Johannsen introduced the term ‘gene’.<br />
1928 Alexander Fleming noticed that the mould Penicillium killed bacteria in a petri dish.<br />
1933 Ernst Ruska built the first electron microscope.<br />
1935 Howard Florey began to search for a useful medicine to kill germs.<br />
1938 Fritz Zernike invented the phase contrast microscope which can be used to observe living,<br />
unstained cells.<br />
1939 Howard Florey extracted stable penicillin (the first antibiotic).<br />
1941 George Beadle and Edward Tatum published the results of their experiments with bread mould,<br />
in which they proposed the one-gene-one-enzyme (protein) hypothesis.<br />
1942 Viruses first seen under the electron microscope.<br />
1945 Frank McFarlane Burnet isolated influenza A virus (in Australia) and developed a vaccine.<br />
1945 Howard Florey and Alexander Fleming received the Nobel Prize for Physiology and Medicine for<br />
their work on penicillin.<br />
1950 Rosalind Franklin and Maurice Wilkins made a crystal of DNA to study its structure.<br />
CONTEMPORARY SCIENCE<br />
molecular technology,<br />
biotechnology and health<br />
1953 James Watson and Francis Crick put together a model of DNA.<br />
1955 Marvin Minsky invented the scanning electron microscope.<br />
1960 Frank McFarlane Burnet and Peter Medawar received the Nobel Prize for Physiology and Medicine<br />
for their work in immunology and organ transplants.<br />
1962 Vernon Ingram did further work on genes and proteins leading to the change to the one-gene-onepolypeptide<br />
hypothesis.<br />
1962 Watson, Crick and Wilkins received the Nobel Prize for Chemistry for their discovery of DNA.<br />
(Rosalind Franklin died in 1958; her work was acknowledged, but Nobel prize nominations cannot<br />
be awarded posthumously.)<br />
1972 Niles Eldridge and Stephen Jay Gould put forward the theory of evolution by punctuated equilibrium.<br />
1980 WHO declared the disease smallpox eradicated worldwide.<br />
To present<br />
Genetic and reproductive revolution: in-vitro fertilisation, genetic engineering, cloning and advanced<br />
biotechnology.<br />
Note: Dates in many timelines show slight inconsistencies when compared. This is due to inconsistent record-keeping long ago.<br />
It is the sequence of events that is more important in reflecting the historical developments in science, than the absolute dates.<br />
SAMPLE CHAPTER ONLY<br />
65
Organisms are made of cells that have similar<br />
structural characteristics<br />
CHAPTER 1<br />
Cells and the cell theory<br />
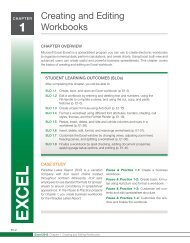
Figure 1.1 Living or<br />
non-living? A beetle as<br />
opposed to stones<br />
Introduction<br />
Up until 400 years ago, objects that<br />
were too small to be seen with the<br />
naked eye could not be examined<br />
successfully. Magnifying glasses had<br />
been in use since the 13th century, but<br />
were still fairly ineffective instruments<br />
of observation because of the imperfect<br />
shape of the lenses and the low quality<br />
of the glass used to produce them.<br />
The study of living things was<br />
popular, but at a macroscopic level,<br />
based on what could be viewed<br />
with the naked eye or with the<br />
lenses available—living organisms<br />
had certainly never been considered<br />
at a cellular level. Biologists at that<br />
time were called ‘natural scientists’,<br />
suggesting a broad study of nature.<br />
Today, biologists study living things<br />
not only at a macroscopic level, but<br />
also at a microscopic (cellular and<br />
sub-cellular) level and even at a<br />
molecular level. This progress began<br />
with the discovery of the microscope.<br />
Characteristics of living<br />
organisms<br />
From your studies in junior science,<br />
you will be familiar with today’s<br />
accepted idea that all living things are<br />
made of one or more units called cells.<br />
This is the most basic characteristic of<br />
living things. How does one distinguish<br />
between something that is living and<br />
a non-living thing? All living things<br />
are made of cells, but based on<br />
everyday observations without using<br />
a microscope what tells us that, for<br />
example a beetle is alive but a stone<br />
is not?<br />
Certain characteristics or life<br />
functions are common to all living<br />
things. Living things are made of one<br />
or more cells and they can:<br />
■ reproduce—produce offspring that<br />
resemble the parents<br />
■ grow–increase in size<br />
■ move—even plants can make some<br />
small movements such as opening<br />
and closing petals<br />
66<br />
SAMPLE CHAPTER ONLY
CELLS AND THE CELL THEORY<br />
■ respire—produce chemical energy<br />
by taking in oxygen and combining<br />
it with sugar, giving out carbon<br />
dioxide as a by-product<br />
■ excrete—get rid of wastes such as<br />
carbon dioxide<br />
■ respond to stimuli in the<br />
environment—such as moving<br />
towards food or growing towards<br />
light<br />
■ obtain nutrients<br />
■ die—death is when all of the above<br />
functions cease.<br />
To be dead, something must have<br />
once been living and when all of its<br />
life functions cease, death results. This<br />
differs from non-living things that are<br />
not alive and never were.<br />
These functions of life are easy<br />
to picture in complex multicellular<br />
organisms, such as insects, sunflowers<br />
and humans. In unicellular organisms<br />
(microscopic living things made of only<br />
one cell), all of the life functions listed<br />
above still occur, but each single cell<br />
carries out every function.<br />
The discovery of the cellular basis of living things<br />
■ outline the historical development of the cell theory,<br />
in particular, the contributions of Robert Hooke and<br />
Robert Brown<br />
1.1<br />
Introduction<br />
The statement that all living things are<br />
made of cells forms the basis of what<br />
is currently termed the cell theory.<br />
The historical development of the cell<br />
theory is interwoven with the story<br />
of the invention and development<br />
of the microscope. Improvements in<br />
the design and use of microscopes,<br />
as well as progress in techniques to<br />
prepare specimens for viewing, play<br />
a significant part in advancing our<br />
knowledge and understanding of cells.<br />
To study the historical development<br />
of a theory (see PFA P1 on page ix),<br />
we need to know the currently<br />
accepted view (‘now’) and the views<br />
in the past (‘then’). New ideas are<br />
often linked to advances in technology,<br />
which allow new discoveries to be<br />
made (see PFA P3 on page ix).<br />
(The PFAs or Prescribed Focus<br />
Areas are different emphases in the<br />
Preliminary and HSC biology curriculum<br />
designed to increase students’<br />
understanding of biology as an everdeveloping<br />
science. See page ix.)<br />
The cell theory<br />
The cell theory forms the basis of all<br />
biology. In its universally accepted<br />
form, it states that:<br />
1. All living things are made of cells.<br />
2. Cells are the basic structural and<br />
functional unit of organisms.<br />
3. All cells come from pre-existing<br />
cells.<br />
However, this has not always been<br />
the accepted biological view.<br />
A scientific theory is a broad<br />
and general idea or explanation<br />
provided by scientists, and is related<br />
to observations and is supported by<br />
a large amount of evidence. It is not<br />
a fact and cannot be proved; it can<br />
only be supported or not supported<br />
by evidence. Since an explanation is<br />
a product of the mind, it is not a fact<br />
and therefore a theory may have to be<br />
modified if new evidence arises that<br />
no longer supports it.<br />
Theories are tested by examining<br />
whether their consequences<br />
(predictions) are supported by<br />
observation and experiment.<br />
SAMPLE CHAPTER ONLY<br />
67
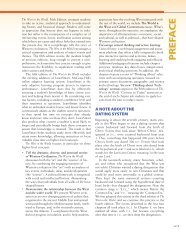
PATTERNS <strong>IN</strong> NATURE<br />
SR<br />
TR<br />
Discovering a<br />
compound microscope<br />
Figure 1.2 The first<br />
compound microscope<br />
(circa 1595)<br />
The build up to the proposal of the<br />
cell theory is interesting and, in reading<br />
this historical account, we as scientists<br />
should look for evidence that has been<br />
gathered to validate the theory before<br />
we accept it (see PFA P2 on page ix).<br />
Biological view prior to the<br />
proposal of the cell theory<br />
Before the discovery of the<br />
microscopic world<br />
Until the last decade of the 16th century,<br />
microscopes did not exist, cells had<br />
never been seen and so the living world<br />
had not been considered at a cellular<br />
level. One of the accepted views was<br />
the theory of spontaneous generation.<br />
This theory predicted that living<br />
creatures could arise from inanimate<br />
(non-living) material. This idea dated<br />
back to the time of Aristotle and the<br />
evidence was based on observation.<br />
For example it was noticed that maggots<br />
(fly larvae) appeared on rotting meat if<br />
meat was left exposed for a period of<br />
time. In the 1500s, this theory was being<br />
challenged, but it was not until the mid<br />
1600s that scientists suggested that the<br />
flies that visited the meat contributed<br />
to the appearance of the maggots.<br />
Francesco Redi (1668) performed an<br />
experiment that tested this hypothesis<br />
successfully, showing that maggots<br />
only appeared in meat that had been<br />
exposed to flies in the environment—<br />
if the meat was covered, no maggots<br />
arose. This is one of the first recorded<br />
examples of experimentation being<br />
used to oppose a theory—an example<br />
of the ‘scientific method’ of today<br />
(see PFA P3 on page ix).<br />
The idea that the meat ‘spontaneously’<br />
gave rise to maggots may seem<br />
ridiculous now, but seems less so if one<br />
considers that people could not see<br />
fly eggs in those days. What happened<br />
between 1500 and 1668, to encourage<br />
people to think differently?<br />
The invention of the compound<br />
microscope<br />
In the late 1500s, scientists, who were<br />
using poor quality magnifying glasses<br />
to view small or ‘minute’ objects, tried<br />
many things to improve the images that<br />
they were viewing. The idea that led<br />
to the invention of the first compound<br />
microscope was that, to get a larger and<br />
clearer image, two convex lenses could<br />
be placed one above the other. The<br />
lower lens would produce a magnified<br />
image of the object and the upper lens<br />
would further magnify or enlarge the<br />
first image.<br />
Two Dutch lens makers, a father<br />
and son named Hans and Zacharias<br />
Janssen, are credited with having made<br />
the first compound microscope in<br />
1590. A simple microscope uses only<br />
one lens to magnify an object viewed,<br />
so the invention of the compound<br />
microscope relied on the principle<br />
of using two lenses, kept a set distance<br />
apart. It consisted quite simply of<br />
two convex lenses placed at either<br />
end of a wooden tube to keep them<br />
the ideal distance apart from each<br />
other. These tubes could magnify<br />
objects 3 to 9×, were held by hand and<br />
formed the basis of the first compound<br />
microscopes. (They had not as yet been<br />
named microscopes.)<br />
68<br />
SAMPLE CHAPTER ONLY
CELLS AND THE CELL THEORY<br />
Biological studies and<br />
technology that led to the<br />
proposal of the cell theory<br />
Technology: improvements to the<br />
compound microscope<br />
As people across Europe continued<br />
to use what are today known as<br />
compound microscopes, these<br />
instruments were being refined and<br />
improved upon all the time. By the<br />
early 1620s, most microscopes in use<br />
had a magnification of about 30×, but it<br />
is recorded that those used in Italy had<br />
magnifications of about 150×. This was<br />
probably due to the high quality glass<br />
that the Italians used, producing lenses<br />
of greater clarity. (Italy is still renowned<br />
for its high quality glass today.)<br />
For a lens to be effective, it needs to<br />
do two things:<br />
1. give an enlarged view of an object<br />
2. make the detail appear clear, giving<br />
a precise (not fuzzy), outline to the<br />
parts of the object being viewed.<br />
The ability to enlarge an image is<br />
termed magnification. The ability to<br />
show fine detail, distinguishing two<br />
very close objects as separate images,<br />
is termed resolution. A good quality<br />
lens is one that has high magnification<br />
and high resolution. The convex shape<br />
() of a lens enables it to magnify an<br />
object, but to get this shape, one has<br />
to grind the glass. Both the quality<br />
of the glass used, as well as the<br />
manner in which the glass is ground<br />
to minimise imperfections, play a role<br />
in determining a lens’s resolution or<br />
resolving power.<br />
During the 17th century, the handheld<br />
tube designed by the Janssens was<br />
mounted onto a stand and the design<br />
of the microscope as we know it today<br />
began to take shape. Robert Hooke in<br />
England, Anton van Leeuwenhoek in<br />
Holland, and Galileo Galilei in Italy all<br />
made noted contributions to improving<br />
the design of microscopes.<br />
Robert Hooke’s compound<br />
microscope was progressive for its<br />
time because it used a fine adjustment<br />
knob to move the tube holding the<br />
lenses up and down. His microscope<br />
also had a light source to illuminate<br />
the specimen—another lens that<br />
concentrated the glow of a candle<br />
onto the specimen. Hooke probably<br />
had his microscopes built London, but<br />
he ground his own lenses. He gave<br />
the first demonstration of the use of<br />
his microscope to the Royal Society<br />
of London in 1663.<br />
Biological view: understanding living<br />
things using a microscope<br />
Robert Hooke<br />
In 1665 Robert Hooke produced a<br />
book, the first recorded publication<br />
to describe observations of living<br />
tissue using a microscope. Entitled<br />
Micrographia: physiological studies of<br />
minute bodies made by magnifying<br />
glasses, his book included 57 diagrams.<br />
It was in this book that he used the<br />
term ‘cell’ to describe the ‘honeycomb’<br />
elements (units) of cork. He was<br />
looking at dead plant cells which had<br />
no contents and clearly resembled<br />
small compartments, similar to the<br />
cells of monks. Hooke’s findings<br />
were respected, but not universally<br />
accepted by scientists at that time.<br />
fine adjustment<br />
knob<br />
lens to<br />
concentrate<br />
light source<br />
eyepiece<br />
stage to hold<br />
specimen<br />
Figure 1.3<br />
Hooke’s compound<br />
microscope<br />
SAMPLE CHAPTER ONLY<br />
69
PATTERNS <strong>IN</strong> NATURE<br />
70<br />
Figure 1.4<br />
Van Leeuwenhoek’s<br />
simple microscope<br />
The low quality lenses in use still<br />
distorted images and separated colours,<br />
giving a rainbow ‘fringe’ to the objects<br />
being viewed and so many scientists<br />
were sceptical about the ‘artificial<br />
images’ created.<br />
Anton Van Leeuwenhoek<br />
Anton Van Leeuwenhoek was a<br />
Dutch lens maker whose grinding<br />
technique was far superior to that of<br />
his contemporaries and so he was<br />
able to produce lenses of much higher<br />
quality. As a result of his work between<br />
1674 and 1683 with crystal, quartz and<br />
even diamond lenses, he developed a<br />
simple microscope that used a single,<br />
powerful lens that could magnify up<br />
to 300×, perhaps more. The single lens<br />
used did not have the usual aberrations<br />
associated with lenses at that time.<br />
Unfortunately, Van Leeuwenhoek did<br />
not record his technique and so similar<br />
lenses could not be produced after his<br />
death. Starting off in the cloth trade,<br />
Van Leeuwenhoek used very many<br />
microscopes to study both fabrics<br />
and a great variety of living tissue.<br />
He discovered many single-celled living<br />
things, but because there was no cell<br />
theory at the time Van Leeuwenhoek<br />
had no framework in which to<br />
accurately name or describe his<br />
findings. When Van Leeuwenhoek<br />
front<br />
single lens sandwiched<br />
between 2 brass plates<br />
rivetted together<br />
specimen<br />
holder<br />
focus<br />
adjustment<br />
moves<br />
specimen<br />
across the field of<br />
view (up and down)<br />
back<br />
first presented his work to the Royal<br />
Society of London they asked Robert<br />
Hooke, a member of the society, to<br />
confirm these findings, which he did.<br />
Evidence of Van Leeuwenhoek’s findings<br />
are documented in letters to the Royal<br />
Society, spanning 50 years. These letters<br />
have been translated from Dutch into<br />
English and Latin. Van Leeuwenhoek is<br />
credited with discovering bacteria, and<br />
from his descriptions, may have even<br />
seen nuclei.<br />
Figure 1.5 Robert Brown<br />
Robert Brown<br />
Robert Brown, a Scottish botanist, is<br />
known for his discovery of the cell<br />
nucleus (plural nuclei). Although he<br />
first described nuclei seen in the outer<br />
layer of cells in orchid plant tissue, he<br />
discovered that nuclei were present in<br />
a wide variety of plant tissues that he<br />
studied. He had no idea at that time<br />
of the importance of the nucleus or<br />
its function in cells. (Robert Brown<br />
is famous in science for his diverse<br />
discoveries, including being the<br />
first person to observe and describe<br />
Brownian motion. He also travelled on<br />
a ship with Captain Mathew Flinders<br />
to Australia in 1801 and he identified<br />
many genera of Australian plants.)<br />
SAMPLE CHAPTER ONLY
CELLS AND THE CELL THEORY<br />
Microscopes as valid scientific<br />
instruments<br />
It was about 200 years after the<br />
discovery of microscopes, from the<br />
time when the first compound optics<br />
microscopes were in use (1824), that<br />
microscopes began to be acknowledged<br />
as useful scientific instruments. The<br />
lenses of these optics microscopes were<br />
achromatic (did not separate colours)<br />
and they no longer produced distorted<br />
images. There was the added benefit<br />
of powerful light sources and precise<br />
focusing screws, thereby increasing<br />
the precision of the instruments in<br />
general. With the improved technology,<br />
scientists became less suspicious of<br />
the ‘artificial images’ and observations<br />
made were accepted as valid scientific<br />
evidence. It is not surprising that,<br />
shortly after this time, the cell theory<br />
was proposed.<br />
Schwann and Schleiden<br />
In 1838, apparently over a cup of<br />
coffee after dinner, two German<br />
scientists—Theodor Schwann and<br />
Matthias Schleiden, were discussing the<br />
results of their microscopic studies of<br />
living things. As Schleiden (a botanist)<br />
described the regular placement of<br />
nuclei that he had observed in plant<br />
cells, Schwann (a zoologist) recognised<br />
a similarity to the animal cells that he<br />
had been studying and they both went<br />
right then to Schwann’s laboratory to<br />
look at his slides. It was the first time<br />
that a common basic structure for all<br />
living things had become evident. A<br />
year later (1839) Schwann published a<br />
book on plant and animal cells, listing<br />
three main conclusions, two of which<br />
are still accepted today as the basis for<br />
the cell theory. Schwann’s first two<br />
conclusions are summarised below.<br />
1. The cell is the unit of structure of all<br />
living things.<br />
2. The cell exists as a distinct entity<br />
and as a building block in the<br />
construction of organisms.<br />
Further investigation led to evidence<br />
that his third conclusion, cells form<br />
by free-cell formation, similar to the<br />
formation of crystals, is not valid.<br />
Rudolf Virchow<br />
The accepted version of how cells<br />
arise is attributed to a German medical<br />
scientist, Rudolf Virchow. In 1855<br />
his studies led to his statement that:<br />
‘Where a cell arises, there a cell must<br />
have previously existed’. From this is<br />
derived the accepted third statement<br />
of the cell theory:<br />
3. All cells come from pre-existing cells.<br />
Virchow had not only discovered cell<br />
division but, by implying that living<br />
things could not arise from non-living<br />
elements, had convincingly refuted<br />
spontaneous generation. In 1879,<br />
Walther Fleming confirmed Virchow’s<br />
observations and named the process<br />
of division mitosis.<br />
Effect of microscope on disease theory<br />
From the time of Hippocrates until the<br />
discovery of cells, it was believed that<br />
disease resulted from ‘imbalance in<br />
body humors’. This was replaced with<br />
a cell-based theory of disease—look<br />
at the timeline (see pages 61–5) to<br />
discover the close relationship between<br />
the discovery of the cell theory and<br />
advances in the understanding of<br />
disease.<br />
Collaboration in science: the<br />
importance of the contributions<br />
of Hooke and Brown<br />
Although the work of other scientists<br />
was not formally acknowledged<br />
by Schwann in his book, the basic<br />
cell theory is today attributed to<br />
both Schleiden and Schwann and<br />
significance is given to the work of<br />
previous scientists such as Hooke and<br />
Brown. It was the regular placement<br />
of nuclei in plant and animal tissue<br />
which suggested to Schleiden and<br />
Schwann that all living tissue has<br />
a similar, compartmentalised basis.<br />
SAMPLE CHAPTER ONLY<br />
71
PATTERNS <strong>IN</strong> NATURE<br />
Figure 1.6<br />
Photomicrographs:<br />
(a) plant and (b) animal<br />
cells seen under a light<br />
microscope showing<br />
the compartmental<br />
nature of cells<br />
This compartmental nature of tissue led<br />
them directly to the idea that cells are<br />
the basic unit of living things. Without<br />
the work of Hooke (who, more than<br />
150 years before, had recorded the<br />
compartmentalised nature of cork and<br />
named these compartments ‘cells’)<br />
and Brown (who had discovered the<br />
nucleus six years before Schwann’s<br />
book was published), Schleiden and<br />
Schwann could not have built their<br />
cell theory. It is noticeable that it is<br />
often the collaborative work between<br />
scientists, as well as their building on<br />
(a)<br />
the work of previous scientists, that<br />
leads to a new theory in science.<br />
The cellular basis of life was a major<br />
breakthrough in biological thinking<br />
and led not only to further studies of<br />
cells, but also to a cell-based theory of<br />
disease. You will notice in the timeline<br />
summary (see pages 64–5) that both<br />
the discovery of cells and progress in<br />
the study of disease coincided with<br />
advances in microscopy (the history<br />
of the discovery of disease forms<br />
part of the HSC course).<br />
(b)<br />
PFA<br />
Evidence to support the cell theory<br />
■ describe evidence to support the cell theory<br />
(PFA P1) The evidence to support the<br />
cell theory has been described in detail,<br />
along with the historical development<br />
of the cell theory on pages 67–72.<br />
Table 1.1 provides a summary of these<br />
findings.<br />
Table 1.1 Summary of evidence for the cell theory<br />
Time frame<br />
and/or person<br />
Contribution (discovery<br />
or proposal)<br />
Evidence to support finding<br />
Response of scientific<br />
community (acceptance<br />
or rejection and grounds)<br />
Past: time of Aristotle<br />
(380 BC) until<br />
the Renaissance<br />
(14th to 16th century)<br />
Spontaneous generation: belief<br />
that creatures could originate<br />
from inanimate (non-living)<br />
material.<br />
People relied on observation<br />
with the naked eye and drew<br />
inferences from what they saw<br />
(e.g. rotting meat left exposed<br />
developed maggots—fly larvae).<br />
Theory accepted, but was<br />
being challenged. (Cells not<br />
yet discovered.)<br />
1663<br />
Robert Hooke<br />
72<br />
Introduced the term ‘cell’.<br />
Observed units seen in thin<br />
slices of cork using a compound<br />
microscope (published in<br />
Hooke’s book Micrographia).<br />
Not well received at first—<br />
believed distorted images and<br />
colour separation may have<br />
given ‘artificial images’. Later<br />
accepted.<br />
SAMPLE CHAPTER ONLY
CELLS AND THE CELL THEORY<br />
Time frame<br />
and/or person<br />
Contribution (discovery<br />
or proposal)<br />
Evidence to support finding<br />
Response of scientific<br />
community (acceptance<br />
or rejection and grounds)<br />
1674–1683<br />
Anton Van Leeuwenhoek<br />
Discovered bacteria.<br />
May have seen cells or nuclei.<br />
Viewed microscopic<br />
‘animalcules’ (‘tiny beasties living<br />
all around us’); viewed ‘globules’<br />
in tadpoles and eggs. Findings<br />
recorded in letters to the<br />
Royal Society of London.<br />
Royal Society asked Robert<br />
Hooke to verify these findings,<br />
which he did.<br />
1801<br />
Robert Brown<br />
Discovered the nucleus in cells.<br />
Microscopic studies of plants<br />
(orchids) and later many other<br />
plant tissues revealed that<br />
each cell had a nucleus.<br />
Discovery of nucleus noted,<br />
but were not aware of its<br />
importance.<br />
1838<br />
Schleiden and Schwann<br />
Proposed the cell theory:<br />
1. All living things are made<br />
of cells.<br />
2. Cells are the basic unit<br />
of organisms.<br />
Microscopic examination of<br />
plant tissue (Schleiden), and<br />
animal tissue (Schwann),<br />
revealed a common cellular<br />
basis for all living tissue.<br />
Findings published in Schwann’s<br />
book, Microscopic investigations<br />
on the accordance in the<br />
structure and growth of plants<br />
and animals.<br />
Two of three statements<br />
accepted by scientific<br />
community and still hold<br />
true today.<br />
1855<br />
Rudolf Virchow<br />
Proposed cell theory:<br />
3. All cells come from<br />
pre-existing cells.<br />
This disproved the theory<br />
of spontaneous generation.<br />
Studies of living tissue using a<br />
microscope showed that cells<br />
only arise if other cells are<br />
present to give rise to them.<br />
(1879) Walther Fleming<br />
confirmed Virchow’s<br />
observations and named<br />
process ‘mitosis’.<br />
Technological advances and the development of the<br />
1.2<br />
cell theory<br />
■ discuss the significance of technological advances to<br />
developments in the cell theory<br />
Continued advances in light microscope technology<br />
Improvements to the light microscope<br />
continued and, in the 1870s, oilimmersion<br />
lenses were introduced by<br />
Zeiss and Abbe, enabling a good image<br />
of up to 1500× magnification to be seen.<br />
By the 1890s the top-level microscopes<br />
of the time were fairly similar in their<br />
viewing capacity to the current senior<br />
school microscopes. Over the next<br />
100 years improvement to the quality<br />
of images produced by microscopes has<br />
resulted from ongoing research into the<br />
technology (see pages 74–8).<br />
Because the microscopes at this<br />
stage of the advance in technology were<br />
similar to those that you currently use<br />
at school, this is an appropriate time<br />
for you to become acquainted with the<br />
workings of a compound microscope<br />
(see classroom activity on next page).<br />
SAMPLE CHAPTER ONLY<br />
73
PATTERNS <strong>IN</strong> NATURE<br />
Figure 1.7 The<br />
compound microscope<br />
eye<br />
eyepiece<br />
coarse<br />
adjustment<br />
ocular lens<br />
objective lens<br />
specimen<br />
stage<br />
condenser lens<br />
light source<br />
base/foot<br />
CLASSROOM ACTIVITY<br />
SR<br />
TR<br />
This classroom activity<br />
practical is continued<br />
on the Student<br />
Resource CD and the<br />
Teacher Resource CD<br />
Practical introduction to using a microscope<br />
This investigation, although not specifi ed by the Preliminary Course syllabus, is recommended<br />
to guide students in the correct use of a compound light microscope. It should also assist their<br />
understanding of the size of microscopic fi elds, magnifi cation and resolution, and the importance of<br />
introducing contrast to improve the image that is being viewed.<br />
The microscope is the main technology used to investigate cell structure and functioning.<br />
Three main attributes of a microscope that allow you to clearly view a specimen are the magnifi cation,<br />
contrast and resolution of a microscope. It is also important for you to understand measurement under<br />
the microscope. In this introductory practical we will:<br />
■ identify parts of a microscope and investigate the functions of each part, including the diaphragm<br />
(for contrast)<br />
■ investigate magnifi cation and become familiar with microscopic units of measurement<br />
■ estimate/calculate the diameter of the fi elds of view of a microscope<br />
■ investigate resolution.<br />
74<br />
The invention of the electron microscope<br />
■ By the end of the 19th century<br />
compound light microscopes had<br />
been developed to a point where<br />
they were no longer limited by the<br />
quality of the lenses—their main<br />
limiting factor had become the<br />
wavelength of light. The wavelength<br />
of visible light (0.5 µm) limits the<br />
resolving power of microscopes<br />
so that objects closer together than<br />
0.45 µm are no longer seen as<br />
separate objects, even if the shortest<br />
wavelength of light is used. The best<br />
optical microscope cannot effectively<br />
magnify larger than 2000×. This led<br />
scientists to begin experimenting<br />
with forms of energy other than light.<br />
■ The next big breakthrough in<br />
our knowledge of cells was as<br />
a result of the invention (1933)<br />
and advancement of the electron<br />
microscope. With this technology<br />
SAMPLE CHAPTER ONLY
CELLS AND THE CELL THEORY<br />
images are produced using a beam<br />
of electrons—electrons that are<br />
made to behave like light (waves).<br />
In 1928, Ernst Ruska and his<br />
supervisor Max Kroll built the first<br />
electron microscope, but it only<br />
had a magnification of 17×. Ruska<br />
continued working on the device<br />
and by 1933 he had built the first<br />
transmission electron microscope<br />
that could magnify up to 12 000×.<br />
Ruska’s team continued working<br />
on the electron microscope during<br />
the second world war, achieving a<br />
magnification of one million times.<br />
■ The basic principle of the<br />
transmission electron microscope<br />
is similar to that of the compound<br />
light microscope, except that<br />
the energy source transmitted<br />
through the specimen is a beam of<br />
electrons instead of a beam of light.<br />
Modifications to the design have had<br />
to be made because electrons do not<br />
normally travel in a manner similar<br />
to light, but bounce off anything that<br />
they hit, such as air. The electrons<br />
must therefore pass through the<br />
specimen in a vacuum, making it<br />
possible to view only non-living,<br />
preserved tissue. The electrons are<br />
focused by electron magnets, rather<br />
than by glass lenses, and the image is<br />
produced on a screen where it shows<br />
up as fluorescence, or it may be<br />
projected onto a photographic plate.<br />
■ The invention of the scanning<br />
electron microscope followed in<br />
1955. The electron beam causes the<br />
specimen to emit its own electrons,<br />
producing a three-dimensional<br />
image (but it has a low resolution).<br />
The picture on the front cover of this<br />
textbook was produced by a modern<br />
day, scanning electron microscope.<br />
Advantages<br />
The main advantage of the transmission<br />
electron microscope is the high<br />
magnification and resolution which<br />
show an enormous amount of detail.<br />
The electron microscope reveals<br />
structures at not only the cellular level,<br />
but also the sub-cellular level. Many<br />
parts of cells (organelles) were seen<br />
for the first time after the invention<br />
of the electron microscope. Other<br />
parts previously seen with the light<br />
microscope can be seen in far greater<br />
detail, providing increased knowledge<br />
of their internal structure. This has led<br />
to an understanding of their functions<br />
in cells.<br />
source of<br />
electrons<br />
Figure 1.8 The<br />
electron microscope<br />
specimen<br />
eye<br />
electromagnetic<br />
lenses<br />
final image<br />
on<br />
photographic<br />
plate or<br />
screen<br />
SAMPLE CHAPTER ONLY<br />
75
PATTERNS <strong>IN</strong> NATURE<br />
76<br />
Disadvantages<br />
The main disadvantage of the<br />
transmission electron microscope is<br />
that the specimen must be placed in<br />
a vacuum for viewing, as air would<br />
interfere with the flow of electrons. As<br />
a result, living tissue cannot be viewed.<br />
This leads scientists to question how<br />
different the preserved specimens<br />
are from living tissue, as a direct<br />
comparison cannot be made.<br />
Another difficulty is the size,<br />
expense and maintenance: electron<br />
microscopes are very large (one<br />
microscope fills a small room), must<br />
be kept at constant temperature and<br />
pressure, and are extremely expensive.<br />
As a result, they are not accessible to<br />
the general public or to schools. The<br />
biology department of a university<br />
usually has an electron microscope, but<br />
it is in high demand and researchers<br />
would need to book time to use it.<br />
Techniques for preparing<br />
specimens for viewing<br />
The preparation of tissue for viewing<br />
under microscopes has become<br />
an integral part of microscopy—as<br />
microscopes improved, technology<br />
for specimen preparation has had to<br />
keep up.<br />
Two main criteria must be met when<br />
preparing tissue for viewing under the<br />
microscope:<br />
1. The sections must be thin enough<br />
to allow light or electrons to pass<br />
through them.<br />
2. Very thin sections of living tissue are<br />
mostly transparent, so the structure<br />
is difficult to observe unless some<br />
contrast is created between the<br />
tissue and its background.<br />
While preparing the tissue for<br />
viewing, the technique should minimise<br />
the alteration of tissue from its living<br />
form, otherwise what we view under<br />
the microscope may be an artefact<br />
(aberration or ‘artificial image’).<br />
To meet these criteria, a four-step<br />
process is used to prepare slides<br />
involving fixation, embedding, slicing<br />
and staining:<br />
1. fixation: the tissue is placed into a<br />
preservative substance that kills it<br />
and preserves it, as closely to the<br />
living from as possible. In some cells<br />
chemical fixation disrupts the cell<br />
and its contents, so it is important<br />
to study cells prepared in a variety<br />
of ways<br />
2. embedding: tissue is embedded in<br />
a hard medium such as wax (or<br />
an even harder substance such as<br />
resin for electron microscopy), to<br />
overcome the difficulty of cutting<br />
soft tissue into very thin sections<br />
3. slicing or sectioning: a machine<br />
called a microtome was invented,<br />
which could cut much thinner<br />
sections of tissue more smoothly<br />
than could be done by hand. An<br />
ultramicrotome has been invented<br />
more recently to allow ultra-thin<br />
specimens to be cut, suitable<br />
for viewing under the electron<br />
microscope. The thinner the section,<br />
the greater is the clarity of the image<br />
being viewed<br />
4. staining: colour is produced by a<br />
variety of stains to create a contrast<br />
between the transparent material and<br />
its background or heavy metals may<br />
be used to stain tissue for viewing<br />
under the electron microscope.<br />
Historical evidence of specimen<br />
preparation<br />
Robert Hooke noticed that he could get<br />
a clearer view of his cork cells if he cut<br />
a section very thinly to allow the light<br />
to pass through it.<br />
The use of dyes to stain tissue and<br />
improve visibility in specimens began<br />
in the late 1770s, but it was in the 1880s<br />
that Walther Flemming, using synthetic<br />
dyes, named the material that became<br />
most strongly stained chromatin<br />
material. And in 1888 Wilhelm<br />
Waldeyer-Hertz named the shortened<br />
threads of chromatin, chromosomes<br />
(chromo = coloured; soma = body).<br />
SAMPLE CHAPTER ONLY
CELLS AND THE CELL THEORY<br />
STUDENT ACTIVITY<br />
Use a table to compare (show the differences and similarities between) the light microscope and<br />
the transmission electron microscope. Headings that may be useful as points of comparison are<br />
suggested below:<br />
■ Energy source<br />
■ Focus<br />
■ Specimen preparation<br />
■ Magnifi cation<br />
■ Resolution<br />
■ Can live specimens be viewed?<br />
■ Image—colour or black and white?<br />
■ Advantages and disadvantages<br />
SR<br />
TR<br />
Table for comparison<br />
By using advanced preparation<br />
techniques to view tissue under the<br />
microscope, our knowledge and<br />
understanding of cell structure is further<br />
increased.<br />
Current biological research,<br />
technology and the cell theory<br />
The electron microscope and further<br />
developments in the cell theory<br />
The development of the electron<br />
microscope has allowed scientists to<br />
study the ultrastructure of cells (parts<br />
smaller than can be seen with a light<br />
microscope). Electron microscopes<br />
are now also linked to computers;<br />
this allows the study of sub-cellular<br />
structures in enormous detail, providing<br />
evidence of their functioning. This<br />
technology is also used in the areas<br />
of genetics and ecology, providing<br />
evidence which has resulted in modern<br />
biologists adding a further three<br />
statements to the original cell theory.<br />
The modern day additions are that:<br />
4. Cells contain hereditary information<br />
which is passed on during cell<br />
division.<br />
5. All cells have the same basic<br />
chemical composition.<br />
6. All energy flow (resulting from<br />
chemical reactions) of life occurs<br />
within cells.<br />
Further advances in microscopy<br />
Phase contrast microscopes<br />
These microscopes use an alternate<br />
way of creating contrast that does not<br />
involve altering the specimen. They<br />
take advantage of the fact that when<br />
light passes through structures of<br />
different densities, it changes phase<br />
because of the wave-like nature of<br />
light. A phase contrast in the incoming<br />
light is created by the different optical<br />
system of the microscope.<br />
Cutting edge technology—contemporary<br />
light and electron microscopes<br />
■ Current developments in compound<br />
light microscopes include link-ups<br />
with computers, where the image<br />
can now be digitally enhanced.<br />
Confocal microscopes use laser<br />
light to allow a three-dimensional<br />
view of a specimen to be built up,<br />
similar to medical scans. This has<br />
the advantage that the specimen<br />
no longer needs to be sliced into<br />
sections to be viewed.<br />
■ Synchrotrons are very recent<br />
microscopes that accelerate electrons<br />
to a speed close to that of the speed<br />
of light. They can be used to study<br />
structure at the atomic level and,<br />
like most electron microscopes, they<br />
control the direction of movement of<br />
the electrons with magnets.<br />
SAMPLE CHAPTER ONLY<br />
77
PATTERNS <strong>IN</strong> NATURE<br />
At the time of writing, an Australian<br />
synchrotron is being built at Monash<br />
University and will be about the size<br />
of a football field.<br />
Figure 1.9 A confocal<br />
microscope<br />
detector<br />
detector pinhole aperture<br />
out-of-focus<br />
light rays<br />
in-focus<br />
light rays<br />
dichromatic<br />
mirror<br />
laser excitation<br />
source<br />
objective<br />
excitation<br />
light<br />
rays<br />
light source pinhole<br />
aperture<br />
focal planes<br />
specimen<br />
SECONDARY SOURCE<br />
<strong>IN</strong>VESTIGATION<br />
PFAs<br />
P3<br />
<strong>BIOLOGY</strong> SKILLS<br />
P11.1<br />
P12.3; 12.4a—f<br />
P13.1a—e<br />
P14.1; 14.3b, d<br />
P15<br />
78<br />
The impact of technology on the development of the<br />
cell theory<br />
■ use available evidence to assess the impact of technology,<br />
including the development of the microscope, on the<br />
development of the cell theory<br />
Scientists in the past were limited in their<br />
research by the technology available to them.<br />
As equipment and techniques became more<br />
sophisticated, they could collect new evidence,<br />
leading to new biological views/theories.<br />
Task<br />
This is a complex task that requires high-order<br />
thinking skills from students, so a suggested<br />
method of tackling this task is given below.<br />
1. Collect relevant information about two things:<br />
■ the advances in technology (such as<br />
microscopes and techniques for preparing<br />
specimens for viewing)<br />
■ the improvement in understanding of a<br />
biological concept (the cell theory) over time.<br />
Plot the relevant information on a timeline.<br />
2. Analyse information to enable you to answer<br />
the dot point. Using both your timeline<br />
and information in the textbook, answer a<br />
series of questions which should improve<br />
your understanding of the links between<br />
the history of the cell theory and the history<br />
of the invention and improvement of the<br />
microscope.<br />
3. Answering the dot point: a ‘scaffold’ has<br />
been provided on page 80 to assist you with<br />
this step.<br />
SAMPLE CHAPTER ONLY
CELLS AND THE CELL THEORY<br />
Introduction<br />
The history of the development of the cell<br />
theory is closely linked to the invention and<br />
improvement of the microscope. The PFA P1:<br />
Outline the historical development of major<br />
biological principles, concepts and ideas is a<br />
precursor to PFA P3: assessing the impact of<br />
technological advances on understanding in<br />
biology, and so we begin our research on the<br />
history of the development of the cell theory<br />
by using a timeline. The suggestions below<br />
will help you to streamline your search for<br />
information, so that it is concise and relevant.<br />
Timeline activity<br />
Read pages 65–78 and any additional<br />
secondary source information, and then<br />
produce a timeline as outlined below.<br />
Remember to use a variety of sources and to<br />
crosscheck any uncertainty in the accuracy of<br />
your information.<br />
■ Research the main contributions to the cell<br />
theory that each of the following scientists<br />
made and the dates of these contributions:<br />
—Robert Hooke<br />
—Hans and Zacharias Janssen<br />
—Anton Van Leeuwenhoek<br />
—Matthias Schleiden<br />
—Theodor Schwann<br />
—Rudolf Virchow<br />
—Ernst Ruska.<br />
■ Draw a timeline showing the chronological<br />
order of the historical development of<br />
the cell theory: draw lines on the upper<br />
side of the line to list the invention of<br />
the technologies; below the line, list the<br />
discoveries made that led to the proposal<br />
of the cell theory. The earliest date should<br />
be on the left of the timeline and the most<br />
recent date on the right. Be sure your<br />
spacing shows a reasonable approximation<br />
of the amount of time elapsed between<br />
dates.<br />
■ Label the timeline in a logical and legible<br />
manner:<br />
— record the name, date and contributions<br />
of each scientist to the cell theory below<br />
the timeline. Some dates may vary<br />
slightly in different sources: evaluate the<br />
source and use the one you think is most<br />
accurate<br />
— record the advances in technology made<br />
(e.g. improvements to the microscope and<br />
specimen preparation techniques) above<br />
the timeline.<br />
Answering the dot point<br />
(PFA P3) Use the information summarised<br />
in your timeline as a guide to answering the<br />
questions below. You will also need to refer to<br />
more detailed information (see pages 65–78)<br />
to answer some of the questions. You may<br />
answer these questions as a rough draft on A4<br />
paper fi rst and then transfer your fi nal answers<br />
to the scaffold provided, or you may write them<br />
straight onto (or type them on the computer<br />
into) the scaffold provided.<br />
1. Technology<br />
1.1 Identify the technology available PRIOR<br />
to the proposal of the cell theory and<br />
outline its uses and limitations.<br />
1.2 Identify the technology (microscopes<br />
and specimen preparation) available<br />
AT THE TIME of the proposal of the<br />
cell theory and outline its uses and<br />
limitations.<br />
1.3 Identify the most advanced CURRENT<br />
technology available and describe<br />
PFA<br />
Figure 1.10 Example<br />
of how to draw a<br />
timeline<br />
Jansens make the first<br />
compound microscope<br />
Advances in<br />
technology<br />
1590<br />
1683<br />
1500<br />
Robert Hook introduces<br />
the term ‘cell’<br />
1600 1665<br />
1700 1800 1900 2000<br />
Discoveries that<br />
led to the proposal<br />
of the cell theory<br />
SAMPLE CHAPTER ONLY<br />
79
PATTERNS <strong>IN</strong> NATURE<br />
four ways in which this technology<br />
(microscopes and specimen preparation)<br />
is an improvement on the past<br />
technology.<br />
2. Knowledge and understanding<br />
2.1 Outline any areas of knowledge and<br />
understanding of the cell theory that<br />
came about as a result of PAST<br />
technology.<br />
2.2 Outline FURTHER areas of knowledge<br />
and understanding of the cell theory<br />
that resulted from the use of CURRENT<br />
technology.<br />
3. Putting the two together<br />
3.1 Explain how the advance in technology<br />
allowed the progressive accumulation<br />
of knowledge and understanding of<br />
the cell theory. (Remember, explain<br />
means ‘relate cause and effect’; that<br />
is, show the relationship between the<br />
improvement of the microscope and the<br />
increased knowledge and understanding<br />
about the cell theory.)<br />
3.2 Assess the impact of (1) on (2); that<br />
is, ‘make a judgment of the value’ of<br />
the advance in technology on the<br />
development of the cell theory.<br />
Table 1.2 The<br />
impact of technology<br />
on knowledge and<br />
understanding<br />
TECHNOLOGY<br />
(Identify<br />
technology and outline its uses and limitations)<br />
THEN<br />
NOW<br />
SR<br />
TR<br />
PRIOR to: the proposal of the cell theory:<br />
PAST: at the time of the proposal of the cell<br />
theory<br />
CURRENT: technology (outline<br />
four ways in which<br />
microscopes and specimen preparation have<br />
improved)<br />
A blank copy<br />
of Table 1.2<br />
For a sample<br />
answer of<br />
Table 1.2<br />
IMPROVEMENT (advance) in technology:<br />
KNOWLEDGE AND UNDERSTAND<strong>IN</strong>G<br />
THEN<br />
NOW<br />
PRIOR to: the cell theory<br />
PAST: at the time of the proposal of the cell<br />
theory<br />
CURRENTLY:<br />
IMPROVEMENT in (progressive accumulation of) knowledge and understanding:<br />
PUTT<strong>IN</strong>G IT ALL TOGETHER<br />
Explain how the advance in technology allowed the progressive accumulation of knowledge and<br />
understanding of the cell theory.<br />
(Show the relationship between the improvement of the microscope and the increased knowledge<br />
and understanding about the cell theory.)<br />
80<br />
Assess the impact of technology on the development of the cell theory.<br />
SAMPLE CHAPTER ONLY
CELLS AND THE CELL THEORY<br />
Cell structure and functioning<br />
Introduction: levels of organisation<br />
1.3<br />
Most living organisms that are seen<br />
every day consist of many cells and are<br />
termed multicellular. However, some<br />
living things consist of only one cell<br />
that carries out all of their life functions.<br />
These are said to be unicellular<br />
and can be seen with a microscope<br />
(e.g. Protists such as Euglena, Amoeba<br />
and Paramecium, living in pond water,<br />
and some disease-causing organisms<br />
such as bacteria) (see Fig. 1.11).<br />
The term ‘cell’ is therefore used to<br />
describe the basic unit of any organism,<br />
whether it is the only unit or one of<br />
many units making up an organism.<br />
Table 1.3 shows how the concept of<br />
‘cells’ fits into the overall organisation<br />
of living things.<br />
Table 1.3<br />
An introduction to<br />
structural organisation<br />
in living things<br />
Level of<br />
organisation Examples Diagrams:<br />
* Multicellular<br />
organism<br />
Plant, animal<br />
organism<br />
Systems<br />
Transport system,<br />
respiratory system<br />
urinary<br />
system<br />
kidney<br />
ureter<br />
Organs<br />
Heart, lungs, muscles, roots,<br />
stems, leaves<br />
urinary bladder<br />
urethra<br />
Tissues<br />
Blood tissue, lung tissue,<br />
photosynthetic tissue<br />
urinary bladder<br />
organ<br />
wall of<br />
urinary<br />
bladder<br />
epithelium<br />
connective tissue<br />
smooth muscle<br />
tissue<br />
Cells<br />
Nerve cell, blood cell, muscle<br />
cell, *unicellular organism<br />
plasma membrane<br />
smooth muscle<br />
connective tissue<br />
Organelles<br />
Nucleus, chloproplast,<br />
mitochondria, ribosomes<br />
nucleus<br />
cell<br />
smooth muscle<br />
tissue<br />
organelle<br />
Molecules<br />
Water (H 2<br />
O), protein, sugar,<br />
lipid, chlorophyll<br />
atoms<br />
molecule<br />
Atoms<br />
Carbon (C), hydrogen (H),<br />
oxygen (O), nitrogen (N)<br />
(DNA)<br />
* terms are explained in the following text<br />
SAMPLE CHAPTER ONLY<br />
81
PATTERNS <strong>IN</strong> NATURE<br />
cilla<br />
cytoplasm<br />
cytoplasm<br />
pseudopodium<br />
gullet<br />
eye spot<br />
chloroplast<br />
nucleus<br />
nucleus<br />
nucleus<br />
cell wall<br />
Paramecium<br />
Amoeba<br />
Euglena<br />
Figure 1.11 Common<br />
unicellular organisms<br />
that may be seen<br />
in a drop of pond<br />
water using a light<br />
microscope<br />
82<br />
TR<br />
Teaching analogy<br />
Figure 1.12 Cells of<br />
multicellular organisms<br />
that can be seen using<br />
a compound light<br />
microscope:<br />
(a) non-photosynthetic<br />
plant cells (onion)<br />
The structure of cells (as seen using a light microscope)<br />
■ identify cell organelles seen with current light and<br />
electron microscopes<br />
The general contents of cells can be<br />
studied using the light microscope, but<br />
if more detailed information is required<br />
an electron microscope must be used.<br />
Cells vary greatly in shape, size,<br />
structure and function. There is, in<br />
reality, no such thing as a ‘typical’<br />
cell. The majority of cells that form<br />
the tissues and organs of an organism<br />
become highly specialised for particular<br />
functions, for example lung tissue and<br />
blood tissue. To allow an understanding<br />
of the general structure and functioning<br />
of cells, a hypothetical or ‘typical’ cell<br />
of plants and one of animals is often<br />
studied, as shown in Figures 1.12<br />
and 1.13 (light microscope) and 1.16<br />
(electron microscope).<br />
(a)<br />
<br />
<br />
<br />
<br />
Cells that are found in plants and<br />
animals have the same basic features,<br />
with some variations. The cell parts<br />
discussed below are those that are<br />
visible with a light microscope:<br />
■ It is in the protoplasm of cells<br />
that the functions essential to life,<br />
such as growth and respiration, are<br />
carried out. The cytoplasm (that<br />
part of the protoplasm outside of<br />
the nucleus) consists of a liquidbased<br />
background, the cytosol,<br />
in which there are dissolved<br />
chemical substances (e.g. ions<br />
such as chloride ions), suspended<br />
organelles and insoluble granules.<br />
Approximately 90 per cent of the<br />
cytoplasm is water—the medium<br />
in which all cell chemicals are<br />
dissolved or suspended.<br />
<br />
<br />
<br />
SAMPLE CHAPTER ONLY
CELLS AND THE CELL THEORY<br />
(b)<br />
<br />
<br />
<br />
<br />
Figure 1.12 Cells of<br />
multicellular organisms<br />
that can be seen<br />
using a compound<br />
light microscope:<br />
(b) photosynthetic<br />
plant cells (pond<br />
weed); (c) animal<br />
cells (cheek cells)<br />
<br />
<br />
(c)<br />
<br />
cell<br />
membrane<br />
nucleus<br />
cytoplasm<br />
protoplasm<br />
■ The nucleus (plural nuclei)<br />
appears as a large, spherical, oval<br />
or sometimes elongate structure<br />
in the cytoplasm. It is colourless,<br />
transparent and slightly more<br />
jelly-like than the rest of the cell.<br />
Most organisms have one nucleus<br />
per cell.<br />
■ The cell membrane (alternate<br />
names are the plasma membrane,<br />
cytoplasmic membrane or<br />
plasmalemma) surrounds the cell<br />
contents in all cells and separates the<br />
cell contents from its surroundings.<br />
It controls the passage of water and<br />
other chemical substances into and<br />
out of cells.<br />
Plant cells<br />
Plant cells have some additional<br />
structures which can be viewed under<br />
a light microscope. These structures are<br />
SAMPLE CHAPTER ONLY<br />
83
PATTERNS <strong>IN</strong> NATURE<br />
exclusive to plant cells and therefore<br />
not usually found in animal cells.<br />
■ Chloroplasts are organelles that are<br />
green in colour, due to the presence<br />
of a pigment called chlorophyll.<br />
Chloroplasts are responsible for<br />
photosynthesis—the manufacturing<br />
of sugar in plants, using the energy<br />
of sunlight. Chloroplasts are not<br />
present in all plant cells, they are<br />
only found in the green tissue of<br />
plants that can photosynthesise.<br />
Under the light microscope, they<br />
appear as green, disc-shaped<br />
structures, smaller than the nucleus.<br />
An electron microscope is needed to<br />
see the detailed interior.<br />
■ Vacuoles in plant cells are large,<br />
permanent, fluid-filled sacs in the<br />
cytoplasm of mature cells. Each<br />
vacuole consists of a watery solution<br />
called cell sap, surrounded by<br />
single membrane, the tonoplast.<br />
Cell sap contains substances such<br />
as mineral salts, sugars and amino<br />
acids dissolved in water. It may also<br />
contain dissolved pigments that<br />
give cells their colour, for example<br />
the reds, pinks and purples seen in<br />
some flower petals. Besides having<br />
a storage function, vacuoles play<br />
a very important role in providing<br />
support to plant cells. By filling<br />
up with water, the vacuole pushes<br />
outwards with the cytoplasm,<br />
exerting a pressure on the cell wall,<br />
keeping it firm. As a result of the<br />
outward pressure of the cell contents<br />
and the resisting pressure of the<br />
cell wall, the cell becomes firm or<br />
turgid. (Small, temporary vesicles<br />
may sometimes be found in animal<br />
cells, but these do not play a role in<br />
cell support, so permanent vacuoles<br />
that give turgidity are considered to<br />
be a feature excusive to plant cells.)<br />
Figure 1.13 is a comparative<br />
diagram of a plant and an animal<br />
cell. To compare two things, both the<br />
similarities and differences must be<br />
Figure 1.13<br />
Comparative diagram<br />
of typical plant and<br />
animal cells as<br />
seen under a light<br />
microscope<br />
structures found in plant<br />
and animal cells<br />
cytoplasm<br />
structures found in plant<br />
cells only<br />
cell wall<br />
tonoplast<br />
cell sap<br />
vacuole<br />
nucleus<br />
chloroplasts<br />
84<br />
animal cell<br />
cell<br />
membrane<br />
plant cell<br />
SAMPLE CHAPTER ONLY
CELLS AND THE CELL THEORY<br />
examined. When this is done using<br />
diagrams, the features common to both<br />
are labelled down the centre and the<br />
features that are different are labelled<br />
on the outside.<br />
The nucleus is one of the largest<br />
organelles visible with the light<br />
microscope. Chloroplasts and vacuoles<br />
in plant cells are also large enough to<br />
be seen with a light microscope, but all<br />
other organelles are much smaller and<br />
appear as granules of various sizes in<br />
the cytoplasm, if viewed under a light<br />
microscope.<br />
Table 1.4 Comparison<br />
of organelles visable<br />
with light and electron<br />
microscopes<br />
School light microscope (10–200 × )<br />
Top technology light microscope<br />
(800–2 000 × ) Electron microscope (60–2 000 000 × )<br />
■ Cell wall<br />
■ Cell membrane<br />
■ Nucleus and nuclear membrane<br />
■ Chloroplast<br />
■ Vacuole: tonoplast and cell sap<br />
■ Cytoplasm<br />
All structures in previous column as well as:<br />
■ Golgi body<br />
■ mitochondria<br />
■ nucleolus<br />
■ (special staining required for all)<br />
All structures in previous two columns as<br />
well as:<br />
■ endoplasmic reticulum<br />
■ ribosomes<br />
■ lysosomes<br />
■ centrosome<br />
■ cytoskeleton (special staining needed<br />
for this)<br />
Observing plant and animal cells using a light microscope<br />
■ perform a first-hand investigation to gather first-hand<br />
information using a light microscope to observe cells in<br />
plants and animals and identify nucleus, cytoplasm, cell<br />
wall, chloroplast and vacuoles<br />
Background<br />
The microscope<br />
The practical introduction to using a microscope<br />
(see page 74) helped students to review<br />
parts of a microscope, safe work practice<br />
in microscopy, inversion of image, as well<br />
as giving them a clearer understanding<br />
of magnifi cation, calculating the size of a<br />
microscope’s fi eld of view and the use of the<br />
diaphragm. This knowledge should be applied<br />
when completing this investigation.<br />
The specimens to be viewed<br />
You are required to examine both plant and<br />
animal cells under the microscope and gather<br />
fi rst-hand information. This investigation<br />
involves:<br />
■ preparing your own slides for the plant<br />
tissue to be viewed, using the wet mount<br />
technique described and illustrated below<br />
■ using permanent prepared slides of animal<br />
cells such as cheek cells and blood cells,<br />
that have been made in commercial<br />
laboratories for you. (As a matter of OH&S,<br />
we no longer prepare our own slides of<br />
this tissue, to avoid the risk of transmitting<br />
infections between students.)<br />
(Note to teacher : A demonstration of how to<br />
prepare a wet mount can be done on a plastic<br />
sheet on the overhead projector, as all materials<br />
are transparent and can be viewed easily.)<br />
Preparing a wet mount<br />
The technique will be described on the next<br />
page, in the method of the practical and your<br />
teacher may also demonstrate this technique<br />
to you. Figure 1.14 illustrates the technique.<br />
dissecting needle<br />
FIRST-HAND<br />
<strong>IN</strong>VESTIGATION<br />
<strong>BIOLOGY</strong> SKILLS<br />
P12.1; 12.2; 12.4<br />
P13.1<br />
Figure 1.14 Diagram<br />
showing technique for<br />
lowering coverslip on<br />
to a wet mount<br />
microscopic slide<br />
drop of water<br />
onion skin<br />
cover slip<br />
SAMPLE CHAPTER ONLY<br />
85
PATTERNS <strong>IN</strong> NATURE<br />
TR<br />
General resources<br />
Recording your results<br />
■ Accurately present your information by<br />
selecting and drawing two to three cells of<br />
each type viewed under the microscope.<br />
Remember to calculate and state the<br />
magnifi cation for each diagram. It is not<br />
essential to draw the circular fi eld of view<br />
around the cells, but this sometimes helps<br />
to remind you that this is a representation<br />
of a microscopic section.<br />
■ The photomicrographs and diagrams<br />
provided (see Fig. 1.12) should help you to<br />
fi nd and recognise the tissues that you are<br />
looking for.<br />
Drawing cells seen under the<br />
microscope<br />
Scientifi c drawing skills apply—use a sharp<br />
pencil and draw single, solid lines. Each<br />
diagram should be large enough (approximately<br />
6 to 7 cm in size) to clearly show all structures<br />
visible inside the cells, have detailed and<br />
accurate labels (see Table 1.4). Label<br />
lines should be parallel if possible, should<br />
never cross each other and should have no<br />
arrowheads, but touch the actual structure<br />
being labelled (see Figs 1.12 and 1.13).<br />
Practical task<br />
Aim<br />
To investigate the structure of plant and animal<br />
cells under a light microscope.<br />
Equipment<br />
■ One compound light microscope per student<br />
if possible<br />
■ Glass microscope slides, coverslips,<br />
dissecting needle, razor blade or scalpel<br />
■ 50 mL beaker, water, dropper, stains such<br />
as iodine or toluidine blue, paper towel, lens<br />
tissue, oil for oil immersion<br />
■ Onion, elodea (water plant), leaves of<br />
agapanthus<br />
■ Prepared slides of cheek cells, blood cells<br />
Method<br />
1. Plant cells<br />
Working in pairs, one student prepares a wet<br />
mount of a section of onion tissue, while the<br />
other student prepares a wet mount of a piece<br />
of pond weed (elodea). Follow the procedure for<br />
preparing a wet mount as demonstrated by your<br />
teacher (see Fig. 1.14).<br />
A. Onion cells (see Fig 1.12a)<br />
■ Remove the onion skin and carefully lift a<br />
thin section of onion tissue from the surface<br />
of one of the layers.<br />
■ Cut a piece about 1 cm 2 in area and<br />
place this in a drop of water plus iodine<br />
(stained) or water (unstained) on the glass<br />
microscope slide.<br />
■ Carefully lower the coverslip using a<br />
dissecting needle, to avoid the formation<br />
of air bubbles.<br />
■ Place a piece of paper towel over the<br />
coverslip and slide to dry any excess water<br />
or stain. (Note: There are no chloroplasts<br />
in white onion cells, but you should be able<br />
to view all other plant cell structures visible<br />
with a school microscope listed in Table 1.4<br />
on page 85.)<br />
B. Pond weed—elodea (see Fig 1.12b)<br />
■ Follow the instructions above for an<br />
unstained wet mount. Pond weed is thin<br />
enough for light to pass through and<br />
you should be able to view chloroplasts<br />
clearly.<br />
■ View under low power, then under higher<br />
power. You will need to place drop of oil<br />
on top of the coverslip to view the cells<br />
under the highest power. Remember<br />
that your microscope is parfocal, so it is<br />
not necessary to adjust the focus before<br />
changing to a higher magnifi cation, but<br />
make sure you use the fi ne adjustment<br />
knob only, when bringing the specimen<br />
into focus.<br />
Draw the cells seen in both parts A and B.<br />
2. Animal cells<br />
C. Cheek cells<br />
■ Using a prepared slide of stained cheek<br />
cells, observe and draw these as seen<br />
under high power or under oil immersion,<br />
as instructed by your teacher.<br />
■ Label the cheek cells (see Table 1.4 for<br />
suggested labels).<br />
■ Record your magnifi cation.<br />
86<br />
SAMPLE CHAPTER ONLY
CELLS AND THE CELL THEORY<br />
(a)<br />
(b)<br />
Figure 1.15<br />
Photomicrographs<br />
taken under a<br />
compound light<br />
microscope:<br />
(a) blood cells;<br />
(b) agapanthus—<br />
surface view of<br />
epidermal cells<br />
and stomates<br />
Further investigations for students who fi nish<br />
early:<br />
(a) blood cells<br />
(b) surface view of leaf of epidermal cells<br />
showing guard cells and stomates an<br />
agapanthus leaf: scour the surface of the<br />
leaf into 1 cm 2 sections with a scalpel blade<br />
and then place transparent sticky tape<br />
over the leaf surface to lift the uppermost<br />
layer (epidermis). Place these cells<br />
attached to the sticky tape in a drop of<br />
water on a microscope slide, as described<br />
for the unstained onion and complete<br />
the wet mount as described. Draw and<br />
label this surface view of epidermal cells<br />
of agapanthus. Breathing pores called<br />
stomates should be visible amongst the<br />
epidermal cells<br />
(c) pond water: place a drop of pond water on a<br />
microscope slide. Cover with a coverslip and<br />
view under low power to fi nd cells and then<br />
under high power to draw (see Fig. 1.11).<br />
Record your magnifi cation.<br />
The ultrastructure of cells (electron microscope)<br />
■ describe the relationship between the structure of cell<br />
organelles and their function<br />
1.4<br />
In order to look at cells and their<br />
organelles in detail, photographs<br />
that have been produced using an<br />
electron microscope are studied.<br />
These photographs are called<br />
electron micrographs and they reveal<br />
the structure of these sub-cellular<br />
components which have been greatly<br />
magnified—termed the ultrastructure<br />
of cells.<br />
The structure of each organelle is<br />
closely related to its function within<br />
the cell.<br />
In any cell, membranes are extremely<br />
important structures which not only<br />
separate one cell from another, but<br />
may also separate organelles within<br />
a cell from the surrounding cytoplasm.<br />
SAMPLE CHAPTER ONLY<br />
87
PATTERNS <strong>IN</strong> NATURE<br />
(a)<br />
centrioles<br />
ribosome<br />
nuclear pore<br />
nuclear envelope<br />
nucleolus<br />
rough endoplasmic<br />
reticulum<br />
lysosome<br />
nucleus<br />
cytoplasm<br />
microfilament<br />
microtubule<br />
mitochondrion<br />
Golgi body<br />
plasma membrane<br />
Figure 1.16<br />
Diagrams of<br />
generalised views<br />
under the electron<br />
microscope showing<br />
details of organelles:<br />
(a) an animal cell<br />
<br />
<br />
<br />
smooth endoplasmic reticulum<br />
<br />
<br />
<br />
<br />
<br />
<br />
<br />
<br />
<br />
<br />
<br />
<br />
<br />
<br />
<br />
88<br />
<br />
<br />
<br />
<br />
<br />
SAMPLE CHAPTER ONLY
CELLS AND THE CELL THEORY<br />
(b)<br />
nuclear pore<br />
rough<br />
endoplasmic<br />
reticulum<br />
ribosome<br />
nuclear envelope<br />
nucleolus<br />
Golgi body<br />
nucleus<br />
mitochondrion<br />
chloroplast<br />
Figure 1.16<br />
Diagrams of<br />
generalised views<br />
under the electron<br />
microscope showing<br />
details of organelles:<br />
(b) a plant cell<br />
chloroplast<br />
smooth<br />
endoplasmic<br />
reticulum<br />
cytoplasm<br />
chloroplast<br />
microtubule<br />
microofilament<br />
plasma membrane<br />
cell wall<br />
plasmodesma<br />
central vacuole<br />
adjoining cell<br />
air space<br />
cell membrane<br />
cell wall<br />
cytoplasm<br />
oil droplets<br />
nuclear pore<br />
nuclear membrane<br />
nuclear sap<br />
nucleus<br />
nucleolus<br />
endoplasmic reticulum<br />
ribosome<br />
chromatin network<br />
Golgi body<br />
vacuolar membrane<br />
or tonoplast<br />
vacuole with cell sap<br />
starch granule<br />
pit with<br />
plasmodesmata<br />
chloroplast<br />
mitochondrion<br />
SAMPLE CHAPTER ONLY<br />
89
PATTERNS <strong>IN</strong> NATURE<br />
90<br />
In the cells of multicellular organisms<br />
and many unicellular organisms, each<br />
organelle within a cell is surrounded<br />
by its own membrane, which may be<br />
either a single or a double membrane.<br />
Cells with membrane-bound organelles<br />
are termed eucaryotic cells (alternate<br />
spelling eukaryotic) and the organism<br />
is classified as a eucaryote. This name<br />
refers to the fact that the genetic<br />
material is contained within a nucleus,<br />
separated from the cytoplasm by a<br />
double nuclear membrane. (Derived<br />
from the Greek ‘eu’ meaning ‘true or<br />
proper’ and ‘karyon’ meaning ‘nucleus ’).<br />
With the use of the electron<br />
microscope, primitive cells called<br />
procaryotic cells (alternate spelling<br />
prokaryotic) were discovered. (Greek<br />
‘pro’ = before, ‘karyon’ = nucleus). These<br />
organisms, for example bacteria, do not<br />
have their genetic material separated<br />
from the cytoplasm by a membrane,<br />
they simply have a strand of genetic<br />
material floating within the cytoplasm.<br />
Further studies with the electron<br />
microscope showed that procaryotes<br />
do not have any membrane-bound<br />
organelles, their sub-cellular components<br />
float within the cytoplasm.<br />
Membranes—selective<br />
boundaries<br />
The cell membrane is a selective barrier,<br />
permitting the passage of only certain<br />
molecules into or out of cells. This<br />
property gives the cell membrane the<br />
feature of being selectively permeable.<br />
(This will be dealt with in greater detail<br />
in the following chapter). Both plant<br />
and animal cells have a cell membrane.<br />
The membranes surrounding organelles<br />
are also selective in allowing only<br />
certain substances to pass between<br />
the cytoplasm and the organelle.<br />
The nucleus—the control and<br />
information centre<br />
■ The nucleus stores the information<br />
needed to control all cell activities.<br />
It is therefore essential for the<br />
nucleus to be able to communicate<br />
with the surrounding cytoplasm.<br />
■ Electron micrographs reveal that the<br />
nucleus is surrounded by a double<br />
nuclear membrane or nuclear<br />
envelope, pierced by tiny pores.<br />
These pores regulate the passage of<br />
substances between the nucleus and<br />
cytoplasm, allowing communication<br />
between them.<br />
■ The nucleoplasm or nuclear sap is<br />
the liquid background of the nucleus<br />
in which the chromatin material<br />
is found. Chromatin is made up of<br />
protein and nucleic acid.<br />
■ The nucleic acid DNA is a very large<br />
chemical that holds, in a coded<br />
form, all the genetic information (the<br />
‘blueprint’) necessary to control the<br />
cell’s functioning. It is this DNA which<br />
contains the hereditary information<br />
of an organism that gets passed from<br />
one generation to the next. Within<br />
one organism, the information stored<br />
in the DNA of each cell is the same.<br />
Before a cell divides, the information<br />
on the DNA must be copied so that<br />
it can be transmitted (passed on) to<br />
newly formed cells.<br />
■ The chromatin material separates into<br />
short, thick separate rod-shaped<br />
structures called chromosomes,<br />
which become visible in dividing<br />
cells. (‘chromo’ = coloured,<br />
‘soma’ = ‘body’—so named<br />
because chromosomes take up<br />
stains easily when being prepared<br />
for microscopy.) Each species of<br />
organism has its own particular<br />
number of chromosomes;<br />
for example, humans have<br />
46 chromosomes, a platypus has 52,<br />
a lettuce has 18 and a camel has 70!<br />
■ The nucleolus is a dense, granular<br />
region commonly seen within the<br />
nucleoplasm and it contains a large<br />
amount of nucleic acid—some DNA,<br />
but mostly RNA. The nucleolus is<br />
responsible for the manufacture<br />
of organelles called ribosomes,<br />
essential ‘machinery’ of the cell.<br />
SAMPLE CHAPTER ONLY
CELLS AND THE CELL THEORY<br />
chromatin material<br />
(DNA protein)<br />
nucleoplasm<br />
ribosomes<br />
Figure 1.17 Diagram of<br />
nucleus and associated ER<br />
and ribosomes<br />
nuclear pore<br />
nucleolus<br />
double nuclear<br />
membrane<br />
rough endoplasmic<br />
reticulum<br />
It is important to remember that the<br />
view of cell organelles revealed by a<br />
transmission electron microscope is a<br />
section cut through the organelle. From<br />
these micrographs it is possible to build<br />
up a three-dimensional view of each<br />
organelle (see Table 1.5 on page 95).<br />
Scanning electron microscopes give an<br />
external view of the surface of these<br />
organelles.<br />
Endoplasmic reticulum—<br />
transport and processing of<br />
proteins and lipids<br />
The outer nuclear membrane is usually<br />
continuous with a network of flattened,<br />
interconnected membranes—the<br />
endoplasmic reticulum (ER). The<br />
ER provides a connection of pathways<br />
between the nucleus and the cell’s<br />
environment, allowing intracellular<br />
transport (transport within a cell).<br />
The immense folding of the sheets of<br />
membrane increases its surface area.<br />
ER may have ribosomes attached<br />
(rough ER) or may have no ribosomes<br />
(smooth ER). The main function of<br />
ER is transport, but it also plays a role<br />
in processing cell products: rough ER<br />
folds and processes proteins products<br />
made by the cell and it can also<br />
synthesise lipids; smooth ER is the main<br />
site of lipid production, essential for<br />
membrane repair and manufacture. ER<br />
may also transport substances from one<br />
cell to another in plant cells, passing<br />
through channels in the cell wall called<br />
cell pits.<br />
Ribosomes—protein synthesis<br />
These small organelles appear as dense<br />
granules in electron micrographs of<br />
cells. Their small size and rounded<br />
shape increase their surface area for<br />
easy interaction with chemicals during<br />
their functioning. Each is made of the<br />
chemicals RNA and protein, and their<br />
function is protein synthesis. Ribosomes<br />
are the ‘machinery’ that carries out the<br />
genetically coded instructions of DNA<br />
to produce any proteins necessary<br />
for cell functioning and structure.<br />
Ribosomes may be found free in the<br />
cytoplasm or scattered over the surface<br />
of ER. Newly synthesised proteins pass<br />
from the ribosomes into the ER where<br />
the folding of the protein occurs.<br />
Golgi bodies—packaging and<br />
sorting the products<br />
Although the Golgi body is also made<br />
of flat membranes, it differs from ER<br />
in that it does not have ribosomes<br />
attached and the membranes are often<br />
in stacks of four to ten. The Golgi body<br />
is easily recognisable by its curved<br />
shape on one surface, where vesicles<br />
can be seen budding off. This surface is<br />
called the forming face and the vesicles<br />
are evidence of the secretory function<br />
of Golgi bodies. The opposite surface<br />
may be convex or flat in shape.<br />
Golgi bodies process, package and<br />
‘sort’ cell products. They are involved<br />
in adding proteins and carbohydrates<br />
to cell products and they also provide<br />
SAMPLE CHAPTER ONLY<br />
91
PATTERNS <strong>IN</strong> NATURE<br />
92<br />
Figure 1.18<br />
Golgi body and<br />
vesicles<br />
a membrane around the cell products<br />
to ‘package’ them. The membranes<br />
provided by Golgi bodies vary and<br />
serve as a ‘packaging label’. Features<br />
of the membrane are used to ‘sort’<br />
these products, determining where they<br />
will end up—they may be transported<br />
within the cell to wherever they are<br />
required or they may be secreted out of<br />
the cell.<br />
forming face<br />
Lysosomes—digestion and<br />
destruction<br />
vesicles<br />
One example of the products of Golgi<br />
bodies are lysosomes. These are little<br />
fluid-filled sacs, most commonly seen<br />
in animal cells. They are surrounded<br />
by a single membrane and the vesicle<br />
is filled with digestive enzymes, for<br />
intracellular digestion. Lysosomes<br />
commonly break down worn out cell<br />
organelles, so that the materials can<br />
be recycled and used to make new<br />
organelles. The membrane is essential<br />
to prevent the enzyme from digesting<br />
the normal cell contents.<br />
Mitochondria—cellular<br />
respiration: production and<br />
storage of energy (ATP)<br />
■ Mitochondria are the ‘powerhouses’<br />
of a cell, producing energy by the<br />
process of chemical respiration.<br />
■ Mitochondria (singular =<br />
mitochondrion) are usually<br />
rod-shaped, but may be round,<br />
they vary in both shape and size.<br />
Mitochondria are smaller than the<br />
nucleus and chloroplasts, but larger<br />
than ribosomes.<br />
■ The number of mitochondria in<br />
a cell depends on how much<br />
energy the cell needs to carry<br />
out its functions. Less active cells<br />
contain few mitochondria, whereas<br />
very active cells have hundreds or<br />
even thousands of mitochondria<br />
(e.g. active liver cells contain 1000<br />
to 2000 mitochondria).<br />
■ Just as machines in a factory need<br />
electrical energy in order to work,<br />
so cells need energy, in the form of<br />
a chemical called ATP (adenosine<br />
triphosphate), to work. Mitochondria<br />
combine oxygen with sugars during<br />
the process of chemical respiration<br />
to release energy in a form (ATP)<br />
that the cell can use.<br />
■ Each mitochondrion is surrounded<br />
by a double membrane: the outer<br />
membrane gives the mitochondria<br />
its shape and allows the passage<br />
of small substances into and out of<br />
mitochondria. The inner membrane<br />
is folded into fine, finger-like ridges<br />
or cristae—this increases the surface<br />
area for the attachment of groups<br />
of enzymes that are responsible<br />
for making energy for the cell.<br />
The groups of enzymes appear as<br />
knob-like particles on the inside of<br />
the cristae.<br />
■ The central space in a mitochondrion<br />
is filled with fluid and is termed the<br />
matrix. It contains mitochondrial<br />
DNA and enzymes that give<br />
mitochondria the unusual feature of<br />
being able to replicate (make copies<br />
of) themselves. The mitochondria<br />
divide by pinching off and then<br />
growing, something that usually<br />
occurs in very active cells or cells<br />
that are about to divide. This ability<br />
of mitochondria to reproduce<br />
themselves is extremely useful<br />
in evolutionary studies.<br />
SAMPLE CHAPTER ONLY
CELLS AND THE CELL THEORY<br />
outer membrane<br />
inner membrane<br />
folded into cristae<br />
cristae<br />
Figure 1.19<br />
Simplified scheme<br />
of mitochondrion in<br />
longitudinal section<br />
particles on<br />
outer membrane<br />
lumen or cavity<br />
Chloroplasts—photosynthesis<br />
■ Chloroplasts belong to a group of<br />
organelles called plastids which<br />
are biconvex in shape and vary in<br />
colour. Plastids that are red, yellow<br />
and orange are called chromoplasts<br />
and they contribute to the colour<br />
of some flowers and fruit. Some<br />
plastids are white (e.g. leucoplasts<br />
in potatoes). Chloroplasts are green<br />
plastids which carry out the process<br />
of photosynthesis.<br />
■ Chloroplasts are larger than<br />
mitochondria, but they are similar<br />
in that they also contain their own<br />
DNA and the number of chloroplasts<br />
per cell varies.<br />
■ Chloroplasts are not found in all<br />
plant cells, only in green cells that<br />
photosynthesise; for example, they<br />
are not present in cells of roots, but<br />
are common in leaves.<br />
■ Chloroplasts are surrounded by a<br />
double membrane which allows<br />
substances to pass between the<br />
cytoplasm and the chloroplast but,<br />
unlike mitochondria, the inner<br />
membrane of the chloroplast is<br />
not folded (see Fig. 1.20).<br />
■ The liquid background of the<br />
chloroplast is called the stroma<br />
and it is here that stacks of<br />
membranes called thylakoids<br />
are found. Each stack or group of<br />
thylakoids is termed a granum<br />
(plural: grana) and the green<br />
pigment, chlorophyll, is found<br />
on these membranes.<br />
■ The layering of the membranes<br />
increases the surface area over<br />
which chlorophyll occurs, allowing<br />
a large amount of sunlight to<br />
be absorbed for the process of<br />
photosynthesis. This captured energy<br />
of sunlight is then used by the plant<br />
to make food. All the enzymes<br />
needed for photosynthesis are<br />
present in the stroma and food made<br />
during photosynthesis is stored in<br />
the stroma as starch grains.<br />
Cytoskeleton—keeps<br />
organelles in place<br />
Organelles are not randomly scattered<br />
within a cell, their distribution is<br />
organised and they are held in place<br />
by a network of tiny microtubules and<br />
microfilaments called the cytoskeleton,<br />
which extends throughout the<br />
cytoplasm.<br />
<br />
<br />
<br />
<br />
<br />
<br />
<br />
<br />
Figure 1.20<br />
Simplified scheme of<br />
chloroplast seen in<br />
longitudinal section<br />
<br />
<br />
<br />
SAMPLE CHAPTER ONLY<br />
93
PATTERNS <strong>IN</strong> NATURE<br />
Centrioles—spindle production<br />
in cell division<br />
A dense, granular structure, the<br />
centrosome, is often found near the<br />
nucleus in animal cells. It consists of<br />
two centrioles, which play an important<br />
role in the formation of spindle fibres<br />
when a cell divides (this will be<br />
referred to in Chapter 5).<br />
Plant cell wall—shape and<br />
support<br />
The cellulose cell wall that surrounds<br />
plant cells differs from the cell<br />
membrane beneath it, because the cell<br />
wall is not really selective in terms of<br />
what substances it does or does not<br />
allow into the cell. Its structure allows it<br />
to provide strength and support. The cell<br />
wall is built up of strands of cellulose<br />
fibres which have a little elasticity and<br />
are somewhat flexible, giving cell walls<br />
their characteristic feature of being<br />
able to resist the outward pressure<br />
of the vacuole and cell contents in<br />
a well-watered plant cell, conferring<br />
turgidity to the cell. Some cell walls are<br />
thickened with additional chemicals such<br />
as lignin, which could make the walls<br />
hard and woody (e.g. in tree trunks), or<br />
the chemical suberin for waterproofing<br />
(e.g. in cork or the waxy cuticle of<br />
leaves).<br />
Figure 1.21<br />
Summary of structures<br />
found in plant and<br />
animal cells<br />
cell wall<br />
chloroplasts<br />
large, permanent<br />
vacuole<br />
cell membrane<br />
cytoplasm<br />
cytoskeleton<br />
nucleus<br />
mitochondria<br />
ER<br />
Golgi body<br />
ribosomes<br />
centrioles<br />
lysosomes<br />
Plant cell<br />
Animal cell<br />
Both<br />
94<br />
SAMPLE CHAPTER ONLY
CELLS AND THE CELL THEORY<br />
Electron micrographs of cell organelles<br />
■ process information from secondary sources to analyse<br />
electron micrographs of cells and identify mitochondria,<br />
chloroplasts, Golgi bodies, lysosomes, endoplasmic<br />
reticulum, ribosomes, nucleus, nucleolus and cell<br />
membranes<br />
Table 1.5 shows a series of micrographs of the<br />
organelles of plant and animal cells, as seen<br />
using a transmission electron microscope. Draw<br />
a scientifi c diagram of the organelles shown in<br />
each micrograph, label the parts listed in the<br />
column next to the micrographs and then select<br />
any two features labelled on your diagram<br />
and describe how their structure relates to<br />
the function of the organelle of which it forms<br />
a part.<br />
SECONDARY SOURCE<br />
<strong>IN</strong>VESTIGATION<br />
<strong>BIOLOGY</strong> SKILLS<br />
P12.3; P12.4<br />
Table 1.5 Identifying<br />
cell organelles and<br />
relating structure<br />
to function<br />
Three-dimensional view of organelle<br />
Micrograph of organelle<br />
Identify and label these parts<br />
on the micrograph<br />
Nucleus<br />
nuclear<br />
pore<br />
■ double nuclear membrane<br />
■ nuclear pore<br />
■ chromatin<br />
■ nucleolus<br />
■ nuclear sap<br />
nucleolus<br />
nuclear<br />
membrane<br />
2 m<br />
Mitochondrion<br />
<br />
<br />
<br />
■ outer membrane<br />
■ inner membrane<br />
■ matrix<br />
■ crista<br />
■ particles adhering to crista<br />
<br />
<br />
<br />
<br />
continued . . .<br />
SR<br />
TR<br />
Student worksheet<br />
SAMPLE CHAPTER ONLY<br />
95
PATTERNS <strong>IN</strong> NATURE<br />
Three-dimensional view of organelle<br />
Micrograph of organelle<br />
Identify and label these parts<br />
on the micrograph<br />
Chloroplast<br />
inner and outer<br />
membranes<br />
stroma<br />
granum<br />
■ double membrane<br />
■ stroma<br />
■ lamella<br />
■ granum<br />
■ cholorophyll<br />
■ starch grain<br />
Endoplasmic reticulum and ribosomes<br />
<br />
<br />
<br />
<br />
<br />
<br />
■ flattened membranes<br />
■ ribosomes<br />
■ rough endoplasmic reticulum<br />
■ smooth endoplasmic reticulum<br />
96<br />
SAMPLE CHAPTER ONLY
CELLS AND THE CELL THEORY<br />
Three-dimensional view of organelle<br />
Golgi body and lysosomes<br />
endoplasmic<br />
reticulum<br />
endolysosome<br />
endosome<br />
Micrograph of organelle<br />
Identify and label these parts<br />
on the micrograph<br />
■ membranes of Golgi<br />
■ convex forming face<br />
■ vesicles budding off<br />
■ lysosome<br />
endocytosis<br />
cis<br />
face<br />
trans<br />
face<br />
membrane<br />
recycling<br />
secretory<br />
vesicle<br />
Golgi body<br />
plasma<br />
membrane<br />
Cell membrane and cell wall<br />
cytoplasm<br />
cell wall<br />
plasmodesma<br />
plasma membrane<br />
<br />
■ cell membrane<br />
■ cell wall<br />
■ cytoplasm<br />
SAMPLE CHAPTER ONLY<br />
97
PATTERNS <strong>IN</strong> NATURE<br />
REVISION QUESTIONS<br />
SR<br />
Table 1.6<br />
TR<br />
1. (a) Clarify what is meant by a scientifi c theory.<br />
(b) Describe how you would go about validating a scientifi c theory.<br />
(c) State the cell theory.<br />
2. Before the development of the cell theory, it was commonly believed that living organisms could<br />
arise by spontaneous generation.<br />
(a) Outline the theory of spontaneous generation.<br />
(b) Describe experimental evidence that was used to discount this theory.<br />
(c) Explain the role that the invention of the microscope played in the dismissal of the theory of<br />
spontaneous generation.<br />
3. Describe the contributions of Robert Hooke and Robert Brown in the development of the cell<br />
theory. (Find a reliable way of remembering which ‘Robert’ did what!)<br />
4. Discuss why biologists have continued to use light microscopes since the invention of the<br />
electron microscope.<br />
5. Put the following words into order of size, from smallest to largest: organelles, molecules, cells,<br />
atoms and organisms.<br />
6. Compare the detail seen with a light microscope in plant and animal cells when viewed under<br />
a light microscope. As a guide use the table below. (Copy out a larger version or print it from<br />
the Student Resource CD.)<br />
Table 1.6 Parts of cells visible under a light microscope<br />
Part of cell Plant cell Animal cell<br />
Boundary<br />
Organelles<br />
Cell shape<br />
Vacuoles<br />
7. State whether the each of the following photographs was viewed under a light or an electron<br />
microscope and whether it shows plant or animal cells. Justify your answers.<br />
98<br />
SAMPLE CHAPTER ONLY
CELLS AND THE CELL THEORY<br />
8. Using the method described for comparative diagrams on page 84, draw a comparative<br />
diagram of:<br />
(a) light and electron microscopes<br />
(b) chloroplast and mitochondria.<br />
9. Identify the two types of nucleic acid found in cells.<br />
10. Analyse the micrograph below and assess whether it shows plant or animal cells.<br />
Justify your choice.<br />
SR<br />
TR<br />
Answers to<br />
revision questions<br />
SAMPLE CHAPTER ONLY<br />
99